
Unbricking your Dahua IP camera (Tips, Tricks & Firmware), I am starting this thread to capture a bunch of information in one spot to assist those with “bricked” cameras due failed firmware upgrades. I bought my first Dahua IP camera just a couple weeks ago. I was impressed & pretty happy with it, but upon reading about new capabilities in newer firmware, I decided to upgrade it. Then like many others on here, I lost access to the Web GUI and the camera was no longer functioning.
I spent the last two weeks getting to know everything about these cameras and this thread will capture all this information. It will take me several weeks to document all the information so please be patient.
There are a variety of problems that I will try my best to explain and share the possible solutions. I have gotten pretty comfortable with these cameras and have purposely bricked them to various degrees of severity just to validate the recovery process. Most people “brick” their cameras trying to upgrade the firmware. This is not a serious issue and it can be corrected very easily. The camera runs an upgrade service on port 3800. The configTool always shows a default port of 37777 but this is not an issue as it can do the upgrade on port 3800 anyway. Change your port to 3800 and use a firmware file lsted below and you are back in business.
I will keep updating this post as I get more time to write all the details around recovery. I will also post links to over 40+ firmware files that and which cameras they will work with. It will take me a bit of time to capture all this information, so please be patient.
How to Download and Prepare Firmware
This guide will show how to download and prepare the firmware file for a Dahua device.
Firmware files for Dahua devices can be found at Firmware by Device or the specific product page for the device
Firmware is typical provided in a ZIP file, a compressed file format
This file will contain the actual firmware file, which needs to be extracted from the ZIP file in preparation for the upgrade
Prerequisites
Video Instructions
Step by Step Instructions
Confirm the Model and current firmware of Dahua device
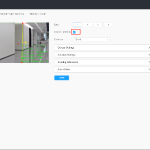
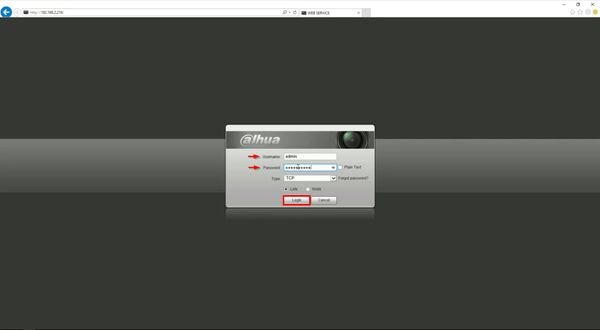
1. Enter the IP of the device into a browser
At the Web Login
Enter the Username and Password
Click Login
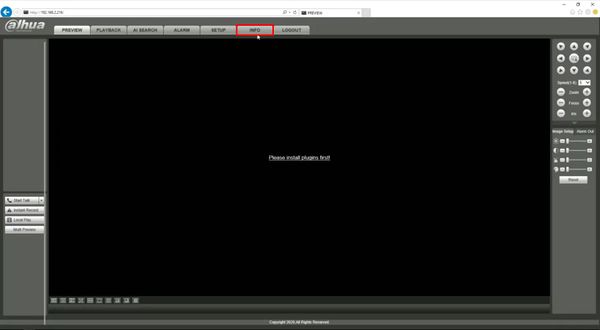
2. Click Info
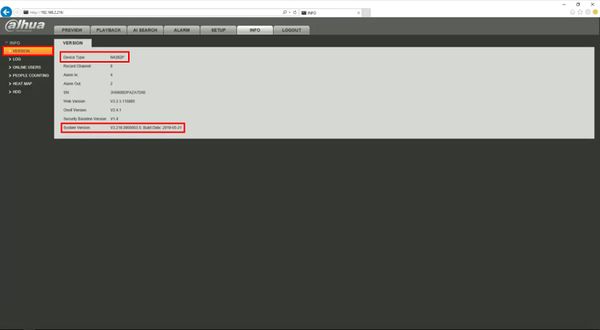
3. Click Version
The Device Type will be displayed
The current System Version will be displayed
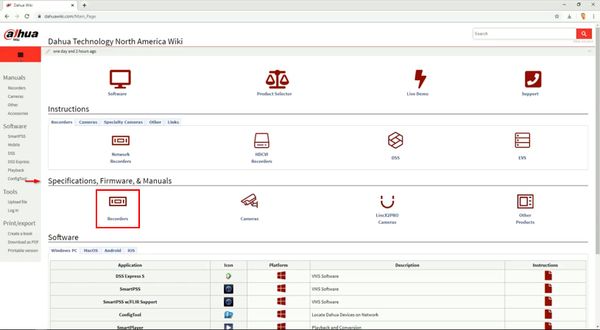
Download the firmware file for device from DahuaWiki
4. In a browser go to DahuaWiki.com
Under Specifications, Firmware, & Manuals
Click the device type (in this example Recorder)
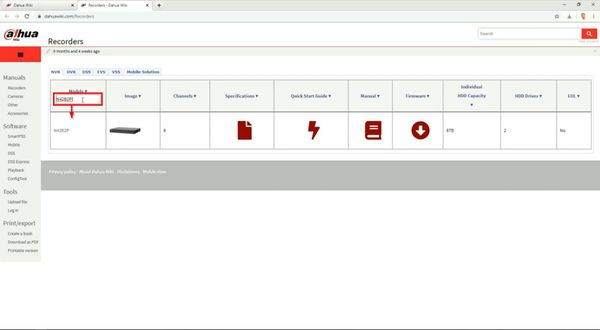
5. Enter the device model into the field
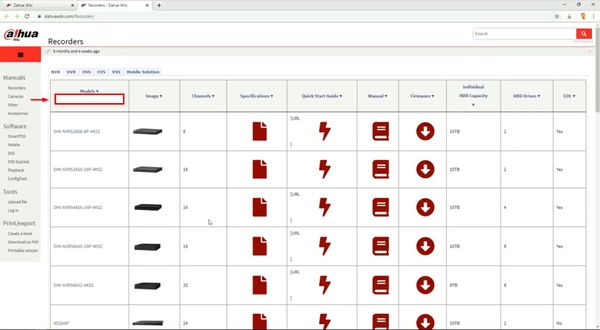
6. The results will be filtered
7. Click the firmware icon to download the firmware file
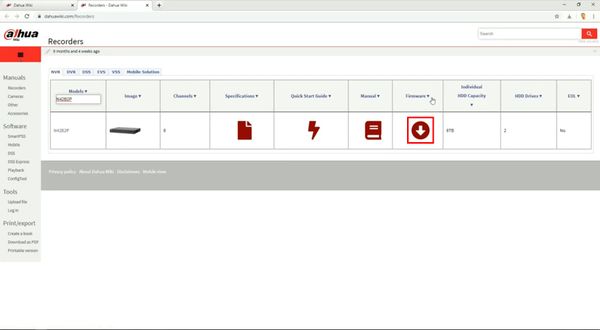
8. The file will download

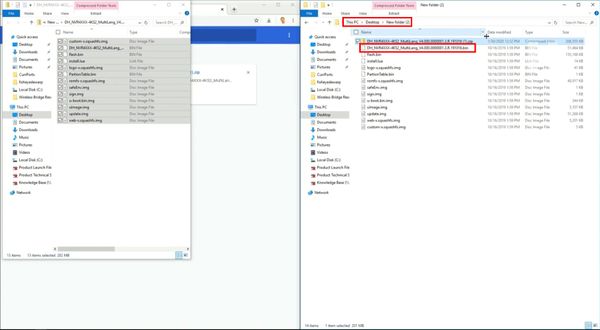
Extract the firmware file to local computer
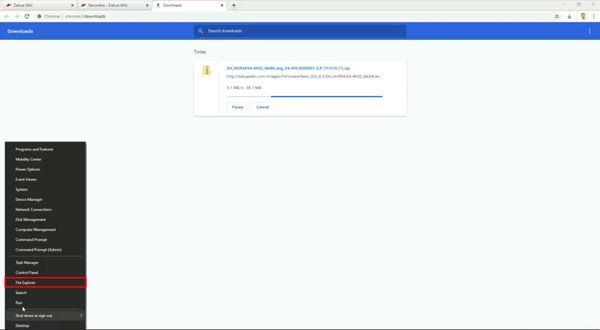
9. Right click the Start Menu / Windows icon in the bottom left of the screen
Select File Explorer
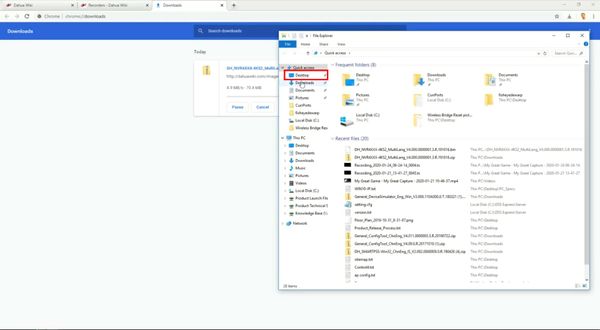
10. Select Desktop
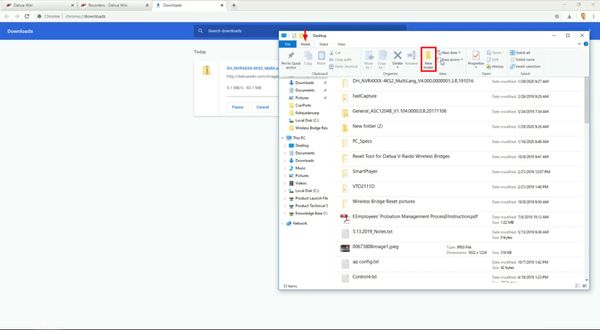
11. Click Home
Then click New folder to create a new folder to extract the contents of the firmware zip file
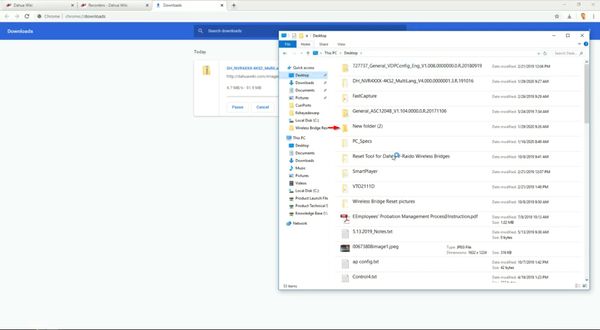
12. Find the created folder in the list, double click to open
13. Under the Downloads window of the browser, click ‘Show in folder’

A new File Explorer window should open containing the directory the firmware zip was downloaded to
Locate the file in the list
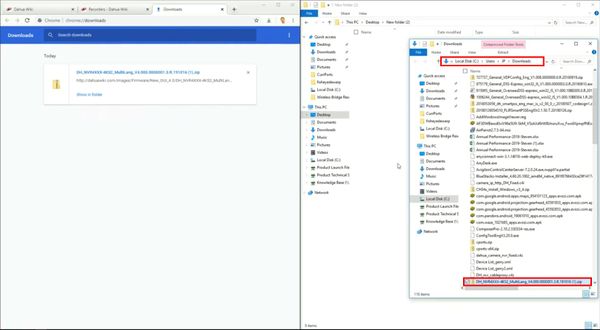
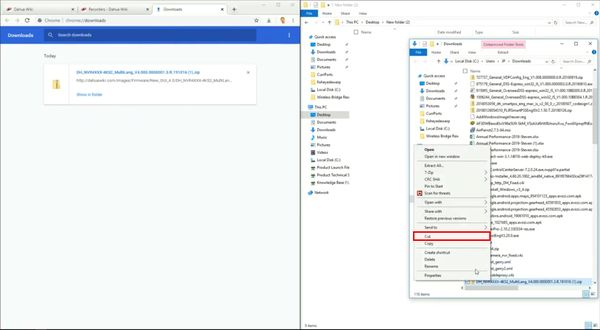
14. Right click
Select Cut
15. Select the window with the new directory
Right click in the window
Select Paste
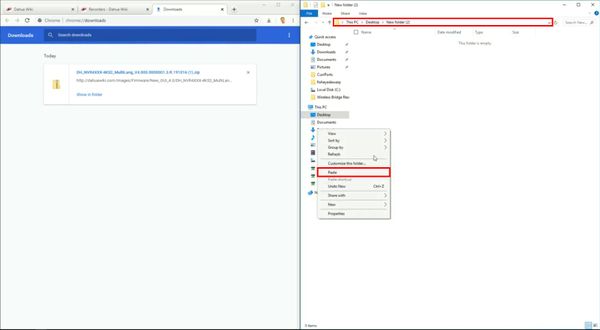
The folder will appear in the directory

16. Right click the file

17. The contents of the zip file will appear in a new window

18. Click to select all files in the folder
Drag and drop the files to the created folder
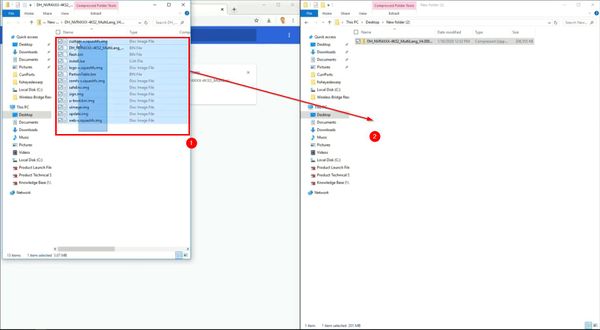
The files will appear in the directory
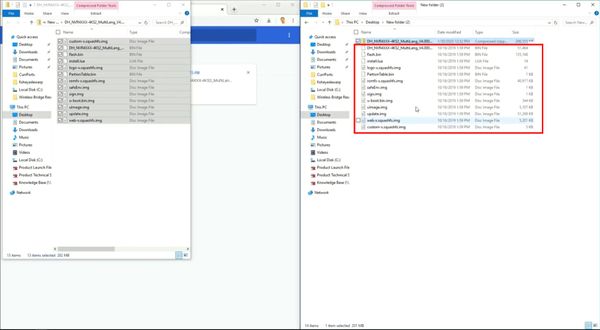
The firmware file will appear in the directory ready to use
Unbricking your Dahua IP camera (Tips, Tricks & Firmware)
BRICKED CAMERA? How can you tell?
There are several types of “BRICKED” camera conditions and they have varying levels of severity and also varying levels of complexity for recovery. Most are simple and caused by bad firmware uploads. The worst will require a full rebuild of the partitions which load the kernel, software and all other data.
1. The first step in identifying the severity of your issue is to determine what still working on your camera. In order to do that, lets remove as many variables as possible to the troubleshooting process. If possible, connect the camera ethernet and PC ethernet on it’s own switch and make sure that no vlan tagging is enabled on the switch.
Next, you need to figure out if the IP address is still reacheable. Ping the last known ip address. The default address for most cameras is 192.168.1.108.
If you don’t know it you can use the arp/ping method to configure which adds as startic arp entry to a new ip address. (This feature is enabled on the camera by default)
2. Once you have a pingable IP, you need to know what services are still active on the camera. This can be done with a simple port scanner. I have added a link to below in tools.
3. Run the port scanner and record which ports are still open. In many cases port 23 and port 3800 will still be open. If this is your situation, it is a very simple fix. If no ports are open, you will need to do a full image load which is more complex.
The typical ports that you would see are:
23 – Telnet access
80 – Web User interface
443 – SSL
554 – Real time streaming port
3800 – Upgrade Deamon
5000 – UPnP
37777 – TCP Video streaming
37778 – UDP Video Streaming
42323 – Real time remote runner
Plus a whole bunch more of UDP ports and more TCP ports
REPAIR WITH PORT 3800
Download a step by step guide (DAHUA IP Camera Recovery v1.0.pdf) with screen prints @ http://tinyurl.com/lbl3up7
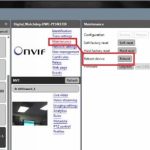
1A. If port 3800 is open you can connect with the Dahua Config tool (link below in tools). I tdefault to port 37777 but change it to 3800 as this port where the upgrade daemon is listening. Port 37777 is a redirect but it won’t work if your firmware has failed.
Launch the config tool and click on login button. Type the IP address , username and password then port 3800.
Open a know working firmware file and upload to the camera.
1B. If port 3800 is not open, go to the next step to enable port 3800.
2. If you have telnet access, you can login with putty. Link to putty below in tools. The default Web UI password is admin / admin.
In older firmware the telnet account is root / vizxv
In newer firmware the telnet account is admin / 7ujMko0+”web UI password” —> 7ujmko0admin
Once connected you can execute a ps command to see running processes. /usr/sbin/upgraded process is what listens on port 3800 for the firmware binary file.
There is also another copy in /var/tmp/
A useful tip for watching the upgrade process is to kill the “upgraded” process that is running and re-launch it in the foreground to watch the upgrade.
~#>ps
625 root 0:00 [mtdblock3]
630 root 0:00 [mtdblock4]
635 root 0:00 [mtdblock5]
772 root 0:00 [ubi_bgt7d]
776 root 0:00 [ubifs_bgt7_0]
790 root 0:00 /sbin/telnetd
798 root 0:00 [OSA_796_1]
860 root 0:00 syshelper elper 60
861 root 0:00 /usr/sbin/upgraded
869 root 0:00 [dsplogd]
870 root 0:00 [encode_guard]
889 root 0:00 [flush-ubifs_6_0]
923 root 3:29 ./VideoDaemon AEWB AF TVOUT
~#> kill -9 861
~#> /usr/sbin/upgraded
[OSA-APP] OSA Build on Apr 19 2014 at 09:55:50. [OSA-APP] SVN NUM: 1609. [libpdi] libpdi.so Build on Apr 19 2014 at 10:06:34. [libpdi] SVN NUM: 13790. [libpdi] Flashtype = 4,patSize = 100000,rwSize = 800,ersSize = 2000022:52:46|[crypt] crypt_open ok!
Name: upgraded, bulid date: Apr 19 2014 09:17:58, svn: 255
[libpdi] >——-getSystemInfo——->Fail to get env authcode!
[libpdi] Get authcode error@@@@ buf = PZC4MU056W00XXX
22:52:52|[pdc] WARN (MISC_ioctl|493): Get SdCard cfg failed !
[libpdi] deviceType: IPC-HFW4300S-V2 [libpdi] processor: A5S88 [libpdi] hardwareVersion: 1.00 [libpdi] appAutoStart: 1 [libpdi] serialNumber: PZC4MU056W00XXX [libpdi] processorCount: 1 [libpdi] deviceClass: IPC [libpdi] noPtz: 1 [libpdi] noSdCard: 1 [libpdi] bandWidth: 48 [libpdi] <——-getSystemInfo——-<UPGRADED_MSG: Can’t Open /mnt/mtd/Config/passwd
UPGRADED_MSG: Login success!
UPGRADED_MSG: Kill 976 successful
[libpdi] Read: blkIndex: 1,pageIndex: 0,byteIndex: 0 ,fLag: ff [libpdi] Write: blkIndex: 1,pageIndex: 0,byteIndex: 0 ,fLag: 0UPGRADED_MSG: reset_watchdog
UPGRADED_MSG: Receive A4(alarm)
UPGRADED_MSG: reset_watchdog
UPGRADED_MSG: Receive A1(alive package)
UPGRADED_MSG: reset_watchdog
UPGRADED_MSG: Received : 29868252, FileSize : 29868252
UPGRADED_MSG: Download Complete
UPGRADED_MSG: DoDownLoad success!
UPGRADED_MSG: Flash init success
UPGRADED_MSG: hwid file success!
Fail to get env native!
UPGRADED_ERR: LINE: 1074: invalid file: Install.lua
UPGRADED_MSG: zip file total size: 40900220
[libpdi] >——-getSystemInfo——->Fail to get env authcode!
[libpdi] Get authcode error@@@@ buf = PZC4MU056W00XXX
22:53:10|[pdc] WARN (MISC_ioctl|493): Get SdCard cfg failed !
[libpdi] deviceType: IPC-HFW4300S-V2 [libpdi] processor: A5S88 [libpdi] hardwareVersion: 1.00 [libpdi] appAutoStart: 1 [libpdi] serialNumber: PZC4MU056W00XXX [libpdi] processorCount: 1 [libpdi] deviceClass: IPC [libpdi] noPtz: 1 [libpdi] noSdCard: 1 [libpdi] bandWidth: 48 [libpdi] <——-getSystemInfo——-<UPGRADED_MSG: packet.name: SD6XXX, board.name: IPC-HFW4300S-V2
UPGRADED_MSG: packet.hardver: , board.hardver:
UPGRADED_MSG: packet.name: IPC-HX3XXX, board.name: IPC-HFW4300S-V2
UPGRADED_MSG: packet.hardver: , board.hardver:
UPGRADED_MSG: Verify version success
Header CRC Checking … OK
Image Name: kernel.img
Image Type: kernel.img (gzip compressed)
Data Size: 2546876 B, Bytes = 2.43 MB
Load Address: 0XC80000
Data CRC Checking … OK
Programing start at: 0XC80000
[libpdi] write update Flag [libpdi] Read: blkIndex: 0,pageIndex: 0,byteIndex: 0 ,fLag: ff [libpdi] Write: blkIndex: 0,pageIndex: 0,byteIndex: 0 ,fLag: 55 [libpdi] Flash_createPartionTab:6 [libpdi] Erase Partion: 6 [libpdi] FlashErase: addr= 0x0xc80000,blkNum:44, blkSize:0x20000,len:0x580000<5>UBIFS: un-mount UBI device 2, volume 0
<5>UBIFS: un-mount UBI device 4, volume 0
Upgrade : Complete Total 6%…
Header CRC Checking … OK
Image Name: partition-x.cramfs.img
Image Type: partition-x.cramfs.img (gzip compressed)
Data Size: 4160 B, Bytes = 0.00 MB
Load Address: 0X500000
Data CRC Checking … OK
Programing start at: 0X500000
[libpdi] Flash_createPartionTab:3 [libpdi] Erase Partion: 3 [libpdi] FlashErase: addr= 0x0x500000,blkNum:8, blkSize:0x20000,len:0x100000Upgrade : Complete Total 6%…
Header CRC Checking … OK
Image Name: romfs-x.ubifs.img
Image Type: romfs-x.ubifs.img (gzip compressed)
Data Size: 7340096 B, Bytes = 7.00 MB
Load Address: 0X1200000
Data CRC Checking … OK
Programing start at: 0X1200000
[libpdi] Flash_createPartionTab:7 [libpdi] Erase Partion: 7 [libpdi] FlashErase: addr= 0x0x1200000,blkNum:64, blkSize:0x20000,len:0x800000Upgrade : Complete Total 24%…
Header CRC Checking … OK
Image Name: pd-x.ubifs.img
Image Type: pd-x.ubifs.img (gzip compressed)
Data Size: 1966144 B, Bytes = 1.88 MB
Load Address: 0X940000
Data CRC Checking … OK
Programing start at: 0X940000
[libpdi] Flash_createPartionTab:5 [libpdi] Erase Partion: 5 [libpdi] FlashErase: addr= 0x0x940000,blkNum:26, blkSize:0x20000,len:0x340000Upgrade : Complete Total 28%…
Header CRC Checking … OK
Image Name: user-x.ubifs.img
Image Type: user-x.ubifs.img (gzip compressed)
Data Size: 21233728 B, Bytes = 20.25 MB
Load Address: 0X2200000
Data CRC Checking … OK
Programing start at: 0X2200000
[libpdi] Flash_createPartionTab:9 [libpdi] Erase Partion: 9 [libpdi] FlashErase: addr= 0x0x2200000,blkNum:204, blkSize:0x20000,len:0x1980000Upgrade : Complete Total 80%…
Header CRC Checking … OK
Image Name: custom-x.ubifs.img
Image Type: custom-x.ubifs.img (gzip compressed)
Data Size: 1966144 B, Bytes = 1.88 MB
Load Address: 0X600000
Data CRC Checking … OK
Programing start at: 0X600000
[libpdi] Flash_createPartionTab:4 [libpdi] Erase Partion: 4 [libpdi] FlashErase: addr= 0x0x600000,blkNum:26, blkSize:0x20000,len:0x340000Upgrade : Complete Total 85%…
Header CRC Checking … OK
Image Name: web-x.ubifs.img
Image Type: web-x.ubifs.img (gzip compressed)
Data Size: 5505088 B, Bytes = 5.25 MB
Load Address: 0X1A00000
Data CRC Checking … OK
Programing start at: 0X1A00000
[libpdi] Flash_createPartionTab:8 [libpdi] Erase Partion: 8 [libpdi] FlashErase: addr= 0x0x1a00000,blkNum:64, blkSize:0x20000,len:0x800000Upgrade : Complete Total 99%… [libpdi] Read: blkIndex: 0,pageIndex: 1,byteIndex: 0 ,fLag: ff
[libpdi] Write: blkIndex: 0,pageIndex: 1,byteIndex: 0 ,fLag: aaUpgrade : Complete Total 100%… UPGRADED_MSG: will reboot system
[libpdi] rebootSystem: i will reboot [libpdi] Read: blkIndex: 1,pageIndex: 0,byteIndex: 0 ,fLag: ff [libpdi] Write: blkIndex: 1,pageIndex: 0,byteIndex: 0 ,fLag: 0 [libpdi] pdi:system will reboot!!Here you can see each partition being loaded wit the individual img files. I will write a quick how to on loading each one individually at a later time.
If you chose a valid firmware file, you will be back in working order. If you still have problems, repeat with another firmware file till you have a valid file. The IPC-HFW4300S-V2 is not natively compatible with all other 4300S firmware. I am in the process of writing a how to that explains how to over come this issue.
UNBRICK WITH UBOOT via SERIAL
NOTE: This section is coming soon… I’m gathering all the images I need for various camera types
OTHER USEFUL INFORMATION (to be sorted later)
The firmware consists of several images that are loaded into various partitions in flash in a UBI file system. You can load each partition separately if needed. More on this later…. (I’ll put a guide together on flashing and recovering partitions)
Once you telnet into the camera, there are number of useful binaries in the user shell that can help correct and diagnose some of the problems people are experiencing. One of the helpful steps is to kill the /var/tmp/upgraded process and run it in the foreground so you can see what is going on and easily capture error messaged. The /var/tmp/upgraded process is what opens the port 3800 and allows you to connect to the camera with the config tool if your web services have failed. There is also another copy in usr/sbin/.
Also, in there is a command to reset all the parameters back to factory defaults (username, password, ip address back to 192.168.1.108 etc.) This can be accomplished with /sbin/clearparam.
Another issue that people run into is the constant reboot issue. This can be caused by a failed process. The main application which provides all the camera capabilities (web interface, streaming, etc.) is /usr/bin/sonia. This process is what makes most firmware different from version to version (sort of). There are also changes to the web partition which contains the web server pages that /usr/bin sonia hosts on port 80. The sonia process is invoked by a shell script in init.d and if the process is killed, the camera reboots after a few minutes. This has cause many people issues when trying to “unbrick” the camera since you only have a few minutes between reboots.
To stop the reboots you can update the flash. There is a parameter called appauto that tells the camera to auto start /us/bin/sonia. If you want the camera to start and not invoke the shell script that launches sonia, you need to set appauto to 0. This will stop the camera from rebooting when sonia is not running.
This cam be accomplished by running ‘/sbin/appauto 0’. To turn it back on, just run /sbin/appauto 1. This writes the boot parameter in flash that the kernel reads before starting the process. You can check the current status of the appauto bootparameter with ‘cat /proc/dahua/bootpara’ It will only show what the parameter was when you booted up, so if you changes it you need to reboot to see the change in /proc/dahua/bootpara.
Realtime streaming URL – rtsp://192.168.1.108/cam/realmonitor?channel=1&subtype=0&proto=Onvif
You can change the subtype to 1 for the secondary stream also you can add user:password@ in front of the IP address if you have the permissions set requiring it.
You can use the HTTP API to configure some parameters that are not yet in the web UI. For instance, another member discovered he could enable NFS through the web UI in addition to the local SD card. This config is not possible through the web interface as you need to pick one or the other.
These documents details the API of Dahua video products (links provided to some of the versions below). Programmers or users can access and configure Dahua video products through the API. Every setting of the camera is available through the API whereas only a small number are available through the WEB interface. The document with version 1.10 is available with firmware version 2.0 and above. This document with version 1.20, 1.21, 1.22, 1.23,1.24,1,25,1,26,1,27,1,28 is available with firmware 2.210 and above.This document with version 1. 29 ,1.30, 1.31, 1.32, 1.33, 1.34, 1.35,
1.36 is available with firmware 2.210 and above.This document with version 1.37 is available with firmware 2.212, 2.4 and above.
I have also done a bit of testing around the tftp process that is invoked in u-boot that looks for upgrade_info_7db780a713a4.txt and failed.txt. I think with a little more work, I’ll figure out if there is a recovery method using tftp without serial access. This would be necessary if you lose telnet access and need to rebuild the kernel partition that hosts telnetd.
Tools
DAHUA IP Camera Recovery v1.0.pdf………………….. http://tinyurl.com/lbl3up7
Port Scanner ………………………………………….. http://tinyurl.com/q53pojg
Putty …………………………………………………….. http://tinyurl.com/lvbbmsq
Tftp Server …………………………………………….. http://tinyurl.com/m46wnhe
Dahua Docs & Tools
DAHUA_HTTP_API 1.0 .pdf ………………………………………… http://tinyurl.com/lb43lga
DAHUA_HTTP_API_1.23.pdf ………………………………………… http://tinyurl.com/lrwye3k
DAHUA_HTTP_API_FOR_IPC 1.28.pdf …………………………………. http://tinyurl.com/kskrcay
DAHUA_HTTP_API_FOR_IPC&SD-V1.36.pdf ……………………………… http://tinyurl.com/mooccf9
DAHUA_HTTP_API_FOR_IPC&SD-V1.37.pdf ……………………………… http://tinyurl.com/kvyddfp
DAHUA_HTTP_API_FOR_DVR_V1.29.pdf ………………………………… http://tinyurl.com/klc72tr
General_ConfigTool_Eng_V1.0.5.R.120428.zip …………………… http://tinyurl.com/mwlzbb3
General_ConfigTool_Eng_V1.06.1.T.120807.zip …………………… http://tinyurl.com/leudphu
General_ConfigTool_Eng_V1.07.2.R.130304.zip ………………….. http://tinyurl.com/obs5ud7
General_ConfigTool_Eng_V1.07.3.R.130701.zip ………………….. http://tinyurl.com/o6p628f <—- Use this one
General_ConfigTool_Eng_V2.00.0.R.140410.zip …………………… http://tinyurl.com/nbqtgev
Firmware Files
Firmware files are grouped by camera type and video signal (NTSC –> Eng_N / PAL –> Eng_P / or BOTH –> Eng_NP)
Files are ordered by version number with the latest Firmware in blue.
Files with DH_ prefix are DAHUA direct firmware files and those with General_ prefix are general release for OEM cameras but I’ve had good luck with both.
DH_IPC-HX1100_Eng_NP_V2.210.0000.3.R.20140416.bin ………………………………………….. http://tinyurl.com/m2jf3qv
General_IPC-HX3(2)XXX_Eng_N_V2.210.0001.0.R.20130517.bin ……………………………………….. http://tinyurl.com/q98zg9x
General_IPC-HX3(2)XXX_Eng_P_V2.210.0001.0.R.20130517.bin ………………………………………… http://tinyurl.com/nekapn3
General_IPC-HX3(2)XXX_Eng_NP_V2.210.0001.0.R.20130517.bin ……………………………………… http://tinyurl.com/p59ym6z
General_IPC-HX3(2)XXX_Eng_P_V2.211.0000.0.R.20130726.bin ………………………………………… http://tinyurl.com/my54r9z
General_IPC-HX3(2)XXX_Eng_N_V2.212.0000.0.R.20131206.bin ……………………………………….. http://tinyurl.com/lrvtm2z
General_IPC-HX3(2)XXX_Eng_P_V2.212.0000.0.R.20131206.bin ………………………………………… http://tinyurl.com/n9rv23n
General_IPC-HX3(2)XXX_Eng_N_V2.212.0001.0.R.20131224.bin ……………………………………….. http://tinyurl.com/l5kg2d9
General_IPC-HX3(2)XXX_Eng_P_V2.212.0001.0.R.20131224.bin ………………………………………… http://tinyurl.com/q6c2gox
DH_IPC-HX3(2)XXX_Eng_NP_8M_V2.212.0000.4.R.20140307.bin ……………………………………….. http://tinyurl.com/mnzx33h
DH_IPC-HX3(2)XXX_Eng_NP_8M_V2.212.0000.5.R.20140326.bin ……………………………………….. http://tinyurl.com/ke285w5
DH_IPC-HX3(2)XXX_Eng_NP_8M_V2.212.0000.6.R.20140419.bin ……………………………………….. http://tinyurl.com/mllzcox
General_IPC-HX3(2)XXX_Eng_P_V2.420.0000.0.R.20140414.bin ………………………………………… http://tinyurl.com/nftaogy
DH_IPC-HX3(2)XXX_Eng_N_V2.420.0000.0.R.20140414.bin ……………………………………………. http://tinyurl.com/ma5q64d
General_IPC-HX5(4)XXX_Eng_P_V2.210.0000.2.R.20130821.bin …………………………………………. http://tinyurl.com/pdcdmdk
General_IPC-HX5(4)XXX_Eng_N_V2.210.0000.4.R.20130911.bin ……………………………………………….. http://tinyurl.com/pdoxjzj
General_IPC-HX5(4)XXX_Eng_P_V2.210.0000.9.R.20131217.bin ……………………………………………….. http://tinyurl.com/p3g4t54
General_IPC-HX5(4)XXX_Eng_N_V2.210.0000.10.R.20140111.bin ……………………………………………… http://tinyurl.com/mnjpd79
General_IPC-HX5(4)XXX_Eng_P_V2.210.0000.12.R.20140225.bin ……………………………………………… http://tinyurl.com/nssnph6
DH_IPC-HX5(4)XXX_Eng_NP_V2.210.0000.12.R.20140225.bin …………………………………………….. http://tinyurl.com/lcjr8xv
DH_IPC-HX5(4)XXX_Eng_NP_V2.210.0000.16.R.20140421.bin …………………………………………….. http://tinyurl.com/k67gu9u
DH_IPC-HX5(4)XXX_Eng_NP_V2.210.0000.18.R.20140429.bin ……………………………………………. http://tinyurl.com/n779scx
General_IPC-HX5(4)XXX_Eng_N_V2.210.0000.21.R.20140613.bin ……………………………………………… http://tinyurl.com/qd2thhe
General_IPC-HX5(4)XXX_Eng_P_V2.210.0000.21.R.20140613.bin ……………………………………………… http://tinyurl.com/p8q75b4
General_IPC-HX5(4)XXX_Eng_N_V2.400.0000.0.R.20131231.bin ……………………………………………….. http://tinyurl.com/kmd7hu9
DH_IPC-HX5(4)XXX_Eng_N_Stream3_V2.420.0000.0.R.20140419.bin ………………………………………….. http://tinyurl.com/mb75g2n
DH_IPC-HX5(4)XXX_Eng_P_Stream3_V2.420.0002.0.R.20140621.bin …………………………………….. http://tinyurl.com/laj29k5
General_IPC-HX5(4)XXX_Eng_N_Stream3_V2.420.0000.0.R.20140419.bin ………………………………….. http://tinyurl.com/mzw85fz
General_IPC-HX5(4)XXX_Eng_P_Stream3_V2.420.0000.0.R.20140419.bin ………………………………….. http://tinyurl.com/ov6krph
General_IPC-HX5(4)XXX_Eng_P_Stream3_P2P_V2.420.0000.0.R.20140419.bin …………………………… http://tinyurl.com/oxgblkq
General_IPC-HX5(4)XXX_Eng_N_Stream3_V2.420.0002.0.R.20140621.bin ………………………………….. http://tinyurl.com/kejg3fv
General_IPC-HX5(4)XXX_Eng_P_Stream3_V2.420.0002.0.R.20140621.bin ………………………………….. http://tinyurl.com/pfmevdu
General_IPC-HX5(4)XXX_Eng_N_Stream3_V2.420.0003.0.R.20140930.bin ……………………………………….. http://tinyurl.com/kchslos
General_IPC-HX5(4)XXX_Eng_N_V2.420.0003.0.R.20140930.bin ……………………………………………….. http://tinyurl.com/ok4f8fx
General_IPC-HX5(4)XXX_Eng_N_Stream3_V2.420.0005.0.R.20141205.bin ………………………………………. http://tinyurl.com/qbrfg3k
General_IPC-HX5(4)XXX_Eng_P_Stream3_V2.420.0005.0.R.20141205.bin ………………………………….. http://tinyurl.com/ot99vgw
DH_IPC-HX8XXX_Eng_NP_V2.400.0000.2.R.20140506.bin …………………………………………………. http://tinyurl.com/lbar98x
I will also post the bare metal img files when I get some time which contain the firmware and all the img files including the update.img that can be used for serial recovery.
I have just started the process of uploading firmware… There are much more to come as well as many more camera models.
Also if you have any you want to share please PM me what you have and where I can link them to this thread.
Thanks to Euly for sharing firmware files!
IMPORTANT NOTE FOR IPC-HFW4300S-V2 CAMERAS
The new camera appears to have differences (a few that I already found) that makes some of the general firmware incompatible with them. I have found a workaround, but it is complex. I will try to summarize it in a separate thread in the following weeks. I will also repackage the newest firmware files in versions that will work for the V2 cameras. Stay tuned! In the meantime, you can use General_IPC-HX5(4)XXX_Eng_N_V2.210.0000.21.R.20140613.bin or the PAL equivalent to recover your camera.
Well, that’s all I have time to share for now, but I’ll do my best to put together a comprehensive guide to the inner workings of these cameras and a guide to unbrick in any failed software situation.
Thanks and take care.


Add Comment