
TP-Link VIGI Cameras Ultimate Guide Part 3, The VIGI management system is mainly divided into “Standalone Management Mode” and “VMS Centralized Management Mode”. Standalone Mode connects directly to the devices for management. The VMS Centralized Management System consists of a server and an application. Devices are connected to the server in a unified manner, and users manage the VMS system through applications.
How to Mount Your VIGI Pan & Tilt Camera to a Wall or Pole
This article will show you how to mount your camera to the wall, and how to remove your camera from the camera base.
How to Mount Your Camera
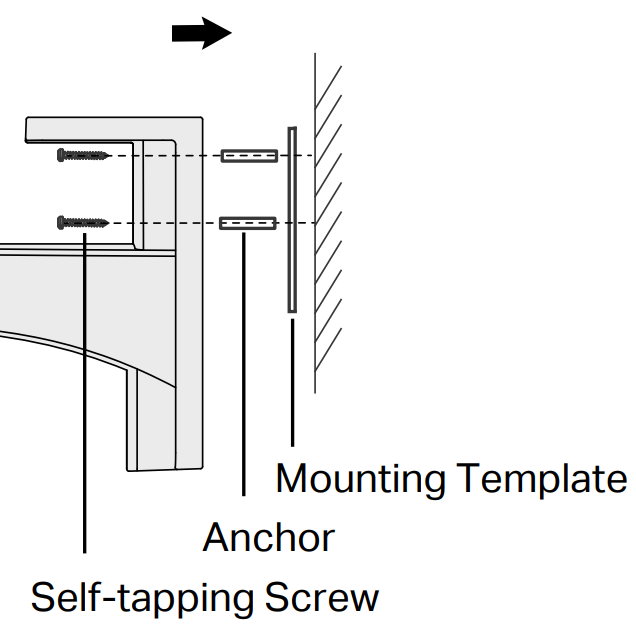
1. Mark Position
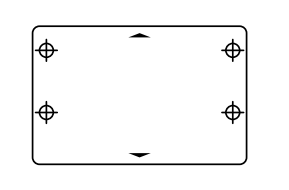
Place the mounting template where you want the camera. For wall mounting, drill four holes through four circles on your mounting template.
2. Mount Base or Pole Mounting
Mount Base:
Affix the camera base using the screws.
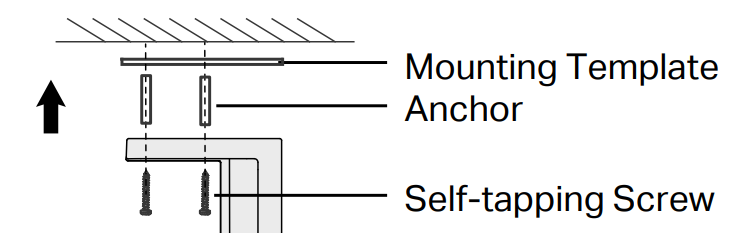
For wall mounting, insert four anchors into the holes and use the self-tapping screws to affix the camera base over the anchors.
There are two ways to install your cameras by the mount base depending on your situation.
Method 1:
Method 2:
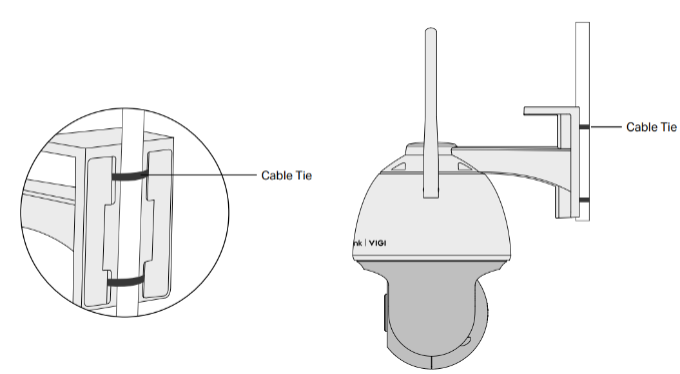
Pole Mounting:
Use the cable tie to attach and tighten your camera to the pole.
How to Uninstall Your Camera
If you mounted it on the wall
Remove the screws from the anchor. Then you can take your camera off the wall.
If you install it to a pole, remove the cable ties and you can uninstall it.
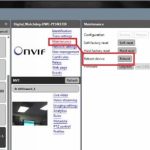
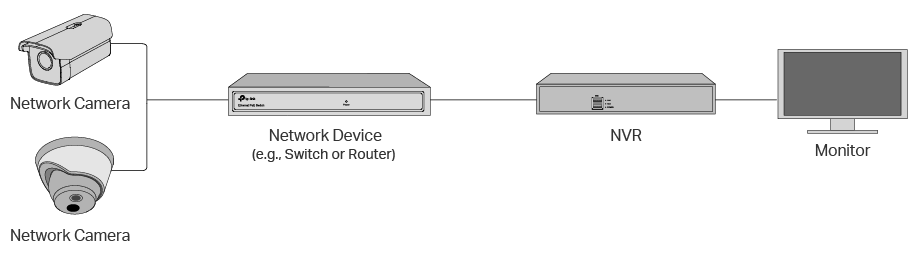
How to use VIGI cameras with other NVR brands or NAS
The VIGI cameras work with VIGI NVR as well as other NVR brands or NAS for easier batch access and management. It is recommended to use the VIGI cameras with the VIGI NVR. For other NVR brands, make sure they support ONVIF and RTSP protocols. Here we will show you how to use VIGI cameras with other NVR brands.
Step 1: Power on your cameras and connect them to the same network as your NVR.
Step 2: Activate the cameras using the VIGI Security Manager or VIGI App.
1. Download the VIGI Security Manager on your windows computer at https://www.tp-link.com/download-center/
2. Install the VIGI Security Manager and open it.
3. Go to Settings > Discovered Devices. Cameras on the same network as your computer can be automatically discovered.
4. Click + Add to activate your discovered cameras by setting passwords.
5. Follow the instructions to add your cameras.
Step 3: Refer to the NVR’s User Manual to add cameras.
We will show you some basic parameters that it may require to connect the VIGI camera to your NVR.
1. The IP address of the camera.
Open VIGI Security Manger and go to Settings > Device > Device List > My Devices > Settings icon of the camera > Network Settings > Connection.

For some NVRs, you’ll need to modify the IP address of the VIGI camera to the same network segment as the NVR for successful adding.
2. The ports for standard ONVIF and RTSP protocols.
Please select Onvif protocols to add VIGI cameras.
ONVIF Service Port: 2020
RTSP Service Port: 554
3. The username/password of the camera.
Username: admin
Password: It is set when you activated the camera. If you forget it, please refer to the link to reset the password.
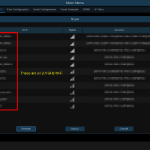
What should I do if VIGI camera is not found?
This article is to solve the problem that VIGI camera is not found. Please check the steps below:
Step 1. Confirm that the camera is powered up.
The camera should be powered up via 12V DC adapter or PoE (802.3af/at). The IR LED will turn on for 20 seconds once the camera is powered on.
Step 2. Confirm that the camera is connected to your network properly.
The camera should be connected to network devices via Ethernet cable.
Step 3. Make sure your device is on the same network as the camera.
Step 4. Reboot your network devices including router and refresh to discover your cameras again.
Step 5. Try other methods to discover devices.
You can try to discover devices via VIGI Security Manager, VIGI NVR or VIGI App.
How to Verify Fake Micro SD Cards When Using with VIGI Cameras
Note:
A security camera that works with a standalone microSD card is primarily designed to store motion-activated recordings or short video clips of movements with local storage, which offers a cost-effective alternative to the subscription-based cloud storage. However, users may run into issues like the camera is unable to overwrite recordings, the SD card becomes full and stops recording or the SD card cannot be formatted by the camera App, etc. These kinds of problems might be caused by the fake SD card.
Micro SD Card and fake SD Card
An SD Card is a small electronic storage medium used by a plethora of storage devices including smartphones, games devices, camcorders, and cameras. Most of the smartphones and security cameras are using the microSD card.
The TP-Link camera supports a microSD card with up to 512GB capacity. If the remaining space of an SD card is less than 500MB or 5% of the total capacity before the first insertion of the camera, it would be impossible to record. There are different speed specifications for microSD cards and it is recommended to use a card with Class 10 or UHS 1 speed rating, which requires a minimum writing speed of 10MB/s.
The most common fake microSD card is the fake capacity expanded card, which uses illegal means and tools to make the cards with a small capacity appear larger. For example, a 32GB card is displayed as 128GB on your computer or other devices. This kind of card is usually having a lower price than the official quality goods. Since the capacity is Manual deceived by the illegal means and tools so that the space beyond the original capacity cannot be used normally.
If the stored file exceeds the actual capacity, the file will be unavailable. Our camera recognizes the microSD card and will format it in Fat32 format and creates index files to save your video data. This process reads and writes the entire space of the SD card and checks whether it is valid. If your SD card is an expanded card, it will not be formatted successfully and will not work properly on our camera.
We do not support the card due to the particularity of the monitoring camera; we need to ensure that the SD card can work stably for a long time. And since camera data is relatively important, data loss or failure to write data can have a significant impact.
Note: For VIGI cameras, it is required to format the SD card on the VIGI app for local recording.
Comparison of SD card Speed Class ratings

Types of Fake SD cards
When it comes to counterfeit memory cards, you will find some different types of them like listed below:
1. Reduced Read / Write Speed: You buy an SD card that shows something like “maximum 95 MB/s read and 90 MB/s write speed” and a “V30” label that is supposed to guarantee a minimum writing speed of 30 MB/s. But when copying a file using a fast SD card reader, you might not even get more than 5-10 MB/s.
2. Reduced Capacity: The SD card might report a large capacity when inserted in your computer, camera, or storage device, while it contains only a very small part of the overall capacity. This happens because the microchip (a tiny part of the SD card that is responsible for reporting the total amount of storage available) within the card has been reprogrammed to report a different size to the host. Counterfeit SD cards with reduced capacities should be avoided the most because they will most certainly result in data loss.
3. Fake Brand: Some SD cards have big brand labels attached to them and sold at a premium price when they are made from cheap parts by some unknown manufacturer. Such products are often more difficult to identify and might require a call to the manufacturer to verify the serial number. You can also read the reviews posted by verified buyers on Amazon or other online stores.
4. Unrealistic Capacity: There are memory cards that advertise completely unrealistic storage sizes. For example, if you search online for microSD cards, you may find cards with capacities as large as 2TB, however, such capacities do not yet exist.
5. Bogus / Non-Working: Some SD cards are sold at incredibly low prices by unknown sellers and may just don’t work.
Fake SD Card Issues
As you can see from the earlier section, the issues can range from getting very slow speeds to data loss and unusable SD cards. The problem with fake SD cards with reduced capacity is that when users go over a certain capacity, all data from that point on will be corrupted. Everything appears to be working great at first, but troubles may show up in later usage.
How to Identify a Fake SD Card
If you have already purchased an SD card, there are a few things you can inspect and basic tests you can run to identify a fake SD card.
1. Inspect Product Packaging: Make sure the package contains necessary information about the product such as its specifications and card speed, as well as all the appropriate labels, warranty info, and a proper UPC. Users may also verify with SD card manufacturer directly.
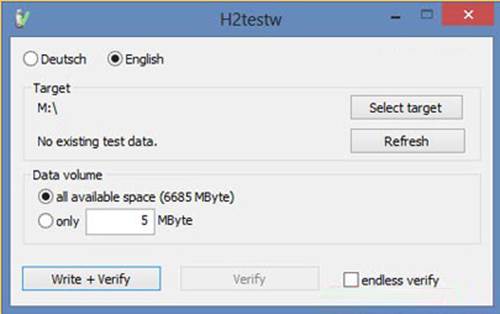
2. Test the SD card with third-party software: Make sure you format the SD card before you start this step. For example, you could verify if you can write files to the advertised capacity for your SD card with software H2testw. Install the H2testw on your Windows computer (you can also run a similar tool called “F3” on Mac OS, and an app called SD Insight on Android device) and run the test, it will show you the real capacity of your SD card.

If the SD card you are using is fake, it will report errors and show how much actual data was written and read from the card.
Memory Card Buying Tips
Sum up the article with the below memory card buying tips:
· Always make sure to buy from an authorized seller.
· Be careful about cheap SD cards.
· Always inspect and test each card to make sure that it is genuine.
· Do not buy used or refurbished SD cards.
· Replace SD cards once every few years to reduce potential failure.
A list of microSD card we have tested:
| Sandisk | 4GB | C4 (Black) |
| 64GB | HIGH ENDURANCE U3 V30 (White) | |
| 64GB | MAX ENDURANCE U3 V30 (White) | |
| 64GB | Extreme PRO U3 V30 (Black and red) | |
| 128GB | Extreme U3 V30 A2 (Red and yellow) | |
| 256GB | Ultra U1 (Red and grey) | |
| 256GB | Extreme PRO U3 V30 A2 (Black and red) | |
| 256GB | Extreme U3 V30 (Red and yellow) | |
| 512GB | Extreme U3 V30 A2 (Red and yellow) | |
| Kingston | 8GB | C4 (Black) |
| 64GB | ENDURANCE U1 (Black and white) | |
| 64GB | (Black) | |
| 64GB | CANVAS Go! Plus U3 V30 A2 (Blue) | |
| 128GB | CANVAS Select Plus (Black) | |
| 128GB | CANVAS Select Plus (Black) | |
| 256GB | CANVAS Go! Plus U3 V30 A2 (Black and blue) | |
| Samsung | 64GB | PRO Endurance U1 (Black and white) |
| 64GB | PRO Endurance U1 V10 (White) | |
| 128GB | EVO Plus U3 V30 A2 (White) | |
| 256GB | PRO Plus U3 V30 A2 (Blue) | |
| DM | 4GB | U1 (Black and yellow) |
| KIOXIA | 32GB | EXCERIA PLUS U3 V30 (Purple) |
| Lexar | 32GB | HIGH-ENDURANCE U1 V10 (Black and white) |
| ADATA | 32GB | U1 V10 (Black and blue) |
| Netac | 64GB | PRO U3 V30 (Black and red) |
| Gigastone | 64GB | Professional 633x U3 (Red and orange) |
.
How to Waterproof VIGI Outdoor Security Cameras
When the camera is installed outdoors, please install waterproof items to waterproof your VIGI outdoor security cameras. Make sure each part is securely attached and the water-proofing rings are flush to keep out water.
Step 1: Install Waterproof Cable Attachments
Install the waterproof cable attachments for the network interface when the camera is installed outdoors.
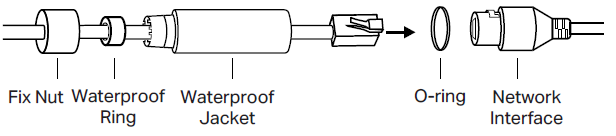
Done! The network interface is now waterproof.
Step 2: Install Waterproof Seal for Power Connectors
Install the waterproof seal for the power connectors when the camera is installed outdoors.

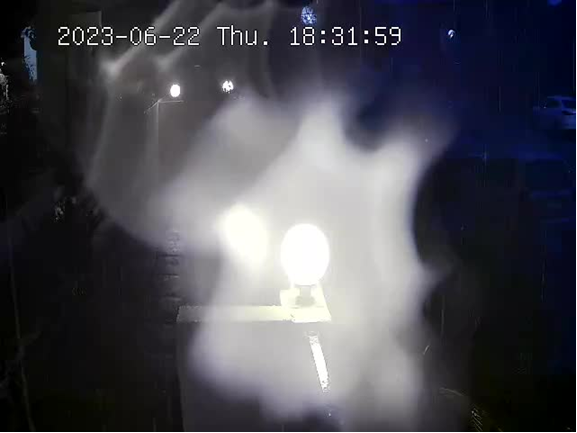
What to do when the image of VIGI Camera is misty and hazy on the Night Vision
This article aims to optimize the image quality when it looks misty and hazy in night vision mode.
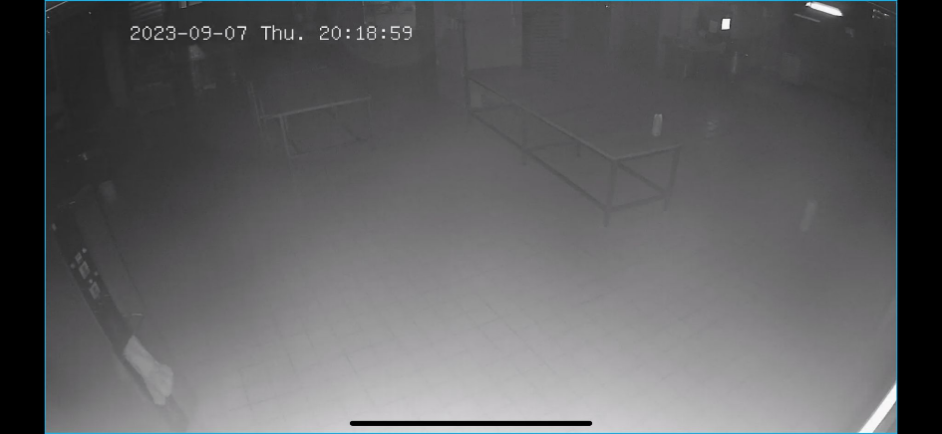
As shown in the above image, sometimes we may notice that the camera display appears to be covered with a layer of silk, or like fingerprints on the lens, making it particularly blurry and difficult to see anything in night vision mode.
Generally speaking, there are several reasons that can cause abnormal image:
There may be fingerprints during the installation, dust, or dirt on the lens or dome cover, causing the image to appear blurry. It is necessary to clean the lens and the inside and outside of the dome cover with a clean cloth to avoid interference.
There may be obvious reflections from objects near the housing or lens, such as metal railings, walls, or the housing itself. Pay attention to the position relationship between the lens and the housing, and make sure to install it correctly according to the Quick Installation Guide (QIG). Also, adjust the camera’s installation angle to avoid direct reflection from fixed objects like walls, ensuring proper illumination in the monitoring area.
In areas with large temperature differences, water mist is prone to condense near the lens, resulting in a blurred image. You can clean it with a clean cloth or add a bit of desiccant inside the camera.
If the lens cushion, as shown in the diagram below, is damaged or lost, which is installed in the housing, then the prototype needs to be repaired.
To optimize the camera performance and ensure clear image quality:
By following these steps, you can improve the clarity of the camera’s display and ensure better surveillance performance.
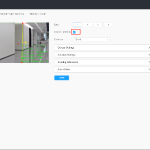
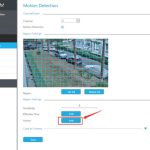
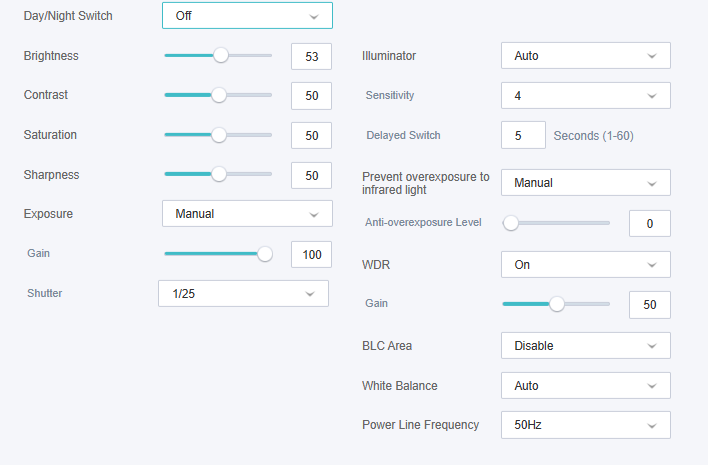
How to configure VIGI camera’s exposure parameters
This article discusses how to adjust the exposure parameters of VIGI Cameras using the web interface or VIGI Security Manager to achieve better image quality in different environments.
Exposure refers to the amount of light entering the camera. Overexposure in surveillance images results in a too bright image, while underexposure leads to a dark image that lacks clarity.
Overexposure can generally be divided into overexposure during the day and overexposure at night. Overexposure during the day is mainly caused by backlighting in the scene, while overexposure at night is caused by excessive infrared reflection from objects.
Underexposure, on the other hand, is primarily due to low ambient brightness, resulting in insufficient light entering the camera.
To address the above issues, we can make adjustments through Exposure setting, Prevent Overexposure setting, as well as BLC (Backlight Compensation) and WDR (Wide Dynamic Range) settings to obtain more suitable image effects for specific scenes.
Exposure settings include exposure gain and shutter speed. Higher gain and slower shutter speed allow more light to enter the camera within the same time frame, resulting in a brighter image, and vice versa for a darker image.
Prevent overexposure, the brightness of the infrared illuminator can be adjusted to avoid excessive infrared reflection at night.
In addition, there are WDR settings and BLC settings. WDR processes the dark and bright areas of the image to make the dark areas brighter and the bright areas darker, thus achieving better image quality in environments with high contrast between highlights and shadows. BLC targets specific backlight areas and adjusts the light entering the camera accordingly to achieve the desired image effect.
Next, we will explain how to adjust these parameters through VIGI Security Manager and the camera’s web interface.
Configuring through VIGI Security Manager:

Note: WDR and BLC are disabled by default, while exposure and overexposure prevention are set to auto by default.
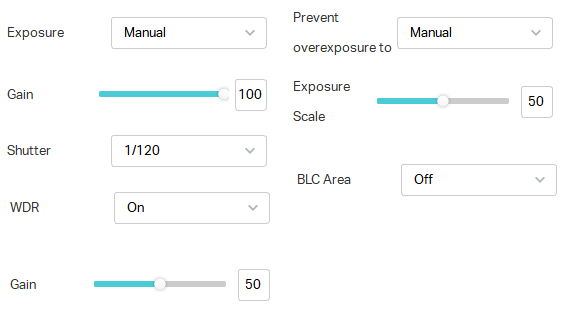
Configuring through the web interface:
TP-Link VIGI Cameras Ultimate Guide Part 3
General questions about halos on the VIGI Camera’s screen
Have you ever noticed large, irregular halos on your device’s screen, especially after rain or in damp weather? These can significantly disrupt your viewing experience. This article will explain why this happens and how to fix it. By understanding these common screen distortions, you can take the necessary steps to maintain the quality of your device’s.
Q1: What causes the appearance of large, irregular halos on my screen as below picture?
A: This issue is typically caused by dirt or contamination on the lens or casing of your device. Common culprits include fingerprints or condensation, which can lead to irregular reflections. These reflections then manifest as large, irregular halos on your screen.
Q2: How can I resolve this issue?
A: To rectify this, it’s important to regularly check the condition of your device’s lens and casing. Wiping the lens with a dry cloth can help keep it clean, reducing the likelihood of these halos appearing.
In the course of normal device usage, you might also notice glare or ghosting effects on your screen as below. The following section will explain these phenomena.
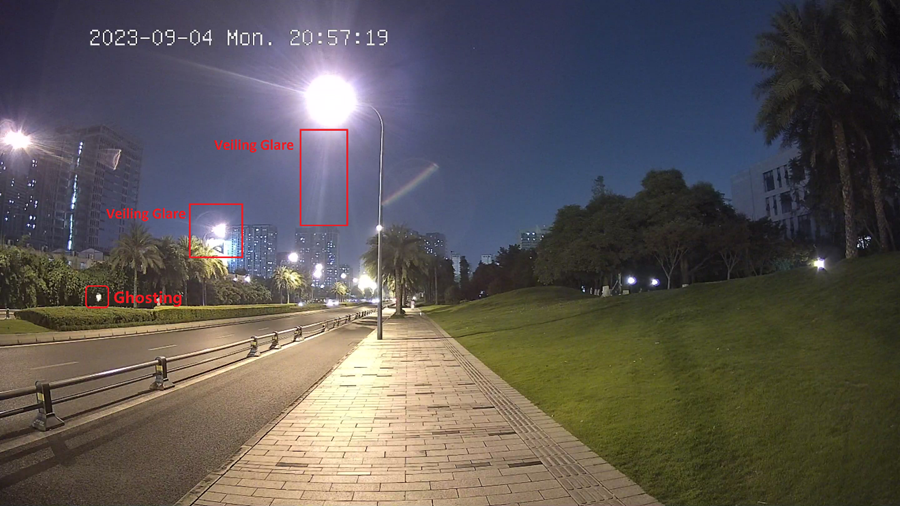
Q3: What are glare and ghosting effects?
A: Glare is a phenomenon that occurs around a light source, taking a shape similar to the light source, complete with a halo and radiating light beams. Ghosting, on the other hand, forms a light cluster at a different location that resembles the light source.
Q4: Why do these phenomena occur?
A: Both glare and ghosting occur when the point light source is too strong, causing light reflected from the lens surface to repeatedly reflect within the camera. These reflected lights cover the screen, reducing contrast and causing local obstruction, ultimately presenting as halos on the screen.
Q5: How can I resolve this issue?
A: To avoid these issues, consider the following methods:
1. Keep the lens clean. Dust or oily fingerprints on the lens can intensify ghosting and glare.
2. Use a lens hood.
3. Change the light source or shooting location.
4. Try to avoid shooting directly into the sun.


Add Comment