TP-Link VIGI Cameras Ultimate Guide Part 1, The VIGI management system is mainly divided into “Standalone Management Mode” and “VMS Centralized Management Mode”. Standalone Mode connects directly to the devices for management. The VMS Centralized Management System consists of a server and an application. Devices are connected to the server in a unified manner, and users manage the VMS system through applications.
What Should I Do If I Cannot Control My VIGI Devices?
If you have finished the configuration on the VIGI app but you are unable to control the VIGI device with the app, you can refer to the following steps to troubleshoot.
Case 1: Unable to control the VIGI device in the local network.
Step 1. Ensure the router is working properly. You can connect your phone or laptop to the Wi-Fi network of your router, then confirm if the router is working or not.
Step 2. Make sure if there are any mac filtering, ACL, and firewall rules on the router. If yes, disable the rules and then reboot the VIGI device for a try.
Step 3. Move the VIGI device closer to the router/switch or check the Ethernet connection to your router/switch, in case the problem is caused by the bad signal or cable. It is recommended to use a 3ft cable during the troubleshoot to isolate the possible cause.
Step 4. Update the firmware of the VIGI device.
Case 2. Unable to control the VIGI device remotely.
Step 1. Ensure you can control the VIGI device in the local network. If you are unable to control the VIGI device in the local network, please refer to the Case 1 to troubleshoot.
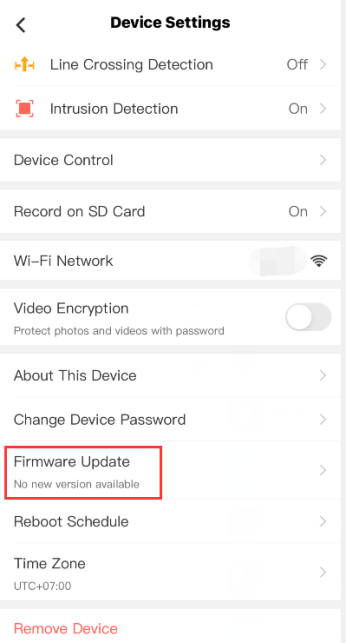
Step 2. Upgrade your VIGI device to the latest firmware. On the VIGI app, find your model and view More Settings, then tap Firmware Update to update the firmware.
Step 3. Try to change the DNS server on your home router.
Step 4. Disable firewall settings if there is one on your home router/switch, then reboot the router/switch.
What is DORI?
DORI, standing for Detection, Observation, Recognition, and Identification, is a reference standard tailored for cameras, based on the IEC EN62676-4:2015 international standard, to assess their visual range. This measurement method is typically expressed in PPM (Pixels per Meter), defining the count of pixels within a one-meter width at a designated distance from the camera. By employing these PPM values, cameras can be objectively evaluated based on their sensor/lens combination, enabling an unbiased comparison of each camera’s long-distance magnification capability and verifying its ability to meet customer performance requirements.
The DORI standard encompasses four distinct levels: Detection, Observation, Recognition, and Identification.
The Detection level is set at 25 PPM, allowing for reliable and straightforward determination of the presence of a person or vehicle, though few details will be discernible.
The Observation level, set at 62 PPM, offers distinctive details of an individual, such as distinctive clothing or unique physical characteristics. This level also provides a broader perspective of the activities surrounding an incident, providing context and assisting in comprehensive incident analysis.
The Recognition level, established at 125 PPM, aims to ascertain, with a high degree of certainty, whether an individual appearing in the footage is identical to someone previously observed.
The Identification criterion, defined at a standard of 250 PPM, enables the unequivocal identification of an individual. This level of clarity is so precise that it allows for the confirmation of a person’s identity beyond any reasonable doubt, making it especially useful in high-security scenarios and investigations.
What Factors Will Affect DORI?
The focal length and resolution of a camera will significantly influence its DORI performance.
At the same level, longer lenses or smaller sensors result in a narrower field of view, while shorter lenses or larger sensors provide a wider view. Thus, a longer focal length allows for a greater distance to be seen, which means that an object of the same 1m size will achieve the same PPM at a greater distance with a camera having a longer focal length compared to a shorter one. Therefore, for a given DORI effect, a long-focal-length camera can see farther, but at the same time, its field of view is more constricted.
Additionally, another key factor influencing the performance of long-distance cameras is sensor resolution, which determines the level of detail captured within the camera’s field of view. For instance, a 2MP camera and an 8MP camera have a resolution difference of fourfold. This means that, at the same approximate distance of 1 meter, the 8MP camera, with four times as many pixels as the 2MP one, can depict the scene with greater clarity. Similarly, at the same PPM value, the 8MP camera can observe from a greater distance.
How to choose a suitable VIGI Camera?
When selecting a camera, it’s crucial to first establish the required DORI image quality based on the type and size of the surveillance scene.
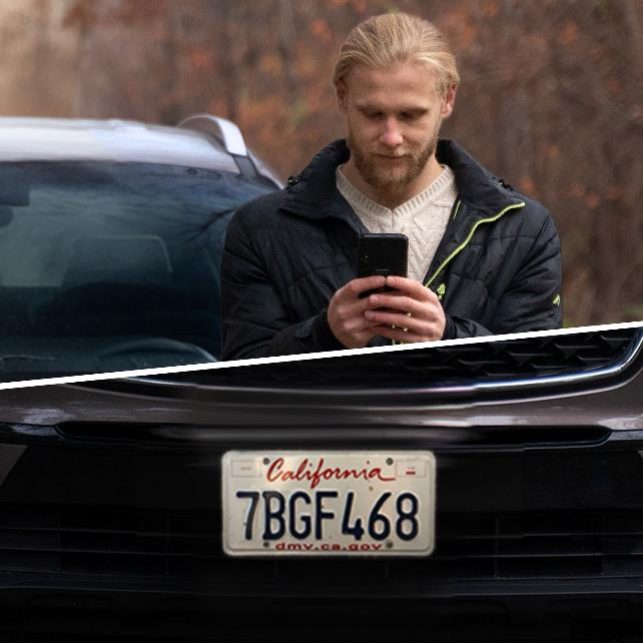
For instance, when facial surveillance is required, to ensure clear images of faces are captured, it’s ideal to select the appropriate camera based on the Identification level. Similarly, in settings like parking lots where clear license plate information is needed, choosing a camera at the Identification level is similarly advisable.
When capturing general human and vehicle shapes at a store entrance or similar setting, opt for the Recognition level when selecting the Camera to ensure clear images of passing vehicles and pedestrians are captured.
When the surveillance area is expansive and only human or vehicle shapes need to be captured from a distance, the Observation level is suitable for selecting the appropriate Camera model.
Additionally, should additional functionalities be required, it is essential to consider the specific needs and elevate the DORI level of the Camera accordingly.
Lastly, based on individual usage preferences and the field of view needed for the surveillance area, determine the appropriate focal length range. Select the model that meets the requirements at that focal length.
Below is the DORI List for different VIGI cameras, we can refer to that list to filter the camera at first.
| . |
Identification |
Recognition |
Observation |
Detection |
||||||||||||||||
2MP |
3MP |
4MP |
5MP |
8MP |
2MP |
3MP |
4MP |
5MP |
8MP |
2MP |
3MP |
4MP |
5MP |
8MP |
2MP |
3MP |
4MP |
5MP |
8MP |
|
2.8mm |
5m |
5m |
6m |
6m |
8m |
9m |
10m |
12m |
12m |
17m |
19m |
22m |
25m |
26m |
35m |
45m |
52m |
60m |
63m |
85m |
4mm |
6m |
7m |
8m |
8m |
11m |
12m |
14m |
16m |
16m |
21m |
25m |
29m |
33m |
33m |
44m |
60m |
70m |
80m |
80m |
107m |
6mm |
9m |
10m |
12m |
12m |
/ |
18m |
20m |
24m |
24m |
/ |
38m |
41m |
50m |
50m |
/ |
91m |
100m |
120m |
120m |
/ |
TP-Link VIGI Cameras Ultimate Guide Part 1
How to connect alarm device/audio aevice to VIGI Camera
This article applies to VIGI network cameras equipped with alarm/audio interface.
External commonly used alarm and audio equipment:
| Type | Role | Common Devices |
| Audio In | Used for sound collection | microphone, pickup |
| Audio Out | Used for sound output | speakers, subwoofers, loudspeakers |
| Alarm In | Built-in sensors detect environmental abnormalities and provide abnormal signals | smoke detectors, infrared detectors |
| Alarm Out | After receiving the alarm signal, it alerts the user | buzzer, alarm light |
In this article, we will describe how to connect the above external alarm/audio devices to the VIGI camera.
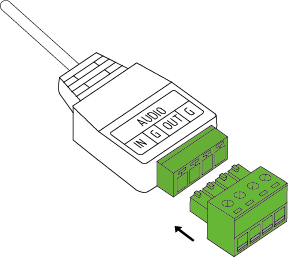
When adding an external alarm/audio device, first connect the provided terminal to the corresponding alarm/audio interface.
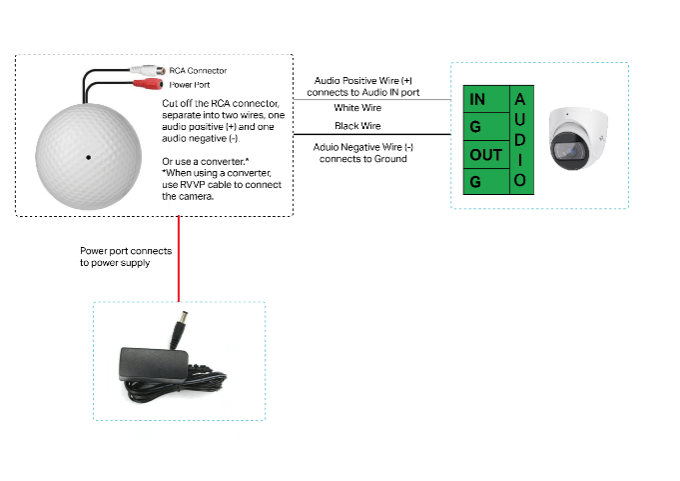
1. Connect the Audio In device (taking the microphone as an example)
Refer to the following diagram for the connection:
Some microphones have dedicated interfaces for power and audio, which are pre-made connectors. Refer to the following diagram for the connection:
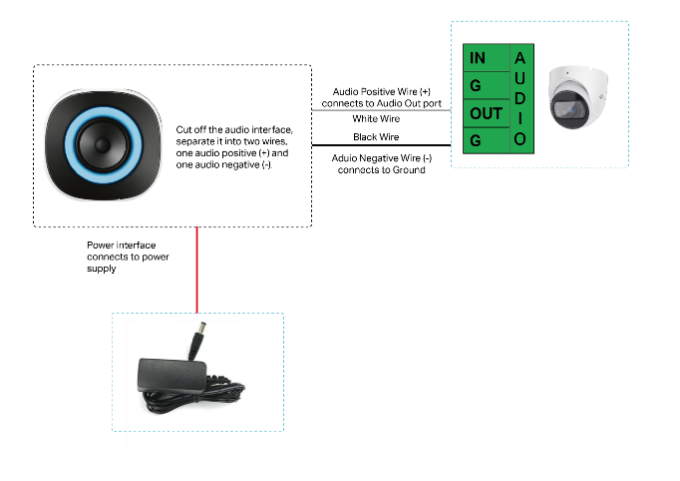
2. Connect the Audio Out device (taking the speaker as an example)
Refer to the following diagram for the connection:
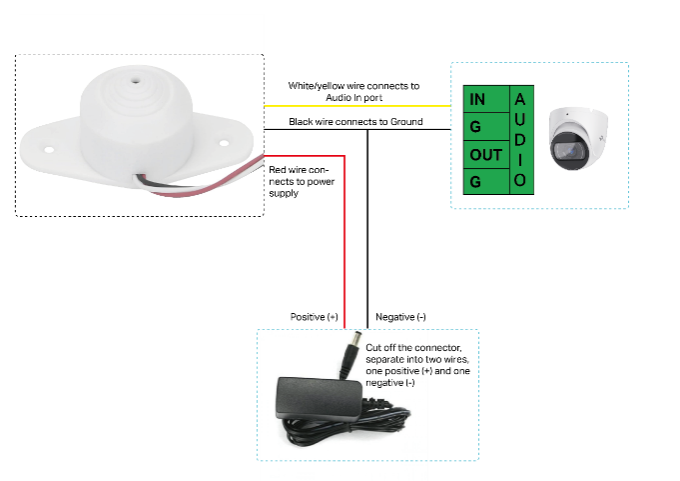
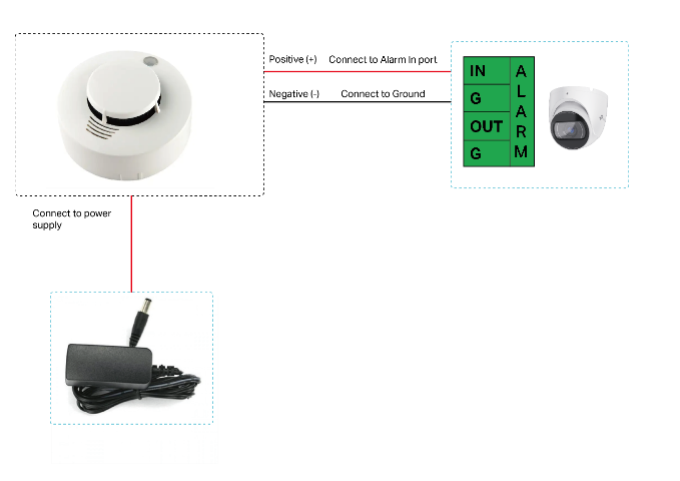
3. Connect the Alarm In device (taking the smoke sensor as an example)
When an external alarm device detects an abnormal situation, it sends a signal to notify the camera, which then immediately takes corresponding measures to deal with it. There are various types of commonly used external detectors, such as sound sensors, infrared sensors, smoke sensors, etc., which are connected to the Alarm IN port of the device. Taking the smoke sensor as an example, the connection diagram is as follows:
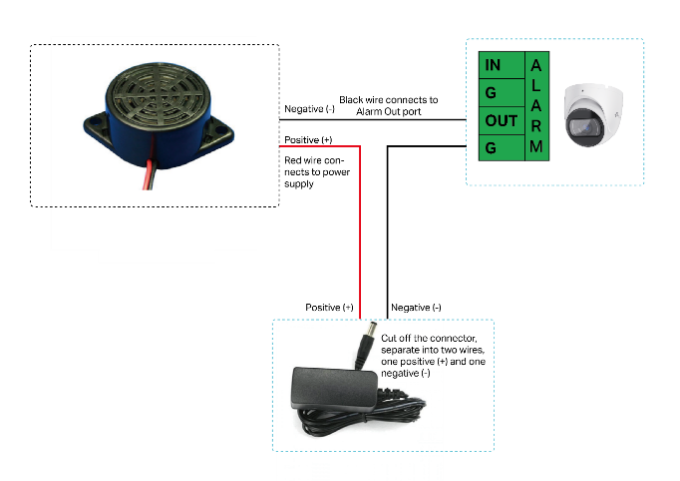
4. Connect the Alarm Out device (taking the buzzer as an example)
VIGI devices can trigger alarms through external alarm devices such as external alarm lights, sirens, buzzers, etc. These alarm devices are connected to the Alarm OUT port of the camera. Taking a buzzer as an example, the connection diagram is as follows:
How to use recovery mode to recover firmware for VIGI Camera and NVR
Scenario
If the VIGI NVR/Camera becomes unresponsive or stops working after a firmware upgrade due to disoperation or power supply interruption, it can be restored to normal using the firmware recovery function.
Phenomenon
1. The NVR cannot boot successfully, no image output on the connected monitor via HDMI or VGA, or it remains stuck on the logo screen.
2. The Camera doesn’t respond to any operations, such as device adding or video stream via RTSP.
How to recover
Step1: Find a PC and assign a static IP address to it. The IP address needs to be in the 192.168.0.1/24 subnet and cannot be 192.168.0.60 or 192.168.0.240.
For example:
IP address: 192.168.0.200
Subnet Mask:255.255.255.0
Step2: Power on the IPC or NVR.
Directly connect the Ethernet port of the PC to the Ethernet port of the IPC/NVR. Please note, do not use a switch between NVR/IPC and PC.
For NVR4032H, please use the LAN port 2.
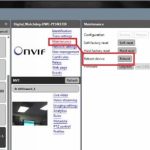
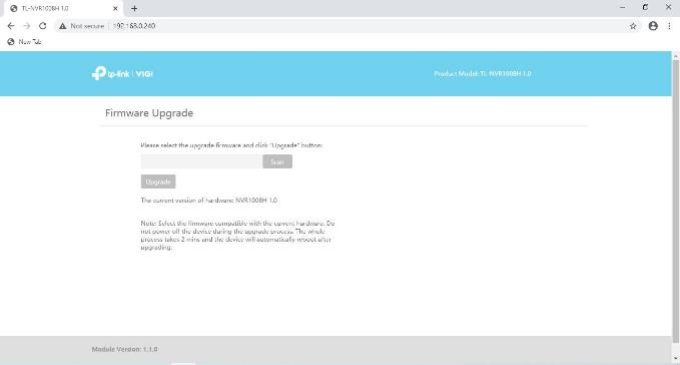
Step3: Open a web browser and enter the IP address in the address bar, then press ‘enter’.
For VIGI NVR, use 192.168.0.240. For VIGI Camera, use 192.168.0.60.
This will take us to the firmware recovery page.
Step4: Upload the correct official firmware file and upgrade.
(You can obtain the official firmware from TP-Link Official Website or TP-Link Technical support team)
https://www.tp-link.com/en/vigi/
Step5: VIGI NVR/Camera will reboot and restore normal operation within a few minutes.
How to set up record and playback on the computer via VIGI Security Manager
If you don’t have a NVR, you can save recordings on the computer via VIGI Security Manager. Here will show you how to set up.
Step 1. Add VIGI cameras via VIGI Security Manager. In step 2 of Add Device, please enable the Record on Computer. Set the time schedule and other parameters as you want. After cameras are added, you can go to Settings > Storage > Storage Schedule to change recording settings.

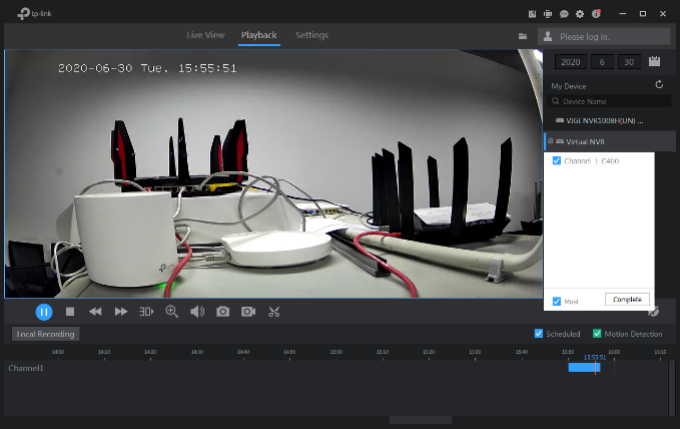
Step 2. Go to Playback page, click the Virtual NVR and select the corresponding camera. Then you can watch local recordings.
Note: Only when VIGI Security Manager is running on your computer and your computer is connected to the same network as the camera, recordings can be saved on your computer in real time.
How to Reduce Motion Detections from Rain, Snow, or Insects, etc.
Using the motion detection feature on an outdoor camera, you may receive many unwanted notifications and recordings from rain, snow, or insects. This is more likely to happen when the camera is in night vision mode with the IR light on.
Motion detection, as its name implies, will detect most movements from all kinds of objects, not just the human body.
How does motion detection work?
Before trying to reduce unwanted detections, we need to know how camera motion detection works.
The basic camera’s detection mechanism is based on image changes between different frames. The frame is one of the many still images which compose the complete moving picture. If there is a difference between the frames, the camera will recognize it as a motion detected.
When it rains, the raindrops will cause a significant change in the image, therefore this kind of detection cannot be avoided.
Tips to reduce other detections:
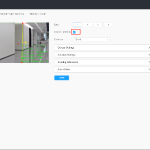
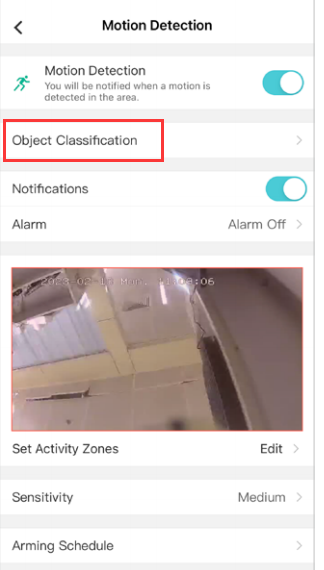
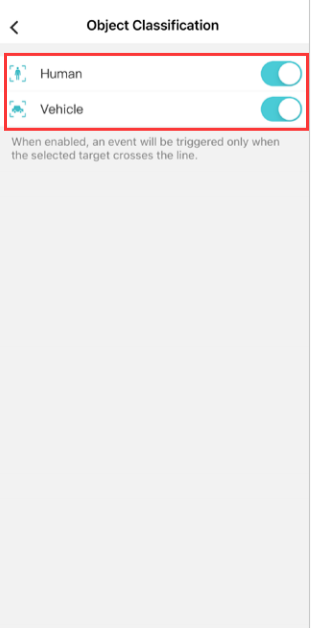
1. Enable Object Classification.
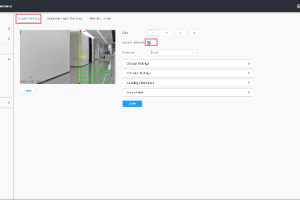
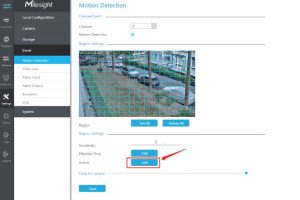
You can turn on Object Classification under Motion Detection. Go to My Devices page and enter the Device Settings page, there you can find Motion Detection. Tap on it and you can see more parameters. In Object Classification, you can enable object classification to trigger the notification you want.
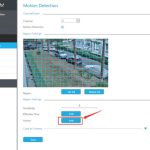
2. Adjust activity zone and sensitivity
Based on your use conditions, adjusting the detection zone and sensitivity may help reduce too many detections.
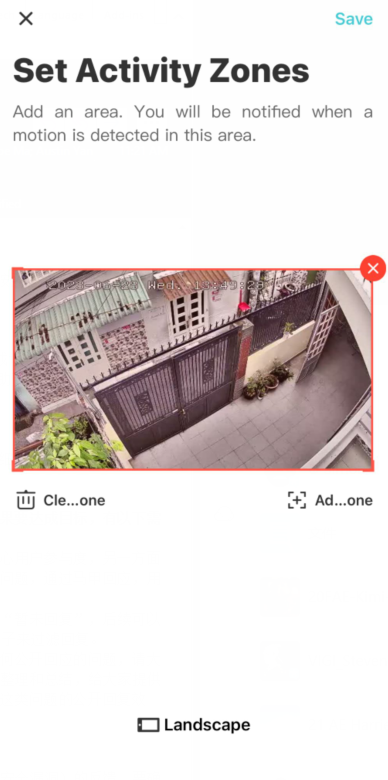
(1) Set Activity Zone allows you to define a specific area that you want your camera to detect, everything outside of the zone will be ignored.
NOTE: Exclude the areas which have objects or small movements like trees, bushes, leaves waving in the wind; light changes like sunset or sunrise, car light of passing vehicles, tree shadow, reflections; public areas like busy streets, sidewalks, etc.
(2) Setting the detection Sensitivity to a lower level can also help reduce the detections, but it may defeat the purpose of true motion detection. You may find that you’re missing alerts when there is a real person or animal in the camera’s view.
3. Adjust the angle and location of the camera
You may also adjust the installation angle to be away from the false alerts trigger. Try to avoid pointing the camera at busy public areas like busy streets, sidewalks, etc.
How to View VIGI Camera on PC Through RTSP Stream
The VIGI camera supports the RTSP protocol, so it can work with third-party NVR or NAS devices that also support the RTSP protocol. If a user wants to view the live stream of the camera with a third-party app like VLC Player, he will just need to input the URL of the RTSP stream on the VLC Player app.
The URL of the RTSP live stream for the VIGI cameras will be:
For high quality stream1: rtsp://IP Address/stream1
For low quality stream2: rtsp:// IP Address/stream2
Notes:
1. The username/password is the camera account that you created via the VIGI app.
2. The IP address is the camera’s IP address assigned by your host router. You can find it on your host router’s DHCP list or in the VIGI app (Go to Camera Settings and navigate to the camera details page).
3. If you want to view the live stream of the VIGI camera with a third-party app remotely, you will need to open port 554 for the camera on your host router first.
4. You could also use ONVIF standards to add the VIGI camera with its username/password and IP address.
Apart from the VIGI app, VIGI cameras can work with other third-party software to use and manage your VIGI camera.
Note: Before you start, make sure the computer and your camera are connecting to the same network.
Step 1: Confirm your access to the camera
Make sure that you have access to your camera by Username and Password which you created at the very beginning of the setup.
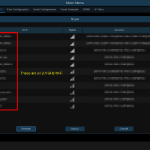
Step 2: Add your VIGI camera on iSpy
1. Run the iSpy software on your computer.
2. Click Add on the top left menu and select ONVIF Camera.
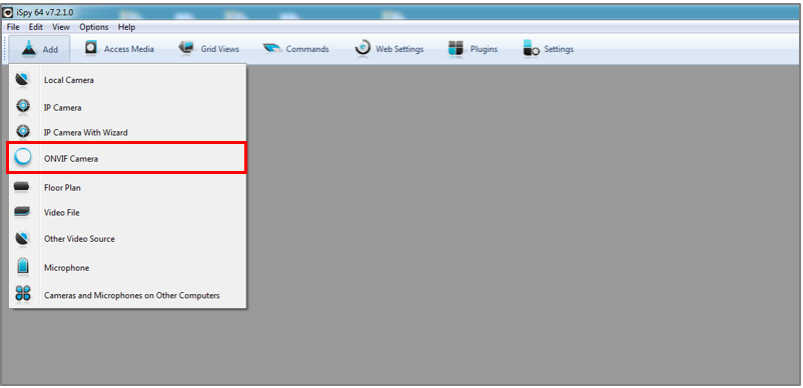
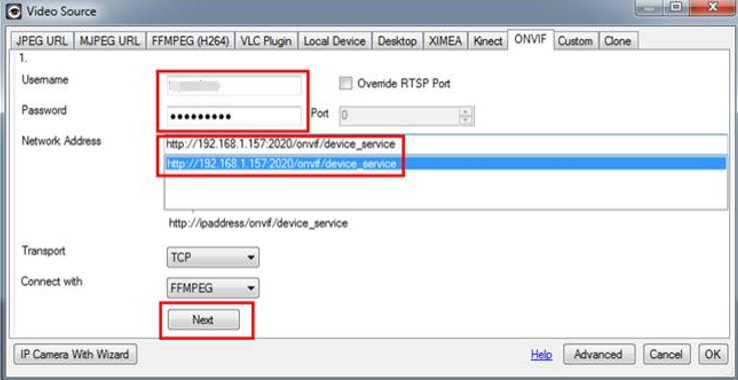
3. Enter the Username and Password that you set for your camera on the pop-up window, select Network Address, and click Next. You can customize other parameters if needed.
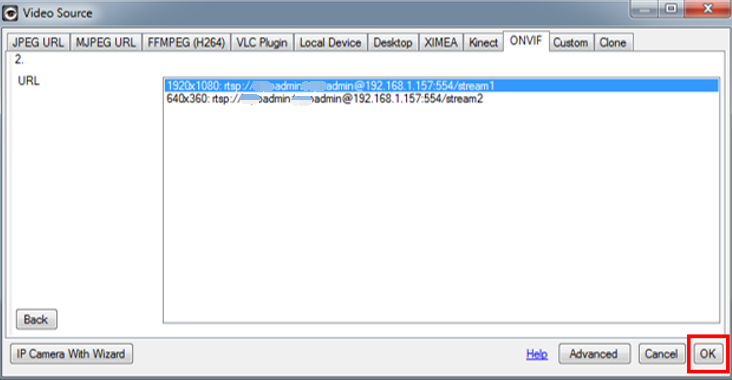
4. Choose the video resolution and click OK.
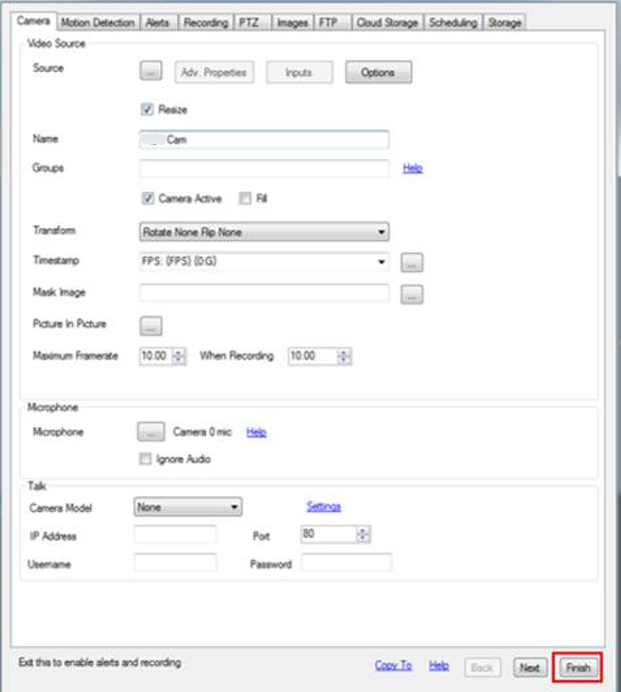
5. Customize the camera settings as needed, including Microphone, Talk, Motion Detection, Alerts, Recording, Images, Scheduling, and Storage. You can also change all the settings later. Click Finish to complete adding your camera to iSpy.
6. After adding your VIGI camera to iSpy, you can monitor and manage it using the app. View the live, customize motion detection, check the recordings when motion detected, set recording schedules, record videos and more.
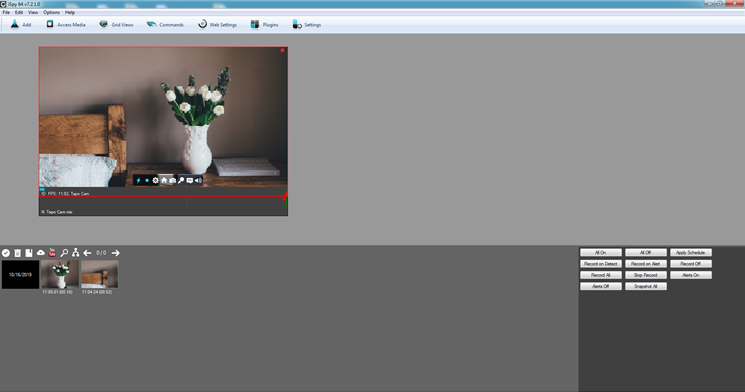


Add Comment