Sunell NVR DVR FAQ Since its foundation in 1997, Sunell has been committing to the research, development, and innovation in intelligent video products and solutions, and has been the leading company in the surveillance industry in China.
With its headquarter located in Shenzhen, Sunell has 24 branch offices in China and has an international branch office in Hongkong. Sunell’s products have served in 113 countries and regions around the globe, and have provided security for billions of people.
Sunell NVR Guide
Hard disk alarm or unable to record video
1. Make sure the hard disk is well (check by replacing with another new one)
2. When hanging with multiple hard disk, note that the power supply can meet the requirement, monitoring specialized hard disk is more stable with smaller starting current, lower working speed and consume less power than consumer hard disk, if power supply is not enough, the hard disk will not be able to work, which result in disk unrecognized and recording failure.
3. If NVR can read the disk, please format the disk first, as in most cases, repeating read and write will generate disk fragmentation or bad sectors, a formatting process will skip or repair the bad sector.
What is the default IP of NVR?
Default IP of NVR is 192.168.0.121
Is it possible to add third party IPC to Sunell NVR?
Yes, it is accessible for those third-party devices which support ONVIF protocol.
Read Next : AEEYE Smart NVR 2.0 installation guide
NVR can not acquire the IP address automatically?
Please connect the NVR to Router, and make sure the DHCP function of router is enabled,and open the function of automatically getting IP on NVR network setting menu
How to get RTSP stream from NVR?
RTSP format: rtsp://ip:port/snl/live/cameraid/streamid
Example: rtsp://192.168.1.19:554/snl/live/1/1

NVR can not add POE camera?
1. please check if the username and password is correct when adding the camera
2. network cable issue, please use CAT5e or CAT6e cable, It is recommended to use 8 cores for the wire, the POE cable sequence for data transmit is 1/2/3/6, for positive power is 4/5, for negative power is 7/8, the distance of cable should be controlled around 70 meters
3. camera is not powered on, please check if camera support POE
NVR can not find the IP of camera?
If camera is sunell camera, and you don’t know the ip, please connect camera and PC at same local network(or directly connect camera to PC), using IPsearch tool to find the correct IP, then add it to NVR; If camera is from third party, please check if they provide tool to search the camera IP, Then add it to NVR by input the IP, user name and password of camera
IPC often shows offline on NVR?
1. Power supply of IPC is not stable, for example, IPC will consume more power at night with IR Led enabled, which may cause electricity insufficient.
2. Network bandwidth issue, the switcher performance is insufficient
3. Camera issue:
If only the specified camera or channel has this issue, we recommend you replace with a normal camera to check
If offline issue happens randomly with all channel, we suggest checking reason 1 and 2
If offline happens to all channel at same time, please check if the camera is powered by centralized supply, please check the power status
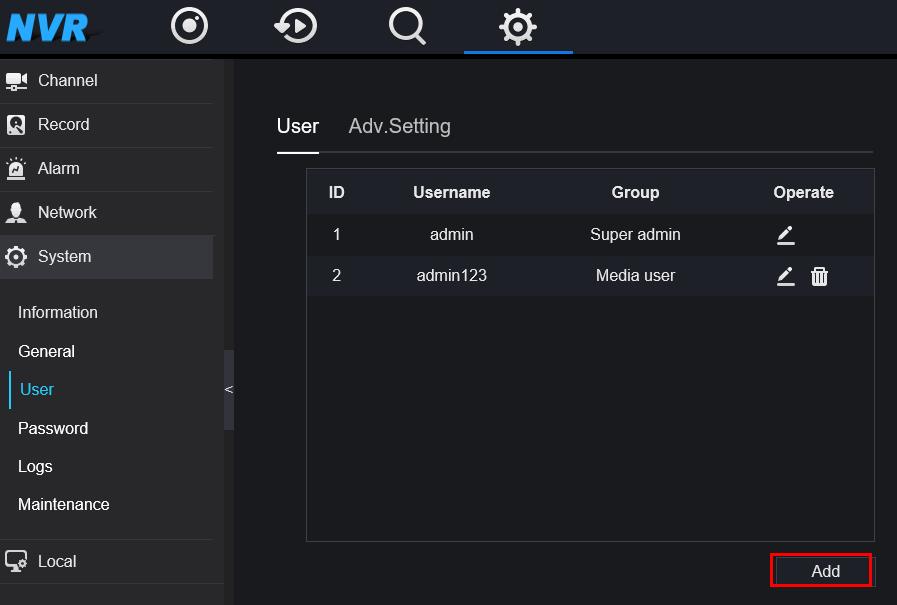
Where to add other users account and what authorities can be set?
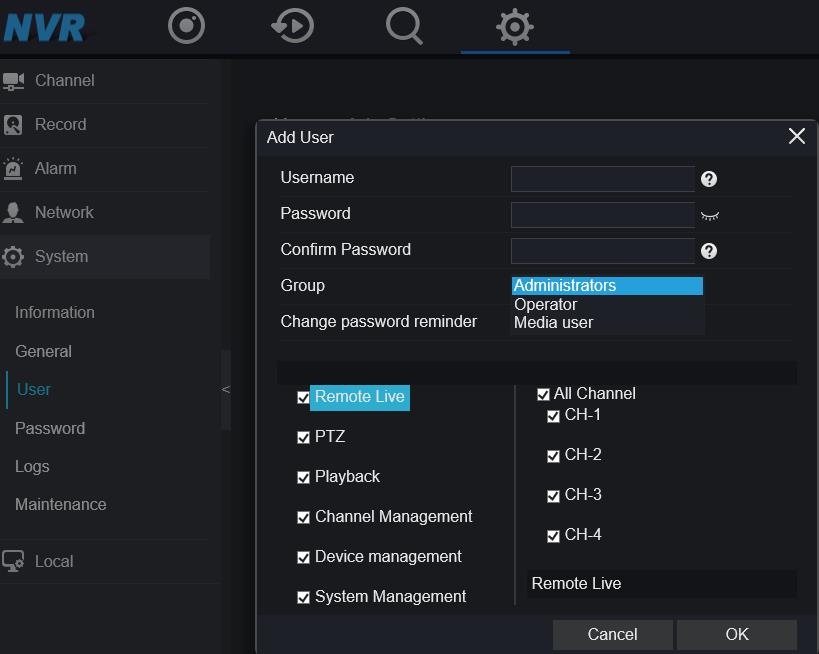
At System-User-Add:
3 different group of user can be created:
Administrator/Operator/Media user,
- Administrators: Remote Live, PTZ, Playback, Channel Management, Device Management, System Management;
- Operator: Remote Live, PTZ, Playback, System Management;
- Media user: Remote Live, Playback; (please mind that the admin account is the superuser, it can not be deleted);
Channel selection:
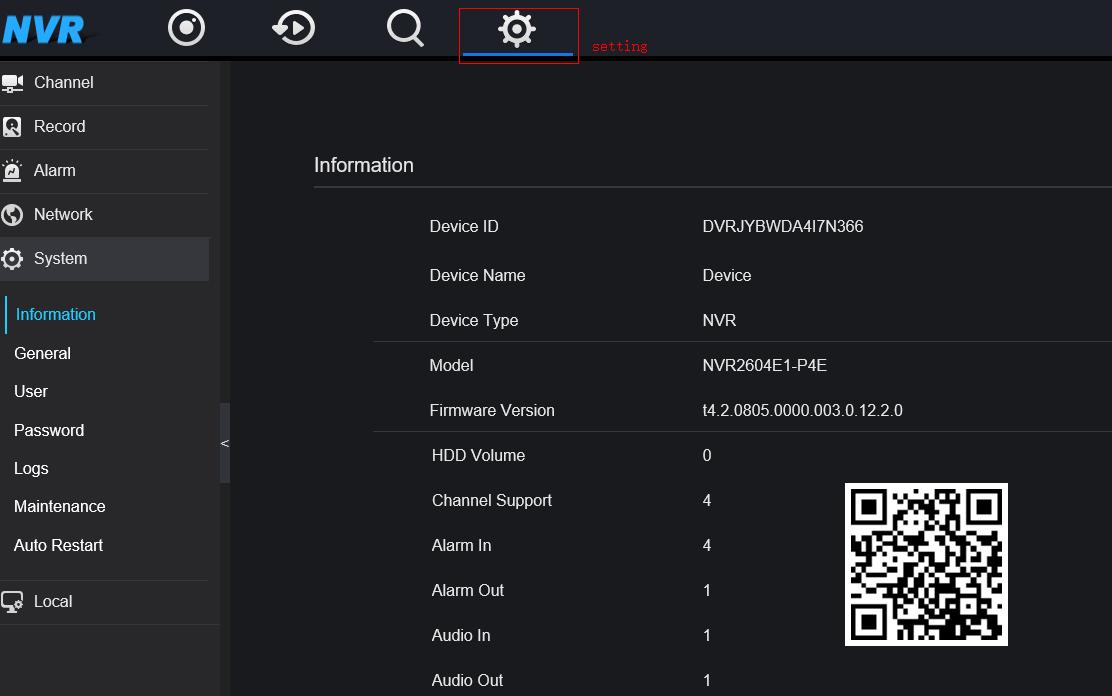
How to know device info?
For old interface: go to “Setup”->”Device Information”
![]()
For new interface: go to “setting”, then you can get Information
Why the NVR cannot find the HDDs?
1. Please make sure to install it correctly and safely.
2. Please choose well-known brands of HDD: Seagate, WD, TOSHIBA
3. Ensure the life of the HDD.
4. try to format the HDD.
Why there is noise of audio in live view or playback?
1. go to web interface of the IP Camera firstly, and make sure if the audio is working well.
2. Decrease the audio-in setting.
3. change to use other connection cables or test other IP cameras with the same cable.
4. change another NVR for a test.
How to manage multiple NVRs?
Please use our VMS “Sunview” to manage multiple NVRs.
and here is the download link:
http://www.sunellsecurity.com/products.php?id=51
brief features:
〉server/Client Based
〉10,000+ Channels Connection
〉Face Recognition
〉1,000,000 Face Library
〉Smart Search
〉Multiple Screens
〉sunell Products Unified Management
〉Data Statistics
〉E-map

How to format the HDD?
For old interface: go to Record–>Storage–>Format
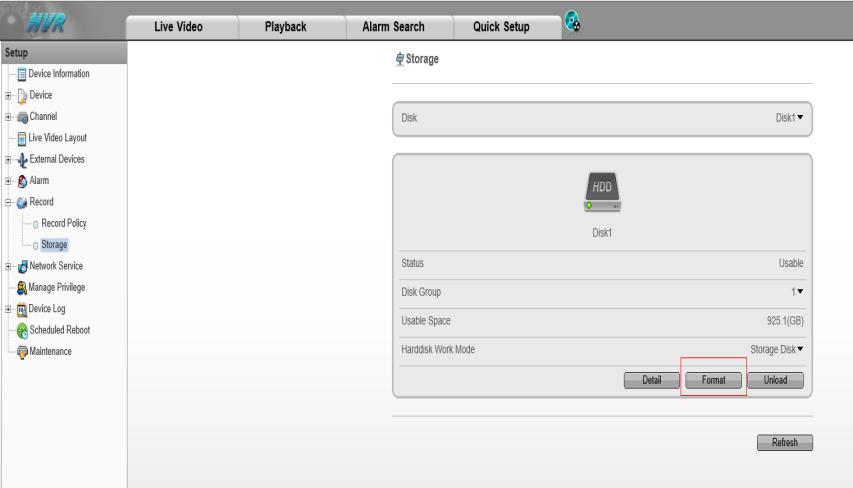
For new interface: go to Record–>Disk–>Format
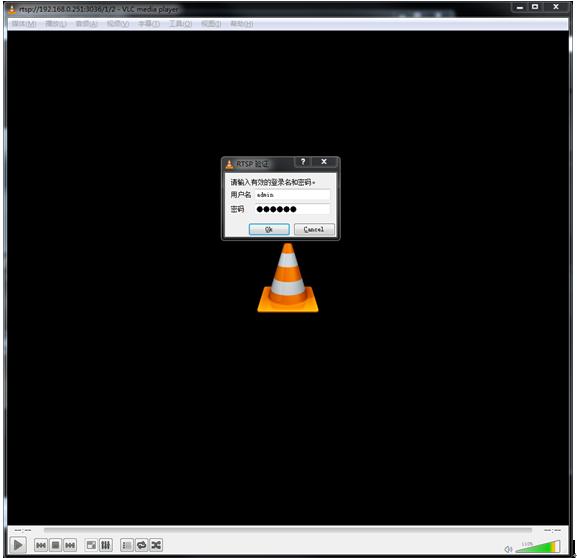
How to get RTSP stream from NVR with V4.x FW?
1. Check IP and Port of NVR
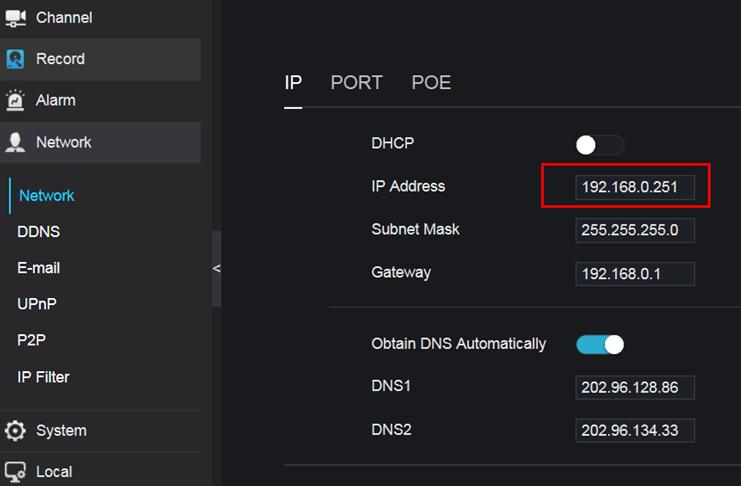
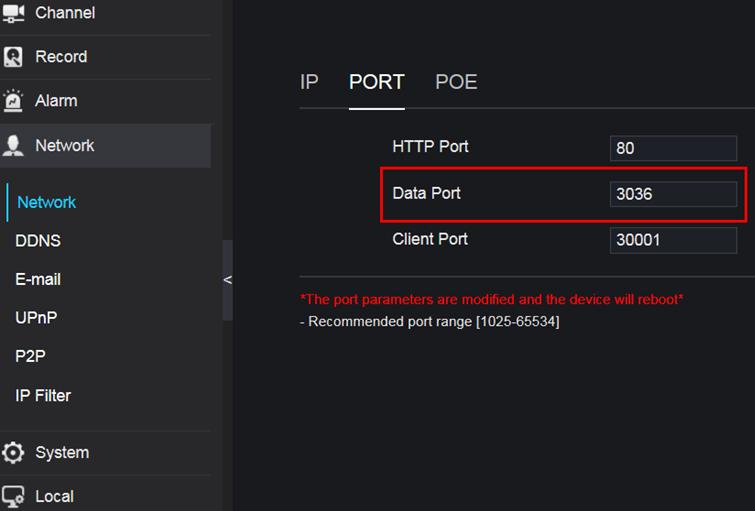
2. Input RTSP URL: rtsp://
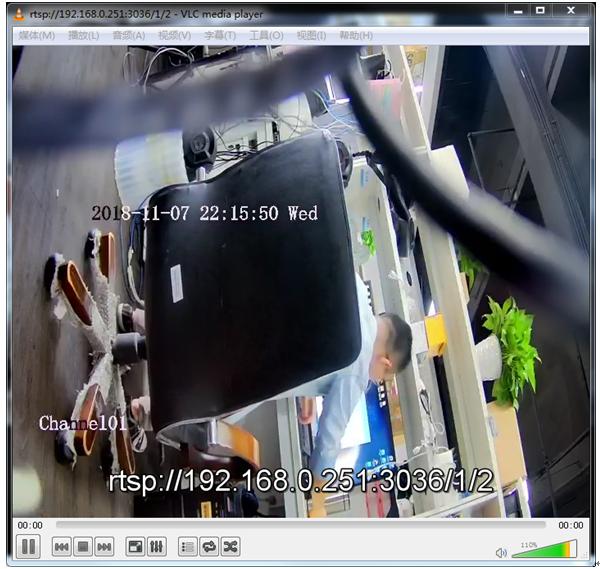
For example: rtsp://192.168.0.251:3036/1/2 — means get the RTSP stream 2 from channel 1 of the NVR with IP 192.168.0.251
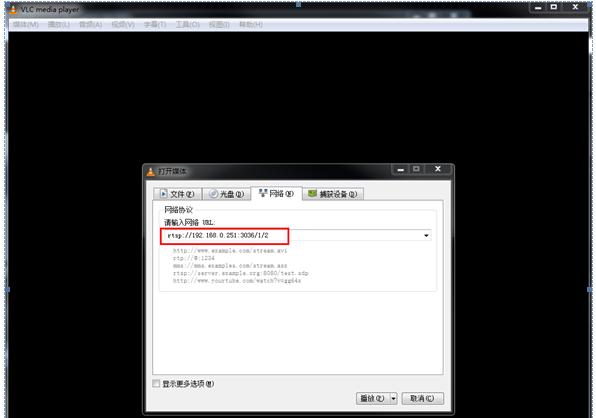
3. Input username and password of the NVR (not IPC)
How to use DDNS function?
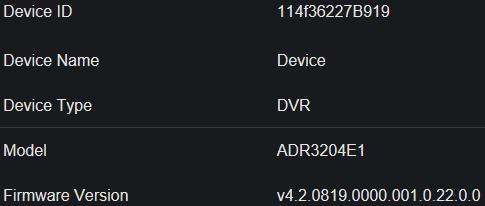
1. Sample information
2. Network setting
Please enter the valid values:

3. Check the status of Upnp option
If the Networking setting and router setting are correct, the Upnp will get the current ports, too.
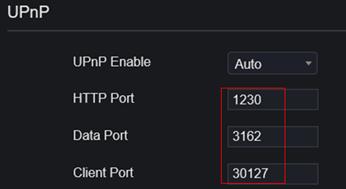
Otherwise, if you get “0” for each port, please check your network and router setting.
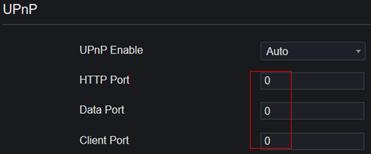
4. DDNS
Enable this option and then select the proper protocol you want:
1) sunellddns
enter a name, then click [Test]
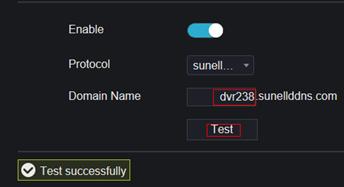
If it shows “Test successfully “, Then you can enter “dvr238.sunllddns.com:1230” in IE broswer
Note: 1230 is the HTTP Port in the option “UPnp”
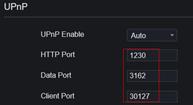

How to use the dual ports of the NVR?How to get RTSP stream from NVR with V4.x FW?
1. One network port connects the camera and the other one connects the router connecting the external network.
2. Or one network port connects the IP address of one segment and another network port connects the camera of another segment.

NVR with two network ports can set different IP addresses for two network ports.
Whether you want to use it or not depends on your own situation.
Can NVR connect to wireless network?
NVR generally does not support wireless connection. Usually It is also possible to link routes or switches through network cables, or to connect directly with cameras using network cables.
What to do if the registered camera on NVR often drops off?
1. Camera power supply is unstable, test with new power supply.
2. Network cable Problems, or Check Switch Ports, or Replace new Switches.
3. Restore factory settings or upgrade new programs.
What to do if the NVR can’t startup?
1. please make sure the power supply is stable, or you can change a new one
2. if the NVR stop at the booting screen, maybe the main program(firmware) has the problem, please contact tech support to check it remotely.
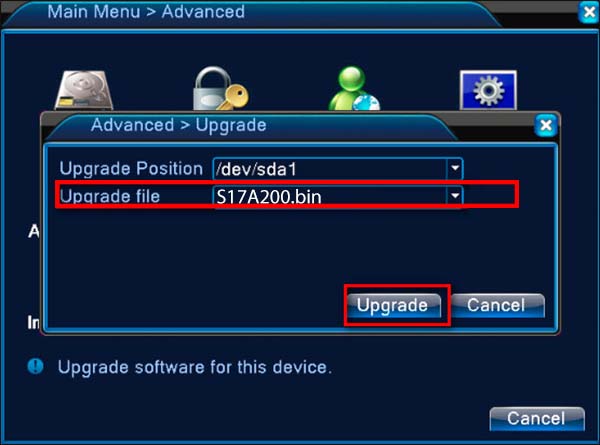
3. If the NVR restart automatically, please update the firmware to the latest version.
Can the device continue to record when the device is disconnected to network?
1. NVR+HDD: the NVR is connected to the network camera, it is recommended to fix the IP address of the NVR. In the system configuration, network configuration, basic configuration interface, do not enable automatic acquisition of the IPV4 address, manually assign an IP to the NVR. In this case, in the case of an external network interruption, as long as the LAN is connected [the network between the camera and the NVR] without interruption, the recording will continue. The NVRis connected to an analog or coaxial camera, and whether the network is connected does not affect the recording.
2. IP Camera +SD card: the external network or LAN interrupt will not affect the recording.
Can H.265 and H.264 cameras connect to NVR with H.265 at the same time?
YES, it can be done like this.
However, 265 encoded video can only be realized when accessing the H.265 camera, saving space. If the H.264 camera is connected, this function cannot be realized.
How to calculate video storage capacity of HDD?
it’s the theoretical value
The capacity of storage space should be calculated according to the days, bit rate and type
1. Bit rate: 2Mb (for example)
| channel and time | Disk space required |
| 1 channel for 1 hour | 2048Kb/8Byte*3600sec*=921600KB=900MB |
| 1 channel for 1 day | 900MB*24=21600MB≈21.09GB |
| 1 channel for 30 days | 21.09GB*30≈632.81GB |
| 16 channel for 30days | 632.81GB*16≈10125GB≈9.89TB |
1. Bit rate: 4Mb (for example)
| channel and time | Disk space required |
| 1 channel for 1 hour | 4096Kb/8Byte*3600sec*=1843200KB=1800MB |
| 1 channel for 1 day | 1800MB*24=43200MB≈42.19GB |
| 1 channel for 30 days | 42.19GB*30≈1265.7GB |
| 16 channel for 30days | 1265.7GB*16≈20251.2GB≈19.78TB |
2. Bit rate: 6Mb (for example)
| channel and time | Disk space required |
| 1 channel for 1 hour | 6144Kb/8Byte*3600sec*=921600KB=2700MB |
| 1 channel for 1 day | 2700MB*24=64800MB≈63.28GB |
| 1 channel for 30 days | 63.28GB*30≈1898.43GB |
| 16 channel for 30days | 1898.43GB*16≈30375GB≈29.66TB |
How to add a NVR V4.2 to the app on Android or IOS phone via DDNS or IP Address?
1. Download and install the correct application
2. Ensure that the device is connected to the network properly. Check if the device’s network setting is set up correctly. You can find this in Setting > Network > Network > IP.
1)The device’s IP Address should be in the same range as the router’s gateway.
2)Subnet Mask should be same as what is indicated in the router’s network setting.
3)The Gateway should the router’s gateway or local IP address.
4)DNS 1 and DNS 2 can be your router’s DNS servers or you can use 8.8.8.8 and 8.8.4.4.
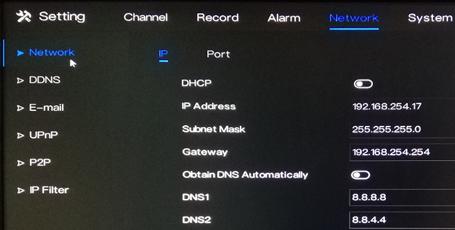
3. If you would like to use DDNS in adding the device to the app, please enable the DDNS first.Go to 1)Setting > Network > DDNS.
2)Click the toggle switch to Enable DDNS.
3)Choose one protocol.
4)Input a Domain Name inside the box.
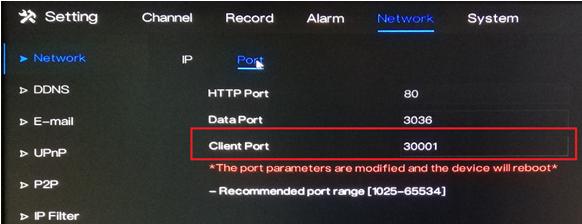
4. If you would like to access the device remotely via WAN (external/public) IP or DDNS address using your mobile phone, you have to open/forward the Client Port of your device.
1)The Client Port can be found in Setting > Network > Network > Port.
2)The default value is 30001. If you changed this to a different number, please open/forward the new port number.
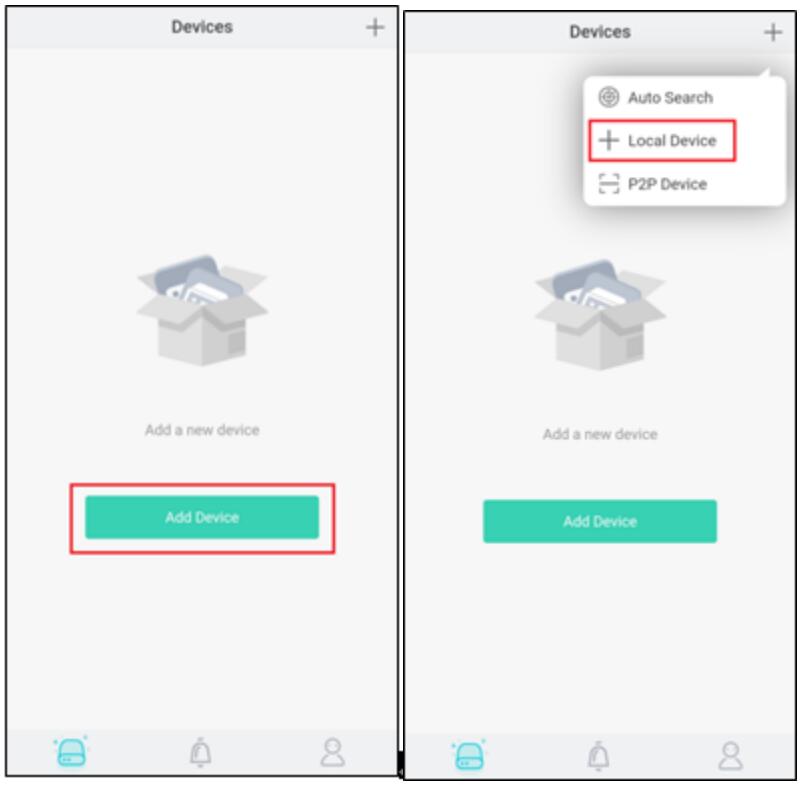
5. Open the app on your mobile phone. Click Add Device. Tap + Local Device.
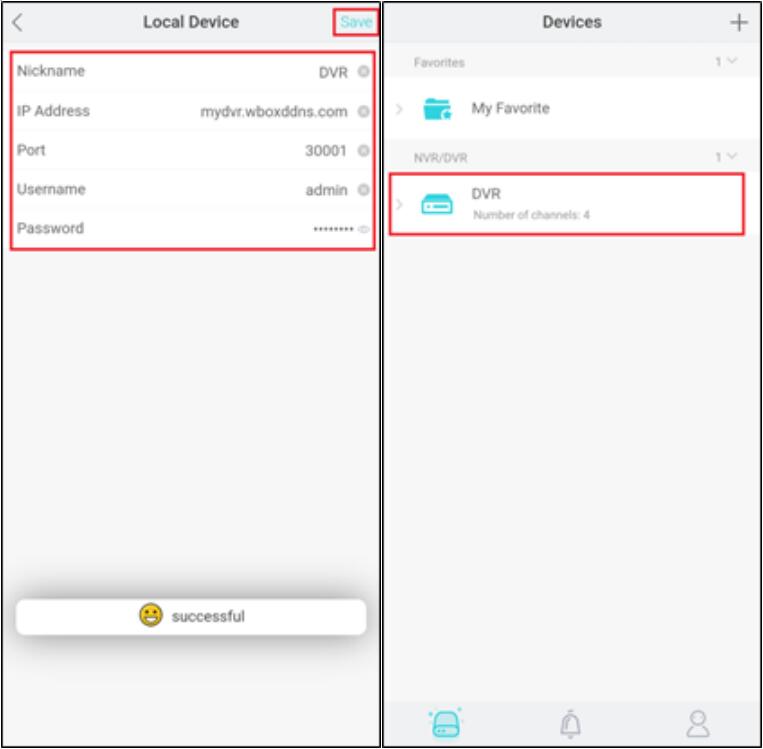
6. Input the needed information on the app.
1)Enter a Nickname.
2)In the IP Address field, enter the local IP address, WAN (external/public) IP address or the DDNS address of the device.
3)In the Port field, input the Client Port indicated in the device setting. This information can be found in Setting > Network > Network > Port.
note: The default value of the Client Port is 30001. If you changed it to a different number, please make sure to input the new port number in the app.
4)Enter the Username and Password of the device.
5)Hit Save at the upper right corner to save the information.
How to back up the recordings of the NVR V4.2 on a USB flash drive?
1. Go to the Playback menu on the device’s GUI. It can be found on the task bar at the bottom of the screen when on live view.

2. On Time Search, select the specific recording that you want to back up. Select your preferred: Camera, Date, Record Type, Time Interval, Start Time
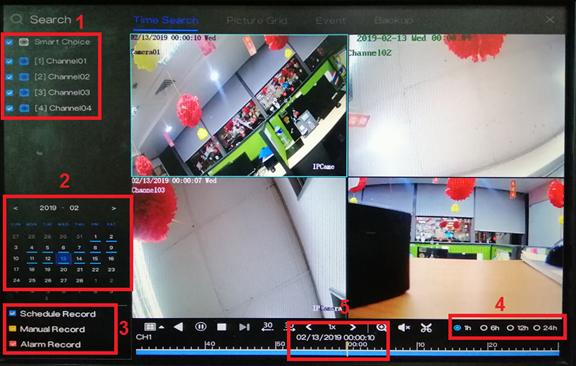
3. After selecting the specific time, click the ![]() icon (Start Backup) to start the backup process.
icon (Start Backup) to start the backup process.
4. Drag the timeline to until when you would like to back up the recordings. The yellow bar indicates the timeframe of the recording that you will be downloading.

5. After selecting the specific timeframe of recording, click the ![]() (End Backup) icon to save the recording.
(End Backup) icon to save the recording.
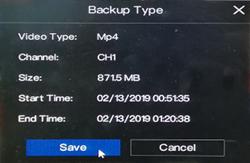
6. There will be pop-up message regarding the backup information and an option to save. Click Save to proceed.
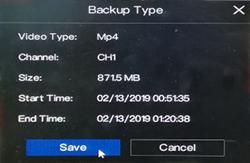
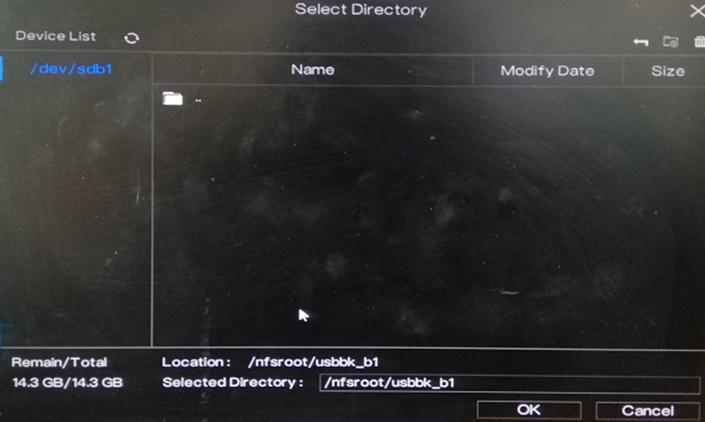
7. Select the specific folder in the USB flash drive directory and then click OK.

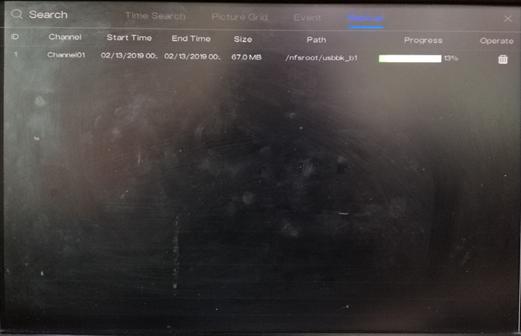
8. You can view the backup status in the Backup menu.
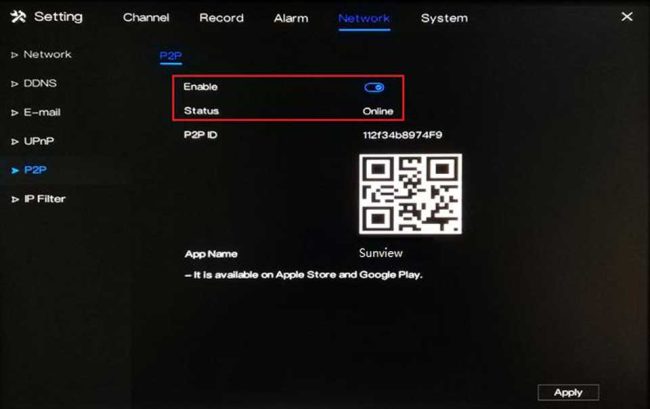
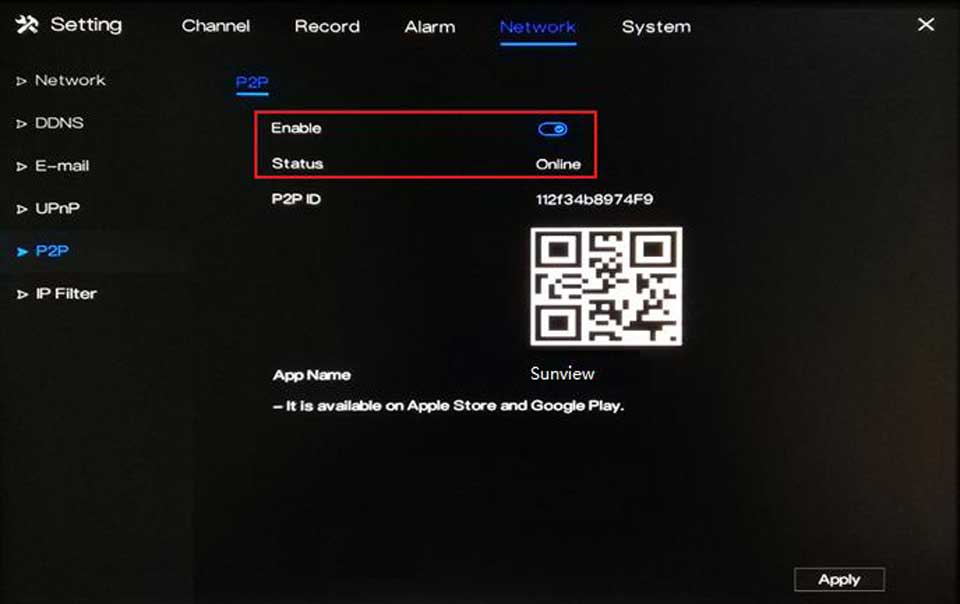
How can I add a NVR V4.2 to the app on my Android or IOS phone via P2P?
How can I enable the motion detection recording on DVR V4.2 or NVR V4.2?
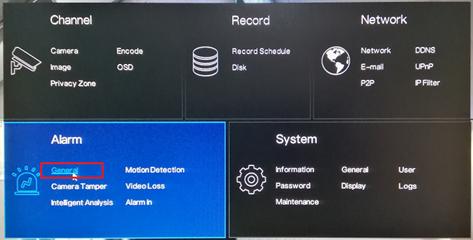
1. Click the right mouse button and select General under Alarm.
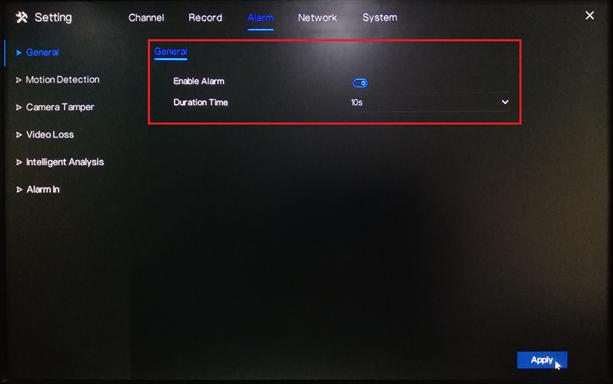
2. Turn on the Enable Alarm option and select a Duration Time from the drop-down list. Click Apply to save the settings.
3. Go to Motion Detection. Under Channel, select a specific channel you would like to set the motion detection recording. Turn on the Enable option.
Under Event Actions, turn on the specific action you would like to have if there is a motion detected by the device. To ensure that the device will record when there is a motion detected; don’t forget to turn on Post Recording, select a Recording Time and select the corresponding channel under Channel.
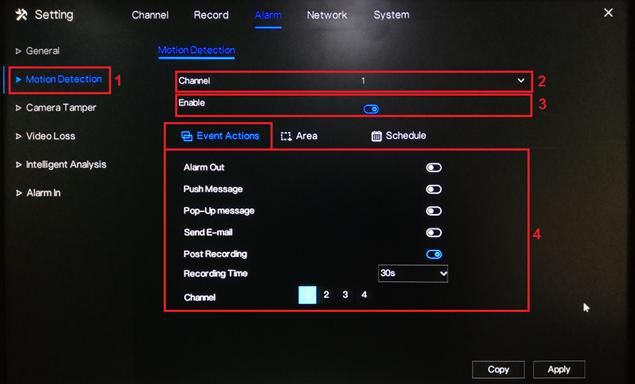
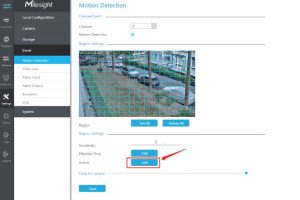
4. To configure the motion area and sensitivity, go to Area.
On the live preview on the page, you may select the motion area. Click the left mouse button on the live preview and drag the mouse on the specific area that you would like to set. The red grids represent the area that you have selected. To clear the area, just perform a double-click action using the left mouse button.
Select a Sensitivity option from the drop-down list. You may select from Low, Medium, High and Highest.

5. Under the Schedule setting, select the specific day and time that you would like to detect the motion. Use the left mouse button to select a specific box. You may also hold down and drag the left mouse button to select a wider schedule. To select all the boxes (24/7 by motion recording), just click the icon on the upper left corner. You may also click the same icon to clear the schedule.
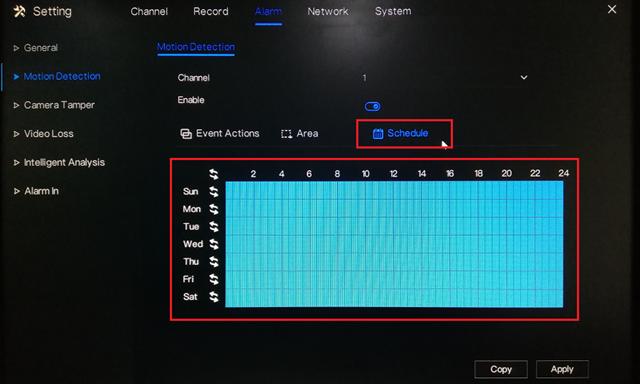
6. Click Apply to save the settings.
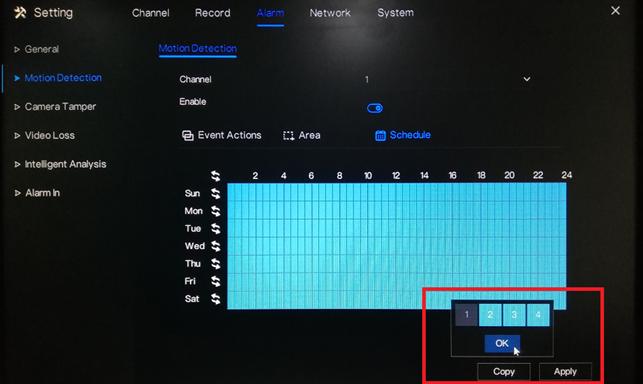
7. If you would like to copy the motion detection settings to the other channels, click Copy and select the specific channel you would like to copy the setting. Click OK then Apply to save the changes.
1. Enter the IP address of your NVR on the IE Tab’s address bar. You may now log in to your device using Chrome

2. After clicking “Allow…”, you will be prompted with another message as shown below. Select “Allow and Remember”.

3. You may now log in to your device.

How to back up the recordings of a DVR V4.2or NVR V4.2 on USB flash drive?
1. Go to the Playback menu on the device’s GUI. It can be found on the task bar at the bottom of the screen when on live view.

2. On Time Search, select the specific recording that you want to back up. Select your preferred:
[1] Camera [2] Date [3] Record Type [4] Time Interval [5] Start Time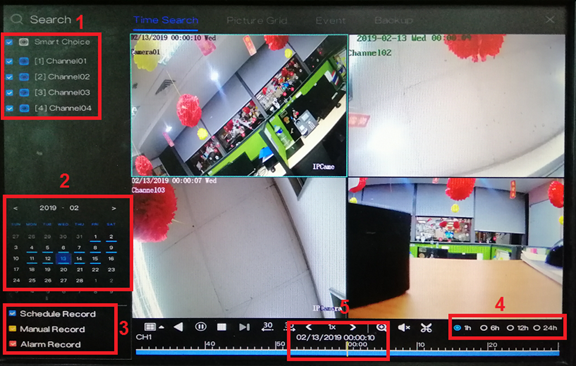
3. After selecting the specific time, click the icon ![]() (Start Backup) to start the backup process.
(Start Backup) to start the backup process.
4. Drag the timeline to until when you would like to back up the recordings. The yellow bar indicates the timeframe of the recording that you will be downloading.

5. After selecting the specific timeframe of recording, click the ![]() (End Backup) icon to save the recording.
(End Backup) icon to save the recording.
6. There will be pop-up message regarding the backup information and an option to save. Click Save to proceed.
7. Select the specific folder in the USB flash drive directory and then click OK.
8. You can view the backup status in the Backup menu.

Security Center in NVR Ver4.3
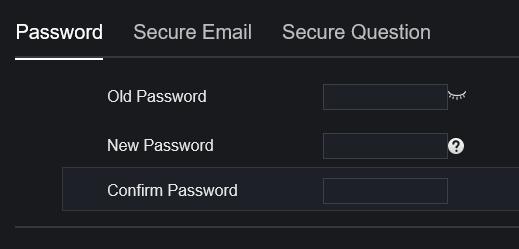
To avoid password loss, here are three functions in Security Center:
1. Password
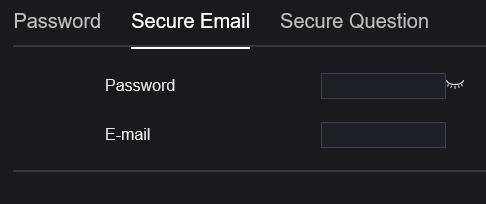
2. Secure Email
Password: it’s the login password
E-mail: available Email
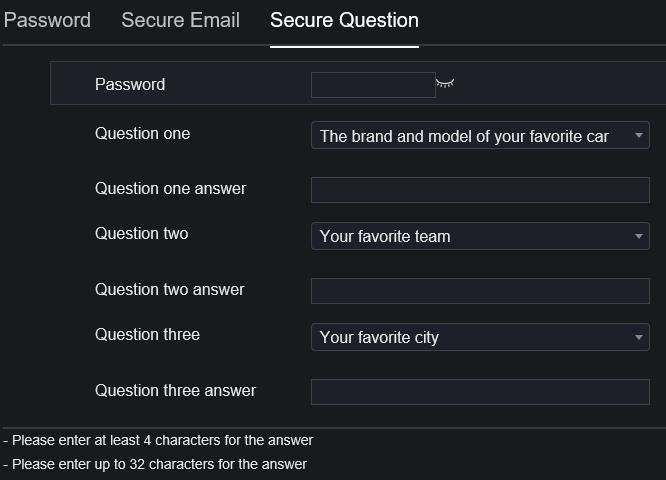
3. Secure Question
Password: it’s the login password
How to set path for local image and video which is backup on WEB interface?
1. go to setting->local->download config
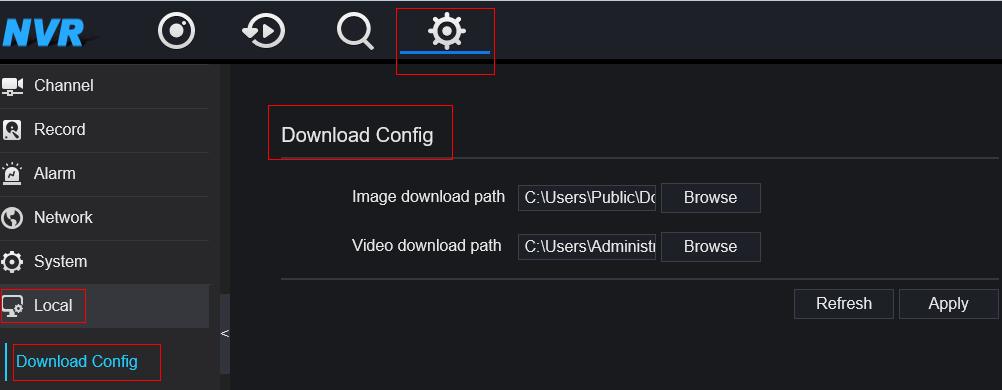
2. the set the paths here.
Note: these tables are only for reference, and the actual values have redundant.




Add Comment