•Camera No.: This dropdown box allows the user to select a camera to view or change PTZ settings for.
•Baudrate: This dropdown box allows the user to change the baudrate for the selected camera.
•Data Bit: This dropdown box allows the user to change the data bit for the selected camera.
•Stop Bit: This dropdown box allows the user to change the stop bit for the selected camera.
•Parity: This dropdown box allows the user to change the parity for the selected camera.
•Flow Ctrl: This dropdown box allows the user to change the flow control settings for the selected camera.
•PTZ Protocol: This dropdown box allows the user to change the PTZ protocol for the selected camera.
•Address: This dropdown box allows the user to view the PTZ address for the selected camera.
4.6.8 System
The system menu is where the user can change general settings, user settings, view system information, and conduct system maintenance.
4.6.8.1 General
.
Below is an explanation of the fields on this screen:
•Language: This dropdown box allows the user to change the NVR’s display language.
•Video Standard: This dropdown box allows the user to change the NVR’s video standard to either PAL or NTSC.
•Time Zone: This dropdown box allows the user to change the NVR’s time zone.
•Menu Date Format: This dropdown box allows the user to change the date format used on the NVR.
•System Time: This dropdown box allows the user to change the system time for the NVR. The DST button activates daylight savings time on the NVR.
•Enable Password: This dropdown box allows the user to enable or disable password protection for the NVR.
•Auto Lock Time: This dropdown box allows the user to change the automatic password lock on the NVR.
•Device Name: This dropdown box allows the user to change the NVR’s display name.
4.6.8.2 User
O «play
O “‘^l
• ‘¡etwot.
* -■ – n
©
^^ Shut Dôw
.
.
.
.
.
.
.
.
.
.
.
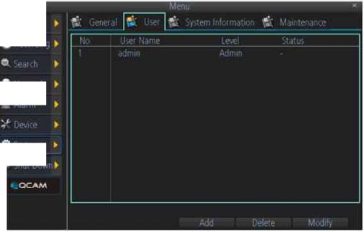
Below is an explanation of the table on this screen:
•No: This field shows the user the hard drive number for the selected hard drive.
•User Name: This field shows the user names available on the device.
•Level: This field shows the permissions level of the username.
•Status: This field shows the status of the username.
.
.
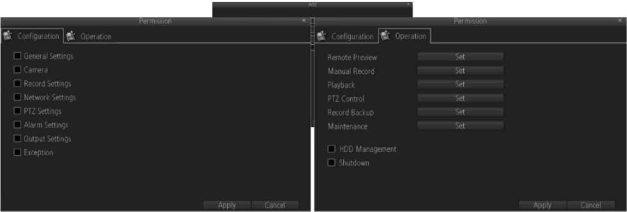
Click the Add button to add a new user, click the Delete button to delete a user, click the Modify button to modify a user. Up to 10 users can be added to the device. Each user can have custom permissions set through the Add user menu:
.
.
.
.
.
.
.
.
.
.
•Device Name: This field shows the NVR’s name.
•Model: This field shows the NVR’s model number.
•Build No: This field shows the NVR’s build number.
•HW No: This field shows the NVR’s hard ware number.
•Fw Version: This field shows the NVR’s firmware version.
•Detail: This field shows the NVR’s detailed string.
•UID: This image shows the QR code that represents the NVR’s UID.





Add Comment