UI 4.0 – Reset Login Password with Security Code
How to reset login password with Security Code
1. on login screen, click forget my password

2. select verified by Security Code

3. check the system date and look for the security code from LTS tech support (How can I get the Secure Code for Platinum NVR/DVR? – LTSecurityinc.com (zendesk.com)) then input the security code

4. input new password

5. confirm if want to duplicate password to channel default password

UI 4.0 – Reset Login Password with reserved email
How to reset login password with reserved email?
Note: email has to be setup in admin user management page on local monitor
1. on local login page, select forgot password

2. select verified by reserved email

3. scan QR code from LTS Connect app


4. check reserved email for the verification code and input the code


5. input new password

UI 4.0 – Reset Login Password with PT cloud
How to reset login password with PT cloud
1. on login screen, click forget my password

2. select verified by PT Cloud

3. use LTS Connect app, select add device, scan QR code on local screen


4. verification code will be generated on LTS Connect app

5. input verification code from LTS Connect app on local screen then ok

6. input new password

Platinum – Reset IP Camera to Factory Defaults
- Disconnect the power supply or unplug ethernet cable from POE port.
- Press and hold the reset button.
- Keep holding the reset button and restore the power supply/plugin to POE port.
- Continue to hold the reset button for a further 10 seconds.
- Release the button and allow the camera to complete a restart/reboot.
(Platinum) – How to Reset Password from the local screen?
There are two ways to reset the login password for the DVR/NVR.
- Directly Reset it from the local console (DVR/NVR).
- Reset the password from the local network (use the IP portal software) with PC.
1. Directly Reset it from the local console (DVR/NVR).
Here is how to locate the Reset Password window from the Local DVR/NVR.
We have two DVR/NVR Local Console Interface; UI3.0 and UI4.0.
————————————————————————-
Local Recorder – Earlier Model User Interface. (3.0)
The Main Menu button is located on the Screen Bottom Left. (Click picture to shows detail)
Go to the (3.0 Local Password Restore KB)
————————————————————————-
Local Recorder – Newer Model User Interface (4.0)
The Main Menu is the blue banner on the Top of your screen. (Click picture to shows detail)
Go to the (4.0 Local Password Restore KB)
(Platinum) use PC to Reset Password
Our Support Hours:(NJ)(CA) Monday to Friday, 8:30 AM – 9:00 PM (EST)
You may e-mail LTS Technical Support at (based on your region)
East Su***************@***********nc.com
Central Su*************@***********nc.com
West Su****************@***********nc.com
This KB applies to the Platinum DVR/NVR/IPC series.

Requirements
1. Windows 10 Laptop / PC.
2. Local Network environment. The recorder or camera is on the same network as your computer.
3. You have administrative rights on your personal computer.
4. You are authorized to access the recorder
One Picture Flowing Diagram:
Resetting the Password
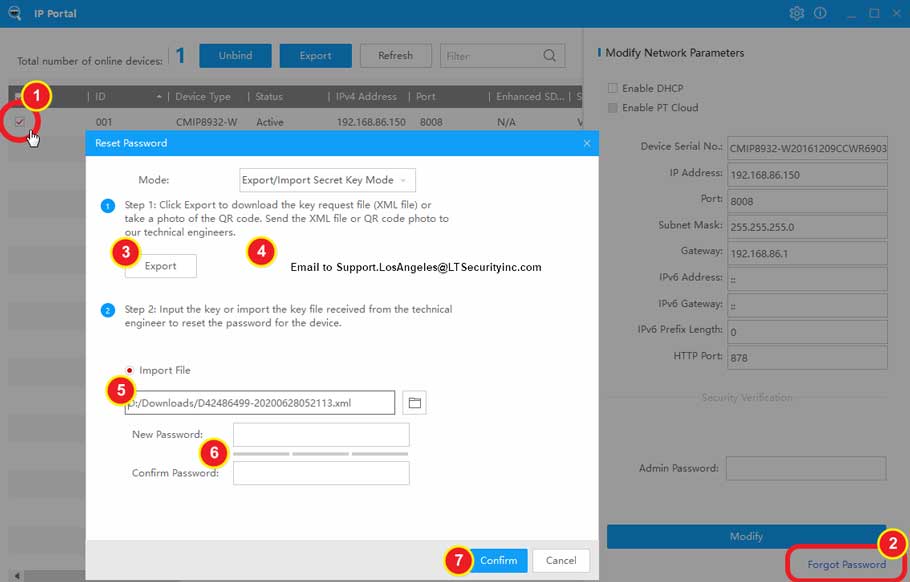
Step 1. Open the IP Portal first. Select the device that needs to have its password reset.
Step 2. Select “Forgot Password.” on the bottom right corner.

Step 3. A new menu will now present itself. This is the password reset menu.
Click Export. Remember: Export/Import Key must finish within a day.

Step 4. Select Export and then designate the location the file will be saved to.

Email to:
East Su***************@***********nc.com
Central Su*************@***********nc.com
West Su****************@***********nc.com
Step 5. Once you have the file. E-mail the XML file to LTS.

Step 6. LTS Tech Support will reply email with the unlock file.
You will need to download the attached file onto your personal computer.
REMEMBER: Export/Import unlock file must process in a day.
Step 7. Select “Import File” under Step 2. Select the browse icon next to find the file you received from LTS Tech Support.

Note: “admin” keyword in the password is forbidden.
Step 8. Create a new password for your device. Once complete, select “Confirm” to change it. You have successfully reset the password.
To learn more about all of the functions in the Platinum IP Portal, refer to the IP Portal reference sheets for more information.
More Reference: IP Portal
If you haven’t installed the Platinum IP Portal program, click here to learn more.
If you are instead having issues with resetting your password, learn more here.
Before proceeding with the rest of this guide, please ensure that you have met the requirements below.
How can I get the Secure Code for Platinum NVR/DVR?
What are Secured Codes?
A secured code is required when resetting the password on LTS Platinum Recorders (UI3.0). The secure code will changes based on the System Date. You need to open the Password Reset window from the Local Console to enter it.
How to get the Secure Code?
To receive a secured code, you may do one of the following;
1. E-mail Su***************@***********nc.com and request a secured code.
2. Call our support center at 1-831-250-1292.
3. Contact your LTS sales representative.
How to local the Reset Password window?
To learn more on how to use the secured codes, click here.
What Are Old, New, and WH Codes?
The secured code is not a combination of all three codes. You will only use one of the three for your recorder depending on the model and type.
What happen if I don’t have the local monitor?
A secured code is not required if you are resetting the password through our program, the Platinum IP Portal. If you would like to learn more about using the IP Portal program, click here.
UI 3.0 – Reset Login Password
Locate the Password reset window first.
If you forgot the password and you want to reset it, the fast easy way is using the local DVR/NVR access.
Please make sure you are looking at the correct interface (UI 3.0).
How to identify the UI 3.0, 4.0 click Here.
1. Your Main Menu button is located from the bottom right of the screen. Click it. If you see something like the picture looks like (ie: Playback Export, Manual HDD, etc..) Please Log Out first.


Go MENU > Shutdown > LogOut
2. Once you Logout the menu, click the MENU again. You should see the Login Screen.
The Login Pattern window (below picture Left) or the Login Window. (Pic Right)
3. If the Login Pattern window is pop up, please don’t log in. Instead, click the Switch User at the bottom. If you already see the Login Window, please go to step 4.

4. (Important) When you see the Login window, move the mouse cursor to the bottom left corner. Double click (Left Click) on the edge corner. It should pop the Restore default password window. If the window is not pop up, cancel the window and repeat the step 3-4 until the restore window shows.

This is the “Restore default password” window looks like.

How to get the Secure Code?
You can contact/email the LTS Call Center.
Once you get the code, Take note of the system date.
You must use the secured code that corresponds with that system date.
For example, the format of the date; the translation is: Year Month Day 2018 09 26

Type the secured code that corresponds with the system date on your recorder as indicated in the picture below. Note: Try New code first, if doesn’t work, try others.


Then, it should popup either Create New Password or restore to the default password (12345) for before the year 2015 model.
The create New Password window
The password must contain 8 to 16 characters, combining numbers, lowercase letters, uppercase letters, and special characters.
At least two types of the above-mentioned characters are required to activate the device.
The new password can not contain “admin” keyword)
The system will check the password strength; Minimal 1 bar at least.

UI 4.0 – Reset Login Password
The 4.0 interface MENU blue banner is locate on the top of the screen.

Click the icon to Power Off > Log Out, then Log On again.

(If you have the Draw Pattern window popup, go to the pattern bottom.
Select Switch To the User Window.)
Click Forgot Password.

Choose Verify by Secret Question to Answer that you defined it before.

Or, select GUID (aka USB key file) / Verify by Reserved Email (if available).
If you forgot or haven’t any there, then you must use PC (IP portal) to reset the password.
Summary
To ensure the highest level of protection, LTS has launched a new login procedure
that requires users to create a new password for the admin account upon the first login to
all devices. The password must contain 8 to 16 characters, combining numbers,
lowercase letters, uppercase letters, and special characters.
At least two types of the above-mentioned characters are required to activate the device.
The system will check the password strength; “Risky” passwords will not be accepted.

For the latest DVR/NVR/IPC firmware.
The password can not contains the User Name inside.
(Unbind PTCloud) – How to Unbind the PTCloud number?
Hello, there is a hold on all PT Cloud Unbinding Requests.
1 – If your DVR/NVR is running 4.0+ Firmware, and you have a mouse and a monitor connected directly to the DVR/NVR, go to the DVR/NVR, and go to the PT Cloud Settings (On some Units it is called Platform Access instead of PT Cloud) if there is an “Unbind” Button, click that button, and it should be able to unbind the device from the account.

if there is no “Unbind” Button, then try this other way
2 – Using a Mobile Phone or Tablet, first connect the Mobile Phone or Tablet to the same local network as the DVR/NVR, then using the LTS Connect Mobile APP, Scan the QR Code like you would normally to add a device, the APP will of course tell you that the device is already bound to an account, but there will be an “Unbind Device” Button on the APP towards the bottom of the page. Select that button, and give the APP some time to process the command.
Note – Not all DVR/NVR with 4.0+ firmware will have the “Unbind” Buttons on the Local Monitor PT Cloud / Platform Access Settings
Note – When using the “Unbind Device” Button in the LTS Connect Mobile APP, the Mobile Phone / Tablet MUST be on the same local network as the DVR/NVR
Note – DVR/NVR with 3.0- firmware will NOT have the “Unbind” Buttons on the Local Monitor PT Cloud / Platform Access Settings.


Add Comment