LaView NVR Setup and User Guide, At LaView, we believe security is for everyone. The comfort of knowing that your home or business is secure 24/7 is essential.
From small apartments to large-scale businesses, our DIY security solutions streamline your setup and provide high quality
surveillance day and night. Let LaView enhance your lifestyle so you can work and travel without losing visual contact with your property.
How to connect a LaView Saturn Series IP Camera to a Non-Saturn Series NVR

5a. If you are connecting the camera to the NVR PoE port, set up the Target IP to 192.168.254.xxx (xxx being a random number from 2-254), and Gateway to 192.168.254.1, Subnet Mask 255.255.255.0. Then unplug the camera from the PoE switch or Router and connect it to the NVR using Cat5e cable.
5b. If you are connecting the camera via LAN, use DHCP or set up the IP address to your network range. For example: Target IP 192.168.0.217, Subnet 255.255.255.0, Gateway 192.168.0.1
6. Go the NVR Menu => Camera => Camera.
7. Click on the channel which the camera is connected to (ie if the camera is connected to port 3 on the back of the NVR, click on channel 3). If you are connecting the camera via LAN, Click on any unused channel.

8. Change ‘Plug and Play’ to ‘Manual’ and enter the camera IP address (192.168.254.xxx or 192.168.0.217 as in previous example)
9. Change protocol to ONVIF and Management port is 80
10. Enter user name and password you set up when you activated the camera in step 3.
LaView NVR Setup and User Guide
Read Also : LongPlus Camera User Guide
How to reset LaView Saturn IP Camera

3. Press and hold the reset button for at least 5 seconds until the camera restarts, and then the camera will be restored to factory default settings.
What features are LaView Saturn Series Camera compatible with LaView (LV-N95, LV-N96, LV-N98, LV-N99) Series NVR?
LaView Saturn Series IP Cameras have many great features designed to work with LaView Saturn Series NVR. If you already have a LaView NVR and wish to add a LaView Saturn IP Camera, you can do so using this instruction. However, we recommend using LaView Saturn Series IP Cameras with a LaView Saturn Series NVR for best performance.
The following features of LaView Saturn IP Camera are compatible with LaView Series NVR:
The following features may NOT be compatible
What should I do if I connect a LaView Saturn Camera to LV-N96, LV-N95, LV-N98 series NVR but only get 720P maximum resolution in main stream?
If you only get 720p in mainstream, it means the IP camera is set to H.265. Please use the following instruction to switch the camera to H.264 compression.

The system worked seamlessly until last week when it suddenly shut off and now won’t come back on
Would suggestion you follow the instruction below for troubleshooting,

Please contact our support team for further support if it does not help.
NVR is showing offline on Platform Access menu
In this case, please check the connection between the router and the NVR. Unplug and plug the ethernet cable to make sure the connection is solid.
Then go to the NVR system, enable ‘DHCP’, “Obtain DNS Server Address” and ‘Platform Access’, disable ‘DDNS’ and check if the status of the NVR changes from “Offline” to “Online”. Please see the pictures attached as a reference.


If it doesn’t work, please try to reboot the system to see if the issue can be resolved.
How to add Wi-Fi Cam (One PT ) to your NVR
1. Make sure One PT camera and the NVR are well connected to the same LAN.
2. Enter the camera management menu of NVR, select an unoccupied channel, and click the “Edit” icon to add the camera manually.

3. Make sure the adding method is manual, select the ONVIF protocol, enter the correct IPv4 Address and password of the camera.
(Please click the link below, download the IP Portal software to your PC/laptop. Then open it to locate the IP Address and the management port of your camera.)
http://dl.ltsecurityinc.com/software/Platinum%20IP%20Portal.zip
(Kindly note that the One PT Cam password is the same as the verification code shown on the silver sticker at the bottom of the camera.)


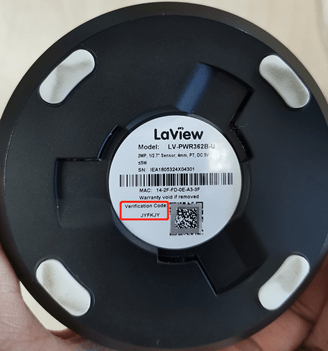
4. Click ‘Ok’ to save the settings and then you will be able to view the One PT camera on
your NVR.
Password Reset via XML files
Please find a 12V power adapter to power up your camera. And directly connect this camera to the router with an Ethernet cable if you need to reset the password via XML files.
Please power on the device (NVR/DVR/cameras) and connect it to the router via an ethernet cable first.
Then find the attachment and follow the instructions to export the XML file and send it to us. We will help to generate a key file and send it back to you to reset the password.
Kindly pay attention to the following when you export the file.
1. BOTH THE EXPORTED AND IMPORTED XML FILE IS VALID FOR ONLY 24 HOURS.
2. MAKE SURE THE DEVICE STAYS POWER ON AND ONLINE AFTER EXPORTING THE FILE.
If you have any questions about the steps, feel free to contact us for further assistance
Password Reset by Secure Code
Please refer to the steps as per below to reset the password.
1. Click on the Menu button on the top left.
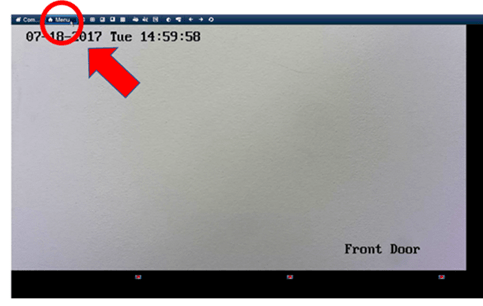
2. Click two times(2X) on the bottom left. Use the left button on the mouse for this.
(If you have a pattern click “Forgot My Pattern” on the bottom left of that screen to get to the login screen)
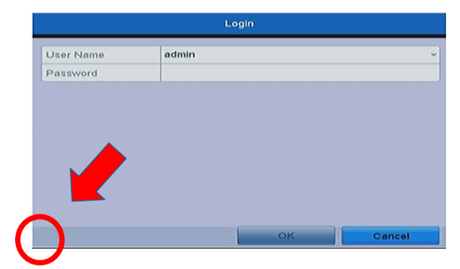
3. Send us the screenshot of the Serial No. and the date shown on monitor screen for a secure code.
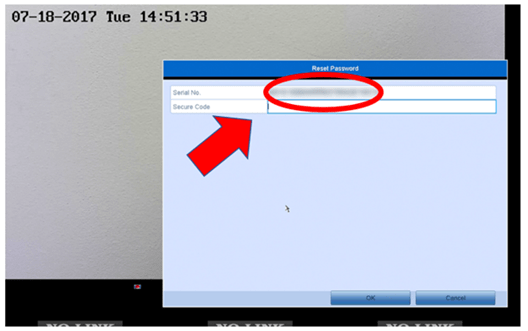
4. Create and confirm the new password, must be 8-16 characters only.
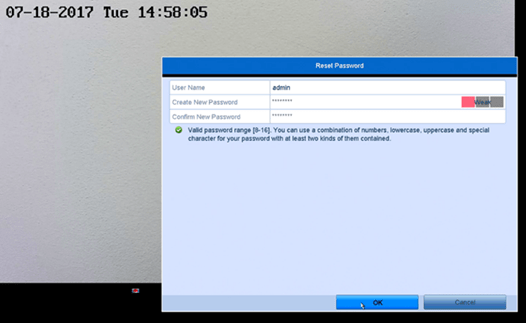
Please refer to the attachments or simply click the link below to see the steps for a password reset.
If you need further support with the steps, please reply to this email and we will be glad to assist you further.
Password Reset by Secure Code
Please refer to the steps as per below to reset the password.
1. Click on the Menu button on the top left.
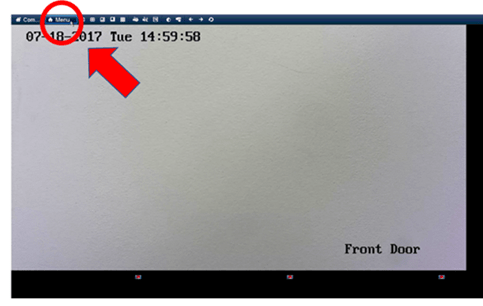
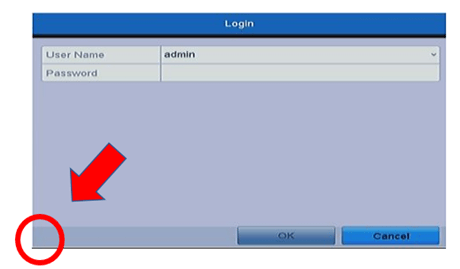
2. Click two times(2X) on the bottom left. Use the left button on the mouse for this.
(If you have a pattern click “Forgot My Pattern” on the bottom left of that screen to get to the login screen)
3. Send us the screenshot of the Serial No. and the date shown on monitor screen for a secure code.
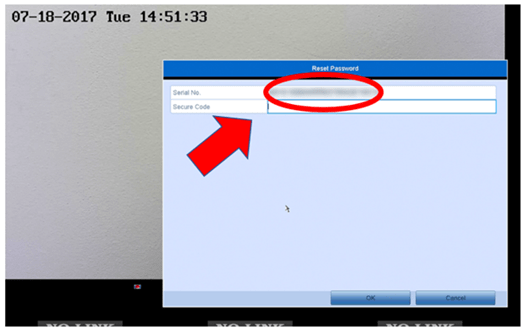
4. Create and confirm the new password, must be 8-16 characters only.
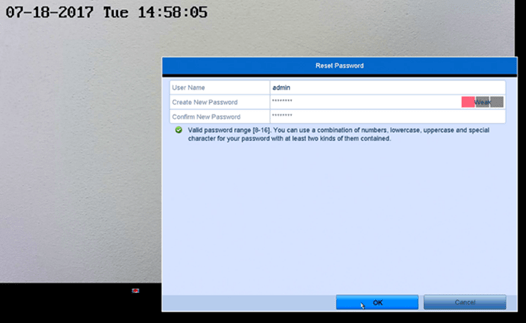
Please refer to the attachments or simply click the link below to see the steps for a password reset.
If you need further support with the steps, please reply to this email and we will be glad to assist you further.
Push Notification
If you would like to receive push notifications on your phone, please
5. allow the app to send you notifications on your phone settings
Hope it works for you.
Setup Email Notification
Please refer to the instructions to set up the email notifications. Here I will take the Outlook account as an example. (Sorry that Gmail is not supported anymore, please use other email addresses to set it up.)
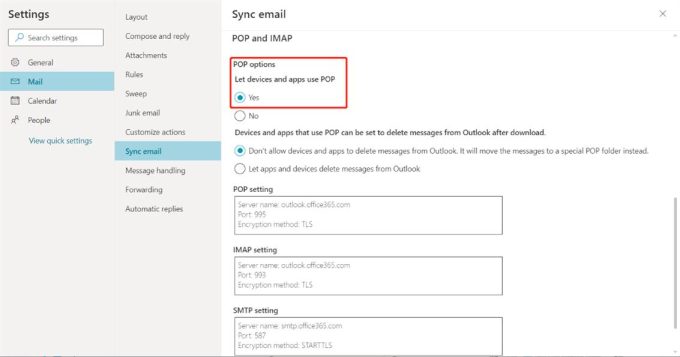
First, please go to the Outlook mailbox settings and enable POP option.
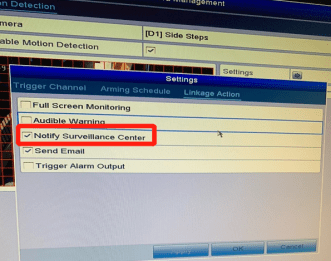
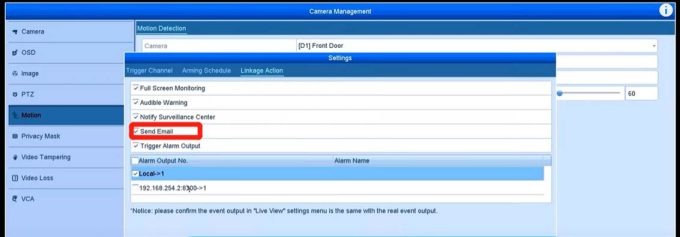
Secondly, please go to your camera management settings -> tap into ‘Settings’ -> find ‘Linakge Action’ to enable ‘Send Email’ for each of your camera.
Thirdly, please go to your system menu -> find ‘Configuration’ -> find ‘Network’ -> click the ‘Email’ option and enter the email information:
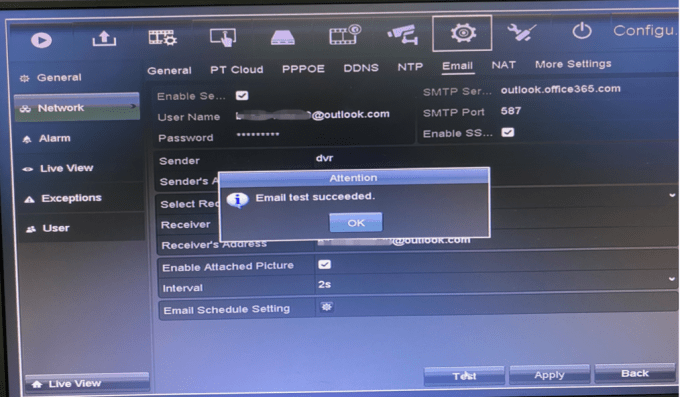
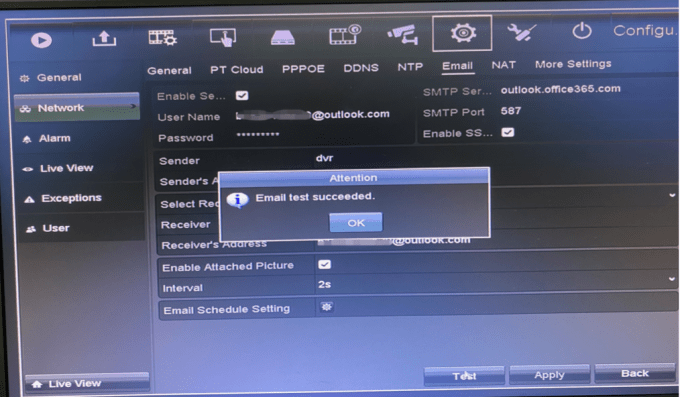
After filling out the email information on this page, please tap the ‘Test’ icon to test if the system can send an email to your email. If it is set successfully, the system will show ‘Email test succeeded’ message as the following picture shown.
If you fail to set it up, the system will say ‘Failed to send test email’.
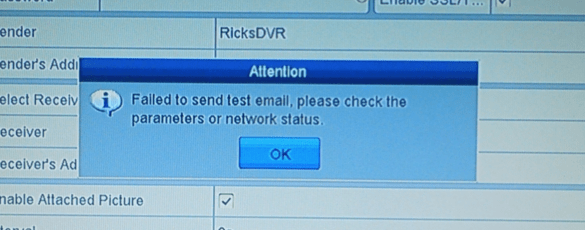
If you do meet this situation, please take a screenshot of your email settings and send it to LaView Support Team, so that we can further check your specific problem.
You can also refer to the video for a better understanding. (Set up email notification: plz skip to 5:45)
Set up DDNS
You may follow the steps below to enable the DDNS feature,
1.Log in to http://laviewddns.com/ and set up an account
2.In the NVR interface, enter the correct account and setting in DDNS menu
3.In the router menu, assign Port 80, Port 8000 and Port 8554 to the IP address of the system
4.Go to www.canyouseeme.org to ensure the ports are opened
Feel free to email the LaView Suppor Team if you have further questions.
Set up PC viewing by PT Cloud
If you need to remotely view your system when you are not under the same Wi-Fi, please try to follow the steps below to set up the P2P connection.
Before adding your system to the PC software, please make sure your system is connected to the router(network) and is showing ‘Online’ status. Please go to your system menu -> Configuration -> Network -> PT Cloud/Platform Access to double-check your system’s online status.
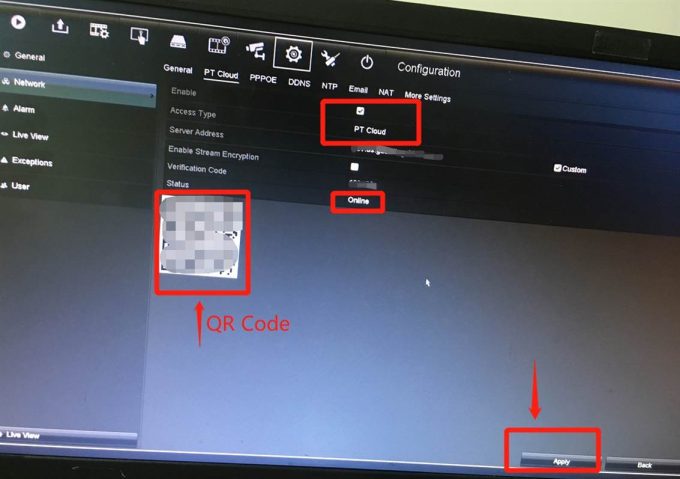
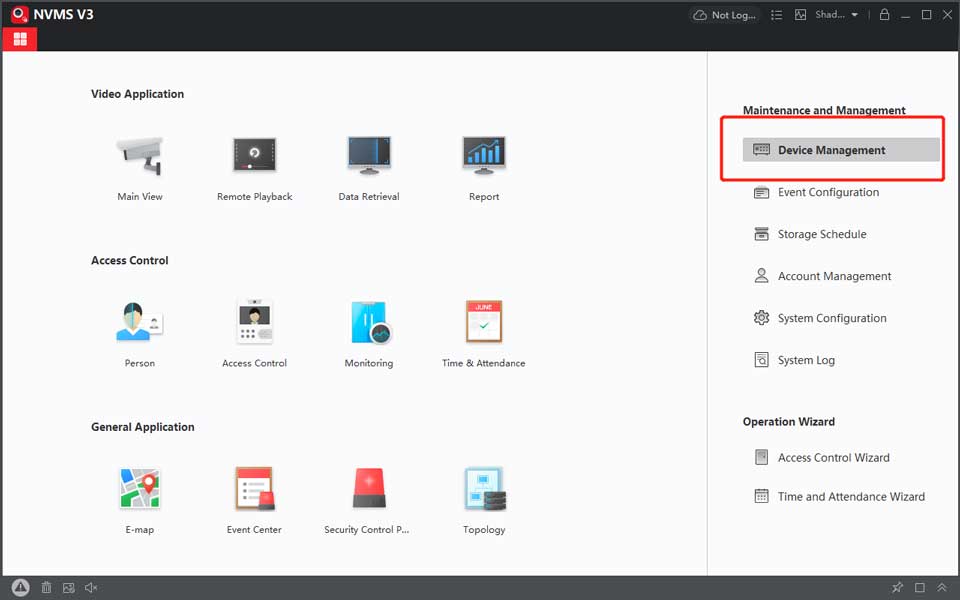
Here I will take my NVMS V3 as an example.
1. Go to NVMS V3, go to ‘Maintenance and Management.
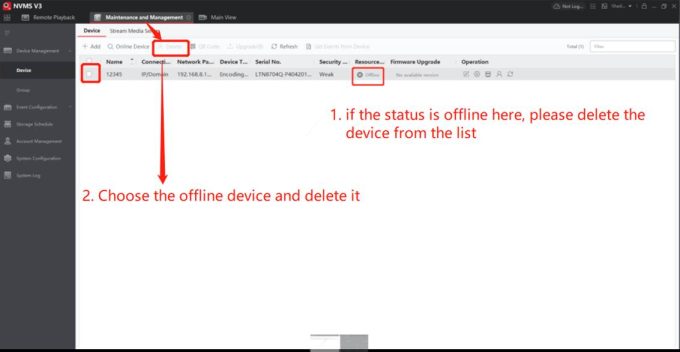
2. Click ‘Add’ here.

3. Choose ‘PT COULD’ here.
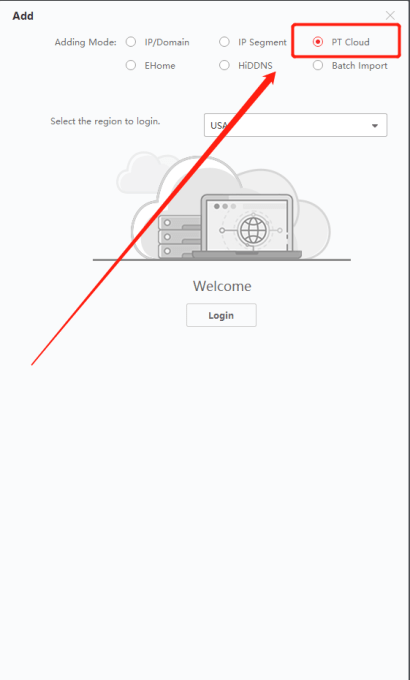
4. Log in to the LaView Connect app. Go to the ‘More’-> ‘Account Management’. Note down the ‘Username'(which belongs to your LaView P2P account) and ‘Country/Region’ information.
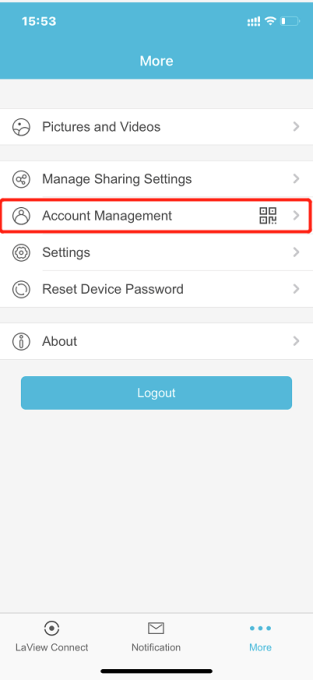
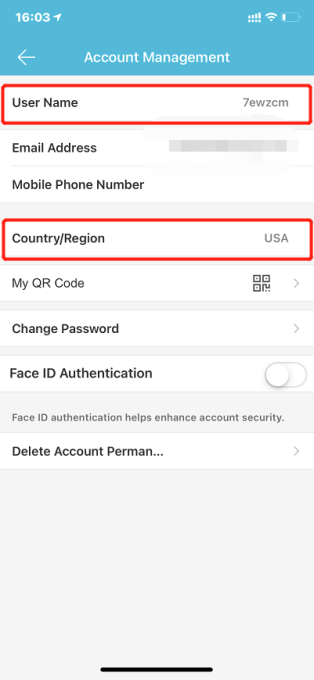
5. Get back the Client Software.
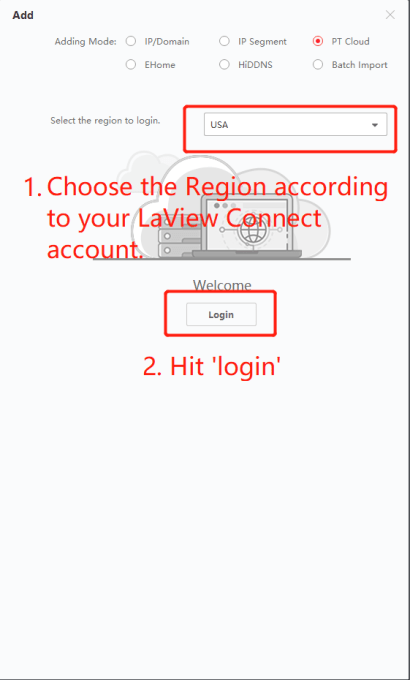
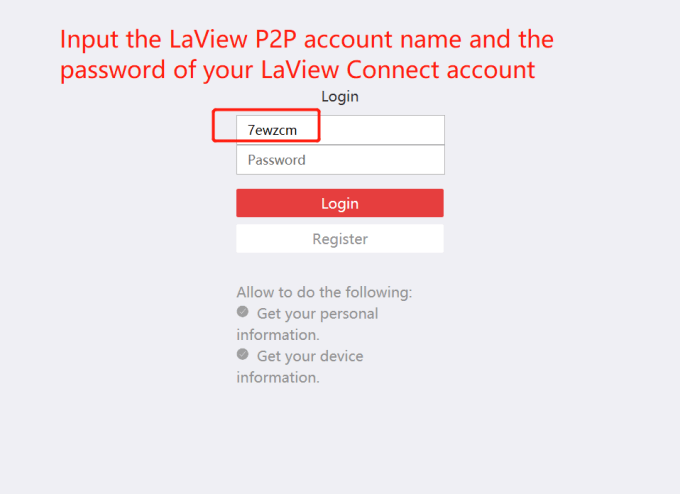
6. After logging in to the PT cloud account, please tap ‘Online’ and search for and choose the online device you would like to add.
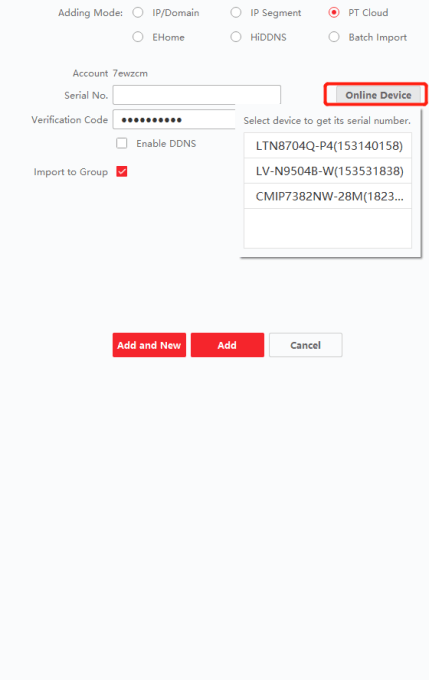
7. Input the verification code set in ‘Platform Access’ in NVR and tap the “Add” icon.
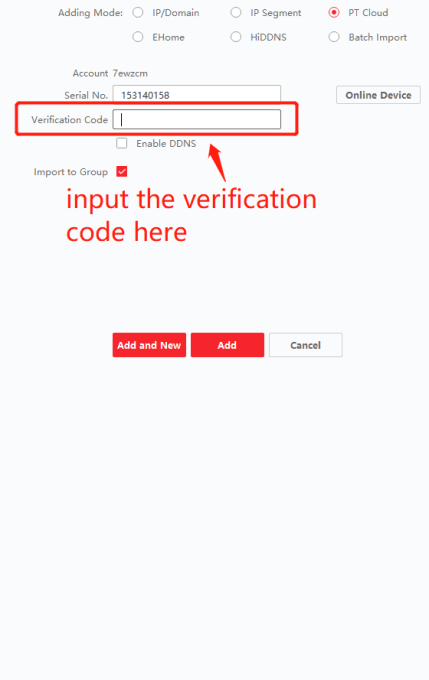
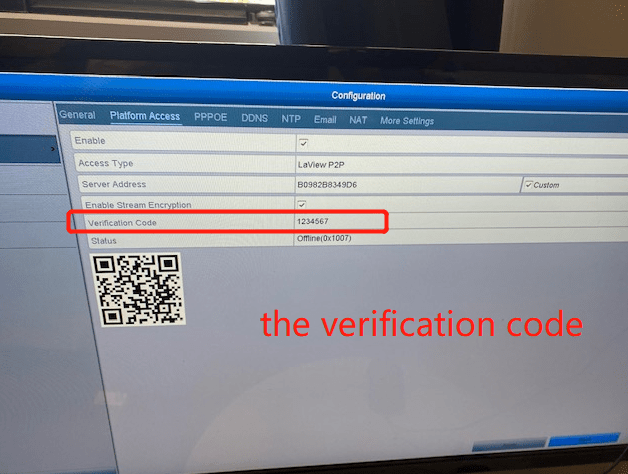
8. Then you are good to go now.
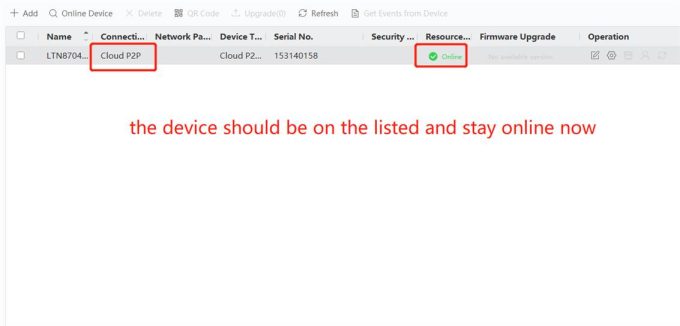
9. Go to ‘Main View’ on the Client Software, you are also required to input the same verification code to watch the cameras. Please input the one as #7.
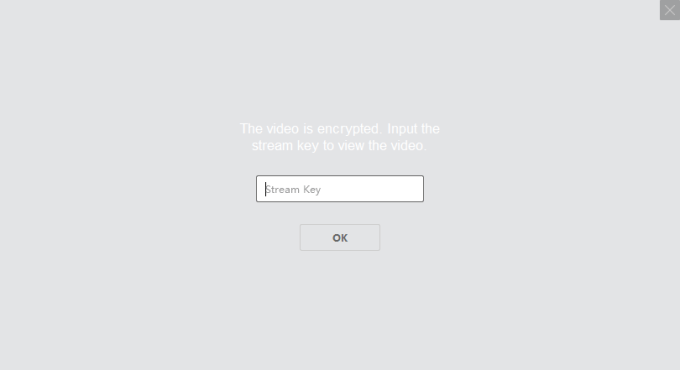
Hope the above works and let the support team know with any concerns.
Set up PC viewing by IP address
Please download the PC software NVMS V3 or NVMS 7000 on your laptop to set up PC viewing. Kindly find the tools at this link: http://www.ltsecurityinc.com/downloads
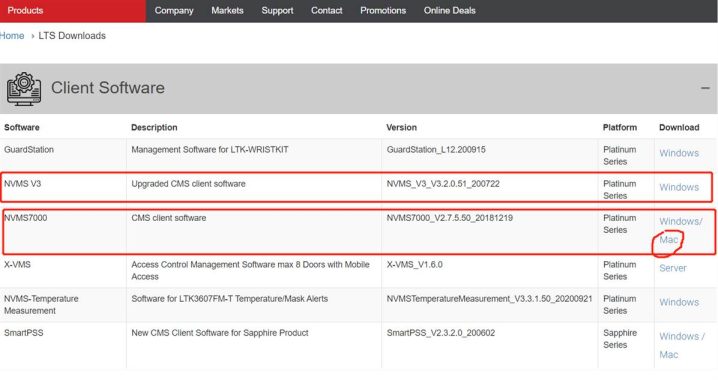
Here are more instructions about the NVMS V3.
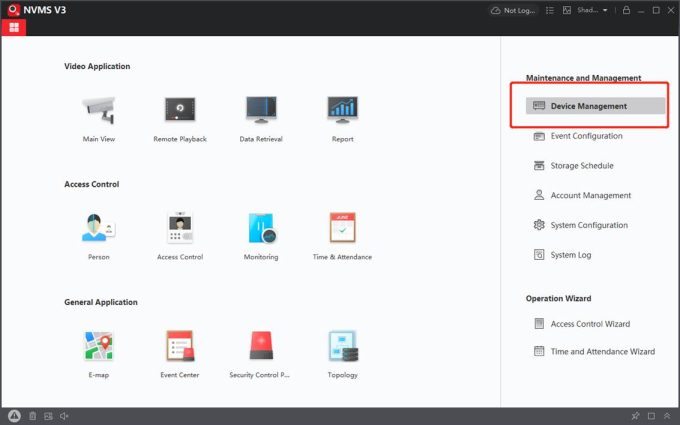
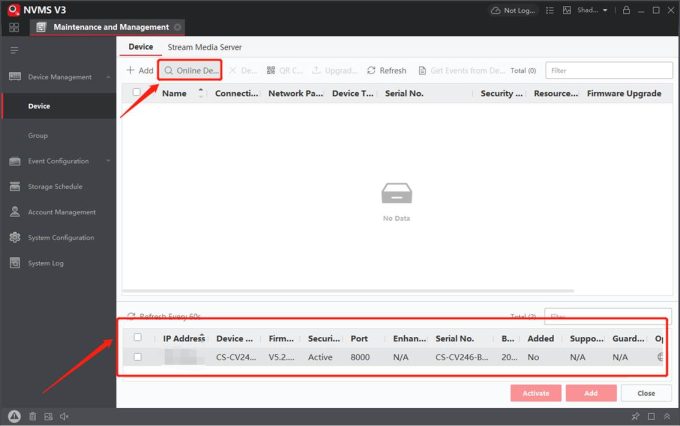
In the example, NVMS V3 will automatically detect the online device so we are adding the device with its IP address. In this way, the system and the computer will be requested to connect to the same local network so that the software can auto-detect the online system.
1. Please go to ‘Device Management.
2. Please go to ‘Online device’ and your system will be found automatically.
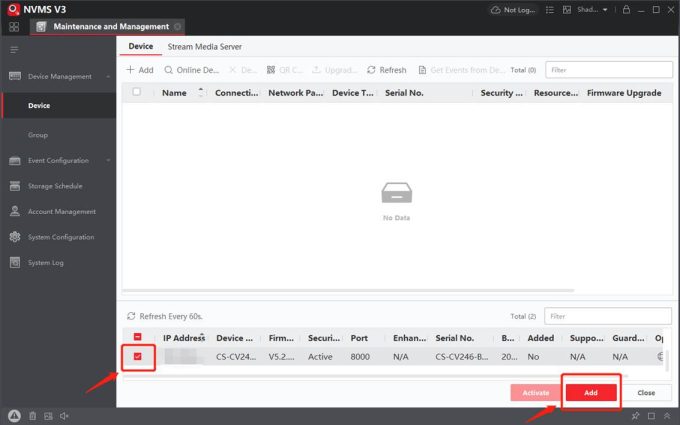
3. Please choose your system from the online device and click on ‘Add’.
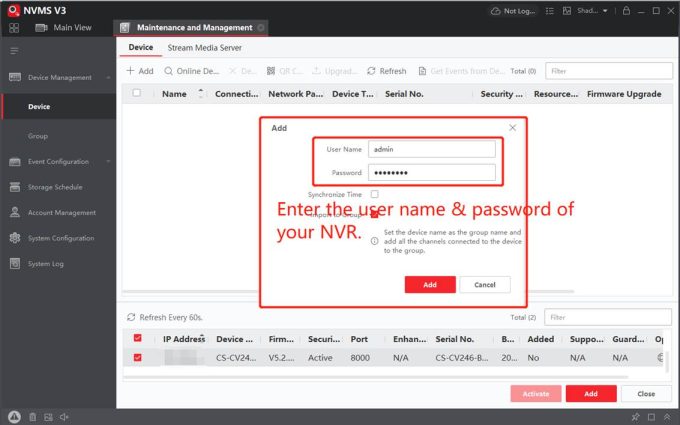
4. Please enter the admin name and the admin password of your system in the box popping out.
5. Your system should be added and please go to ‘Main View’ on the home page.
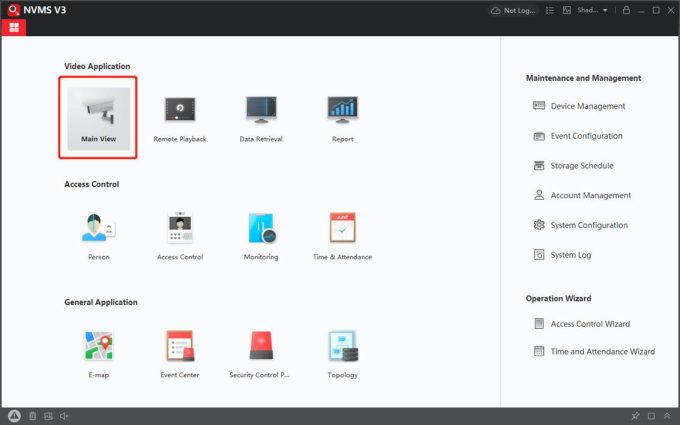
Please feel free to contact our support team if you need further help.
No video on monitor
Will need to confirm the resolution of the camera first. Kindly note that the resolution of the monitor should be higher than the camera’s. Otherwise, the monitor will go black. Please get in touch with our LaView Support Team and provide the model number of your camera as well as your system if you do not know the system resolution.
If the monitor and system work fine before but quit working suddenly, please change the HDMI/VGA cable to check this issue.
If you have another monitor, please also exchange it to see if it can work. If necessary, you can also try to access your system on your computer to double-check.
As for PC viewing, please download the PC software NVMS V3 or NVMS 7000 to your computer/laptop to get access. (Kindly find them from this link: http://www.ltsecurityinc.com/downloads) NVMS V3 tool is the latest version. NVMS 7000 can support the Mac system.
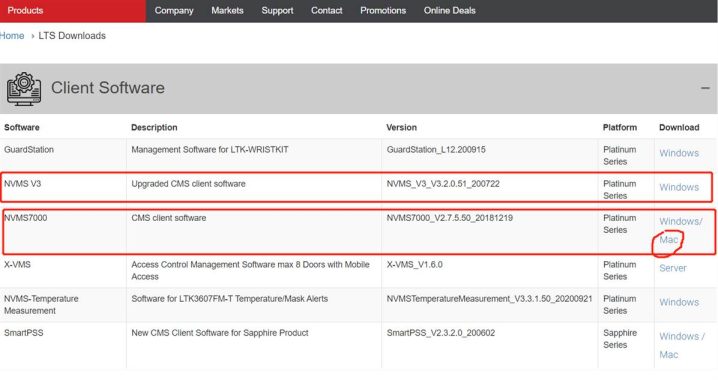
Please contact our support team if the troubleshooting does not work.
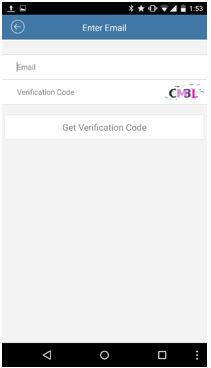
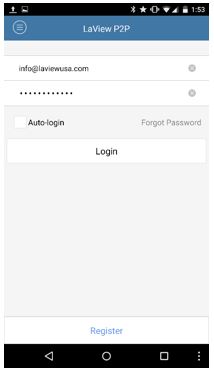
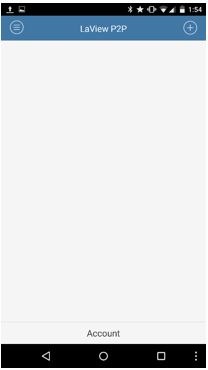
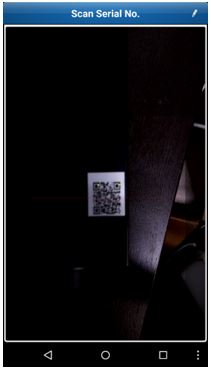
How do I connect my NVR to my Phone?
Please follow these steps to setup your mobile device. You can watch the YouTube videos and follow along or follow the instructions bellow.
https://www.youtube.com/watch?v=zshaTac0ka8
Android:
https://www.youtube.com/watch?v=G1DtkrYLIas
LaView NET app:

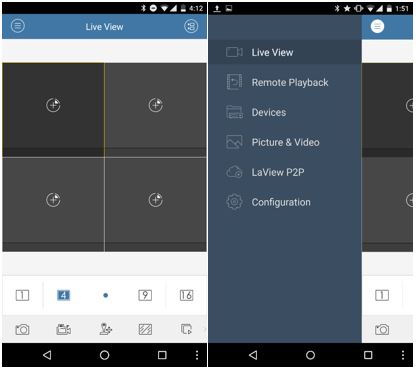
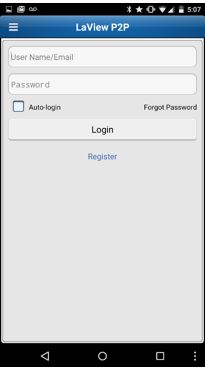
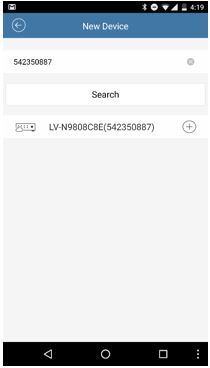
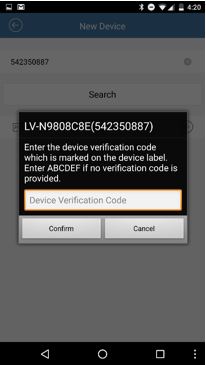
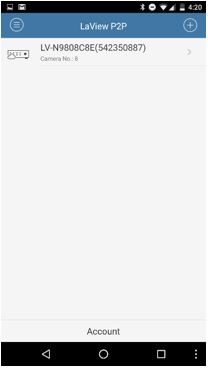
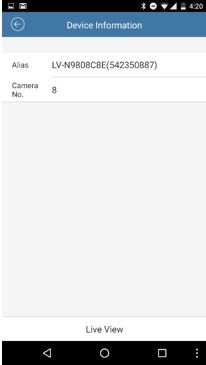
*If using 4G/LTE with bad signal, you may not obtain a picture. Attempt using a strong signal.
What is an NVR?
An NVR, or “network video recorder” is a central unit that processes, records, and manages footage recorded by your surveillance cameras. An NVR recorder allows you to review and save footage, set up a recording schedule, and manage your surveillance.
Are Your Surveillance Camera Systems Hard to Set Up?
No. We have a full library of helpful videos and/or step-by-step directions for the components you purchase. Find the best surveillance camera system here, and your DIY experience will be smoother and easier than you can imagine.
Are There Any Front Door Peephole Cameras with Remote Viewing on My Cell Phone?
Definitely. We offer a front door peephole camera with remote viewing to any mobile device, fully-customizable motion detection, IR night vision, and full HD resolution.
What are the Advantages of Installing a Wifi Security Camera System?
A wifi security camera system is significantly easier to install than a traditional system, because there is no need to run special wires to each wifi camera. This not only helps the day of installation, but also allows clients to position cameras in places they might not otherwise be able to place them.
I tried to change the name of my camera, but I’m getting “Camera Does not support this function”.
It is possible that there are no cameras connected to that specific channel or the camera has lost connectivity. If you are using a third-party camera it is possible the ONVIF protocol supported by camera is outdated which does not support OSD configuration.
Is it possible to connect a third-party camera to a LaView NVR, or a LaView Camera to a third-party NVR?
Yes, if the third-party devices support the ONVIF protocol and you are using the correct setup for the specific camera.
I’m having issues connecting my NVR to my phone
Possible Fixes:
1.Please go to Menu-Configuration-Network and under the General tab make sure enable DHCP is selected, if it is not enabled then select enable and apply. If you had to enable it, restart the NVR and try the P2P setup again.
2.If you are still having issues, make sure DDNS is NOT enabled(unchecked). If DDNS is checked, uncheck it and apply then go back to Platform Access and disable P2P and apply. Once both are disabled, do a power cycle and reboot the unit. After the unit restarts enable P2P again, and do another power cycle.
3.Go to Extranet Access, Platform Access or DDNS and make sure LaView P2P is selected then apply, also make sure “Enable Stream Encryption” is disabled.
4. If none of these work, then it could be a network issue. Try to restart your modem/router by unplugging it for about 45 seconds. Plug it back in and restart the NVR, then try to reconnect your system to the P2P account.
How Do I find my system’s IP address?
To find your system’s IP address go to Main Menu>Maintenance>System Info>Network. The IPv4 Address at the top is your local IP. If your IP address is 0.0.0.0 or 192.0.0.64, this means your system is offline. There are a few causes from this, but usually, it’s a bad ethernet cable or the cable is not plugged in properly to either the DVR or Router. If those are checked to be correct, try restarting your router by unplugging it for a minute and restarting the DVR.
Can I Access a Feed from My Wifi Camera on My Cell Phone?
Yes. View your recordings or live footage anytime, anywhere! You can even and receive mobile push notifications. Stay connected at all times to your wifi camera system by simply downloading the free LaView Connect app, and enjoy your new window into your home.
Which Surveillance Camera Resolution is Best for Me?
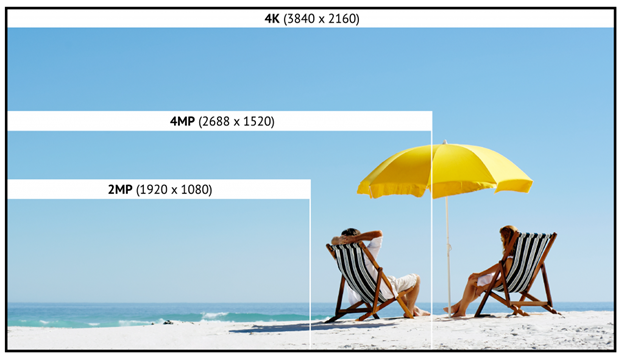
The higher the resolution the more details you can capture in your footage. As this graphic shows, there can be noteworthy differences between a 1080p camera system, a 4MP camera security system, and a 4k security camera system. The only disadvantage to higher resolution cameras is that they consume more memory. High resolution cameras function best with motions detection cameras or larger hard drives. Many clients mix and match cameras for different applications. Feel free to call us at 626-898-4988 to discuss the best options for your specific situation.




Add Comment