Applies to: All WiFi NVRs
The following steps describe how to upgrade firmware for Reolink cameras/WiFi NVRs via Reolink WiFi NVR.
Note: Please make sure that you have already downloaded the firmware (choose the correct model and version according to your devices) from Reolink Download Center before upgrading.
Step 1. Unzip the firmware file (.pak file) on your PC and transfer it to a USB, then insert the USB to the NVR USB port.
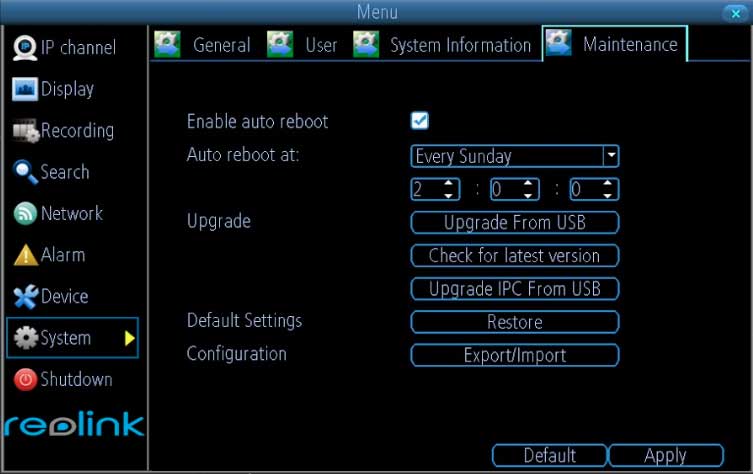
Step 2. Log in to your Reolink WiFi NVR on an NVR monitor, then go to Device Settings -> System –> Maintenance page.

Step 3. Choose the correct firmware file and start to upgrade.
- If you only want to upgrade the firmware for the NVR, you may click the Upgrade From Local and select the correct firmware file, then tap on Upgrade button.
- If you need to upgrade the firmware for cameras which are connected to the WiFi NVR, please choose Upgrade IPC From USB, then select the correct firmware for each channel and click on Upgrade button to start upgrading.
You may also upgrade firmware for Reolink Cameras/WiFi NVRs by using other methods. Check details in:
How to Upgrade Firmware via Reolink Client (New Client)
You may follow the steps below to upgrade firmware for Reolink cameras/NVRs on Reolink new Client.
Note: Please make sure that you have already downloaded the firmware (choose the correct model and version according to your devices) from Reolink Download Center and unzipped the .pak file before upgrading.
Step 1. Launch Reolink Client and log in to your cameras/NVRs, then go to Device Settings –> System -> Maintenance page.
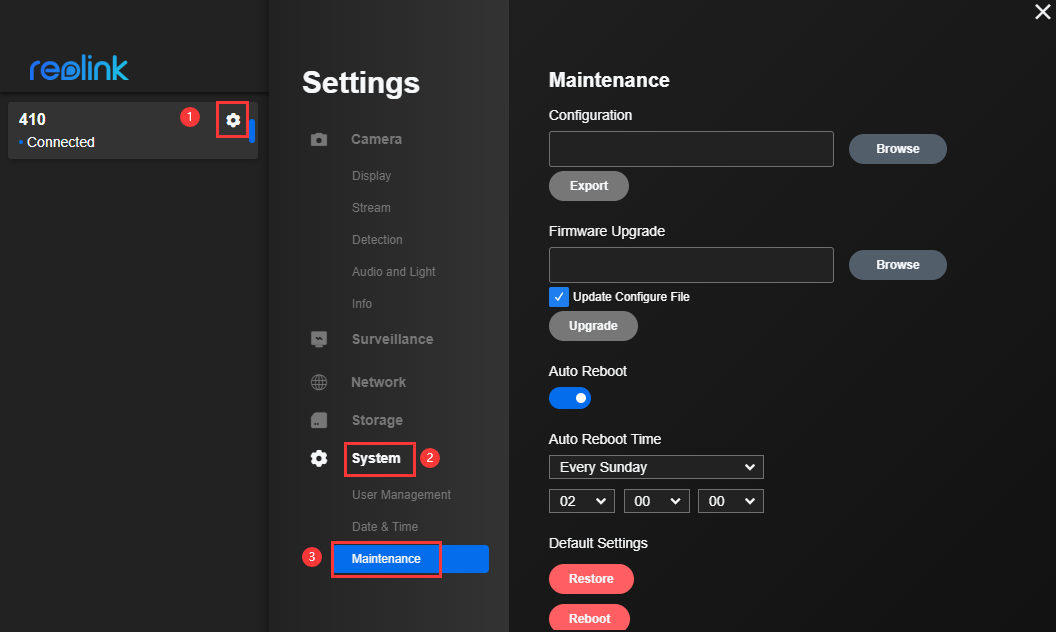
Step 2. Click on the Upgrade button next to Firmware Upgrade, then tap on Browse to select the correct firmware file and click Upgrade to start.
Note: If you don’t want to restore your camera or NVR settings to factory status, please uncheck/ don’t enable the” update configure File” option.

How to Upgrade Firmware via Web Browsers
Here we’ll guide you to upgrade firmware for Reolink cameras/NVRs via a web browser.
Note: Please make sure that you have already downloaded the firmware (choose the correct model and version according to your devices) from Reolink Download Center and unzipped the .pak file before upgrading.
Step 1. Launch Reolink Client in a web browser and log in to your cameras/NVRs, then go to Device Settings -> System -> Maintenance page.

Step 2. Select the correct file and click on Upgrade to update the firmware.
Notes:
- You may check/uncheck the box next to Update Configure File to restore/keep the configurations.
- You may fail to access the Device Settings after the firmware upgrade with the prompt “App detected that firmware of your device has been upgraded, now it will reload this App“. Under that circumstance, you could delete the browser cache and try to access the device settings page again.

Besides web browser, you may also update firmware for Reolink Cameras/NVRs by using other methods. Check details in:
How to Upgrade Firmware via PoE NVRs
Here we’ll guide you to quickly upgrade the firmware for Reolink PoE NVRs or the cameras which are connected to these PoE NVRs.
Step 1. Unzip/extract the firmware file on your PC and transfer the PAK file to a USB, then insert the USB to the NVR USB port.
Step 2. Log in to your Reolink PoE NVR on an NVR monitor, then go to Device Settings -> System –> Maintenance page.

Step 3. Choose the correct firmware file and start to upgrade.
- If you only want to upgrade the firmware for the PoE NVR, you may click the Upgrade From USB and select the correct firmware file, then tap on Upgrade button.
- If you need to upgrade the firmware for cameras that are connected to the PoE NVR, please choose Upgrade IPC From USB, then select the correct firmware for each channel and click on Upgrade button to start upgrading.
Here is a video for your reference to upgrade the firmware for the camera:
Step 4. Check if you want the cameras that are connected to the PoE NVR to restore or not. If you do not want the cameras to restore, please uncheck the “Update Configure File” button.

You may also refer to the following methods to update the firmware for your Reolink products.





I am having trouble with the installation
I sent an e-mail from the communication channel. Can you help?
Can you write your contact number?
I really love you
It was a great sharing
problem not solved thanks