How to Setup Your Uniview Security System
In this guide, we will go through all the steps related to setting up your newly acquired Uniview Security System.
Overview:
-
Access the NVR via a dedicated display.
-
Log in using the default credentials found on the product manual and update the password.
-
Install and pair the EZView app for mobile access anytime, anywhere.
-
Check the timezone and the device clocks for accurate alerts and scheduling.
-
Access the NVR via a browser from another device. Use EZTools to get the IP address.
-
Enable and configure NVR/camera features, alerts, and etc.
Setting up using Direct NVR Access
The NVR interface can be accessed directly by simply connecting the NVR to a display (this can be done with an HDMI or older VGA cable) and to a mouse. Once the display and the mouse is connected and the login screen is displayed, proceed to login. Since this is the first time, we will be using the default username and password (at the time of writing default login and password are admin and 123456) found on the manual that came with the NVR.

Load More :
After logging in, Uniview’s privacy policy will be shown for you to review. Once you have reviewed and accepted, you will immediately gain access to the NVR and cameras connected to it. But, since it is the first time we are logged in and we are still using the default credentials, we will be prompted to change the login information. You will be using the new password for all your future access with the NVR.

Once the password has been changed, a pattern lock will also be prompted (this is optional and can be skipped). After doing so, the Privacy Policy will be displayed for the user to review. The screen that follows the Privacy Policy will let us connect our mobile devices to the NVR. This will grant access to Live View, alerts, and other configurations we may want.

The device QR code will be presented here. Allowing you access to the EZCloud feature. Devices can be added to the cloud manually but it is far easier to just use a link given from the QR code. If you want to pair the NVR with the EZView app, click here to read more about it.
The next step is to set or synchronize the time. This step will ensure that all scheduling configurations you will set and all alerts and alarm information will be accurate and will work based on your local time.

After this, you will be prompted to check the TCP/IP settings, the default settings will work for most people. If you need to specify networking (usually when DHCP is not enabled on other devices on the network), please do so here. You will still be able to alter this later.

Once the time and the password have been configured, you are now ready to enable and disable the features of the NVR.

To access the menu, you can right-click on any part of the screen and then click on Menu. It can also be accessed along with other options by moving your cursor to the bottom left of the screen. This will take you to the SETUP screen where you can enable and customise alerts, features, and other options available to you.

To read about each feature and how to enable and configure them, check out Uniview Setup: Everything You Need To Know.
Setting up using Remote Browser Interface
You can also access the NVR interface through the use of a browser on a device connected to the same network as the NVR. To do this, you will need the IP address of the NVR you wish to login to, and then enter it into the address bar in the browser. The easiest way to find the NVR’s IP address is by checking the “Network” settings tab, followed by the “Basic” tab, then the “TCP/IP” tab. You’ll need the IPv4 Address. In our case its 10.1.1.214 but it will likely be different for you.

Another way to find the IP address of your NVR is with Uniview’s EZTools which can be downloaded here. Once installed on your computer, running the EZtools will automatically show you all connected Uniview devices. The IP address can also be obtained by logging into your router and checking connected devices, using the command prompt (arp -a command and checking for new devices on the private network).
Note: Any browser should work to alter configurations, however using Internet Explorer will be the easiest to access the Live view. (Due to some newer browsers not supporting certain plugins).
From here, we can see the IP address given by our router to the NVR. 192.168.254.192. It will likely be different for you. Clicking on the Remote Web button will open your default browser and take you to the NVR interface.
You can then proceed to login to your Uniview NVR Interface. Since this is the first time, we will be using the default username and password found on the manual that came with the NVR. After logging in, Uniview’s privacy policy will be shown for you to review. Once you have reviewed and accepted, you will immediately gain access to the NVR and cameras connected to it. But, since it is the first time we are logged in and we are still using the default credentials, we will be prompted to change the login information. You will be using the new password for all your future access with the NVR.
Once the password has been updated, you will be greeted by the Live View display. Clicking on any of the cameras found on the left will show you live footage from it. In this case, a single IP camera is connected to the 4-Channel NVR.

From here, you can now click on SETUP to access all configurations and features and set them up to your preference.
To read about each feature and how to enable and configure them, check out Uniview Setup: Everything You Need To Know.
Before we end, we should connect the Uniview NVR to the EZView app for easy and convenient access. To do this, we will need the QR code of the device we want to add to an EZView account.
Navigate to Setup>Network>EZCloud
The device QR code will be presented here. Make sure that the EZCloud feature is enabled and that the device has access to the internet. Click here to read more about it.
EZView App Installation and Device Integration
With the QR code visible, we will need to install the official Uniview app from the playstore. To get EZView you can download and install it here for Android devices and here for iOS.
Android: EZView for Android
iOS: EZView for iOS

Once installed, the EZView app will need permissions to access your device storage to save and view the Live View and playback.

Once granted, the Service Agreement and the Privacy Policy will be presented for the user to review.

After this, you can proceed to create your own EZView account or login if you have an existing one. This is a separate account from the one specified in the NVR. You can choose a different or similar email. The email registered here will be designated as your account for EZView. The email registered on the NVR upon changing the password is for recovery purposes. You will be able to pair multiple devices to the same EZView account and gain live access to all of them.

Once logged in, you will then be taken to the Live View. This screen will not show any cameras at first as we still have not paired any NVR or camera to the EZView account. To add your NVR and cameras, click on the top right Devices icon.

This will take you to a list of all the devices on your account. Since we don’t have one yet, it will either be blank or sometimes, a demo device will be shown. Click on the Add Device (+) button on the top right to add your device.

Ensure that the NVR is connected to the Internet, then choose SCAN for a quick and easy way to pair your smartphone to your NVR.

You can then proceed to scan the QR code found on your NVR or on the display screen where we left off. Once scanned, you may now proceed to configure the device name and other options for your preference.

In this particular situation, I added a Uniview 4-Channel NVR. It is now shown on my devices list along with all the cameras connected to it. I named this NVR as 4CH-NVR. As you can see, the IP Camera attached to this NVR is now available for Live View.
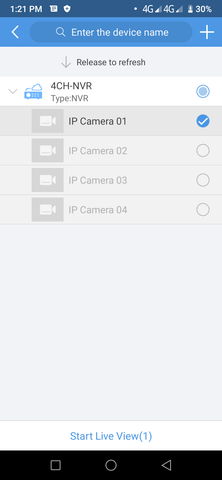
Select the camera by checking the circle and tapping on the Start Live View at the bottom will take me back to the Live View. You will be able to select multiple video feeds from different devices on this screen.

Tapping on the top left icon will allow you to check other features and settings available to you, including alarm notifications and alerts, Playback, recording schedules as well as downloaded snippets of video and screenshots.






Add Comment