How to set up Zosi POE NVR System (with detail user manual), With a single network cable connecting each IP camera to NVR for both power and video transmission, you can get this security system run in no time with simplified PoE installation.
The series NVR is designed specially for security and defence field and is an outstanding surveillance product. It introduces embedded LINUX operating system which is very stable. It introduces standard H.265 mp video compressed format and unique temporal and spatial filtering algorithm which insures the high quality image and low bit rate synchronous audio and video surveillance. It introduces TCP/IP network technology which achieves the strong network data transmission capability and remote control capability. The series NVR can be used individually or online applied as a part of a safety surveillance network. With the professional network video surveillance software it achieves the strong network communication ability and telecommunication ability.
How to set up Zosi POE NVR System
Read Next :
- Zosi NVR Operation – Setup Menu Guide
- Zosi DVR/NVR Firmware Software Tools DL
- How to add an IP camera to a Zosi NVR
The series NVR can be applied in the bank, telecom, electric power system, judicial system, transportation, intelligent housing, factory, storehouse, water conservancy and so on.
Open-package check and cable connections
When you receive the product, please confirm whether it is consistent with the product model you ordered and check carefully whether there is any obvious damage of the product. After opening the casing, check whether the connection between the internal data wire, power wire, fan power wire and so on and the main board are firm .Please protect the labels afifxed to the floor or rear panel , which is very important to our aftersales service work. When you contact our company for after-sales service, we need you to provide the model and serial No. on the label.
1
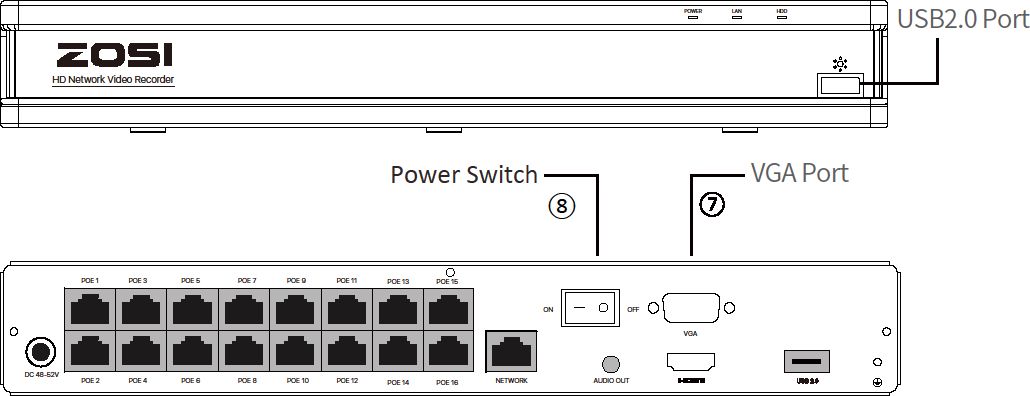
I® I® LAN Port^^ L^-USB2.0 Port
Power Port PoE Interface Audio Output^ L®_ HDMI Port
NOTE: To ensure the device works properly, it is recommended to power on the PoE NVR first for testing before a final installation.
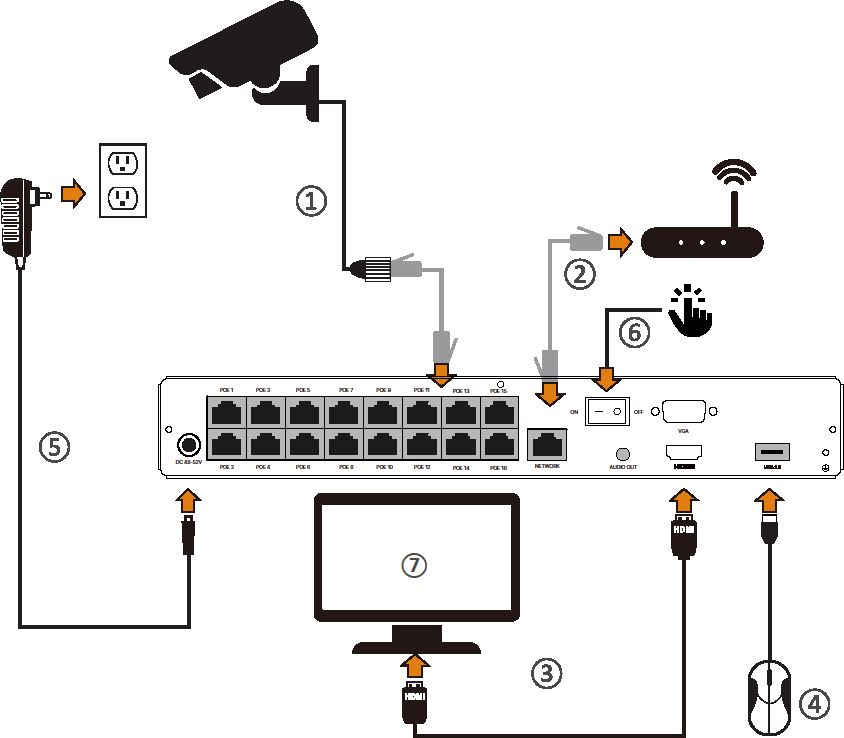
2
@ Connect the Cameras to the PoE NVR with 60ft(18.3m) Ethernet Cable.
@ Connect the PoE NVR to the Router with 3ft(1m) Ethernet Cable.
@ Connect the PoE NVR to the Monitor with VGA or HDMI Cable.
@ Connect the USB Mouse to the USB2.0 Port.
@ Connect the PoE NVR to the Power Outlet.
@ Turn on the power switch and enjoy live view.
@ The monitor will display live view of the camera.
NOTE: To ensure the device works properly, it is recommended to power on the PoE NVR first for testing before a final installation.
Smartphone
Search “ZOSI Smart” in the APP Store or use a browser to scan the QR code below, download and install the app and follow the instructions to register an account.

Zosi Smart

App (IOS/Android)

App video operation link
PC
Download path: Go to https://www.zositech.com/pages/app.
3
Plug the power supply, the power indicator light will illuminate and the video recorder turns on, you will hear a beep at this time. I
After startup, the default setting of the Left Button Right Button
system is multiple-screen output mode and t I
video recording starting up automatically. 1 ^B
Mouse Operation: JH
Left Button:
Double-click a single channel to enter full I
screen and double-click again to exit full screen. \ 1
Right Button:
- Right click to bring up the main menu when the mouse is on the preview interface.
- Navigation Menu: Right click to exit the menu or return to previous menu option.
When the DVR boots up, the user must login and the system provides the corresponding functions with the user purview.
The default user name of the factory equipment is admin, and the default password is blank. You can directly log in to the system when you log in to the system for the first time after starting up.
After entering the preview status , double-click the left mouse button to choose the switch between the windows. The system date, time and channel name are shown in each viewing window. The surveillance video and the alarm status are shown in each window.
| ■ | Green | Manual recording or Trigger recording | ■ | Blue | Timing recording |
| Yellow | Intelligent detection | Network | |||
| recording | disconnection | ||||
4
In preview mode you can right click mouse to get a desktop shortcut menu and right click mouse again to ESC the desktop shortcut menu.
| Single | ► | |
| Multi | ► | |
| * | PT2 | ► |
| Start Scan | ||
| Colour | ||
| E-Zoom | ||
| *- | Audio | |
| IO | Snap | |
| Start Record | ||
| Playback | ► | |
| Intelligent Alarm | ► | |
| * IPC Channel Config | ||
| Û | Main Menu | |
- Single – Select single channel for live viewing
- Multi – Select multi-channel for live viewing
- PTZ: Control the rotation of PTZ camera
- Start Scan – Start/Stop Scan
- Colour – Adjust colour and image settings
- E-Zoom – E-Zoom the preview interface
- Audio – Adjust the camera volume
- Snap – Snap and save the live view images
- Start/stop record
- Playback – Search Video playback and quick playback
- Intelligent Alarm – Set up Human Detection and
Siren-Light Alarm - IPC Channel Configuration – IPC channel
configuration management - Main Menu – Enter the Main Menu
Select a channel for single-screen viewing.
| Single
;; Multi ► |
Channel 1
Channel 2 |
| PTZ ► | Channel 3 |
| Start Scan | Channel 4 |
| * Colour | ‘^4 Channel 5 |
| ,® E-Zoom | Ti Channel 6 |
| 4 Audio | “^4 Channel 7 |
| ÎO Snap | Channel 8 |
| 38 Stop Record | ‘^4 Channel 9 |
| Playback ► | ‘*4 Channel 10 |
| fi Intelligent Alarm ► | ‘^4 Channel 11 |
| T. IPC Channel Config | “^4 Channel 12 |
| A Main Menu | ‘^4 Channel 13 |
| ‘^4 Channel 14 | |
| ‘^4 Channel 15 | |
| ‘^4 Channel 16 |
5
Select the corresponding different multi-screen mode to watch.
| ■ Single * | |
| . . Multi | ■■ Channel 1-4 |
| PTZ » | !! Channel 5-8 |
| Start Scan | !! Channel 9-12 |
| » Colour | Channel 13-16 |
| ® E-Zoom | Channel 1-6 |
| 4 Audio | I!! Channel 7—12 |
| • O’ Snap | ::: Channel 13-16 |
| IÇ Stop Record | Channel 1—6 |
| Playback * | E Channel 7-12 |
| B Intelligent Alarm » | Channel 13—16 |
| IPC Channel Config | Bi Channel 1-8 |
| A Main Menu | “■ Channel 9—16 |
| Hi Channel 1-9 | |
| Channel 10-16
İRİ Channel 1-13 |
|
| »J Channel 14-16 | |
| ii Channel 1—16 |
Control the rotation of the PTZ camera and set the automatic cruise/preset point cruise.

Start Scan means the system will show each live picture in order automatically according to the order of the video devices in the channel grouping. Only when the user selects the channel grouping under the display mode[main menu]>[configuration management]>[live], and it can not show all channels completely under the current preview, this button is available.
6
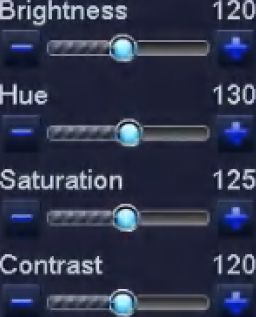
Set image parameters for all channels. The image parameters include: brightness, contrast, saturation and hue.
Channel
Default
Save
E-Zoom for big picture of single channel.
Set startup, turn-off and silent mode of audio for the channel, and adjust the volume ..After select (automatic), it will start up audio of the big picture channel automatically.
| Volume | r’/- — 1 OMute |
| Channel | 1 w □ Auto |
| vz | |
7
Snap a screenshot of the current channel.
After clicking start recording, the system will start full-time recording; after clicking stop recording, the system will stop full-time recording.
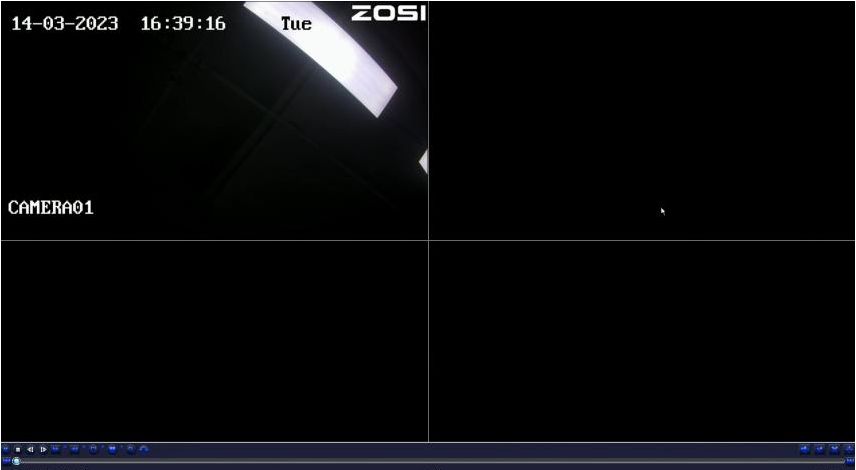
Right click the mouse – Playback – Video Playback/Quick Playback, Video Playback: Playback the video clips via time search or event search. Quick Playback: Quick playback of the first 30 minutes of video.
8
Fast Rewind
Play/Pause Forward Multi-screen display
| – <| |k A A A — | -* ** • |
| 11/25/2014 05:30:00 >>1X | 05:59:59 |
T
Previous Record Next Record
Previous Video: Play the previous video.
Next Video: Play the next video.
Fast forward: You can play the video clips at 1/4 time speed to 16 times speed.
Rewind: You can rewind the video clips at 1 time speed, 8 times speed, 16 times speed, and 32 times speed.
Screen Modes: Single Channel Playback/Multi-channel Playback. Channels without video playback will show a black screen.
Set up Intelligent Alarm and Siren-Light Alarm.
| ‘ Single ► | ||
| :: Mutu » | ||
| ® PTZ ► | ||
| Start Scan | ||
| »» Colour | ||
| ® E-Zoom ♦♦ Audio | ■ | |
| F5 Snap | ||
| ■ Stop Record | ||
| Playback * | ||
| r Intelligent Alarm | f Intelligent Alarm | |
| IRC Channel Config | 1 Siren-Light Alarm | |
| A Main Menu | —I | |
9
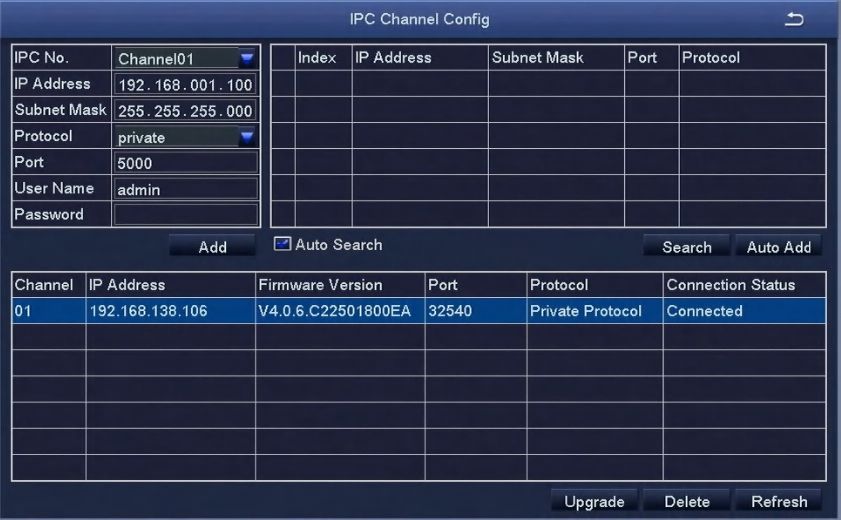
View camera version information, add cameras, upgrade cameras, etc.
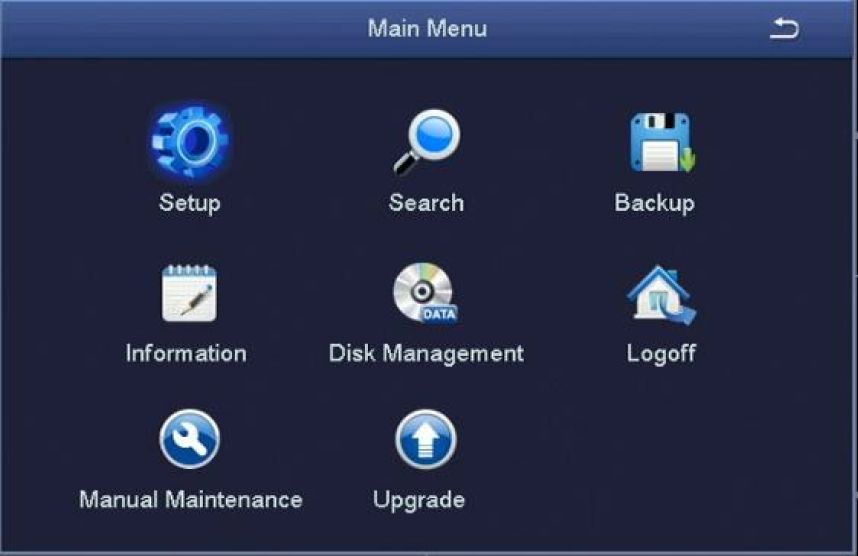
Enter the system main menu interface.
10
| Main menu | Submenu | Function |
| configuration management | Basic configuration | Set the system time, date format, time format, language, the device number, video format, standby time, daylight saving time |
| Live configuration | Set the channel name, color, display mode, privacy mask, etc. | |
| Recording configuration | Start up video recording , set up the video stream, position of channel name, video circulation, snapshot, etc | |
| Recording Plan | Set timer recording, motion alarm recording,period of intelligent recording | |
| Alarm configuration | Set motion detection, video loss, other alarms, intelligent alarms, sound and light alarms, etc. | |
| Network configuration | Set basic network parameters,email | |
| User management | Modify users, change passwords, add users and delete users | |
| PTZ | Set the preset point of the PTZ camera | |
| Advanced configuration | Restore the factory settings, import and export the device parameters,system maintenance | |
| Data retrieval | Time search | Search specified period of time recording , playback the video of this period |
| Event search | Search motion detection, human shape detection, face detection, vehicle detection, playback Videos of this period | |
| Image | Channel screenshots captured by search | |
| Backup | Search for recorded video files, which can be backed up via U disk | |
| View information | System Info | Display the device name, serial number, version, release date |
| Event Info | Inquiry and export of motion detection, video loss, sensor alarm and other events | |
| System log | Search equipment operation log according to time, it can also be exported | |
| Network status | Display network settings and status | |
| Online users | Display the current network users accessing the device |
11
| Hard disk management | Show hard disk’s total space, free space, read and write status and to format. the hard disk |
| After log-off , exit system and log in | After log-off , exit system and log in |
| Manual maintenance | After manual maintenance, the system will automatically restart |
| Upgrade | The system version can be upgraded online |
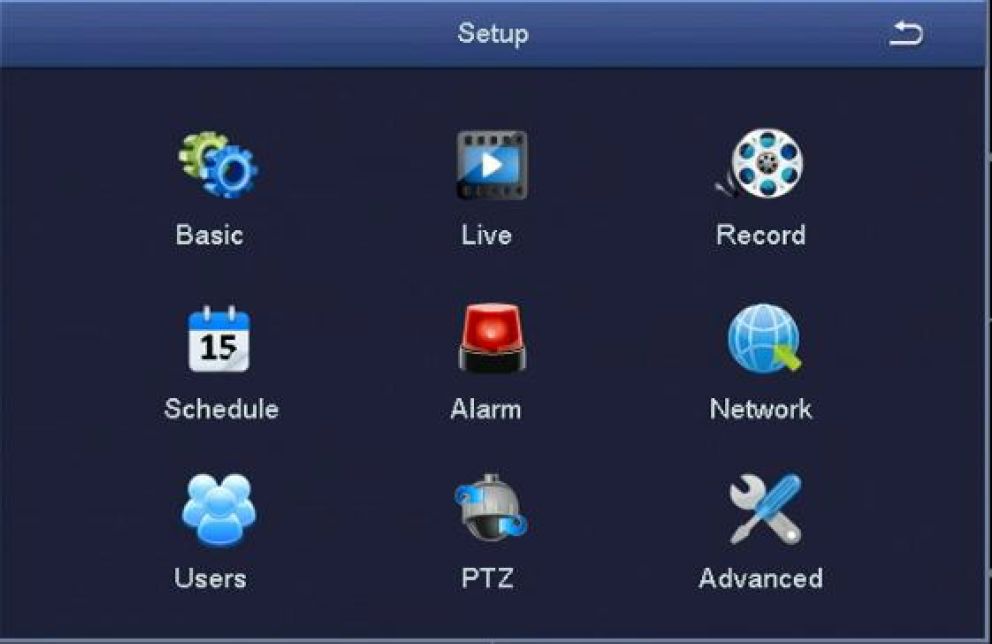
Set every function parameters for the device, including: basic configuration, live configuration, recording configuration, recording plan, alarm configuration, network configuration, user management, PTZ configuration, advanced configuration.
12
Basic configuration includes three sub menus: system, date and time, daylight saving time.
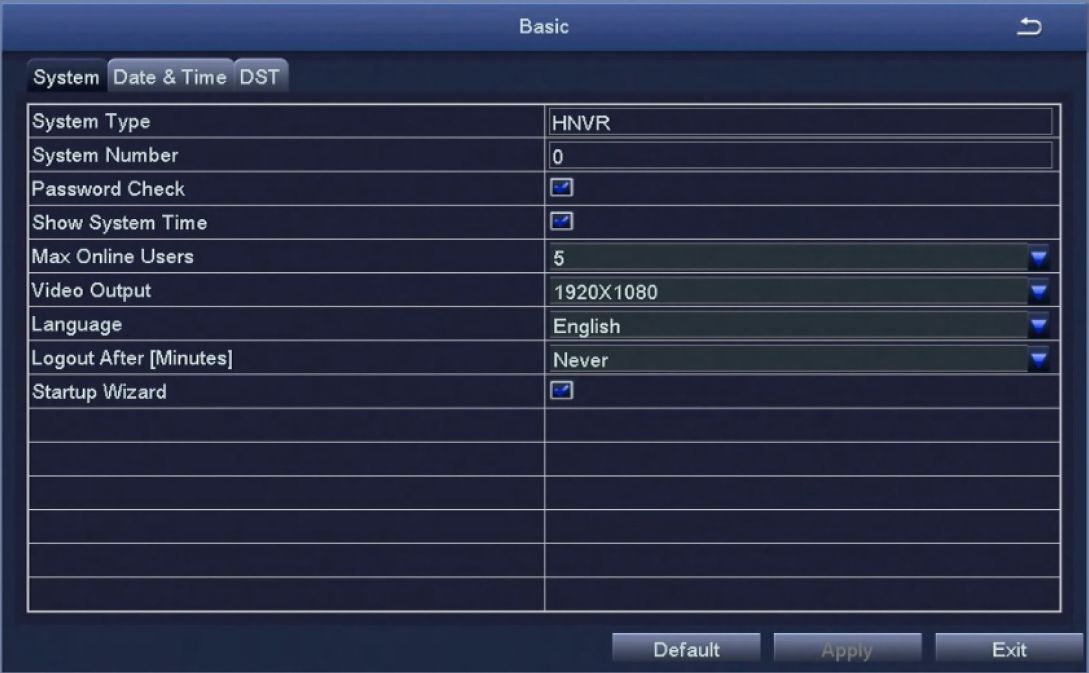
13
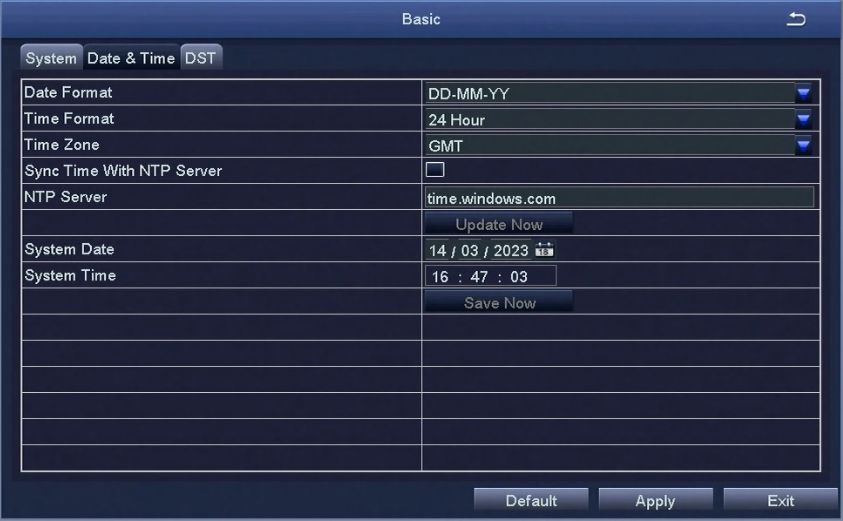
2. Date & Time
In this interface, set the date format, time format, time zone; you can also adjust the system time manually.
Note: the default time zone of the system is GMT.
You can select [Time Synchronization] to correct time. Network time server can be set.
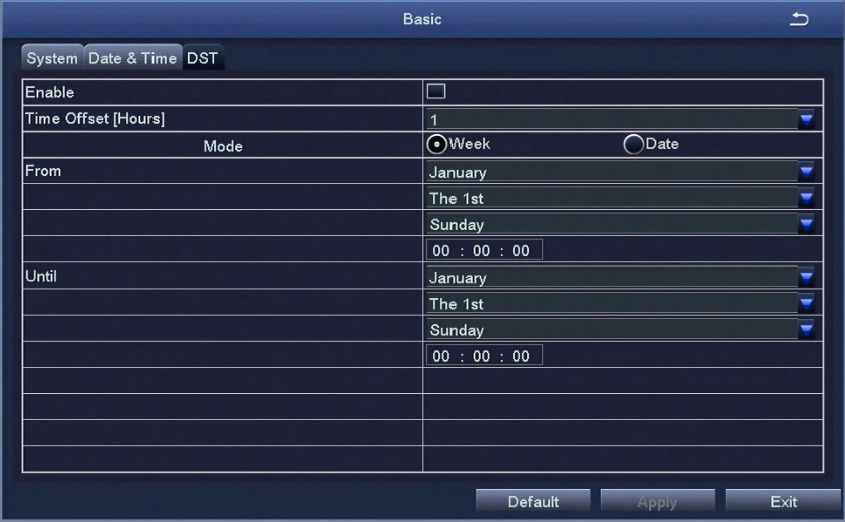
Set the start and end time of daylight saving time by week or date.
14
Live configuration includes three submenu: Live, Main Monitor, Video Blind.
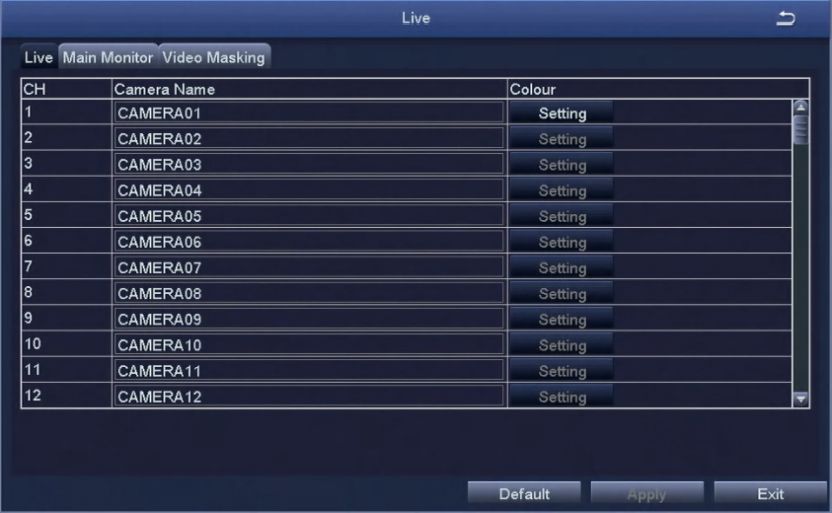
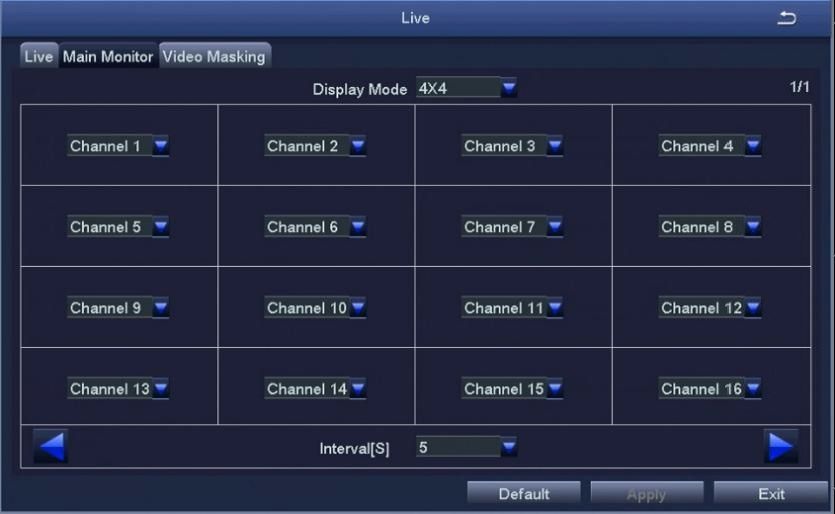
15
3. Video Blind
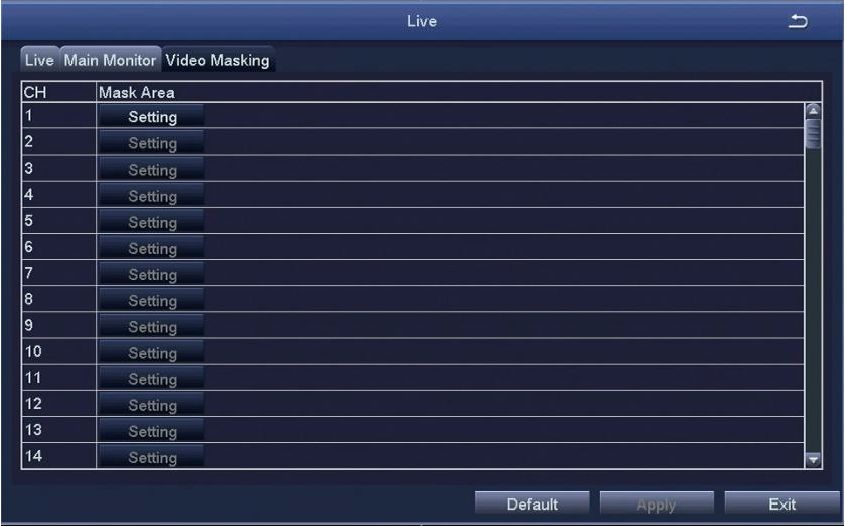
Users can cover up some areas of the live picture, maximum of five areas per channel. [Setting] After entering the live picture , press and hold the left mouse button, drag the mouse to set the blocked area , then click [apply]to save the settings; Double-click on the area you want to delete, later changed into a black area, right-click, Exit. then click [apply] can delete the blocked area.
Record configuration includes six submenus: Enable,Record Bitrate,Stamp,Recycle Record,Snap.
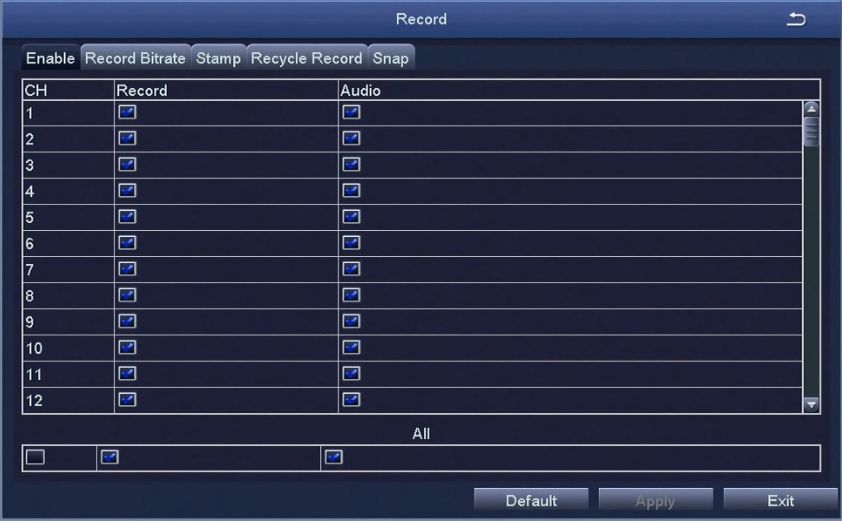
16
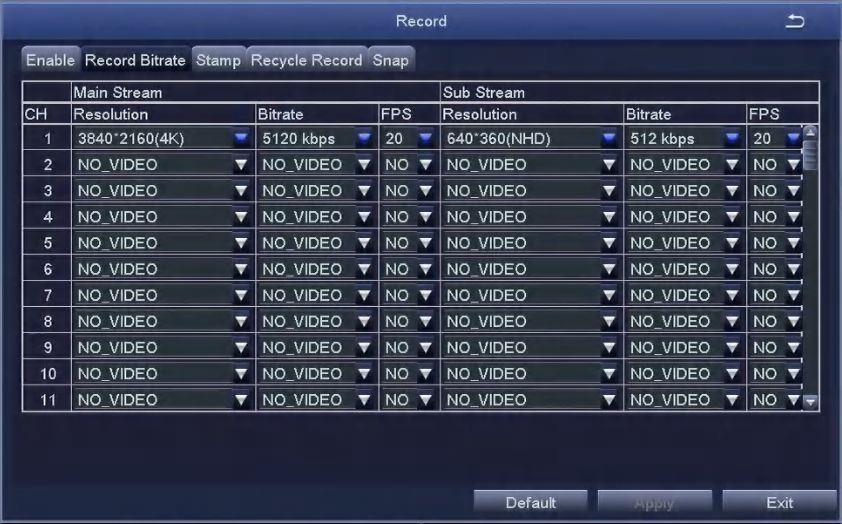
Check the main stream and sub stream information. [Resolution] Display/select camera resolution. [Code rate] Show camera code rate.
[Frame rate] Show camera frame rate.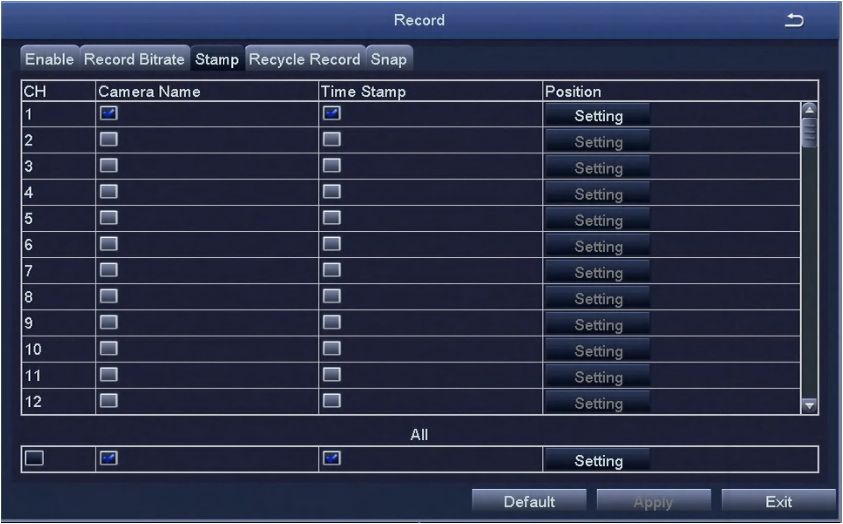
17
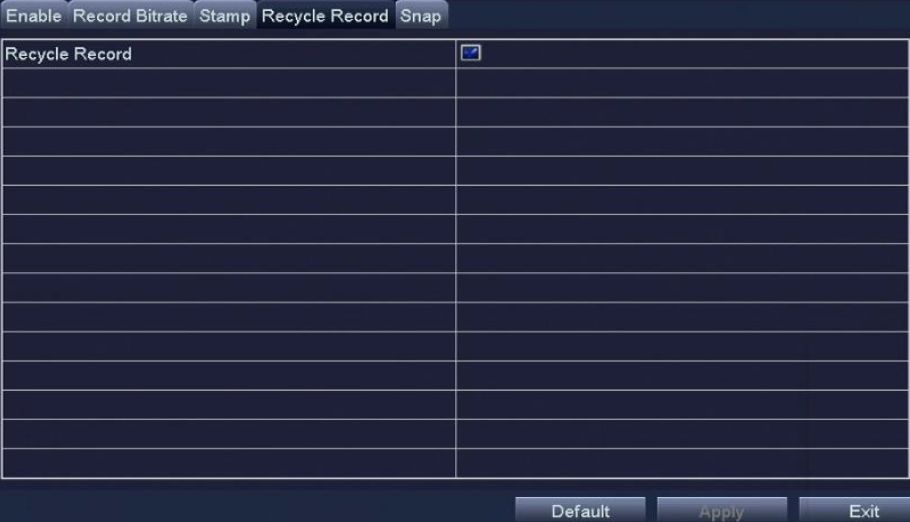
After selecting this item , When the hard disk is full, it will automatically cover the earliest files and continue recording ; Otherwise, it will automatically stop recording and prompt “The remaining space is insufficient” on the screen.
Record O
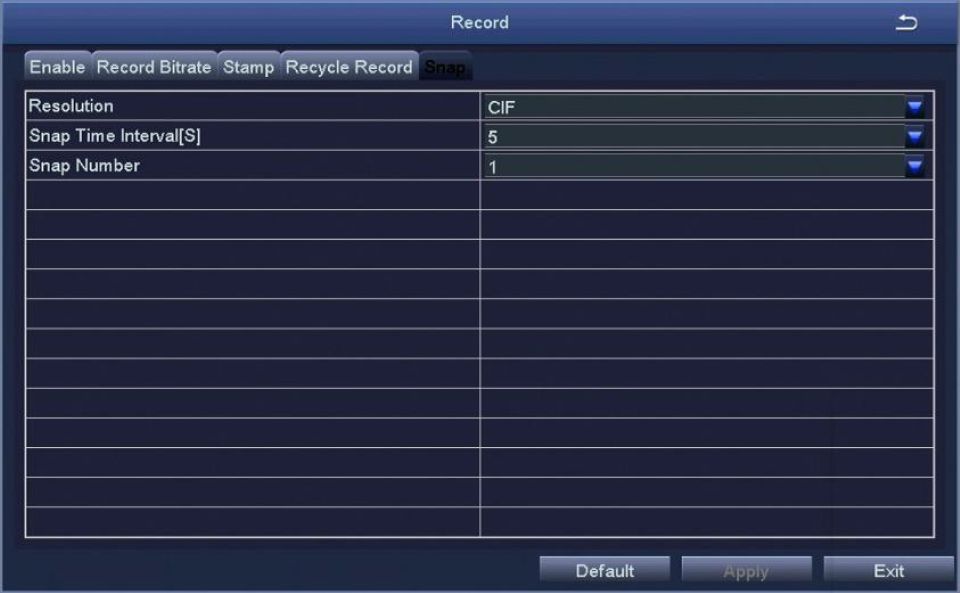
View screenshot information.
18
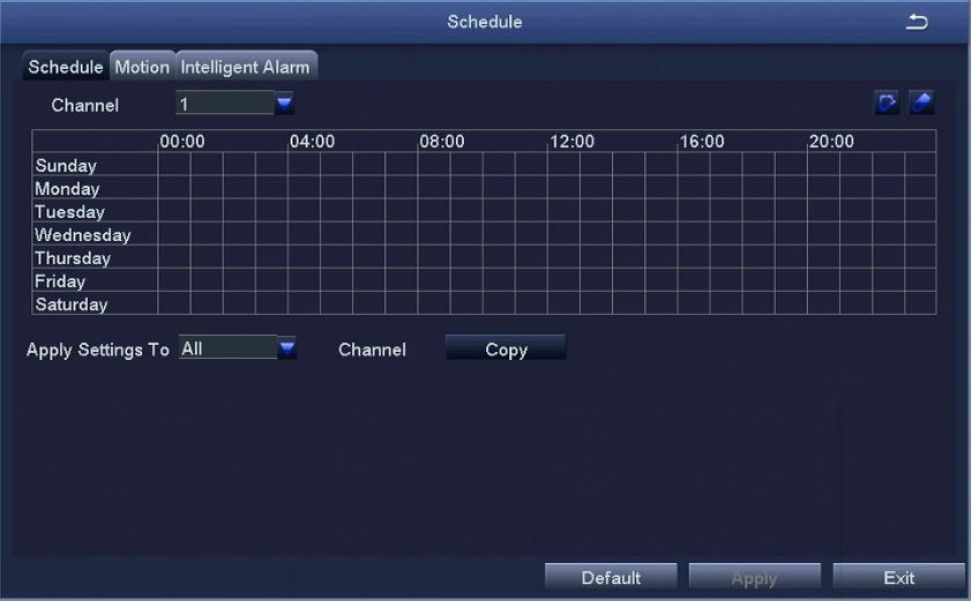
Schedule includes three submenus: timing recording, motion alarm recording, and intelligent recording.
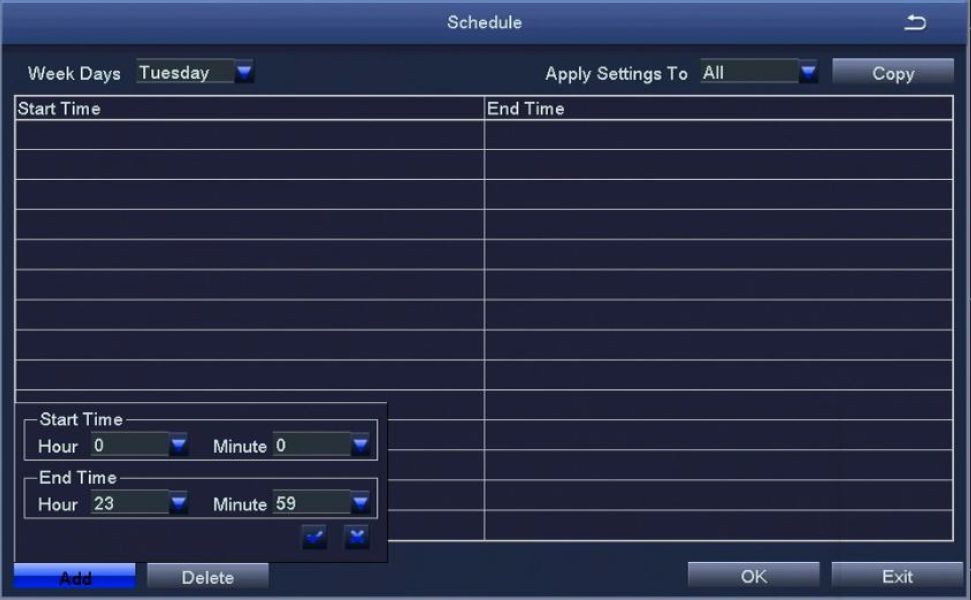
1. Timing Recording
Select the channel: Double click the left mouse button, edit the week plan, as shown in the picture.
19
[Add] To add a recording schedule of some day. [Delete] To delete the selected schedule. [Copy] Copy the schedule of a specified date to another date.The setting method is the same to the timing recording setting, please refer to the timing recording settings.
Note: The default Schedule for Motion alarm is all selected.
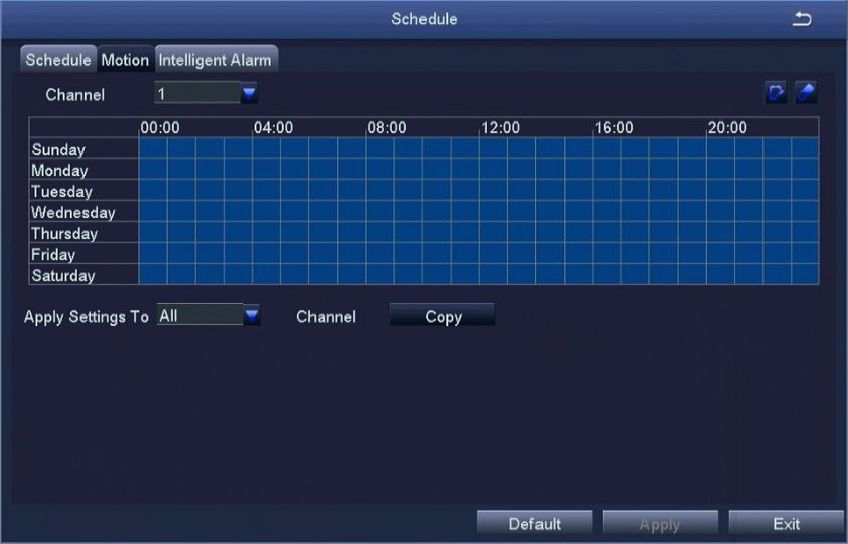
The setting method is the same to the timing recording setting, please refer to the timing recording settings.
Note: The default Schedule for intelligent alarm is all selected.
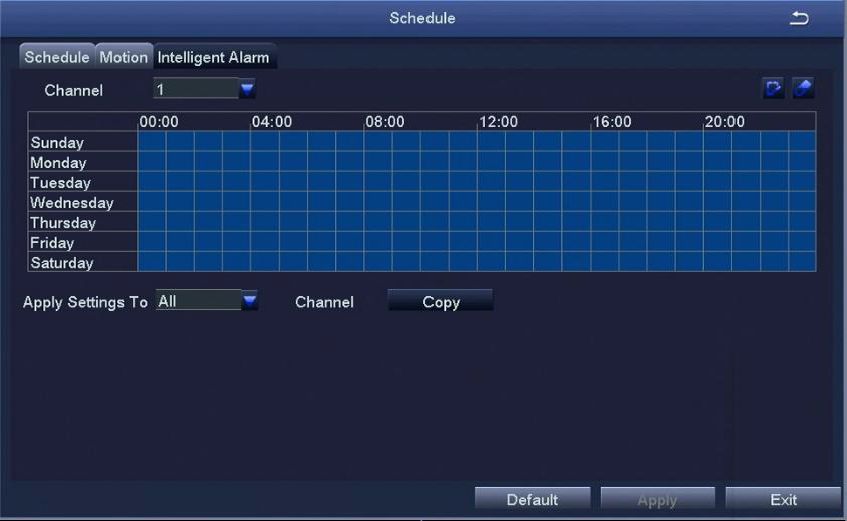
20
Alarm configuration includes five submenus: Motion detection, Video loss, Other alarm,Intelligent alarm,Siren-Light alarm.
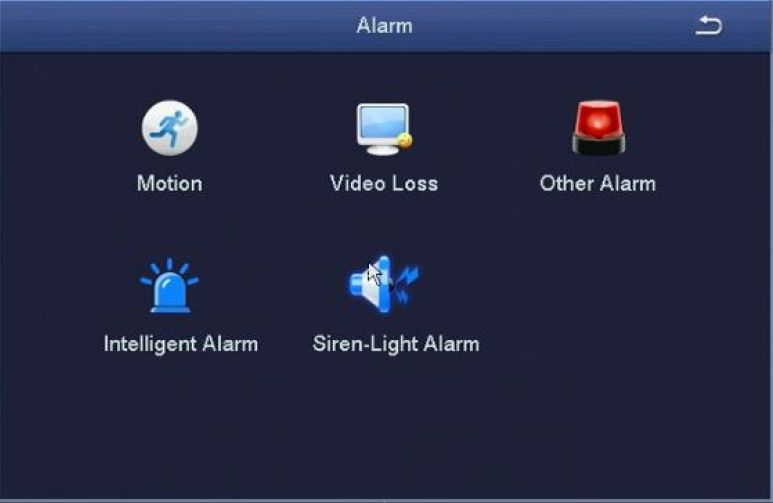
1. Motion Detection
Motion detection includes two submenus: motion detection and schedule.
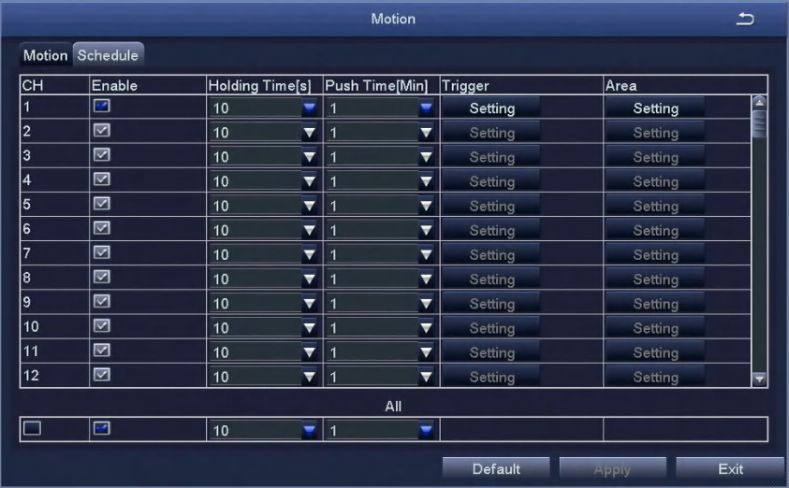
1-1. Motion Detection
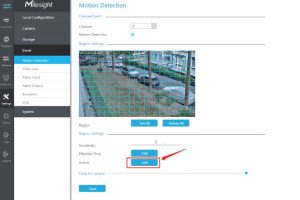
By analyzing the video image, when the system detects a mobile signal which reaches a preset sensitivity, motion detection alarm and the linkage function are initiated.
21
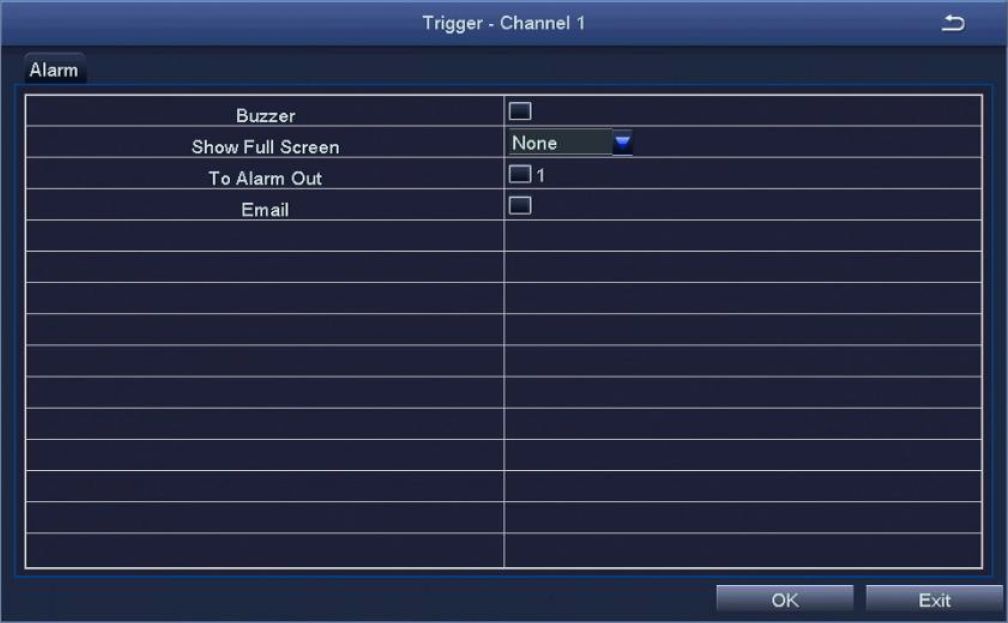
[Enable] After selected, the motion detection function of the corresponding channel will be opened. [Holding Time] To select alarm delay time of the channel .Optional time: 5/10/20/30/ 60/120S always. [Push time] Select the channel APP alarm push time, optional 1/2/3/5/8/10 minutes. [Alarm Handling] Click to set the alarm configuration: [Buzzer] After selecting the alarm, when an alarm is triggered , the buzzer will alarm. [Show Full Screen] When an alarm is triggered, the alarm channel screen will activate [To Alarm Out] Select this item, it will trigger an alarm on the specified alarm output [Email] When an alarm is triggered, the system will send the relevant information to the user-specified mailbox, such as alarm event, snapshot, device name, device number, etc. [Snap] When an alarm is triggered, the system will automatically capture the images of the selected channel and store them to the hard disk. [Regional Settings] In this interface, users can drag the scroll bar to adjust the sensitivity value (1-8), the default value is 4, the smaller the value, the higher the sensitivity. Because the sensitivity is affected by the color time (day or night), the user should adjust the value according to the actual situation;1-2. Recording Schedule
The setting of Motion Detection Schedule is the same to that of Timing Recording, For the detailed steps please refer to 4.2.4 – [Recording Schedule] [Timing Recording]. Note: The default schedule of motion detection is all selected.
2. Video Loss
The setting of video loss alarm processing is the same to that of motion detection alarm processing.
22
[Alarm Type] Including hard disk full, network address conflict, disconnection, HDD attenuation warning and disk loss. [Buzzer ] When an alarm occurs, the device will emit “didi” two long beeps. [Email] When an alarm is triggered, the system will send the relevant information to the user-specified mailbox, such as alarm events, snapshot, device name, device number, etc. [To Alarm Out] To select this item, it will trigger an alarm on the specified alarm output. [Disk Shortage Alarm] When the remaining capacity of the disk reaches the set value, an alarm will be triggered.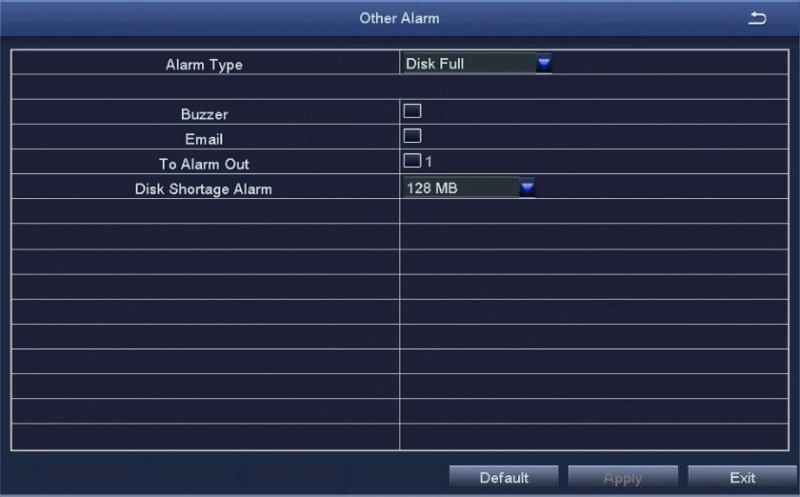
23
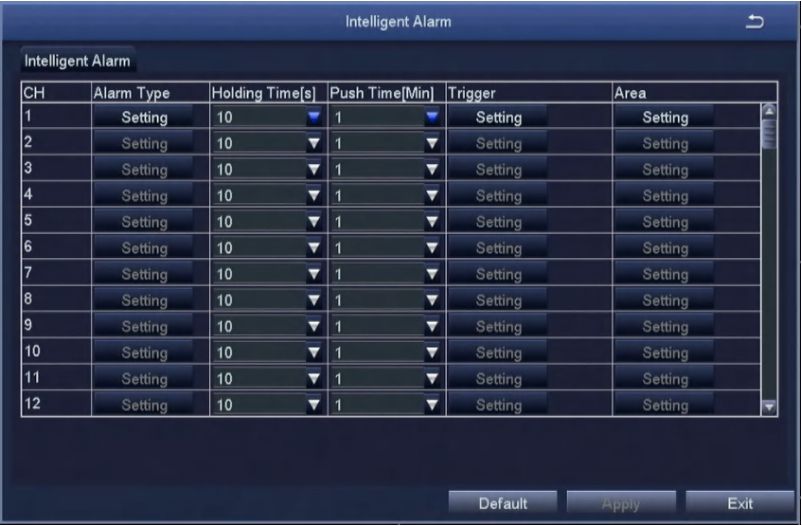
[Alarm type] Set to select the alarm type such as humanoid detection, face, vehicle, etc. [Holding Time] To select alarm delay time of the channel .Optional time: 5/10/20/30/60/ 120s always. [Push time] Select the channel APP alarm push time, optional 1/2/3/5/8/10 minutes. [Alarm Handling] Same as motion detection alarm processing trigger setting. [Area Setting] After entering the live screen, press and hold the left mouse button, drag the mouse to set the human figure detection area, click [Save] to save the settings; double-click the set area again to delete the human figure detection area. Note: The default is to set the whole region.Siren-Light Alarm
| CH | Enable | Alarm Level | Alarm Type | Night Vision Mode | Volume | Manual Alarm | Kep I | |
| 1 | □ | Both (Loud) T | Motion & Intellige T | B&W T | Setting | □ | B | |
| 2 | B | Both (Loud) T | Motion & Intellige ▼ | B&W V | Setting | ■ | g | |
| 3 | n | Both (Loud) ▼ | Motion & Intellige ▼ | B&W V | Setting | ■ | n | |
| 4 | B | Both (Loud) ▼ | Motion & Intellige ▼ | B&W ▼ | Setting | n | n | |
| 5 | B | Both (Loud) V | Motion & Intellige ▼ | B&W ▼ | Setting | B | n | |
| 6 | B | Both (Loud) ▼ | Motion & Intellige ▼ | B&W ▼ | Setting | IB | □ | |
| 7 | □ | Both (Loud) ▼ | Motion & Intellige ▼ | B&W ▼ | Setting | n | n’ | |
| 8 | B | Both (Loud) ▼ | Motion & Intellige ▼ | B&W ▼ | I Setting | ■ | □ | |
| 9 | ■ | Both (Loud) T | Motion & Intellige ▼ | B&W ▼ | Setting | g | ||
| 10 | B | Both (Loud) T | Motion & Intellige ▼ | B&W ▼ | Setting | n | □ | |
| 11 | n | Both (Loud) V | Motion & Intellige ▼ | b&w “▼ | Setting | ■ | g | |
| 12 | B | Both (Loud) T | Motion & Intellige ▼ | b&w y | Setting | B | n | |
| 13 | H | Both (Loud) T | Motion & Intellige ▼ | B&W ~T | Setting | B | B | |
All
|D |O Both (Loud) w | Motion w | |
Default Exit
After opening, the sound and light alarm function of each channel can be set.
[Alarm level] can choose strong sound and light alarm, slight sound and light alarm, strong sound alarm, slight sound alarm, strong light alarm; [Alarm type] can choose motion detection, intelligent alarm, motion detection and intelligent alarm; [Night Vision Mode] Black and White Night Vision, Full Color Night Vision, Intelligent Night Vision; [Volume] Adjust the volume; [Manual alarm] Set manual sound and light alarm; [LED] can turn on and off the LED warning light of the camera;24
Network configuration includes two submenus: Network, Email.
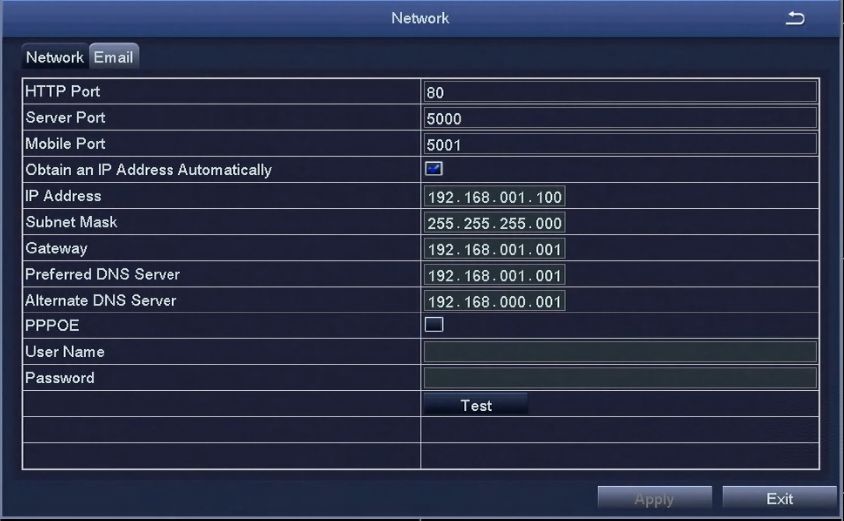
6-1 Network
[HTTP Port] Default value is 80. [Server Port] Default value is 5000. [Mobile Port] Default value is 5001. [Obtain an IP Address Automatically] To obtain the IP function automatically. [IP Address] To set the IP address of the device. [Subnet Mask] To set the subnet mask of the device. [Gateway] To set the default gateway of the device. [Preferred DNS Server] The address is provided by your network operator and must be filled in when using mobile monitoring. [Altemate DNS Server] The address is provided by your network operator. [PPPOE] When enabled, the DVR will automatically establish a network connection in the form of PPPOE, then the IP address can be seen through [Main Menu]-[View Information]-[Network Status] [User Name] Enter the ISP (Internet Service Provider). [Password] The set password. [Test]Test whether the entered IP address and PPPOE information are valid or not.25
6-2 Email
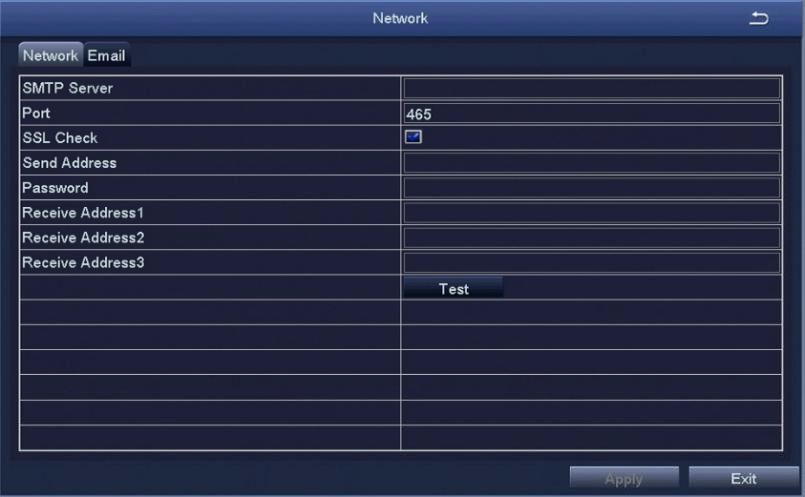
26
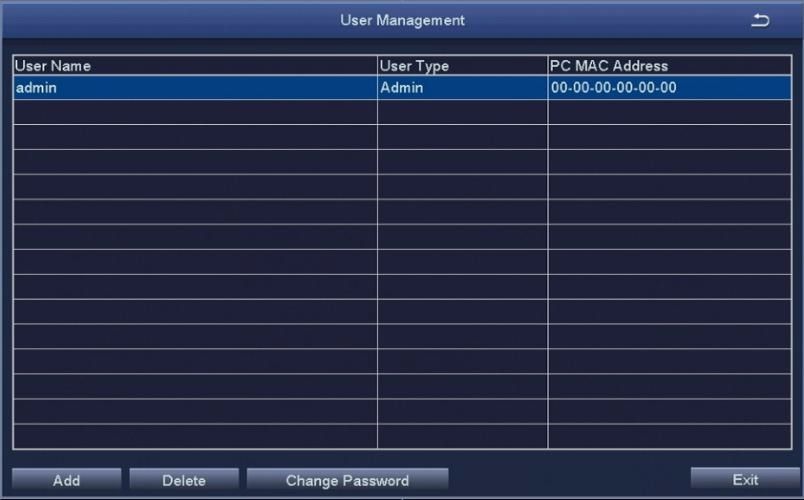
The default administrator name is admin, there is no password set.
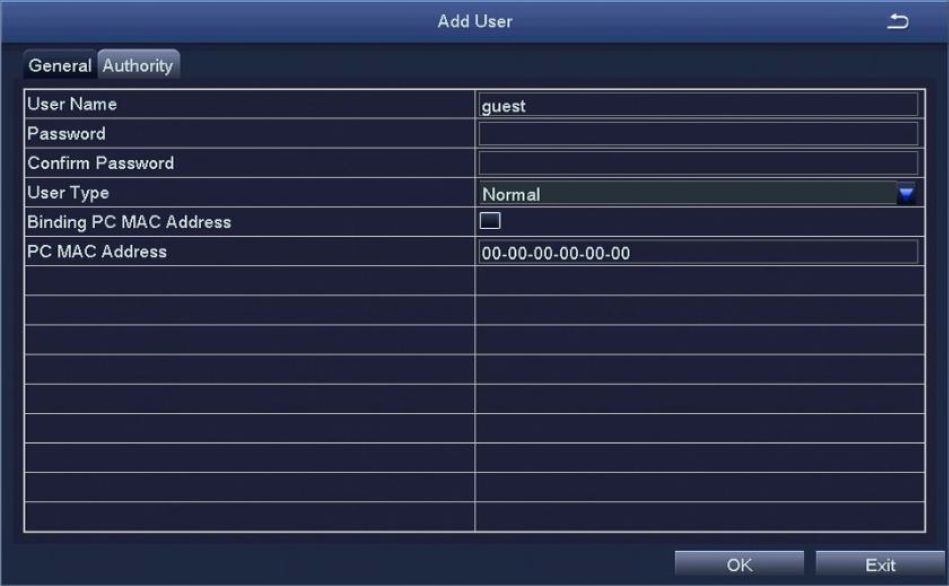
Note: The length of the user name and password is no more than 32 characters. [Add] Add a user name and set the user’s permissions.
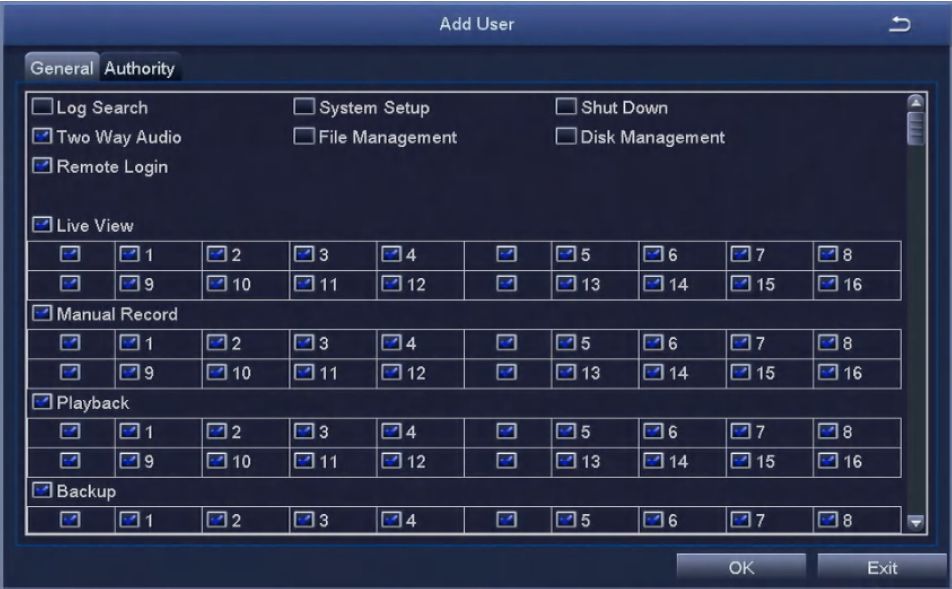
27
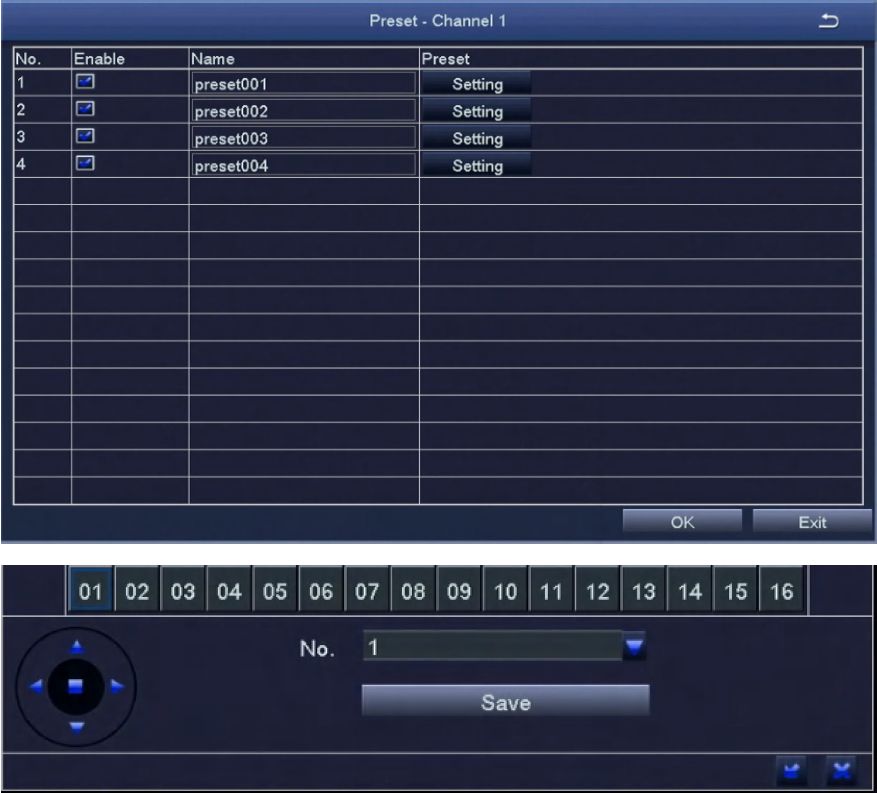
1.[Preset] Click the [Setting] button, and the following window will pop up:
The user can adjust the PTZ to a suitable position through the button on the tool bar, click [Save], the preset point is set successfully, and a maximum of 4 can be set.
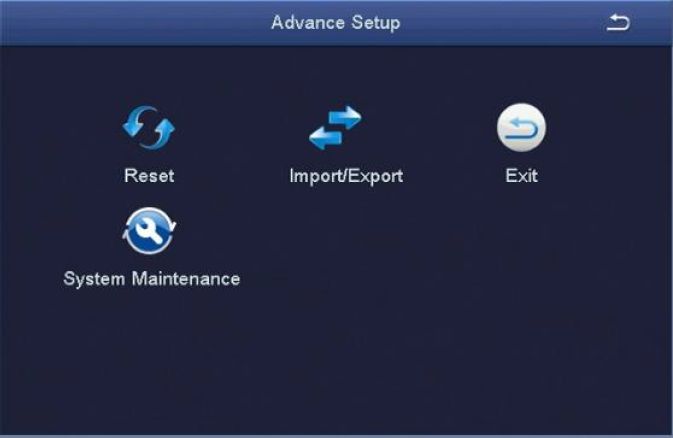
Advanced setting includes three submenus: Reset, Import/Export,system maintenance.
28
[Reset] Reset all settings to the factory settings status. [Import/Export]There is no need to reconfigure other devices.
[System Maintenance] By default, the system will automatically restart at 2 am every Monday, and the maintenance time can be customized.Mainly includes Time Search, Event Search, and Image.
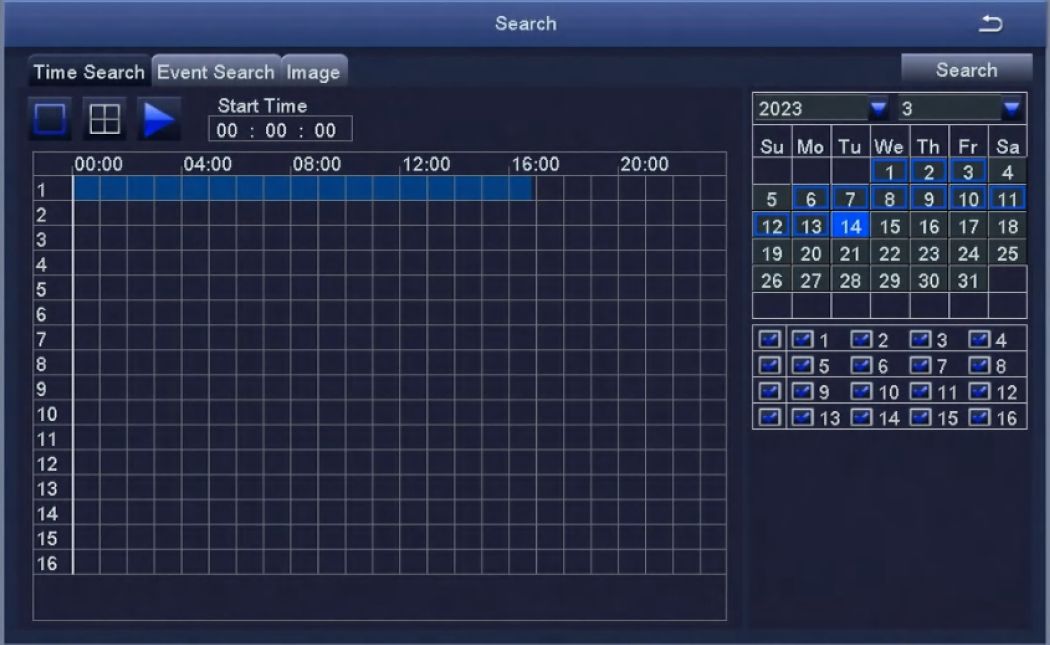

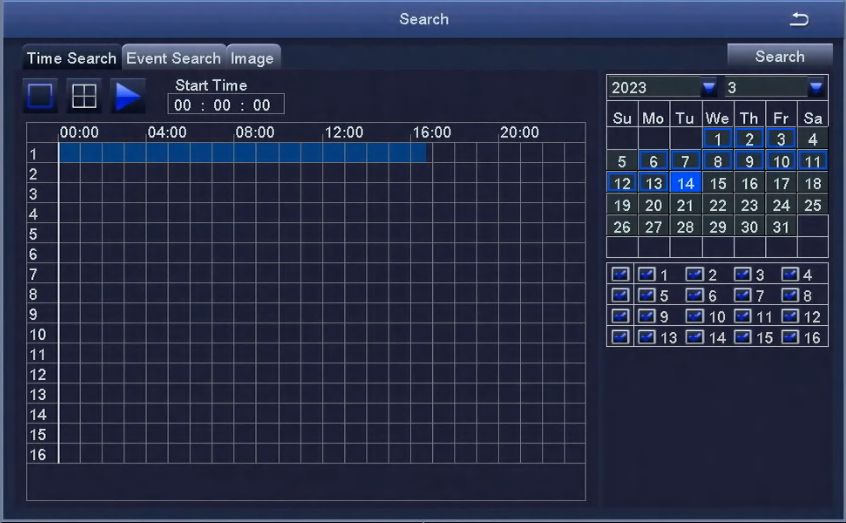
Select the channel to play

Start playing
[Search] Search the video file of set channel and time, then click the play button to start playback.Note: The highlighted date in the calendar indicates there is video file on that day .
29
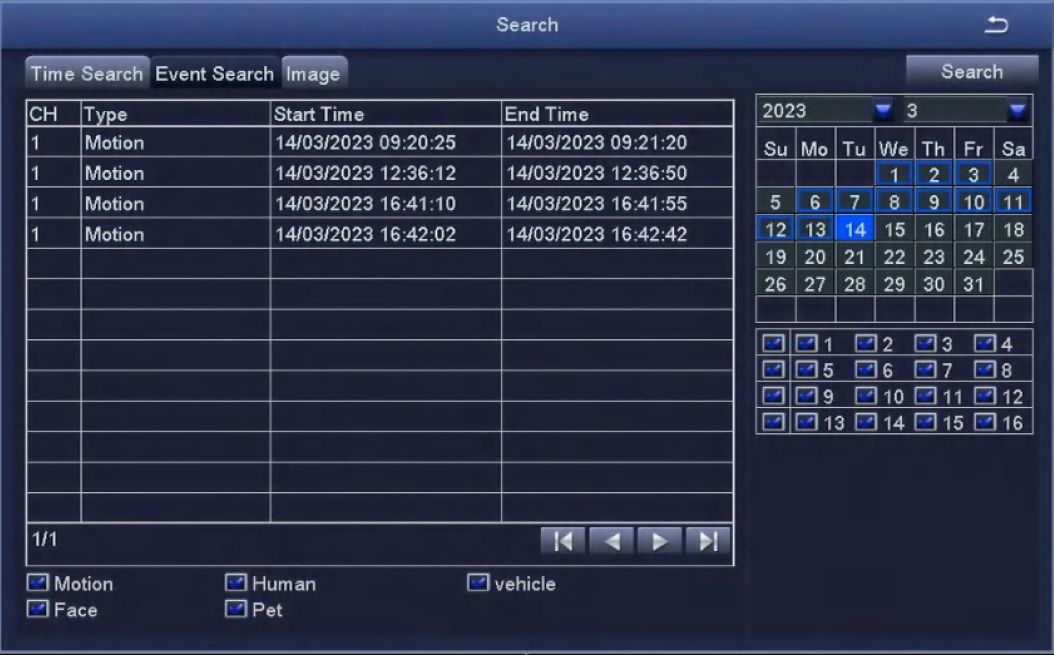
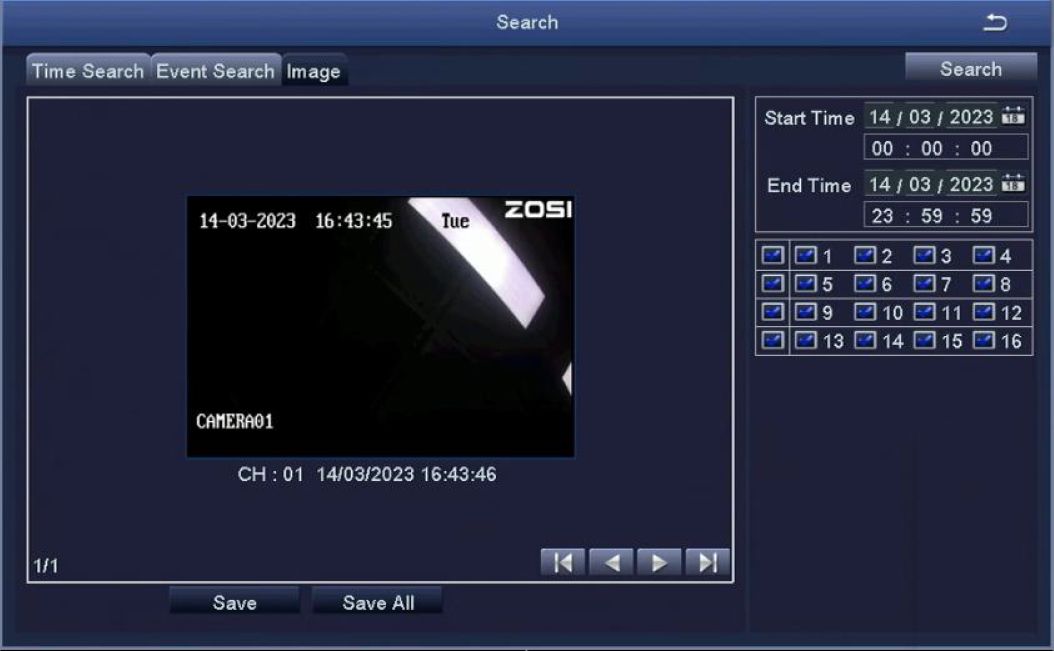
30
[Search] To search the image file of set channel and time. [Save] Save the currently displayed image to a removable storage device. [Save All] Save all the captured images to a removable storage device.Note: 1. The default number of storage image is 2000. If it is more than 2000, the system will automatically overwrite the previously unlocked images.
2. Double-click the image, you can playback the video from the time when the image was captured.
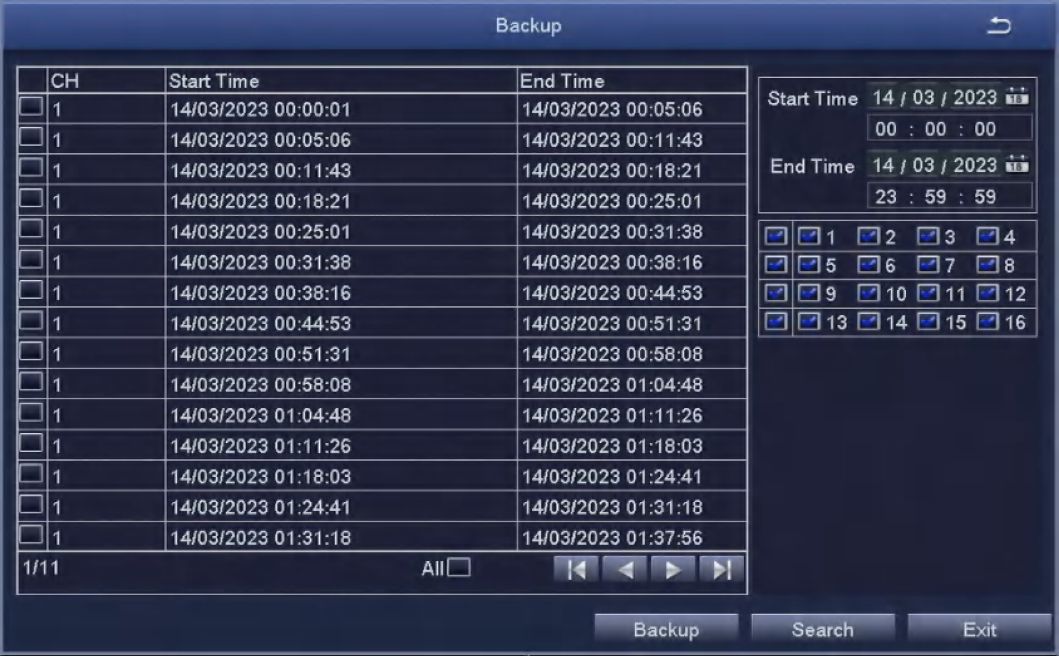
By setting, you can backup the video file to the external storage device
Note: You need to install the storage device capable of accommodating the storage files before backuping the files.
[Search] To select the files that need backup according to time and channel. [Backup] Select files in the list and click “backup”, then it will popup a dialog box of backup information, as shown in figure:31
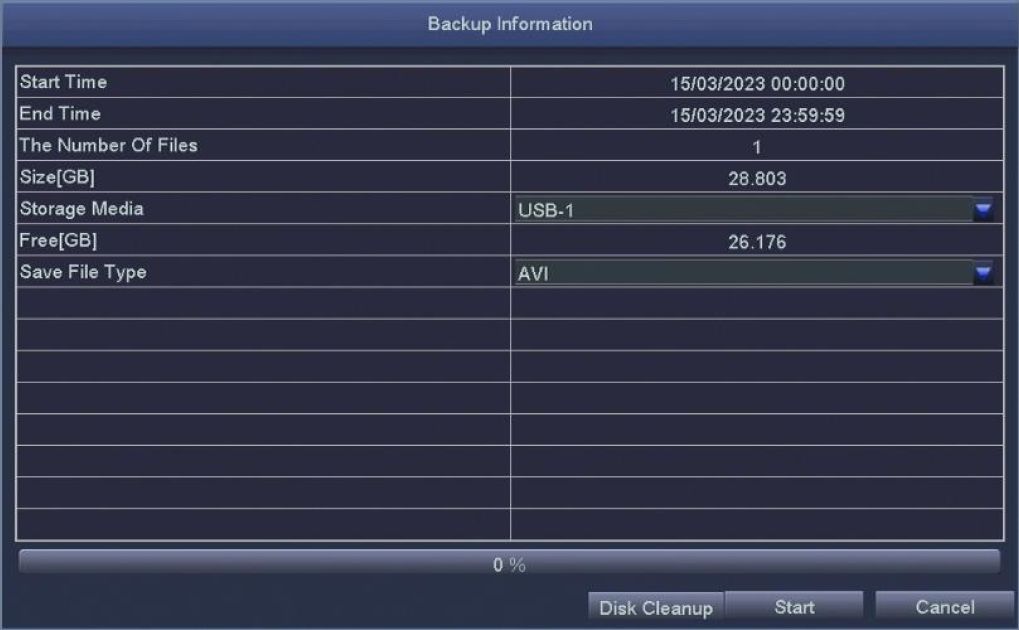
Disk cleanup: to delete all files in the external storage device.
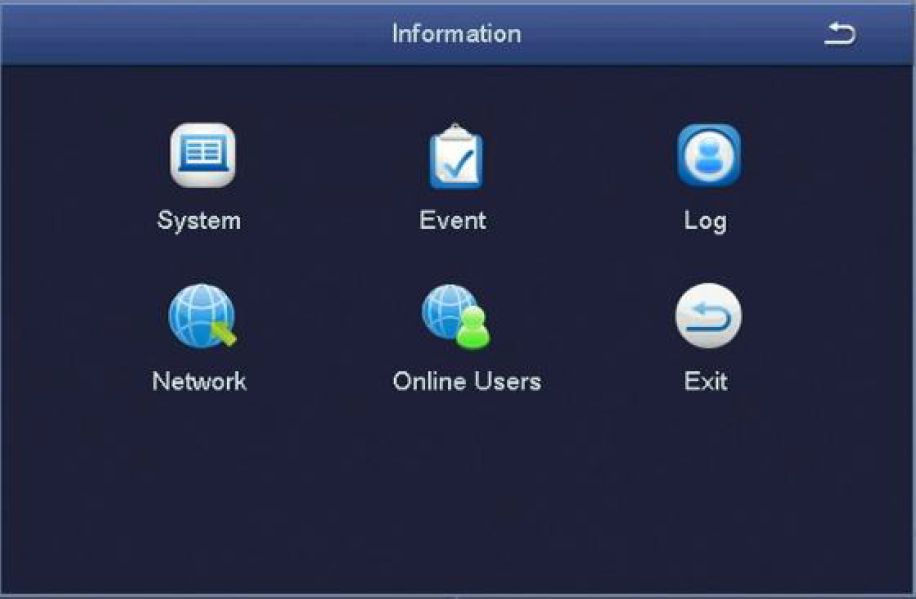
Including five submenus: system information, event information, system log, network status, and online users and other relevant information.
32
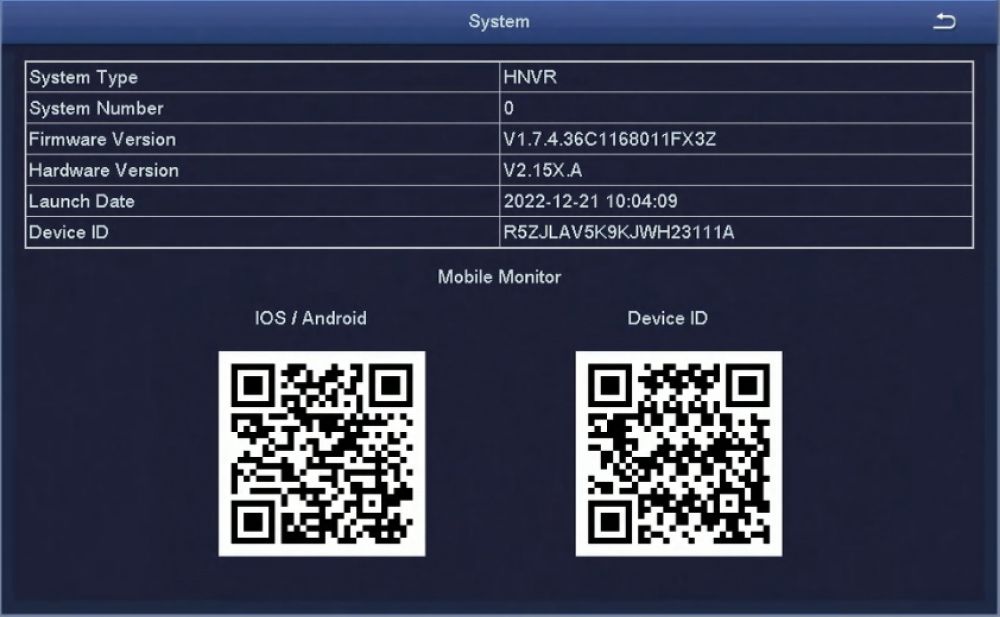
To display the basic information about this device, including hardware information, software version number, release date, and phone port number .
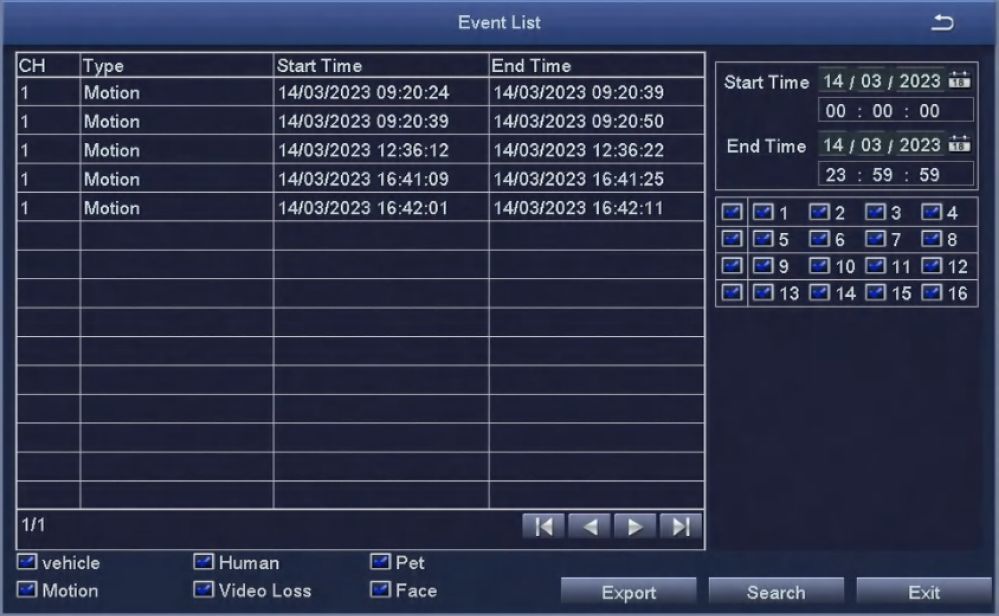
Users can select the event information of motion detection alarm, sensor alarm, video loss alarm and so on which users need to inquire about according to time and channel.
33
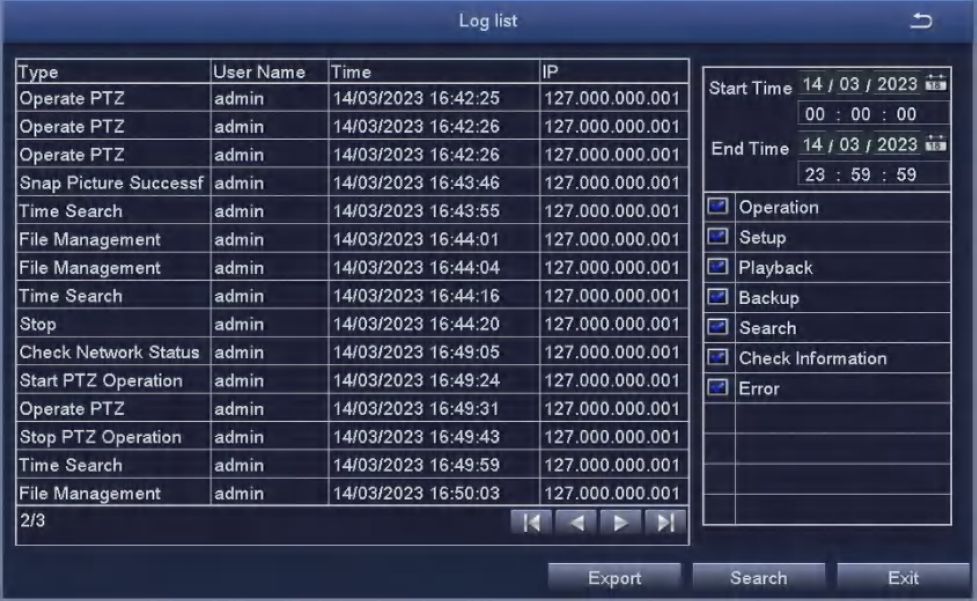
Users can search the operation information of the login user based on time and the operation type. After formatting the hard disk, the information will be cleared.
Users can view the related parameters of the network settings.
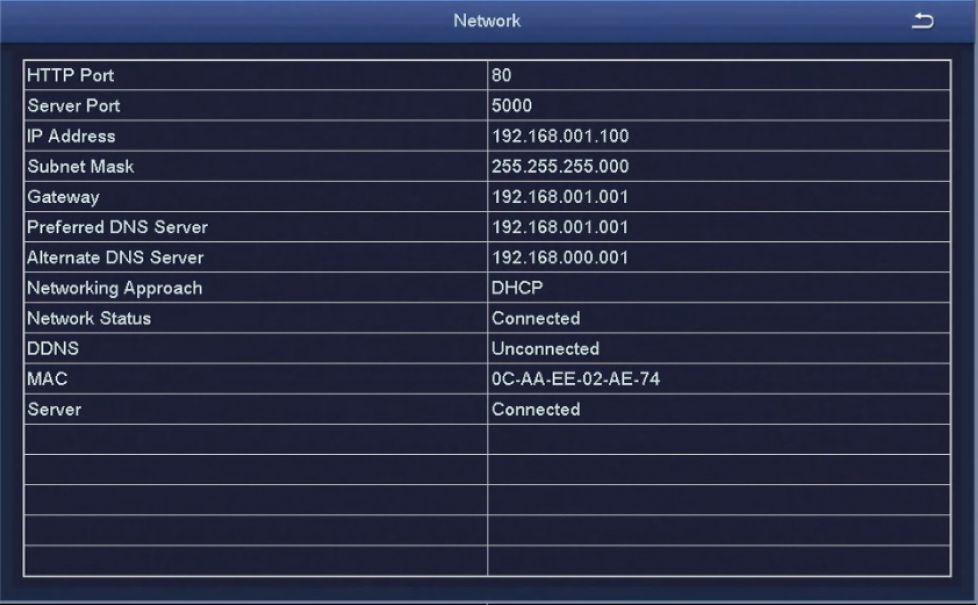
34
See the network user information connecting the local NVR.
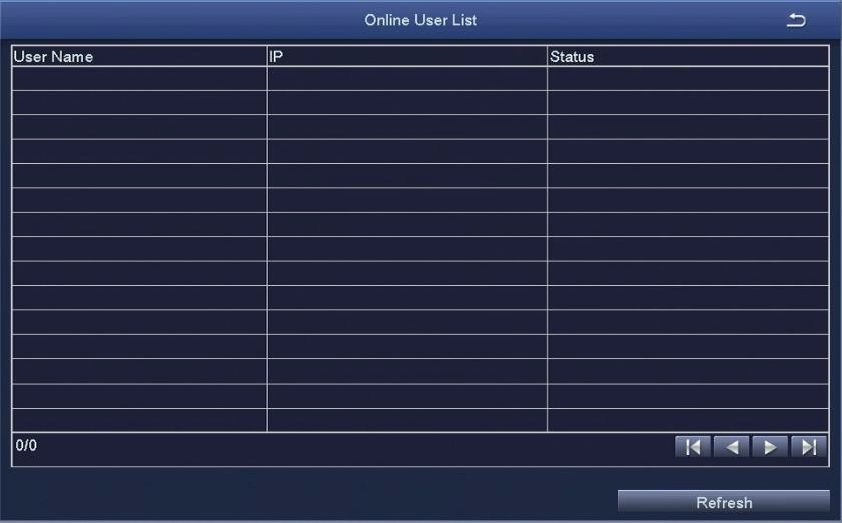
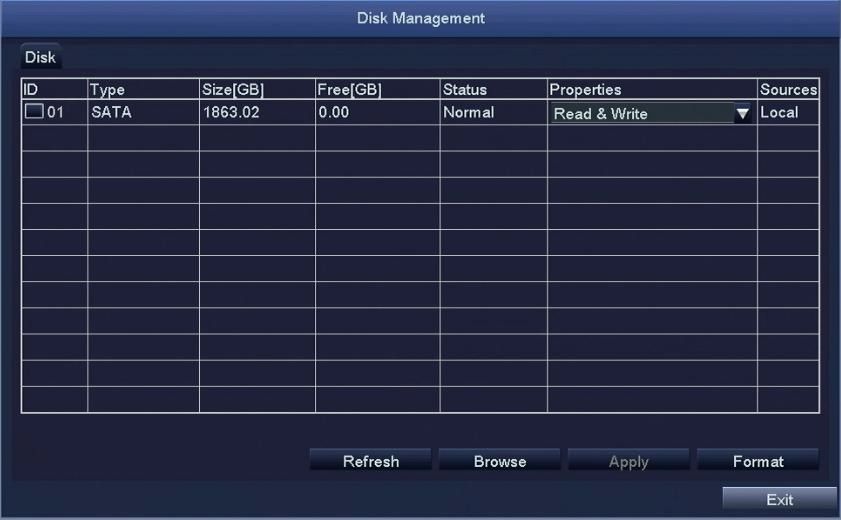
35
The current user logs out of the system. If the user wants to log in again, click the main menu icon and enter the user name and password on the login interface to log in to the device again.
If manual maintenance is confirmed, the system will automatically restart.
[Upgrade] After the system is connected to the Internet, it will detect a new version, click this button, and the system will automatically upgrade. The upgrade process takes about 5 minutes.36




Add Comment