How to set up your farming kit installation guide
farming kit Purpose of the guide
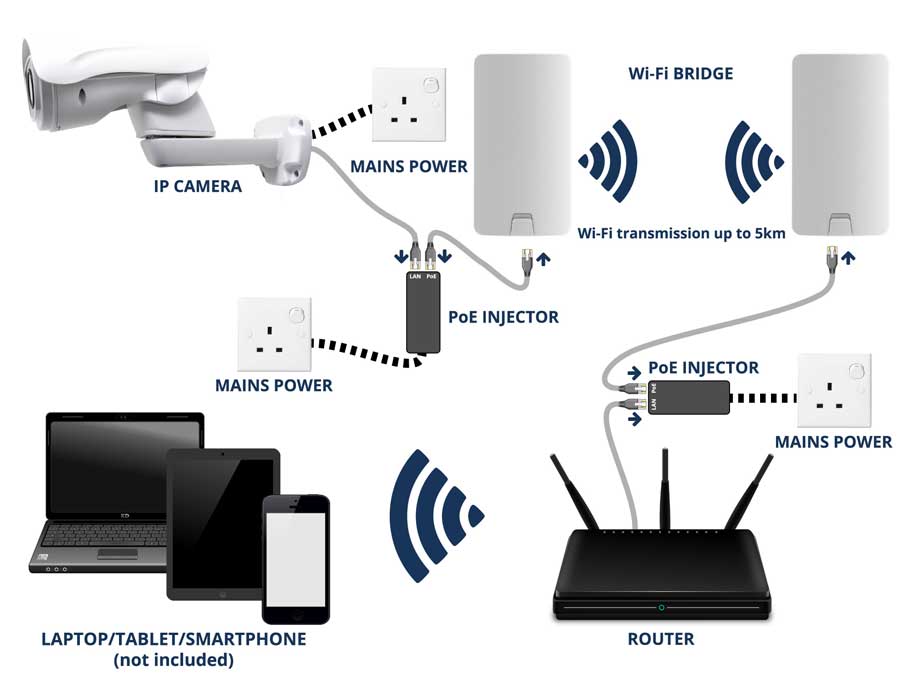
This guide will show you how to set up your Gamut or Hikvision farming/breeding kit from the beginning. There will be some differences depending on the specific equipment you have but the basic idea of a bridge system is (starting from the camera):
- Camera sends data to the ‘secondary site’ Wi-Fi bridge (via the PoE injector)
- ‘Secondary site’ Wi-Fi bridge sends data to the ‘Home’ Wi-Fi bridge (via wireless connection)
- ‘Home’ Wi-Fi bridge sends data to the internet router (via the PoE injector)
- Internet router sends data to computers/phones/tablets via local connection or internet
Unless you have requested that your bridges are not pre-configured, we have probably set them up for you so that they can be connected up immediately. Even if they don’t seem to work, do not press the reset button on the bridges as this will erase all of the settings and will mean the bridges have to be set back up. If you do this and need us to set the bridges back up for you we will need to book you in for an Engineer Support session. If you want to set it up yourself, please follow the relevant guide below:
Comfast: bit.ly/37DiDC0
Ubiquity: bit.ly/2pSPDVQ
Table of contents
- What’s in the box?
- Before You Begin
- Let’s get started
- Additional wiring diagrams
- Wi-Fi Bridge Panels
- Pre-Configured Wi-Fi Bridges
- Setting the bridges up yourself
- Adding a recorder to the system
- Configuring the system
- Gamut PTZ Camera (GTIP210PTZ)
- Gamut IP Camera (GTIP530T-L, GTIP530B-L, GTIP230T, GTIP230B, GTIP830T, GTIP830B)
- Hikvision PTZ/IP Camera (HKIP41025PTZ, HKIP20204PTZ, DS-2CD2045FWD-I)
- Hikvision Remote Viewing (via Hik-Connect)
- Installation
- Additional equipment and guides
- Troubleshooting
- Remote viewing issues
- Lost or forgotten password
What’s in the box?
- One Gamut/Hikvision PTZ or Gamut/Hikvision IP camera
- Two 20M Ethernet network cables
- Two 3M Ethernet network cables
- Two Wi-Fi Bridge Panels
- Two PoE (power over Ethernet) injectors
- Two mains power supplies for PoE injectors
- Two sets of fixings for Wi-Fi bridges
- Two sets of mounting screws
Read Next : NVR Kit Installation Guide AIO
Before You Begin
It is highly recommended that you set up everything inside the same room first, and make sure the whole kit is working before anything is mounted in place. If you encounter any issues during setup it will be far easier to resolve if all of the equipment is in the same room. To configure this system, you will need a computer with an Ethernet (LAN) port.
Let’s get started
First, you need to wire everything up so that it is powered on and connected like the below diagram. The PoE port on the PoE injector needs to be connected to the WAN port on the Wi-Fi bridge. You will know it is the correct port if the LEDs on the side of the bridge light up to show it is powered on.
Additional wiring diagrams
Four cameras, recorder, PoE injectors, WiFi bridges, router: https://bit.ly/35vwWJY
Two IP cameras, switch, PoE injectors, WiFi bridges, recorder: https://bit.ly/3bMoY0m
Wi-Fi Bridge Panels
Depending on what bridges you have ordered you will have either Comfast or Ubiquity branded panels.
Pre-Configured Wi-Fi Bridges
If the bridges have been pre-configured, we will almost always set the bridges to have IP addresses ending in .200 and .201. The bridge ending in .200 will be set up to be connected to your internet router (via the LAN port on the bridge OR the PoE injector), and the one ending in .201 will be connected to your camera. So for example if your internet provider is BT, your first bridge will have an IP address of 192.168.1.200. If you are with Sky or Virgin it will be 192.168.0.200.
There will always be a label on the back of each bridge with the IP address that has been assigned to it, your label will look similar to this:
You will need to use a PC and enter the IP address of the bridges to make sure they are pairing. Just open your internet browser and type in the IP address into the address bar. If the login page loads for each address then we know the bridges are connected to each other. If the login page doesn’t load for the bridge ending in .201 then it is likely a connection issue between the bridges. If the login page doesn’t load for either address then it is likely an issue with the bridge ending in .200. If it seems like there is an issue, don’t forget to check that everything is wired up correctly and powered on.
Setting the bridges up yourself
If you have not had your bridges pre-paired, please read online more about how to do this:
Comfast: bit.ly/37DiDC0
Ubiquity: bit.ly/2pSPDVQ
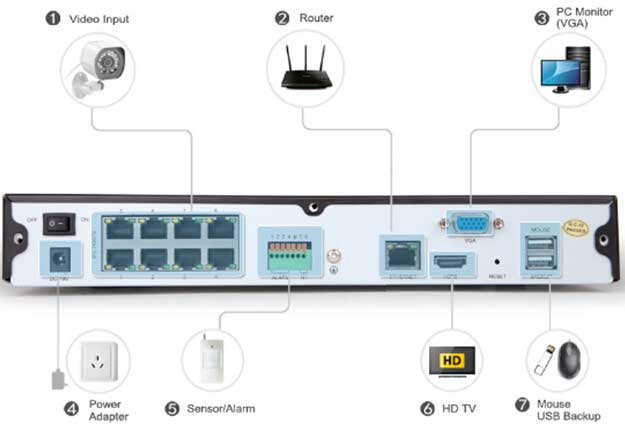
Adding a recorder to the system
If you have a recorder as well, you should add it after setting up the camera. Most modern systems can automatically recognise when a camera is added from the same manufacturer, but the use of Wi-Fi bridges or network switches can cause issues with this, so when setting up one of our farming packs it is highly recommended to set the camera up by itself first, then manually add it to the recorder whilst it is all still in the same room.
Configuring the system
Once you have confirmed that the bridges are paired, the next step is to download the software for your camera and set it up. Choose which type of camera you have below and read our guide online for more on how to do this. If you are using a recorder you can follow the guides in much the same way, using the recorder as the ‘device‘ to be added to the your phone or tablet, rather than the camera.
If you are using a Hikvision device, it is best to set the camera up first using a computer, then set up the Hik-Connect remote viewing service via a computer, then simply download the app onto your phone and log into your account. Follow the instructions below to do so.
Gamut PTZ Camera (GTIP210PTZ)
Set up using a Windows PC (via CMS5/VMS): bit.ly/2KTWhCn
Adding the camera to an Android/iOS phone or tablet: https://bit.ly/2FlxGXd
Gamut IP Camera (GTIP530T-L, GTIP530B-L, GTIP230T, GTIP230B, GTIP830T, GTIP830B)
Quick start guide (this must be done first): https://bit.ly/2FNm4Np
Adding to a Windows or Apple PC (via Surveillance Client): https://bit.ly/3m848gH
Adding the camera to an Android/iOS phone or tablet (via RXCamView): https://bit.ly/3bRSsKo
Hikvision PTZ/IP Camera (HKIP41025PTZ, HKIP20204PTZ, DS-2CD2045FWD-I)
Set up using a Windows or Apple PC (via iVMS4200): bit.ly/37L2ZVg
Set up using a Windows PC (via Internet Explorer or Google Chrome): https://bit.ly/2R9ZTmw
Hikvision Remote Viewing (via Hik-Connect)
If you are using Hikvision, once you have set the camera up and can view it using a computer, you’ll need to register an account for Hik-Connect and add the camera to your account if you want to view it remotely. The below guide will show you how to do so using a Windows or Apple PC (via SADP and a web browser): https://bit.ly/32e0sCb
Installation
Once this is all done, you will need to use the wiring diagram and start to install all the equipment and put it all in place. If you are subscribed to one of our support subscription packages we can set up a DNS address for you which creates an alternative, more direct and often more reliable connection to your equipment than the free remote viewing services provided by Gamut or Hikvision. This is not essential but if you are interested get in contact with the Helpdesk team and they can book you in for a remote setup session.
Additional equipment and guides
How to Configure a 4G router
How to pre-configure and add a Hikvision IP camera to a Gamut NVR
Using the PTZ controls on a Gamut PTZ camera
If you’re looking for more information on Hikvision systems and what you can do with them, you may want to have a look at our general ‘Getting started’ guide for Hikvision recorders and cameras:
Getting started with your Hikvision recorder or IP camera






Add Comment