Here in this post, we are going to give you the complete Hikvision Mobile Setup process. It is given here for users who want to view Hikvision NVR online view from remote areas. The Application is easy to download and install. We have to make our NVR online first. When that is online, we can easily make the mobile setup ready.
Hikvision NVR Online Guide
To make the Hikvision NVR online, the first step is that plugin the NVR and connect it with a network. It will be easily connected to a router through an ethernet cable or Wi-Fi. When it is connected, we go through the following step by step process to make it online.
Load More : Hik-Connect – How to add device
Step-1 Open The Quick Menu
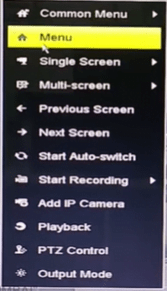
We go to the monitor screen to which the NVR is connected and right-click the mouse. The following screen appears.
It has many functions. We opt for the function to reach the main menu.
Step-2 Login To Open The Main Menu
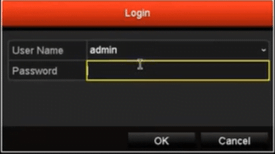
Here, we will log in to the app. Without it, we will not reach the main menu. You will use the same password generated by you while making the NVR setup.
After logging in press the OK system.
Step-3 Go To The Main Menu
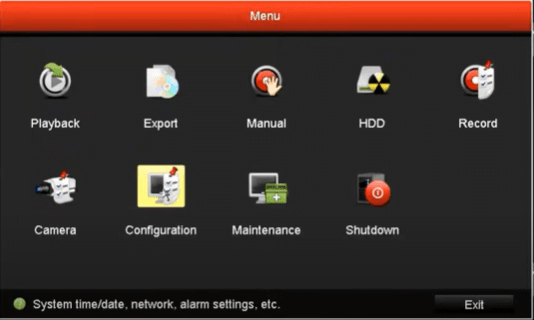
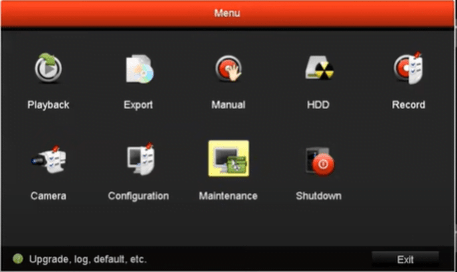
After logging in we reach the main menu. The following page appears.
This page opens. Here we will select the “Configuration” icon. We reach the next step.
Step-4 Go To Configuration
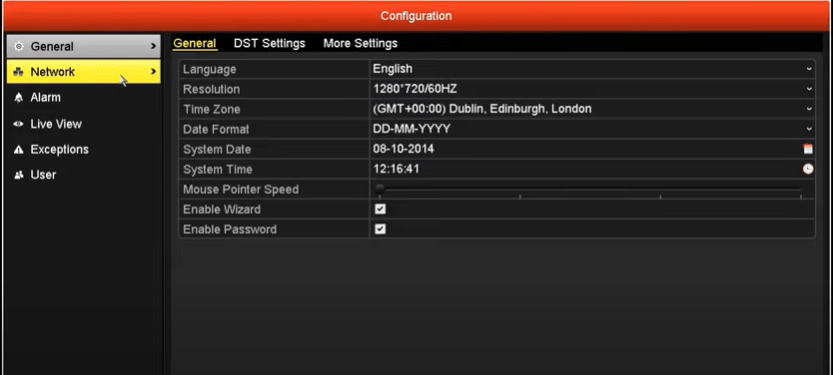
In this window, we will find the following features.
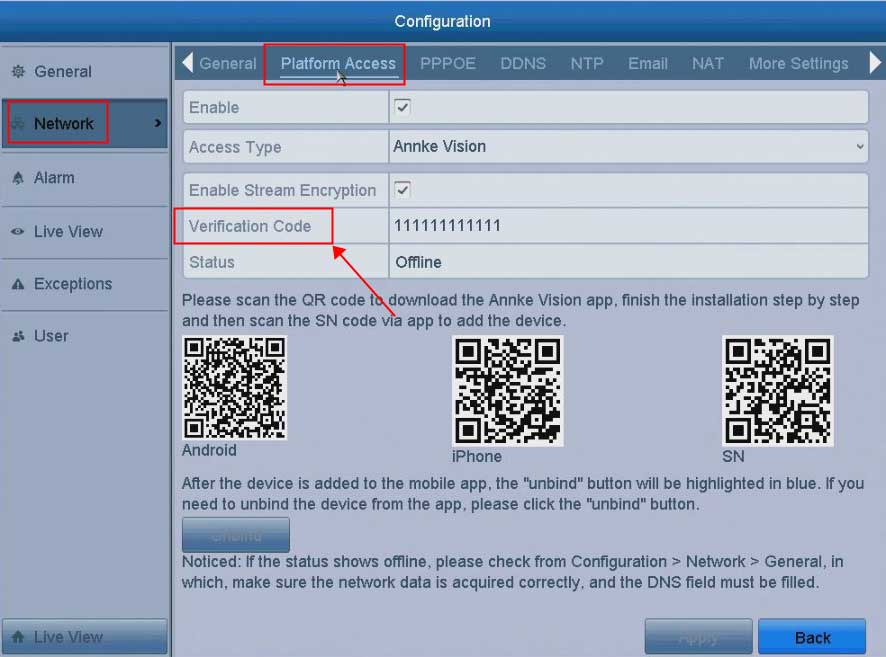
This page has a “Network” option. Click that option and the following page appears.
Step-4 Select The Network Option
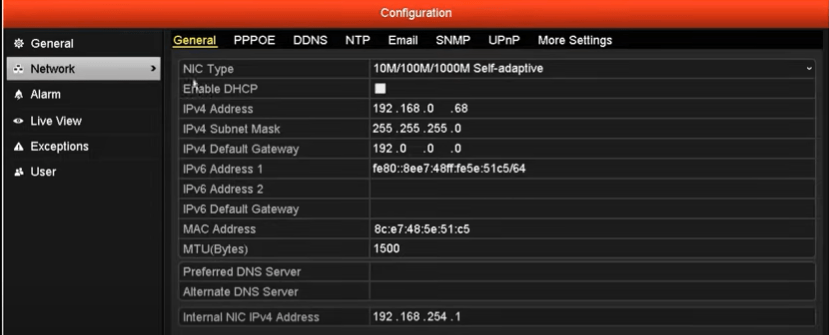
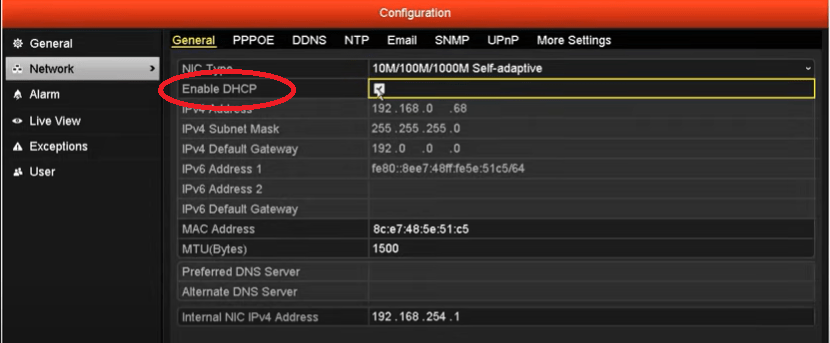
When we click the network button, this page shows up. We will go for enabling the DHCP mode.
Step-5 Enable The DHCP
To enable DHCP, we tick the box. DHCP is the Dynamic Host Configuration Protocol. It facilitates the process of remotely accessing the device.
After ticking the box, press the apply button. After that come back to the main menu.
Step- 6 Go To The Maintenance
We will come back to the main menu and select the maintenance option.
We will go here to check the IP of the system.
Step- 7 Go To The Maintenance- Network
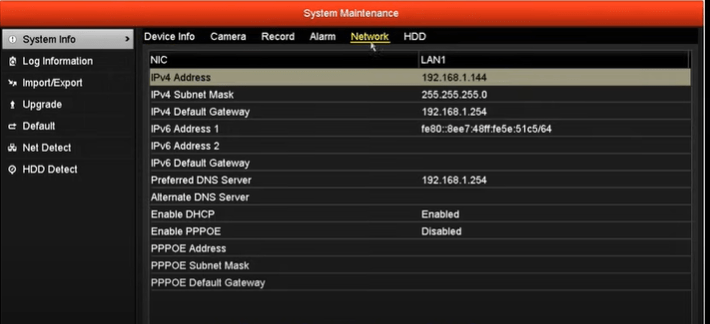
Under maintenance, we will go to check the IP in the Network option. The image is there to guide you.
You have to note down the IPv4 Address, IPv4 Default Gateway, and the Preferred DNS Server. We will align them to make the NVR online. If we don’t align them, there will be an IP conflict. It will not allow us to online the gadget.
After it comes back to the main menu and selects the Network option.
Step- 8 Got To Main Menu Network Option
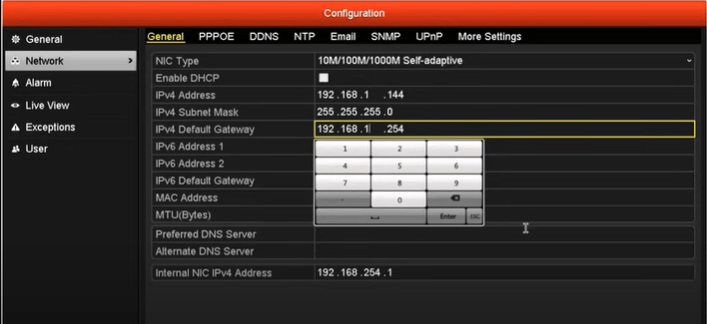
Open this page and align the IPv4, IP address and the default gateway. Once completed this exercise, press the apply button.
When we apply the button, it reaches us to the next page where we see that the device is under the process and will be online.
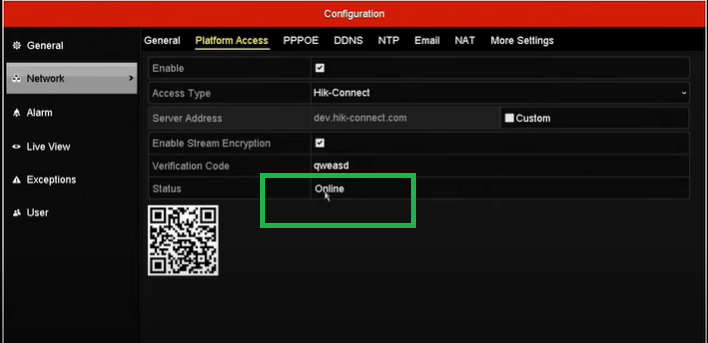
Step- 9 Device Is Online Now
It will show that the device is online.
This way we make the NVR online in any network.
Mobile Setup For Remote Access
For that, we have to open the google play store.
The google play store is an app that is available on Android smartphones. To load it and install it, the first thing you have to do is to search the Hik-connect application on it. Hik-connect is a free Peer to Peer(P2P) service. It is provided by Hikvision.
The basic purpose of this application is that Hikvision devices can easily communicate with one another. We will learn here how the Hik-connect is going to be viewed in iVMS 4500. By default, every remote service of Hikvision is connected with this application.
How To Connect Hikvision Mobile Setup
The first and foremost step is to connect the Hikvision NVR with the network router. You can do it with a wired device or a Wi-fi device. Make the NVR online for monitoring and accessing purposes.
To connect the device and monitor it from any remote location we need to download and install the Hik-connect. Search it and its application iVMS 4500 application will appear on the google play store. You will also get reviews of this item.
This app is smart and intelligent as it easily transmits the best video quality in real-time. There is no time lag. Additionally, it empowers us to use devices from remote areas.
That is why it is very user friendly and empowering. We will show you here the step by step process to set up the device for mobile viewing.
Step-1 Download & Install The App
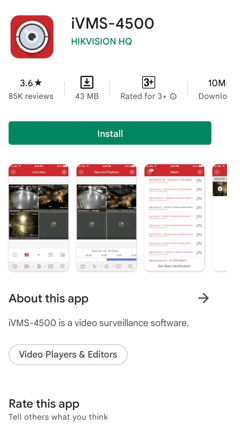
For that, we open the google play store on the google browser. Then enter ‘iVMS 4500′. The following page will appear.
This google play store page will show your search. Now you have to click the ‘install’ button. The installation process will start immediately. It takes only a short while to load the content. When it is finished, the page closes and the app appears on your display screen.
Step-2 Open The App
Press open the icon of the app. The following window will open.
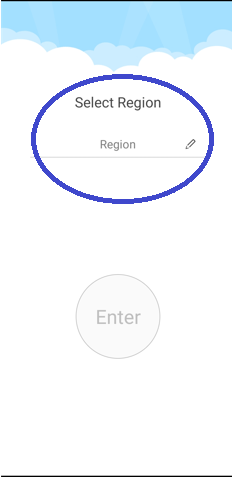
Step-3 Select The Region
Here the app is asking us to select the location. You have to select your zone and the country. For that, you have to click the edit symbol. It will open this page for you.
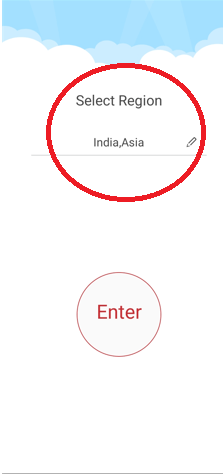
As is mentioned here. We have selected a zone and the country. It initiates this process to become certain that from where we are accessing this system. Press the enter button for the next step.
Step-4 The Home Page Will Appear
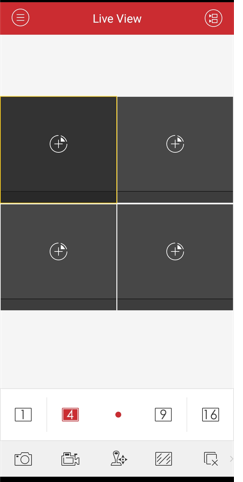
Here, the following page will appear.
This page has many functions. Press the option on the upper left-hand side. You will find that it is filled with many options. We will choose our option for the next stage. Click the three lines symbol given on the upper left-hand side.
Step-5 The Menu Page
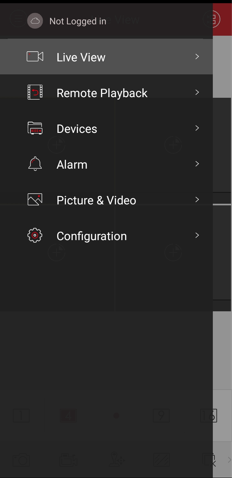
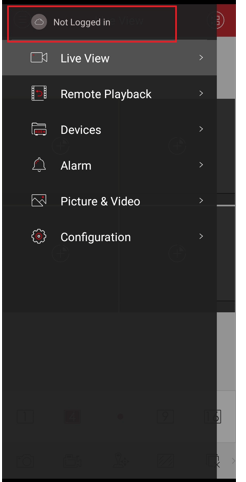
Open the menu page. It will show you multiple options. You have to know about these functions prior, then only you can select the right option.
As you are seeing the multiple options on the side.
The live view is steering you towards the camera monitoring and viewing. It will show you activities after connecting the gadget. A remote playback option is given. It will guide you in watching the recording.
There is a device option given. It is given for NVR management. Alarms are given to use the Sensor option. It will make your security extra solid. It can sense motion and audio and alert you accordingly. Pictures and videos are the galleries where you can keep the backup of the device.
The configuration option is for making certain arrangements and settings for the device. But first, we will go for the device login.
Step-6 Select The Log In Option
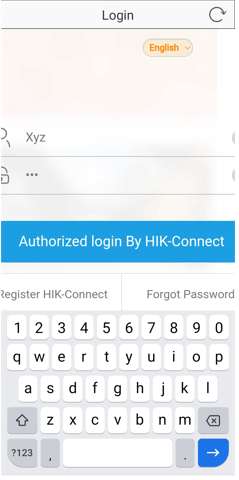
As we have shown here, it is mentioned that not logged in. We will go for the login. For that, we have to click the login option. It will reflect this window on the screen.
Step-7 Device Log In
The page has an Id and a password option. Fill in the id and the password. For that, you have to give the NVR id and the password which you had done to make your device operational.
As we have shown here we have mentioned them in their respective places. If you have forgotten the password then you are left with two options.
Either you have to go for the backup process, where it will ask you for certain security functions or you can register all a new. For that, you have to use the Master password suggested by the Hikvision for this version of the NVR.
After that click the button and move on.
Step-8 Adding The Device
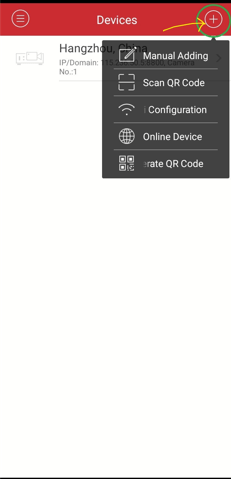
After logging in we will go to add the gadget with the application. The new page will show on the upper right-hand side a “+” icon. It is a symbol for adding the device. Click it to add.
Here, the option is saying multiple ways to add the device. We will know them cursorily and follow the “Scan the QR Code” option, which is easier and safer.
The manual Adding option requires filling in the port, the IP address, user Id and the password. The Configuration option is especially for Wi-Fi purposes. Here, we will adjust the settings for the software to make the device connected with the app.
The online device option is more encompassing. It has functions where you can add many devices by manually setting the fields for every gadget.
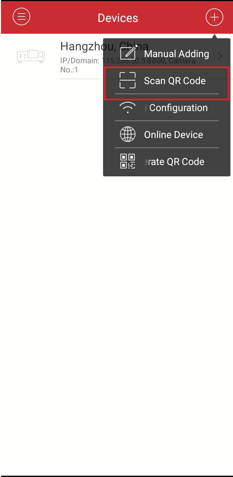
The best and most trusted option is the Scanning of the QR code. We will go for it.
Step-9 Scan The QR Code
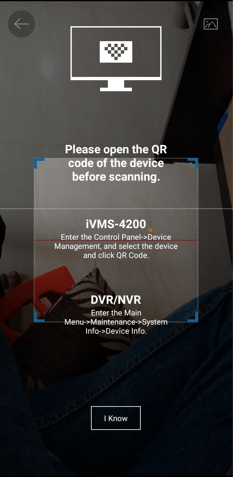
Click the Scan the QR code option. It will open a new window for scanning.
The full form of the QR code is the Quick Response Code. As its name, it is quick to respond. It opens a new window for the users. Where the client has to connect the scan of the NVR with it.
Step-10 Scan The NVR
When we click the option, this page opens for the software. It is asking us to connect the gadget to make it remotely accessed. The moment we align it with the QR Code of the NVR, it reads it automatically and sends us a signal.
There is hardly any time lapse between scanning and capturing. It is done very smoothly. Press the next option now.
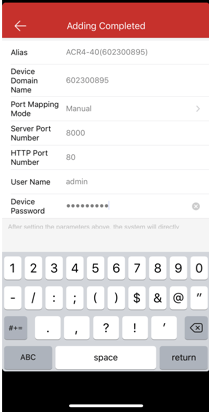
Step-11 Adding Completed
The application will reflect a page that will have the details of the device. It will show you the device name, the domain name, port, user id and password. If it is not showing the id and the password, then you have to manually insert them.
You can add multiple devices to the app by using the same method.
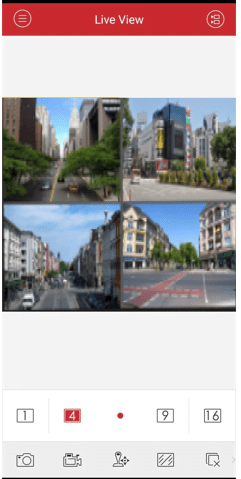
Step-12 Monitoring Begins
This way the gadget is added and we do our monitoring. When the device is added, the cameras attached with that NVR appear on the mobile display screen.
You can add more than 20 devices with the app at a time. It will show you a list, where all the NVRs are mentioned. Whichever you have to view, click them to monitor on the screen.
Conclusion
We have given here the full illustration to guide you with the Hikvision Mobile setup. It can be accessed from any location and we can operate the NVR from our location. It makes our vigilance more powerful.
We can take snaps, record activities, see playbacks, transfer the data, etc. The remote access also saves users’ time as they are in command of the site. We have tried to give you the best possible explanation and solution for the mobile setup process.
Every step is laced with images. These images function as a guide for users. If you have any queries regarding the Hikvision mobile setup process, please let us know. We would love to give you the best possible solutions to your queries.





I can’t upload
can you help me please
I can’t upload
problem not solved thanks
hello nice sharing thanks
problem not solved thanks
hello nice sharing thanks
I really love you
It really worked, I appreciate it!
can you help me please
I sent an e-mail from the communication channel. Can you help?
It was a great sharing
It was a great sharing
I really love you
I am having trouble with the installation
hello nice sharing thanks
It was a great sharing
I sent an e-mail from the communication channel. Can you help?
I really love you