I need to reset my password and have forgotten my existing password:
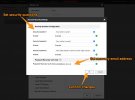
You have a few options here. The two methods below cover how you can do the reset yourself provided you have exported a GUID file or set security questions on an NVR in advance. You can set your security questions and set up a password recovery email address by connecting to the NVR in a web browser and then going to:
Configuration → System → User Management (select user) → Modify → Account Security…
If you don’t have the any of this set, then you can use the SADP tool with the help of the supplier to reset the password. For this method, please see our guide on how to reset the password of your Hikvision device in 5 steps using the SADP tool. Please note that this method will only work if you purchased the device from an Authorised Hikvision Wholesaler or Reseller.
If none of these options work for you and your device has a physical reset button, then you can use this pushbutton to reset the device to its factory state. This will allow you to activate the device again and set a fresh password.
Method 1: Reset the password in the SADP tool with a GUID file (NVRs only)
Step 1:
Find the NVR in the SADP tool and select it by ticking the box at the start of its row, and then click on “Forgot Password” in the right-hand “Modify Network Parameters” flyout:
Step 2:
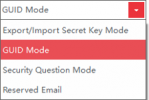
This should open a “Reset Password” popup window with a dropdown for the reset mode, select “GUID Mode” from this dropdown:
Step 3:
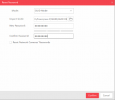
Now, simply click on the folder button beside the “Import GUID” field to locate and upload it from your PC or memory stick. Once this is uploaded, set your new password, and then click “Confirm”.
If the GUID file is correct, the password reset should be successful.
Note – Only tick “Reset Network Cameras’ Passwords” if you want the NVR to pass this new password on to all of the cameras directly connected to it.
Method 2: Reset the password with previously set security questions:
Step 1:
Find your device in the SADP tool and select the Forgot Password option from the Modify Network Parameters window.
Step 2:
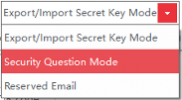
Select “Security Question Mode” from the “Mode” dropdown.
Step 3:
This will bring up your security questions – answer all of these (the answers are case-sensitive), and then set your new password in the bottom two fields. Click “Confirm” when done – If all of the answers are the same as the ones that were originally set, the password will be changed.
Part 8: How do I update the firmware on my Hikvision device?
It is vital that you keep the firmware of your Hikvision devices up-to-date, which means installing the newest version as soon as it becomes available. The best and easiest way to do this is to use the device’s web browser interface. The below steps will show you where to find the newest firmware for your Hikvision device, and how to use the browser interface to install new firmware onto it.
Step 1: Check the current firmware version installed on the device.
Using SADP:
NB – This will not work for any device that is directly connected to an NVR’s PoE ports, or if you have a partitioned network setup.
Install the SADP Tool on your computer, and run it while the computer is connected to the same LAN / network as the Hikvision device.
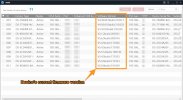
This will scan your network for all the Hikvision devices connected to is, and show their network information, you should see a table similar to the one below.
The current firmware version of a device is shown in the 8th column on its row under the heading “Software Version”.
Using a web browser:
Open a web browser (Internet Explorer tends to work best on older devices), and log into the device by either using its IP address or virtual host links if it’s directly connected to an NVR.
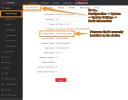
Now, click on the “Configuration” tab at the top, which should take you straight to the device’s “Basic Information” page – this can also be found by following the path:
Configuration → System → System Settings → Basic Information
Your current firmware version is shown in the 5th row:
Step 2: Find the latest firmware available for your device in the Hikvision Download Portal and download it to your computer
Go to the Hikvision Download Portal for your region:
We’ll use the UK portal in this example. Once on the portal, go to:
Portal → Product Firmware → Hikvision
Click on your device type from the list on this page – “Back Ends” here refers to NVRs and “Front Ends” refers to the majority of cameras.
Then, select the platform that your device is from. For instance, to find the firmware of an I-Series NVR, such as the DS-7608NI-I2-8P, then you’ll need to follow the path:
Back Ends → NVR → [76 77 96 NI-I]
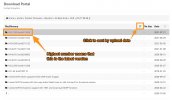
You’ll then be shown the range of firmware versions for that device. To find the latest, just look for the largest number – using the sorting icon marked below can help as it will chronologically arrange the firmware date.
Note – Be cautious if using the sorting icon – it will not always put the latest version at the top, as Hikvision sometimes reuploads older firmware.
In this case, the newest version is “V4.50.010 build210332”:
Once you click on the link, you’ll be taken to a page that usually has both the release notes as a PDF file, as well as a ZIP file, which will contain the firmware itself.
Note – As well as explaining the purpose of / improvements made with the specific firmware version, the release notes will also list all of the devices to which that firmware applies to. It is always worth checking that your device’s model number appears here to confirm that you are about to download the correct firmware file if you have any doubts.
Now, download the ZIP file to your PC:
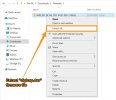
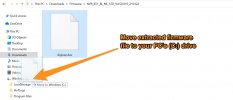
Extract the “digicap.dav” file from it, and copy this to your computer’s C: drive.
..
You’ll be asked to either enter an administrator password or to click continue to confirm that you want to move the file here. Do whichever applies – it’s safe to move your firmware file to this folder:
Step 3: Install the downloaded firmware onto your device
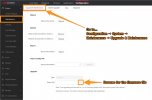
Log into your device again in a web browser, and go to:
Configuration → Maintenance → Upgrade & Maintenance
You’ll see an “Upgrade” tab at the bottom of the page, click “Browse” here:
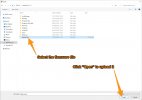
Select the “digicap.dav” saved in your root folder from Step 2, and then click “Open”:
Click “Upgrade” and wait for the upgrade and then “OK” on the popup reminding you that the device will reboot after the firmware is installed:
If you get an error message at this point, check the following:
The update process will begin if you have done everything correctly and then log you out while the device reboots. If you want to double-check that the update was successful, use step 1 again to verify that the new firmware has been installed and showing on the device.










Add Comment