HiSeeu Wireless Camera System installation guide right click your NVR mouse choose fast network, then click auto config, check cloud ID status is online and network is healthy, then you can remotely check the system on your phone app
For version : 3.0.3.0 if it doesn’t notice the password is incorrect , pls make sure you used the wired mouse, due to 3.0.3.0 version doesn’t support wireless mouse.
Note:User name and password should not exceed 8 characters and should not contain such as &*! @ (… #% and other special characters
You can refer to our YouTube channel videos : https://youtu.be/KJpJnYFlGK8
1) Within the black area, Click the left mouse button>right mouse button>left click>right click… Lasts 6 times
 2) Yes
 3) Input your new password,The old password is empty,you don’t need enter anything.
HiSeeu Wireless Camera System installation guide
Read Next : Hisilicon IP Camera Firmware Update
 4) OK
4) OK
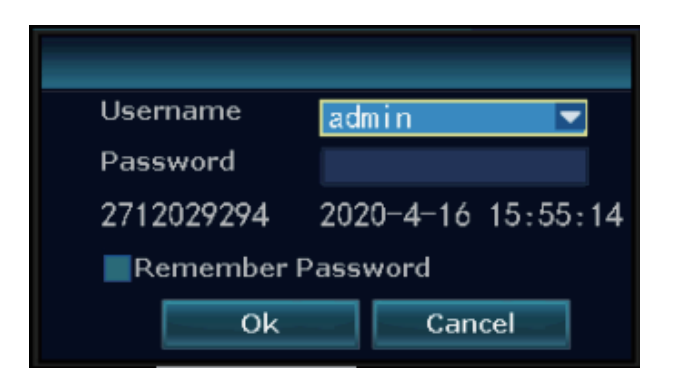
 5) If this step still not work, please email Johnny@hiseeu.com with below screenshot of your NVR, then they will send you the super password to login
How to solve the problem of camera connect failed?
Please follow these steps to troubleshoot
Please check if the white antenna on the camera is loose first.
1)Cover the sensor under lens on the camera to see if the light is lit or not.
If it’s bright, it means camera is not bad.
If it’s not lit,You can connect the power of a good camera to the bad camera.


In the case of determining that camera is not broken.
2)right-click the mouse> video manage> Refresh / Search
3) if your camera with reset button, no LAN port, please take camera close to your NVR
1. delete the connect failed channel
2. press the reset button on camera for 10 seconds
3.Right click the mouse again > wireless add > wait the screen show a new camera IP address 172.20.14.**
4. if no IP address, pls reset camera for several times,
After adding the camera successfully, you can exit the add camera interface
below is the video for you check :https://youtu.be/Kaxvth-sd-Y

4) if your camera with Lan port
Pls use an Ethernet cable connect the camera to your NVR.
Delete the connect failed Channel>Refresh(Search) find IP address 192.168.**.**>Match Code(wait for IP address change to 172.20.14.**)
After that you can unplug the Ethernet cable.
You can refer to this youtube video.
HDD not fund / Not record anything
Please refer to these below to solve the HDD not fund issue.
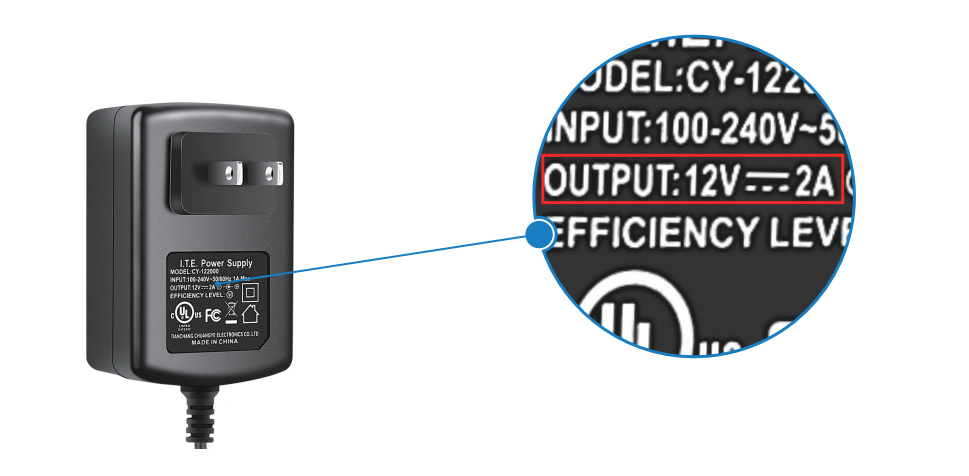
1)Check the power adapter connected to the NVR box. The NVR box uses 12V 2A or 12V 3A power supply. If you connect the 12V 1A cameras’ power supply to the NVR, the NVR box will not provide enough power to drive the hard drive.
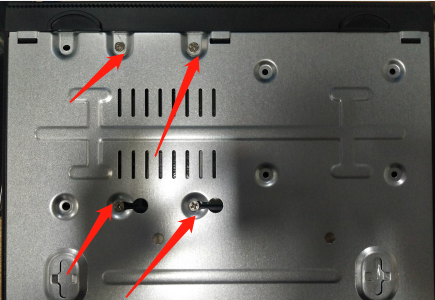
2) If hard drive is preinstalled, there are 4 screws at the bottom of NVR box.
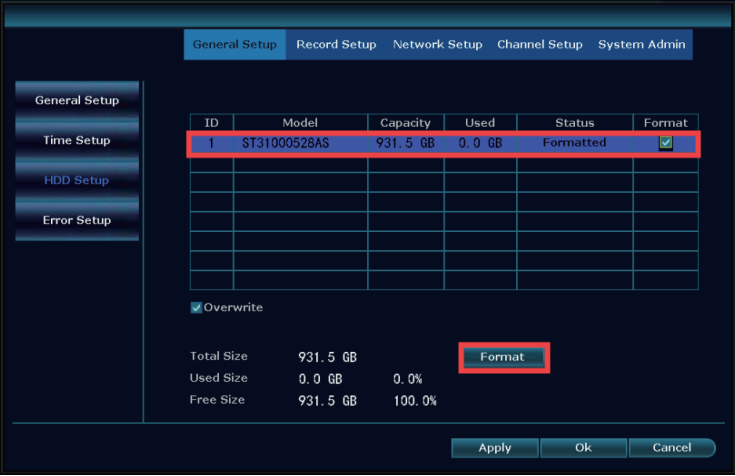
3)Check Hard Drive Information on NVR box and Format it
Right click the mouse>system setup>General setup>HDD setup>select the hard disk>Click Format, if the progress bar always shows a few percent or the formatting is failed, please contact with us.
4) Please open the NVR with a screwdriver, check the two cables connecting the hard drive and see if they are loose.
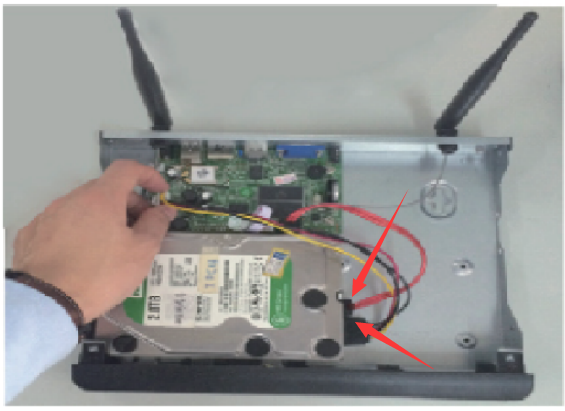
5)Take the hard disk out and install it on your computer. Check if the computer can recognize the hard disk. This is to confrim the HDD is the problem or not.
How to solve Gateway Unreachable or Network Error
If you click “fast network” to appear: Gateway Unreachable or Network Error , pls fellow below steps:
Step 1:
1) you must check if the network line is faulty or not: check whether the switch and router line connection are correct.
2) Can you connect to the external network normally through the computer wired connection?
Notice: Do not directly connect the recorder to the fiber

Step 2: Right click mouse and choose Fast Network —-> Auto config ,check if the network will be healthy or not
 Step 3: If the auto config still can’t make it work , pls kindly check the same network computer network setting
 Then “manual configuration” set the recorder network settings, don’t choose DHCP, input the same IP address and gateway and submask same as your computer

Offline
1)Pls Connect NVR to your router with an Ethernet cable. After that right click the mouse > Fast network.


2)If Step 1 doesn’t work, Maybe the Ethernet cable is damaged. Please replace it with a new one
3)If there is no problem with the cable.
Pls right click the mouse> system setup >Network setup>Do not choose DHCP>Change DNS to 114.114.114.114 or 8.8.8.8 > Power off the NVR and power on again(Reboot the NVR)
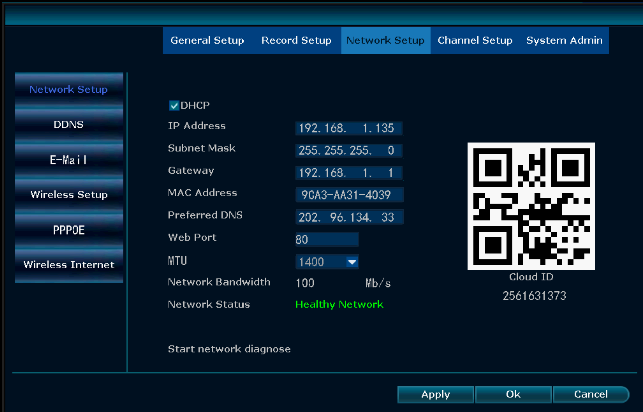
4)You can also connect the NVR to your home WiFi,
Enter the wireless internet interface > Select your home WiFi and enter your password > Apply

Change the display channel of the camera
When you select the corresponding channel, you can click the two buttons on the left, and then move the channel

You can also drag the image directly to another channel

How to set up Motion Detection?
1)Enable Motion Detectin on NVR Monitor
Pls right click the mouse>system setup>Channel Setup>Video detection>Selecting the Channel for Motion Detection>Choose the form of alarm>After you set it up you can Click “Copy to” to set to all channel
 2) Set the area of motion detection to be set within the field of view of the camera.
 3)App Alarm
a)Select App Alarm on NVR
b)Click three dot> Alarm push
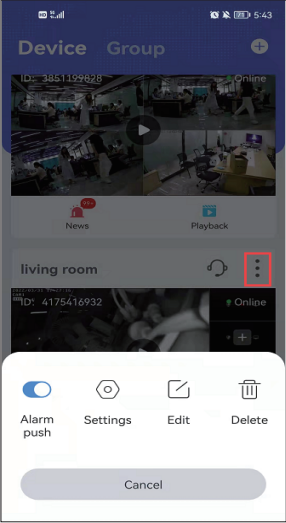
c)Click System authority settings, turn on all permission of the app.

How can I view the camera remotely?
There are four methods to view the camera system remotely. Please refer to these step below.
1) First you need to connect the NVR with your router by wired or WiFi
Wired connection
1. wired connection, connect the NVR with router by ethernet cable
2. right click your NVR mouse choose fast network, then click auto config, check cloud ID status is online and network is healthy, then you can remotely check the system on your phone app
3. if not online and healthy network, please click manual configure, and check your router detail,
make sure the NVR and your router is the same IP gateway, IP address the first 3 number should be the same, the last one can’t be the same ,. preferred DNS please change to 8.8.8.8 and apply it
WiFi connection
1. please notes our NVR only can work with 2.4Ghz wifi network,
2. right click your NVR mouse choose system setup–network setup–wireless internet –enable wireless LAN, then find your house wifi name, input password, apply it
(please note the wifi name can not included any special character ,such as “_”, otherwise it will show connected failed.)
3. check the status is connect failed or success, if it is failed, please click view details,
check the same wifi network details on your phone and your NVR, then change them to the same IP gateway, IP address the first 3 number should be the same, the last one can’t be the same ,. preferred DNS please change to 8.8.8.8 and apply it
https://www.hiseeu.com/a/help/article/27632
2)To view on the Phone
a) Setup NVR box
Please reset your password:right click mouse>system setup>system admin>user>setuppassword>change a new password(Password must be within 8 characters)
b) Setup Mobile Phone
Scan below code download “Eseecloud”

c) Click “+”–“other way to add/scan the QR code on your NVR fast network page “–input cloud ID user name is admin and password is the one you login in NVR (If you doesn’t change the user name and password, User Name is admin password is the one you set for the NVR before), if your forget the password please refer this step: https://www.hiseeu.com/a/help/article/27650
(Cloud ID is in the lower right corner of the screen or right click your NVR mouse and choose fast network to find Cloud ID)

 Scan the QR code on display
 The user name is admin, enter the password of your camera system in the password field
 3)To view via Eseecloud software on PC
EseeCloud for Windows PC
Eseecloud MAC: http://download.dvr163.com/tool/EseeCloud-mac-2.0.8_20200228.zip
Eseecloud Windows: http://download.dvr163.com/tool/eseecloud/EseeCloud_Setup_3.0.7.10.exe
here is the video to check how to add it : https://youtu.be/0AX1-sMKJG4
If you have registered your eseecloud account on your mobile phone, you can directly log in with your eseecloud account on the computer, and the account information will be automatically synchronized to the PC software
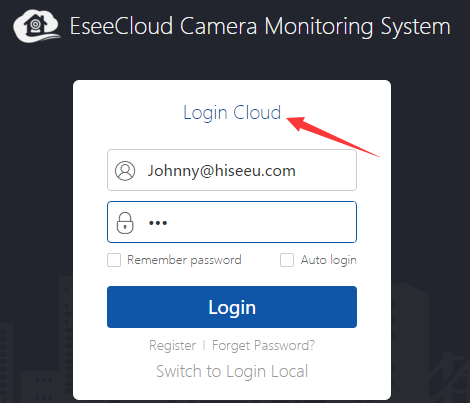 Double Click Cloud ID


How to remove the red triangle mark
For the red triangle mark it is for notice you something happened for your camera
such as the motion detection , video loss, HDD not found,
for remove the triangle
1. you need upgrade your NVR version to 3.0.5.0
there are 2 ways to upgrade
1) online upgrade, connect the NVR with router by LAN cable , right click your NVR mouse and choose system setup–system admin–system upgrade–online upgrade
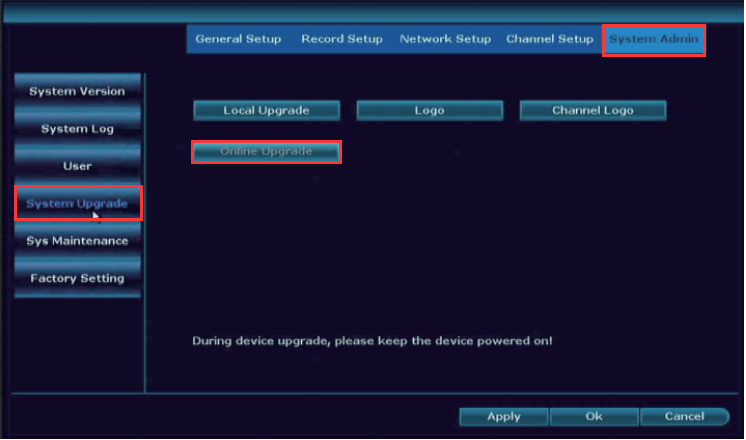
2) offline upgrade, you need copy the firmware to the USB disk and choose local upgrade the firmware you cane email Johnny@hiseeu.com to get it
3) after you upgrade successfully, pls right click your NVR mouse and choose system setup–general setup–error setup–disable alarm icon.

Connect the camera to WiFi, then add it to NVR
You can connect the camera to your home wif and then add it to NVR.
First you need to press the reset button for 6s on the camera to reset the camera,
1) Please refer to pages 4 to 6 of the manual in the attachment to connect the camera directly to your mobile app,


2)First, you need to connect NVR to your router,
Then search the NVR for the camera connected to WiFi
Right Click the mouse > Video manage > Change the “protocol” to “onvif” > Search > Add one
if it show Password Error, please go to your phone app , click “…”–“Edit” then on blank place quickly click 6 time you will see cameras password here, go back to NVR video manage page, select the correct channel, click Manual Edit to input camera password .
What to do when the screen color is not displayed correctly
1) Click the mouse to select the screen –> click the 3rd icon (color adjust)

2) Click Default button–>select Ircut mode–>Ok

If it doesn’t solve your problem ,pls send this screenshot to us
Audio function!
1:Please check if there is a microphone hole on the back of the camera.

 2:When you want to use the audio function of the camera, you need to turn on the audio function of the camera:(left click your mouse on the camera images)
3: right click your mouse — turn up the volume
4: Also turn on the audio button on App


if your version is 3.0 ,you should choose the AV stream also,refer these step
right-click the mouse ->System Setup->Channel Setup ->Encode Setup ->Select orresponding Channel(1-8) ->change the Encode Mode to AV Stream -> Apply
 5: Every camera supports audio, but you can only use the audio of one camera at the same time.
and if the NVR your had order is with monitor, pls plug in your headphones or stereos behind the NVR

Why can’t remotely check the playback and change the setting
pls fellow below step
right click your mouse and choose system setup –system admin–user–edit user– choose remote and config and playback

How to solve the problem of camera lost connect with NVR, need reboot the camera to fix this problem?
Firmware 1: https://www.dropbox.com/s/qlyr53xfsrjscox/%E9%87%8D%E5%90%AF%E7%9B%B8%E6%9C%BA%E5%9B%BA%E4%BB%B6.rar?dl=0
IPCAKV3W_20220415_3_6_82_572011
IPCAKV3W_20220415_3_6_82_572011
(Fix the camera lost connection with NVR need unplug camera power cable)
Firmware 2: https://www.dropbox.com/s/mrdzs1ioqhmuuve/%E4%B9%9D%E5%AE%89%E5%8D%95%E6%9C%BA%E4%BF%A1%E5%8F%B7%E4%BC%98%E5%8C%96%E5%9B%BA%E4%BB%B6.rar?dl=0
IPCAKV3C_20220415_3_6_82_572010
IPCAKV3W_20220415_3_6_82_572011
(Fix camera signal problem)
572010 for the camera model: 5322-W
572011 for the camera model: 5323-W
please go to video manage page to confirm the camera model.
To upgrade the camera firmware: download the firmware from the dropbox, unzip the file at first, copy the correct file to your USB DISK root, format should be FAT32,go to system setup–channel setup—IPC upgrade page–click the correct channel–click start–remove mouse –insert USB disk–wait for camera upgrade successfully
I’ve connected everything, but the display doesn’t show images
Pls Refer to the following steps
1)Press the left mouse button for 30 seconds and the camera system will reboot.
2)A)You need use a VGA cable to connect the NVR to the monitor.
B)If you don’t have a VGA cable but have another monitor, you can connect the camera system to another monitor.
3)Then change the output resolution of NVR.(Right click the mouse>system setup>General setup>Screen setup>Output resolution)
Set an appropriate resolution and switch back to the original HDMI Cable.
4)If the display is still not displayed, you can choose another resolution.

if your NVR box version is 3.03.0 pls change the step 2 as below:
2) Then change the output resolution of NVR.(Right click the mouse>system setup>General setup>Display Resolution)

If camera often loses signal with NVR?
You can use the following four methods to solve the problem of poor camera signal
Please check if the white antenna on the camera is loose first.
1)First, you can change the wireless channel of the camera system to ‘other’, and the antenna of NVR is better to stand up
Right click > system setup > Network setup > change Wireless channel to “other” > Apply
Then restart the NVR, unplug the power supply of the NVR and plug it in again
2)You can replace the white antenna on the camera with the black extension antenna in the package, so that the black extension antenna passes through the wall.


Place the camera next to the NVR to ensure that there is a good signal between the camera and the NVR.
3)You can set a camera as a WiFi repeater to enhance the signal between the camera and the NVR.

4)You can also buy a WIFI repeater, which also enhances the signal between the camera and the NVR.
for Wifi repeater you can search: B07NRBYM5C on amazon.
If you can write a good rating to our camera system,We can send you one for no charge.

(warm notes:if your version is 3.0,there is “Search”button but not “refresh” ,click the “search” but the “refresh”)

(version 3.0)
How to use the wifi repeater to enhance signal

When the repeater is powered on, its indicator lights up.
Press the reset key for 10 seconds and it will deletes all previous matching records
How to use it on NVR.
1)Connect the repeater to NVR by Ethernet cable
2)click “Search” and then there will disappare a device which IP address is “192.xx.xx.xx”
Click it, it will pop up a new window
click Match button to let the status become “wireless has been matched”

At this point, you can unplug the Ethernet cable.
4) back to the Video Manage interface and click the Repeater .it will show the same window as the figure below.
click the add icon after the Router button,then select chanal which you want to enhance sigal

How to add an extra camera?
when you receive the new camera , there is no match between the nvr box and the new camera. You need to pair them.
if your camera with reset botton , no Ethernet port,
1)right click your NVR mouse and choose wireless add
2)press the camera reset botton for 10 seconds
3)wait it shows camera IP address 172.20.14.**
4)if no IP address, pls reset camera for several times, then you can exit,
below is the video for you check
if your camera with Ethernet port, You can refer to our video on Youtube.
1) You need to connect the camera and the NVR box with the Ethernet cable.
2)Right-clik the mouse video manage→Refresh/search( find camera IP address as 192.168.1.**)→Match code( wait camera IP address changed to 172.20.14.**) then exit and choose add one
After camera and NVR are paired, you can unplug the Ethernet Cable.
3) Use the same way to pair more camera.
How to solve “Resolution too big”?
Our system upgraded , the “Resolution too big” camera is 3MP, old system can’t work with 3MP camera
1. right click your NVR mouse choose system admin–system version to check NVR version is 2.8 version or 3.0 version
2. if it is 3.0 version, you can upgrade it to latest firmware then it can support 3MP cameras (3.0.6.0 version and above version)
how to upgrade to NVR?
1) Online upgrade : go to system admin-system upgrade-then click online upgrade, wait for it upgrade successfully, then camera will show image
2) Offline upgrade, please email Johnny@hiseeu.com with your system version page , then she can provide firmware to you
3. if it is 2.8 version,the only way can fix is to upgrade camera firmware
right click your NVR mouse–system setup–system admin–IPC maintance, then take a screenshot of camera version, email : johnny@hiseeu.com for resolution too big problem.
4. after you get the firmware, please copy to your USB DISK root, format should be FAT32,go to IPC maintance page–click the correct channel–click start–remove mouse –insert USB disk–wait for camera upgrade successfully
5. go to system setup–channel setup–encode setup–find correct channel–change resolution from 2304*1296 to 1920*1080.
How to Change the Display Position of Channel
There are 2 ways to changed the position of camera
1)Generally speaking, we will choose four channels to display at the same time on the screen

For convenience, let’s first choose to have all channels displayed on the screen.
right click your mouse — Split Screen — X8 View

Now we want to let the Channel 7 to the Channel 2 position
left click the mouse on the channel 7 screen and dont loose
then move to the channel 2 position ,loose the mouse left key

that is OK
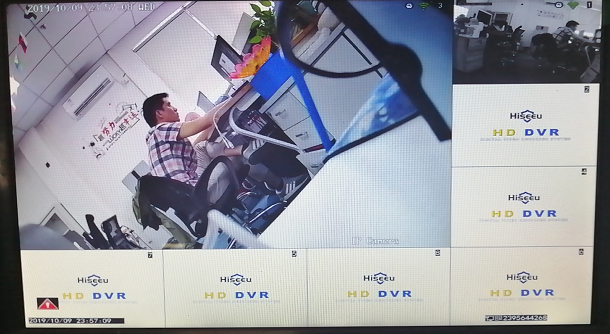
2)Please wrote down the IP address of the camera (which you want to exchange it channel,such as channel 5). Then deleted the channel which you want that camera to place(such as channel 2), did a manual edit on channel 2 ,Enable it and change or add the IP address of channel 5 wrote down. Camera immediately came up on channel 2.

App wrong Password
Pls refer to these step to solve the wrong password issue. refer this video : http://youtu.be/bFVwGqnr2Js
1)If you doesn’t change the User Name and the Password on NVR box.
The User name is ‘admin’, no password (you needn’t input anything)


2)For change the password on NVR box.
Right click the mouse>system setup> system admin>User>set password

3)User name and password should not exceed 8 characters and should not contain such as &*! @ (… #% and other special characters (you can setup password: jasmi985/ jasmi996/ jasmi856 or others. )
If you can login NVR with a password, but can’t login on App, please confirm that the password within 8 characters
Note:App login username and password are different from the camera login username and password. They are two different sets of username and password system.
How to set up Email notification?
a. Enable POP/IMAP in your email. If default setting of your E-mail enables that, please skip this step.
Login your email via browsers; go to Settings – Forwarding and POP/IMAP-Enable POP and IMAP – Save Changes.
 We also need to Allow 2-Step Verification for your Gmail account, login www.google.com
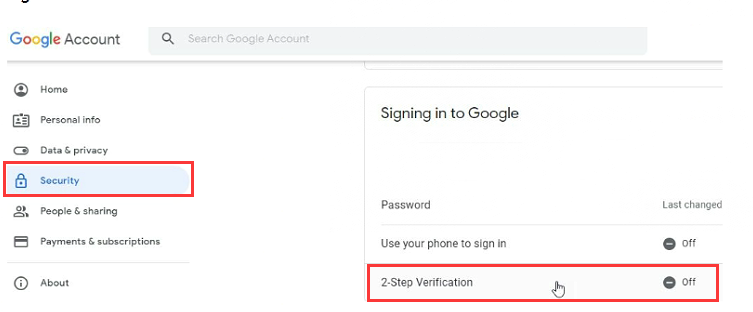
- Open your Google Account.
- Select Security.
- Under “Signing in to Google,” select 2-Step Verification and then Get started.
- Follow the on-screen steps.
- Normally after you set 2-step verification, you will create a new password on NVR password page you need input this password
b. Go to your system main menu. System setting- Channel setting- Video Detection. Enable E-mail Notification and click Copy to apply the same setting to other channels.
 b. Go to your system main menu. System setting- Network setting- Email setting. You will see the interface shown below.
 c. Follow the instruction below to input the information required to finish the setting.
Email Notificaion: Check “Enable”
SMPT Provider: Click the one you use in the selection. Or click USER CUSTOMIZE to use the E-mail server that is not in the selection.
Sender : Type in your sender email address
Password: the password of login your sender emial address
SMTP service: when you choose the correct SMTP provider, it will suggest correct service to you
Port: The default port is 25. If it doesn’t work, you can go to the link below to get the port of the e-mail you use.
https://www.arclab.com/en/kb/e … .html
Encryption Type: Select the one that your E-mail server works. If there is no selection, please choose None.
Sendee 1: the email you want to receive email alerts
Sendee 2: the second email you want to receive email alerts, you can leave it blank
d. Then click Test see if you can receive a test e-mail alerts from Esee. If yes, that means the setting has set successfully. Then, please click Apply to save the setting.
e. Latest APP allow to set email notification on the cellphone directly
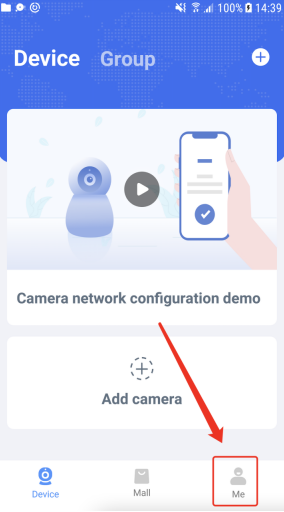
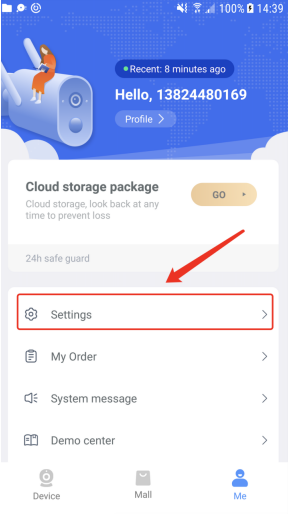
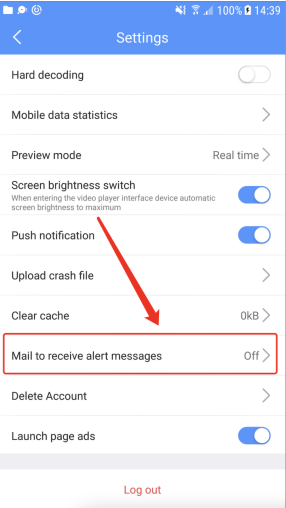
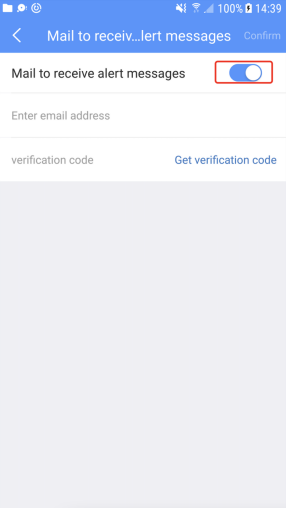
Go to cellphoen app Eseecloud, click me–settings–mail to receive alert messages–enable it, then put your gmail address, to get verfication code, after you input verfication code click confirm, then you will get the email notification, thanks
How to setup Record Plan?
You can set up three modes of record plan
Note:After you have set up the record plan, you need to click “copy to” to apply the record plan to all channels.
1) Time Recording:
Setup period of time of recording on NVR,Right Click the mouse>System Setup>Record Setup>Record Plan.
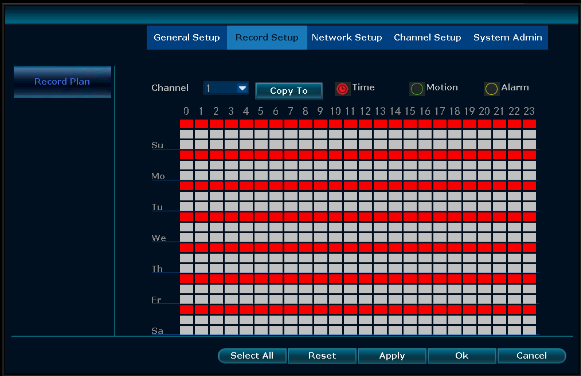
Click Time and put mouse icon on the upper left corner(for example 1 as picture shows).press and drag the mouse to the right to choose the time.the list will turn to red.
2) Motion Recording:
Only detect motion and then start recording. Right click mouse>System Setup>Record Setup>Record Plan.
Click Motion and putr mouse icon on the upper left corner, press and drag the mouse to the right to choose the time. The list will turn to green.
3) Alarm Recording:
Riht click the mouse>System setup>Record Setup>Record Plan.
Click Alarm and put mouse icon on the upper left corner,Press and drag the mouse to the choose the time,The list will turn to yellow.
Note: Users can Setup any period of time they want, for example 0:00:00-23:59:59, That’s 24hrs*7days recording. When NVR detects hard disk, the default setting will be 24hrs*7days recording.
The priority of Alarm is higher than that of Motion, and the priority of Motion is higher than that of Time.
When you have set the corresponding record mode, you can click “select all”, and the time area below will become the corresponding color
Video Playback
Right clik the mouse>Video Playback>Choose date、Channel、record mode>Click Search>then can view playback file
Note:You can only watch four Channels recording at the same time.

1. IIIustration for playback button:

play,

pause:

fast forward*2,*4,*8;
2. Play file: Choose the recording file in file list,as number“1”shown in picture. Chooseone of the recording, click“play”to play to recording file;
3. Video backup: Choose the recording file in file list,as number“1”shown inpicture.insert the U flash disk, click“video backup”to backup the file;
4. Timeline: Click“date”and“time”at left bottom to check the timeline of recording, as number“2”shown in picture;
5. On the timeline with recording file,left click the mouse, the can playbackthe file.
How to watch the playback on my phone?
First ,you should install the Eseecloud on your phone ,if you hadn’t installed it ,refer this link:
http://www.hiseeu.com/news/wirelessskitfaq/69.html
click playback

then it will show the interface follow below
choose the time and channel which you want to watch

Notes: The default is no sound when you watch playback.so you should click this sound button to open it if you want to hear
How to backup the recording
There are 2 ways to make backup
1) use USB disk to backup
1. right click your mouse, and choose video backup.
2. choose the channel/date/time playback you need backup,
(If you copy too much backup, we suggest you copy it one by one channel to save copy time)
3.Backup, the let your mouse out and within 30 seconds put the USB to get the backup
if you need check tbe playback you copy out on computer, pls use VLC player , you can download here :
http://download.dvr163.com/tool/Video-player%20.zip
pls notes USB disk format should be FAT32 otherwise your NVR may can’t find it.
 2) make backup on computer
1. download Eseecloud :
Eseecloud MAC: http://download.dvr163.com/tool/EseeCloud-mac-2.0.8_20200228.zip
Eseecloud Windows: http://download.dvr163.com/tool/eseecloud/EseeCloud_Setup_3.0.7.10.exe
2. add the system to your Eseecloud phone account, then on computer software choose login cloud(login with the phone app Eseecloud account and password)
3. search the cameras playback, and choose the channel you want to make playback and wait for it shows the recording
4. click the download icon the chose the files you want to download, wait for it finished the process, then you can open the it and check the playback on computer
here is the video for you check : https://youtu.be/kR7QN_2UKdI
Factory Setting
Pls refer to these step below to reset system
1)Right click the mouse>System setup>System admin>factory setting
*Note: pls don’t check “Channel setup”&”Screen setup”&”Digital Channel”
Click “Apply”
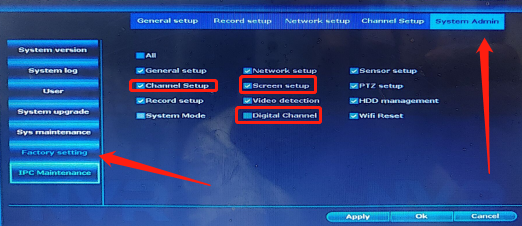
2)If you Check “All”
After NVR Reboot,you need Right click again>video manage>Double-click the IP address of camera (like 172.20.14.2)

If Your NVR box version is 3.0.3.0
Pls refer to below steps
Right click the mouse>System setup>System admin>factory setting>simple restore

The standalone camera connection step
pls connect it step by step , if you fail , pls send us some screenshot and tell us which step is wrong by email or whatsApp
our email is :johnny@hiseeu.com
Wechat/WhatsApp:+86 13392810296
Skype:Johnny.chen1204
1) download “Eseecloud” app on your phone and register it
click add button and choose Standalone camera

2)check if the camera light lit
click this button

3) Point the camera of the mobile phone at the QR code of the camera

4)Choose a network environment for your camera, the WiFi name

5)input the wifi password and click the connecting device button

6) Wait a minute and it will connect succeed click COMPLETE button

7)edit the camera name and set its password(password can be empty )

that is finished! if you want change some camera information such as password, you can click setup button to set it

Here is video for you check how to connect it on phone app : https://youtu.be/tNKeWUfe-mI
How to fix there is no cloud ID
1. Connect the recorder to the same LAN as the computer :connect to the router
2. Provide the IP address of the recorder, System Settings – Network Setup Photo

3. Recorder switching debugging mode: system setting – system management – system maintenance, right mouse click, pop-up dialog box, click the left mouse button in the blank space of this pop-up dialog box, right click, click the left and right button, 12 times, Find out if the font prompt toggles the debug version, click Yes, OK. Go back to the lower left corner of the main interface with a red font. Take a photo to us (2.8 version)
 4. Provide remote tool ID and password, manufacturer technology remote connection control and send the email to us
if you don’t have the remotely tool, you can send the email to us, so we can send to you
(3.0.3.0 version)
3.Recorder switching debugging mode: right click your mouse—system setup–general setup–time setup–change the Date format–right click your mouse, pop-up dialog box ,
click the left mouse button in the blank space of this pop-up dialog box, right click, click the left and right button, 12 times, Find out if the font prompt toggles the debug version, click Yes, OK. Go back to the lower left corner of the main interface with a red font. Take a photo to us.

How to contact amazon customer service?
1). Use your Amazon account to log into www.amazon.com
2).Pull down to the bottom of this page and find “Help” button , and click on it to get into a new page
3). Find “Need more help ” in the middle of this page and move it to this button and you will see “Contact Us ” and click on it .Then you will get in touch with Amazon Customer Service Associate.
4).Or you may choose to call the Customer-Service by number 866-216-1072
Add Device (412 camera system)
First you need to connect the camera system to your WiFi.
Click the home button.


Select your WiFi and enter wifi password

This string of numbers is cloud ID.

Then go to “Eseecloud” app

Networked devices

Input your cloud ID and User name(User name is admin) and password(Camera system has no password by default)

5MP WK-4HB315-1T TZ-HB315 Night Vision is not good,upgrade as below
Please download the firmware at this link :
https://www.dropbox.com/s/gcrg3xw7f42ylys/IPCAKV5C_20221011_3_6_97_572110hsy%281%29.rom?dl=0
After you get the firmware, please copy to your USB DISK root, format should be FAT32,
Pls right click your NVR mouse–System Setup–Channel Setup–IPC Upgrade–Select the correct channel–click start–remove mouse –insert USB disk–wait for camera upgrade successfully
How to solve Most of Network Status Problem?
Please right click NVR mouse choose Fast Network check Network Status
- Healthy network: Network connect successfully
- Gateway Unreachable: means NVR IP Gateway and IP address not in the same gateway as your router, Click Manual Config, then find your router correct IP gateway, such as 192.168.1.1, then IP address should be 192.168.1.***, last numbercan’t be the same as your router, change it on NVR. If you connect with wifi network, you need go to System Setup—Network Setup—Wireless Internet page click View Details and click Manually to change those information.
- Request DNS Error: disable DHCP, change the Preferred DNS to 8.8.8.8, reboot the NVR and router.
- Network Cable Disconnect: make sure the NVR connect with router by Ethernet cable
- Network Card Not Found: on Network Setup page find PPPoE disable it.
- Network Busy: disable DHCP, change the Preferred DNS to 8.8.8.8, reboot the NVR and router.




Add Comment