NEW HiKam PC Software for 2nd Gen Cameras (S6, A7 2nd Gen)
Note 1: This HiKam PC software is suitable for HiKam S6L, S6, HiKam Q8 and HiKam A7 2nd generation.
If you need the software for 1st Gen cameras (S5, Q7, A7 1st Gen), please follow this link: (For HiKam S5, Q7 and A7 1st Gen) HiKam PC Software
Note 2: HiKam PC software can’t display the live video of A7 Pro and Q8 3rd Gen yet, the required update will come as soon as possible.
However, we can provide you with a test version, please just send us a message.
Download HiKamPC
You can choose between a zip and an installation version:
Zip version: HiKam PC V2.1.18 ZIP
To install: HiKam PC V2.1.18
Installation after download:
Zip version:
Move the downloaded zip file to the directory of your choice. Unzip them.
Here you will find HiKamPC.exe. You can start the software with a double click.
Installation Pack:
Start the downloaded exe file and follow the instructions of the installation wizard.
When the installation is complete, launch the software. A shortcut called “HiKamPC” will appear on the desktop:
Register:
The HiKam PC software starts with a login window:
Sign in with:
Username: admin
Password: admin
Annotation:
– Please change the login password later in the software.
Configuration Management > User Management:
– If you forgot the “admin” password, please delete and reinstall the HiKam software.
– If you have several network interfaces on your PC or a virtual machine is running on the PC, you may have to select which network interface the PC software should run on.
a. Click on this button 
b. Go to “Select network” and look for the desired sub-network here.
Quick guide to the PC software
Contents:
1. Add cameras in HiKamPC
2. Watch live video from the camera
3. Change settings like camera password, camera name
4. Take snapshots and save to PC
5. Record videos to PC
6. Play videos stored on the SD card in the camera
7. Play videos stored locally on the PC’s hard drive
8. Download video files from SD card in camera to PC
9. Change admin account password
10. Find out the version of the HiKam PC software
11. Uninstall HiKamPC
1. Add cameras in HiKamPC
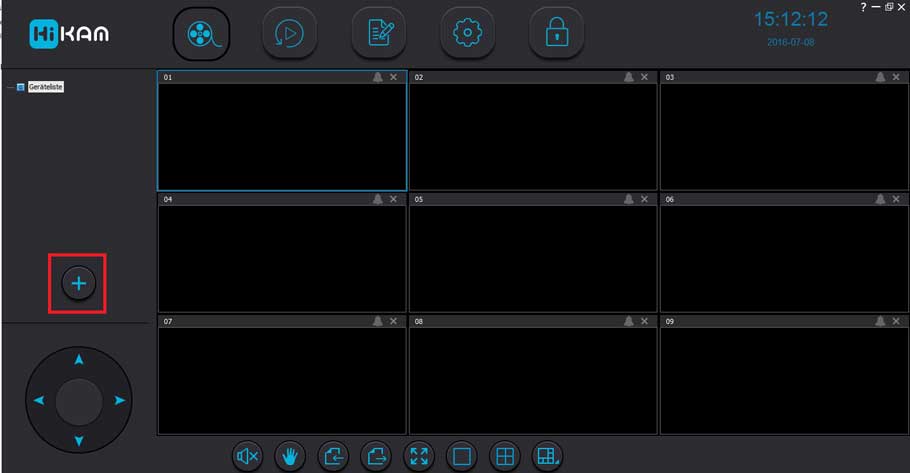
1. After logging in, you will see the main window of the HiKam PC software
Click the “+” button at the bottom left
2. You will then see the “Added Cameras” window
All cameras that are in the same network as the PC software are displayed here.
Check the cameras you want to add, then click Add.
You will see a message that the camera(s) has been added successfully, click “Exit”.
Important:
If no cameras are displayed, please check whether the camera and PC are in the same network and try again as under 1.
Or add the cameras manually as described here below. However, this is only possible with the 2nd generation cameras, not with those of the 1st generation (S5, Q7, A7 1st generation).
3. Now you can see the camera in the camera list on the top left.
Double click the camera, the first time the software will ask for the camera password.
Enter the camera password and confirm. If the password is correct, the HiKam PC software will display the live video.
Add camera manually:
1. After login, you will see the main window of HiKam PC software.
Click the “+” button at the bottom left
2. You will then see the “Added Cameras” window.
Click on the “Add manually” button
3. A new window will open, enter the camera ID (e.g. A000015), a camera name and the camera password.
Then click “Add”
4. If the camera password is correct, you will get a confirmation. Click OK.
Now you can close the add window with “Exit”.
5. The camera is now listed in the camera list.
2. Watch live video from the camera
When the cameras have been added to the software, you can start the live video by double-clicking on the camera in the camera list at the top left.
If the correct camera password has been stored in the software, it will display the live video.
Otherwise you will see the message that the password is incorrect and ask you to enter the correct password.
3. Change settings like camera password, camera name
Right-click the camera in the camera list, select “Settings”.
Under “Camera Editor” you can change the camera name and camera password to access the camera.
Under “Change Password” you can change the camera password that is saved in the camera.
Please note that you must also enter the changed password in the HiKam app and the software on the other PC, otherwise you will see the error message “Incorrect password” here.
4. Take snapshots and save to PC
When the live video is displayed, right click on the camera window.
Select “Snapshot” here.
5. Record videos to PC
To start recording:
- Right-click on the camera window and select “Record”.
If you want to end the recording again:
- Right-click the camera window again and click “Record” again.
- When the recording is finished, the red recording dot at the top right disappears.
6. Play videos stored on the SD card in the camera
In the main window, select the video recordings.
Select the camera in “Camera Name”, then in Source “Cameras”.
Under Time, select a start and end time and click Search.
When the correct password is entered in the software, the video files will be listed.
Double-click on the desired file to play it.
7. Play videos stored locally on the PC’s hard drive
Click the “Recordings” button.
In “Camera name” select the desired camera.
Under Source, select PC.
Enter the desired start and end time and click “Search”.
The existing files are displayed.
Double click on the desired video file to play it.
Important note : this only applies to the videos you have recorded via the HiKam PC software, not to files recorded to an SD card in the camera.
8. Download video files from SD card in camera to PC
Proceed as described under 6. to list the video files that are stored on the SD card in the camera.
Then you will see this window:
Click “Download”.
In the window that opens, you can select the files you want to download – or all of them by checking the top box.
Then click “Start”.
The downloaded files can be found in the directory selected in “Save in directory”.
All downloaded files are in .mp4 format and can be played with common players.
8.1. Read and convert files on SD card in PC
If you do not want or cannot download the files from the SD card in the camera, there is also the option to insert the SD card into the PC and save the files on the PC.
Since the files are in .avx format and cannot be played with standard players, it makes sense to convert them to .mp4.
To do this, you can use this tool:
https://hikam.de/dl/mp4Tool.zip
Unzip the files and start mp4Tool.exe with a double click.
Under 1, select the directory where the .avx files are currently located.
Under two, choose the directory where you want the converted .mp4 files to go.
Click Transform

9. Change admin account password
Click on “Configuration Management” in the top right > User Management. Enter the old password here and then the new one, which must be confirmed again.
Then click on “Confirm”.
10. Find out the version of the HiKam PC software
Click the “?” in the top right corner of the window.
In the window that then appears, you will see the version of the HiKam PC software.
11. Uninstall HiKamPC
You can easily uninstall the zip version by deleting the entire HiKamPC directory.
Please delete the installed version (.exe) by going to the Start button (Windows icon) > Control Panel > Software > Change or Remove Programs > Find HiKamPC > Uninstall.


Add Comment