If the links are not working for you, please right-click on the ‘Download‘ text and select ‘Save link as’ or ‘Save target as’.
Firmware
Version 2.6.080 July 2021 – New cloud service added, works with NETUS-EYES mobile app. General bug fixes.
4 Channel – H6R404_COBRA006.bin
8 Channel – H6R408_COBRA006.bin
16 Channel – H6R416_COBRA006.bin
Emergency Firmware Upgrade
Cobra 5 – ZIP file
Use this when the unit isn’t starting up, or when instructed by a technician. To install, open the zip file, drag the ‘EMERGENCY_FW_UPGRADE’ folder across to your USB stick. Turn off the machine and insert the USB, then turn back on. The screen will advise what to do next. This will return the unit to factory default settings. The contents of your USB stick should look like this:
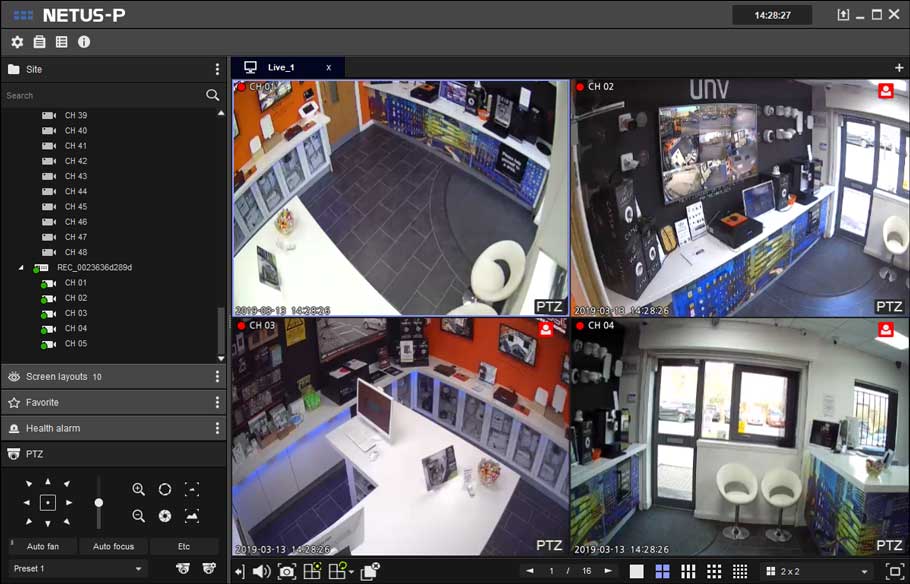
Netus Pro
NETUS-Pro for Windows x64 (Recommended, version 1.0.0.52, updated 05/08/2021)
MANUAL
NETUS-Pro for Windows x86 (32-bit, version 1.0.0.52, updated 05/08/2021)
NETUS-Pro for MacOS (version 1.0.0.47, updated 23/10/2020)
Default password to login to the program is ‘1111111‘. The application is now compatible with older Cobra DVR models, but those without a ‘DVR Web Service’ cannot be configured from within.

VMS and RMS
Please note that the older Cobra software does not fully support the Cobra 5 and will not work properly.
If the links are not working for you, please right-click on the ‘Download’ text and select ‘Save link as’ or ‘Save target as’.
Firmware
Version 2.6.080 July 2021 – New cloud service added, works with NETUS-EYES mobile app. General bug fixes.
4 Channel – H6R04_COBRA006.bin
8 Channel – H6R08_COBRA006.bin
16 Channel – H6R16_COBRA006.bin
Emergency Firmware Upgrade
All HDT-H Models – ZIP file
Use this when the unit isn’t starting up, or when instructed by a technician. To install, open the zip file, drag the ‘EMERGENCY_FW_UPGRADE’ folder across to your USB stick. Turn off the machine and insert the USB, then turn back on. The screen will advise what to do next. This will return the unit to factory default settings. The contents of your USB stick should look like this:
Software
Netus Pro
NETUS-Pro for Windows x64 (Recommended, version 1.0.0.52, updated 05/08/2021)
MANUAL
NETUS-Pro for Windows x86 (32-bit, version 1.0.0.52, updated 05/08/2021)
NETUS-Pro for MacOS (version 1.0.0.47, updated 23/10/2020)
Default password to login to the program is ‘1111111‘. The application is now compatible with older Cobra DVR models, but those without a ‘DVR Web Service’ cannot be configured from within.

Backup Player for Windows
SmartEyesPro for Android
SmartEyesPro for Apple
If the links are not working for you, please right-click on the ‘Download’ text and select ‘Save link as’ or ‘Save target as’.
Firmware
Version 2.6.080 July 2021 – New cloud service added, works with NETUS-EYES mobile app. General bug fixes.
8 Channel – H6D08_COBRA006.bin
16 Channel – H6D16_COBRA006.bin
32 Channel – H6D32_COBRA006.bin
Emergency Firmware Upgrade
All HDT-V models – ZIP file
Use this when the unit isn’t starting up, or when instructed by a technician. To install, open the zip file, drag the ‘EMERGENCY_FW_UPGRADE’ folder across to your USB stick. Turn off the machine and insert the USB, then turn back on. The screen will advise what to do next. This will return the unit to factory default settings. The contents of your USB stick should look like this:

Turn off the machine and insert the USB, then turn back on. The screen will advise what to do next.
Manuals
DVR Hardware Manual
DVR Operating System Manual
Software
Netus Pro
NETUS-Pro for Windows x64 (Recommended, version 1.0.0.52, updated 05/08/2021)
MANUAL
NETUS-Pro for Windows x86 (32-bit, version 1.0.0.52, updated 05/08/2021)
Default password to login to the program is ‘1111111‘. The application is now compatible with older Cobra DVR models, but those without a ‘DVR Web Service’ cannot be configured from within.

VMS and RMS
VMS software for Windows (Version 336, updated 18/06/2019)
Default password for VMS is ‘1111111’. If upgrading from a previous version, run the installer twice (once to remove, again to reinstall).
VMS Manual
RMS software for Windows (Version 469, updated 18/06/2019)
Mac Viewer 2.0 (v1.04 updated 29/05/2018)
Backup Player for Windows
SmartEyesPro for Android
SmartEyesPro for Apple
Firmware
Version 1.4.054 May 2018
Version 1.4.060 December 2018
Updated: Improved detection of external IP address changes when PowerDDNS is used.
C-HDT-A models – H6E04_COBRA054.bin
C-HDT-V models – H6E08_COBRA060.bin
Emergency Firmware Upgrade
All Cobra Compact Models – ZIP file
Use this when the unit isn’t starting up, or when instructed by a technician. To install, open the zip file, drag the ‘EMERGENCY_FW_UPGRADE’ folder across to your USB stick. Turn off the machine and insert the USB, then turn back on. The screen will advise what to do next. This will return the unit to factory default settings. The contents of your USB stick should look like this:
Turn off the machine and insert the USB, then turn back on. The screen will advise what to do next.
————————-
Software
VMS software for Windows (Version 336, updated 18/06/2019)
Default password for VMS is ‘1111111’. If upgrading from a previous version, run the installer twice (once to remove, again to reinstall).
VMS Manual
RMS software for Windows (Version 469, updated 18/06/2019)
Backup Player for Windows
Mac Viewer 2.0 (v1.04 updated 29/05/2018)
SmartEyesPro for Android (Play Store)
SmartEyesPro for Apple (App Store)
Firmware version 15.8.046 (Released 26/04/2017)
Fixes in the latest firmware –
- Updated Web Viewer
- Fixed bug where Fast Playback would sometimes fail on mobile
- Fixed bug where Spot output would reset to default on reboot
- Fixed bug where cameras would go blank after a reboot
Use this when the unit isn’t starting up, or when instructed by a technician. To install, open the zip file, drag the ‘EMERGENCY_FW_UPGRADE’ folder across to your USB stick. This will return the unit to factory default settings. The contents of your USB stick should look like this:
Turn off the machine and insert the USB, then turn back on. The screen will advise what to do next.
VMS software for Windows (Version 336, updated 18/06/2019)
Default password for VMS is ‘1111111’. If upgrading from a previous version, run the installer twice (once to remove, again to reinstall).
VMS Manual
RMS software for Windows (Version 469, updated 18/06/2019)
MacViewer for Mac OS X (Version 2.2.33, updated 09/09/16)
SmartEyesPro for Android
SmartEyesPro for Apple
Firmware version 15.8.046 (Released 26/04/2017)
Fixes in the latest firmware –
- Updated Web Viewer
- Fixed bug where Fast Playback would sometimes fail on mobile
- Fixed bug where Spot output would reset to default on reboot
- Fixed a bug with Coax OSD controls
Use this when the unit isn’t starting up, or when instructed by a technician. To install, open the zip file, drag the ‘EMERGENCY_FW_UPGRADE’ folder across to your USB stick. This will return the unit to factory default settings. The contents of your USB stick should look like this:
Turn off the machine and insert the USB, then turn back on. The screen will advise what to do next.
Software
VMS software for Windows (Version 336, updated 18/06/2019)
Default password for VMS is ‘1111111’. If upgrading from a previous version, run the installer twice (once to remove, again to reinstall).
VMS Manual
RMS software for Windows (Version 469, updated 18/06/2019)
Mac Viewer 2.0 (v1.03 updated 29/09/2017)
SmartEyesPro for Android
SmartEyesPro for Apple
This method of updating a Cobra DVR wipes the system configuration and overwrites the operating system. Recorded footage is kept as this does not affect the HDD.
- Download the correct Emergency Update file for your DVR from www.cctvcommunity.co.uk. Check you have the right model name.
- Plug a USB memory stick into your PC. The filesystem must be in FAT32 format.
- Open the .zip file from your Downloads folder. Inside this file is another folder, named EMERGENCY_FW_UPGRADE
- Extract this folder to the USB drive. You can do this by drag-and-drop, or use the Extract option at the top of the window.
- Turn off power to the DVR and insert the USB stick into any port on the DVR.
- Turn on the power and wait for a black screen and white text to be displayed.
- Wait until the message changes and the DVR starts beeping.
- Remove the USB stick and reboot the DVR.
VMS for Windows
Install
- Download the latest installer from www.cctvcommunity.co.uk
- Double click on the file named (e.g.) VMS_300.exe
- Follow the installation prompts through to completion. When asked if you want to install the ‘K-Lite Codec Pack’, you should tick this box if using Windows XP, 7 or 8.
Upgrade from a previous version
- Download the latest installer from www.cctvcommunity.co.uk
- Double click on the file named (e.g.) VMS_300.exe
- Follow the prompts to uninstall the existing version. It will ask you if you want to remove the address file – make sure this stays un-ticked.
- Double click again on the file from step 2
- Follow the installation prompts through to completion.
Configure
- Double click the VMS icon on your desktop
- Enter the Administrator password ‘1111111′ (seven ones). Tick the box for ‘Skip user login’ if you don’t want this prompt to appear again.
- On the top menu, click Setup, Site Manager
- Click ‘Add/edit’
- If you know the login details of the DVR, click ‘Add’ then type them in. If you need to locate the DVR on the local network, click Search then add the IP address from the right hand side.
- Close all the site manager windows
- In the main window, right-click the name of the DVR under Connect List and select Video Start. You can also double-click on the site name to show the cameras below, then drag-and-drop them into the viewing grid.
RMS for Windows
Install
- Download the latest installer from www.cctvcommunity.co.uk
- Double click on the file named (e.g.) RMS_440.exe
- Follow the installation prompts through to completion. When asked if you want to install the ‘K-Lite Codec Pack’, you should tick this box if using Windows XP, 7 or 8.
Upgrade from a previous version
- Download the latest installer from www.cctvcommunity.co.uk
- Double click on the file named (e.g.) RMS_440.exe
- Follow the prompts to uninstall the existing version. It will ask you if you want to remove the address file – make sure this stays un-ticked.
- Double click again on the file from step 2
- Follow the installation prompts through to completion.
Configure
- Double-click the RMS icon on your desktop
- Click the Site button at the bottom left of the window
- Press Add, then fill in the boxes above with the connection details of the DVR
- Press Add again, then Connect
- The next time you open the program, the Connect button will start viewing the last DVR you selected in the Site window.
MacViewer for MacOS
Install
- Download the latest Macviewer package from www.cctvcommunity.co.uk
- Open your Downloads folder, or click the Downloads button at the top right of the window
- Double click on (e.g.) MacViewer2.0_v1.0.1.pkg
- Follow the prompts to install. If you get a security warning about the file being from an unknown publisher:
- Click the search icon on the MacOS toolbar, top right
- Type in ‘security’ – this will find the Security and Privacy preferences window
- If the settings are greyed out, click the padlock and enter your Mac password
- Click on the ‘Open anyway’ button – this should run the installer and may prompt for your password again
- Once installed, click the search icon on the taskbar again and type ‘macviewer’ and click on the first result
Configure
- Click the site button and press Add
- Type in the connection details for your DVR
- Click add again, then connect
By USB
- Download the correct .bin file from www.cctvcommunity.co.uk for your model
- Save it on to a USB memory stick. Do not put it in a folder.

- Insert the USB stick into the front port of the DVR
- Right click the mouse to bring up the menu
- Go into Setup and then System

- Click Upgrade ‘Firmware’ button

- Click on the filename, then on Yes to confirm.

By Network
- Download the correct .bin file from www.cctvcommunity.co.uk
- Open Internet Explorer and enter the IP address of the DVR

- Click DVR Web Service, login with the admin account and password

- Click on Setup, then System, then System below that.
- Click Upgrade ‘Firmware’ button
- Click browse, select the .bin file you have downloaded.



I really love you
I sent an e-mail from the communication channel. Can you help?
I really love you
problem not solved thanks
It was a great sharing
can you help me please
hello nice sharing thanks
problem not solved thanks
I sent an e-mail from the communication channel. Can you help?
my recorder is not working
I am having trouble with the installation
please provide support for me i leave my email address
Can you write your contact number?
please provide support for me i leave my email address
my recorder is not working
can you help me please