
CloudEdge Mobile PC App User Guide, “CloudEdge” is established to provide a set of video service platforms for families and enterprises.You can easily check the real video and playback image of your apartment/villas/shops/factory and office, etc site via the “CloudEdge” video service platform;Meanwhile, you will receive an instant push message via “CloudEdge” alarm system once the motion detected, so you can do accordingly for the safety protection measures. Your family and enterprise be with you, wherever you are.
1. Downloading our Mobile App
You can go to the Apple App Store or Google Play Store, search for ‘CloudEdge, and download the app for free.
2. Register an Account and Log in
Launch the app and tap Sign up now to register a user account with your email ID. You can also choose to log in with your other accounts like Facebook, WeChat, or Apple ID.
3. Add new doorbells
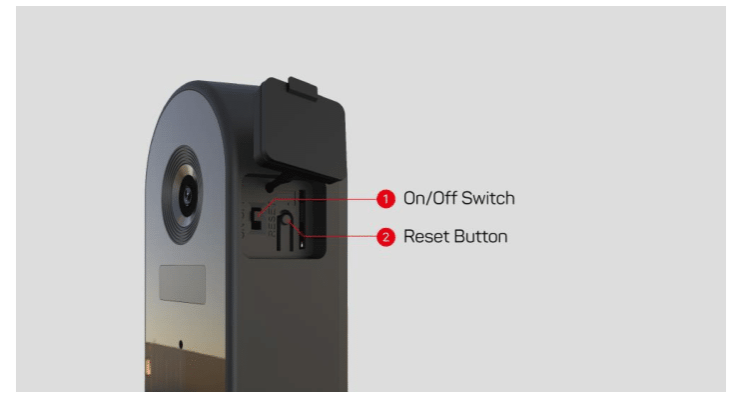
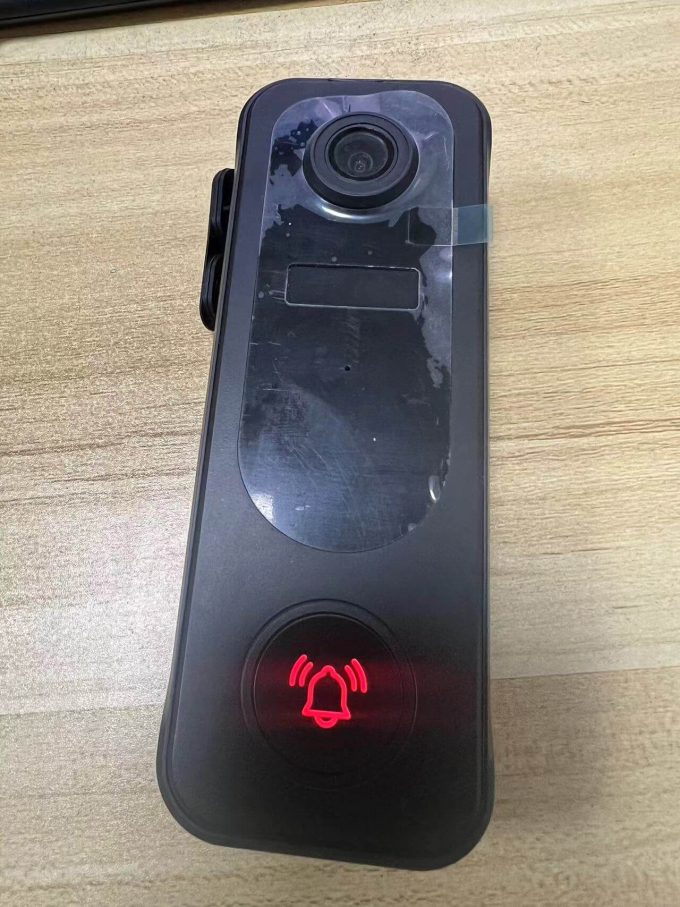
3.1 Power on the doorbell
Switch on the doorbell and make sure the LED indicator flashes red (once per second). If not. Please press and hold the Reset Button for 5 seconds to restore the factory default.
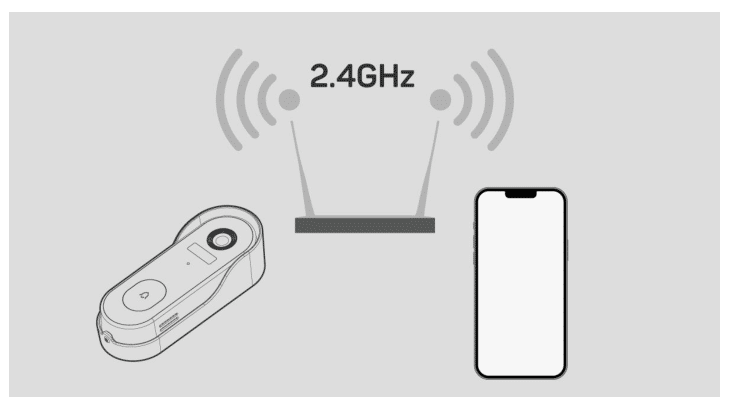
3.2 Make sure your phone is connecting to a 2.4GHz Wi-Fi.
The doorbell does not support 5GHz Wi-Fi frequency. Please connect your phone to a 2.4GHz Wi-Fi and operate the setup close to your router.
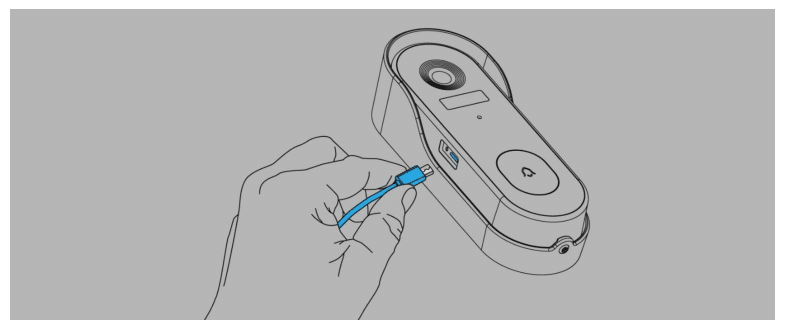
3.3 Charge your doorbell.
The battery inside the doorbell is not fully charged in accordance with transportation safety regulations. Prior to the doorbell installation, please charge your doorbell for about 8-10 hours. The charging LED turns BLUE from RED.
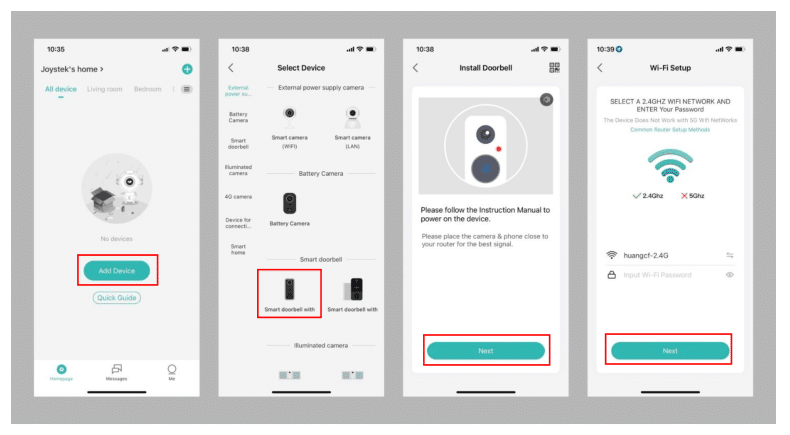
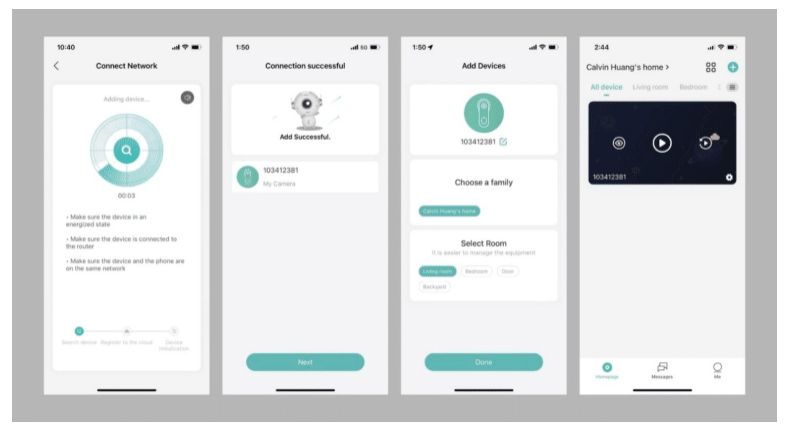
3.4 Add new doorbell
3.4.1 Adding device by QR code (default)
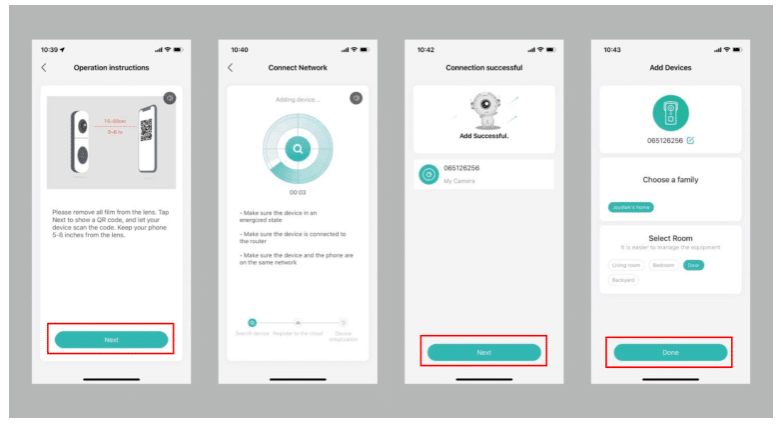
Tap ‘Add device’ or the ‘+’ icon, and select the doorbell. Set up Wi-Fi for your smart doorbell. by following the in-app instructions.
3.4.2 Add device by AP network (Alternative)
Tap ‘Add device’ or the ‘+’ icon > select doorbell > tap on the QR codes icon select AP network.

→ Press and hold the Reset Button for 5 seconds to reset the doorbell – connect to a 2.4GHz Wi-Fiand input the Wi-Fi password – tap ‘connect’ to go to the smartphone WLAN setting, and search for doorbell AP network(STRN_xxxxxx) to connect to.
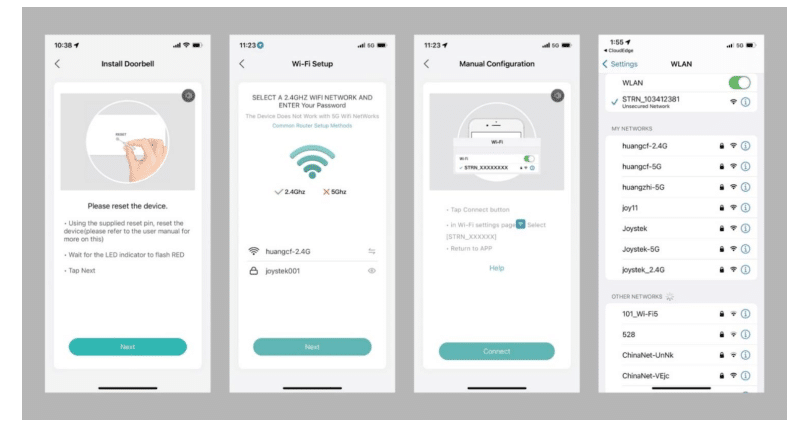
→ go back to CloudEdge app doorbell connecting to the selected Wi-Fi> connection completes → Device adding succeeds.
CloudEdge Mobile PC App User Guide
4. Homepage
4.1 Homepage introduction
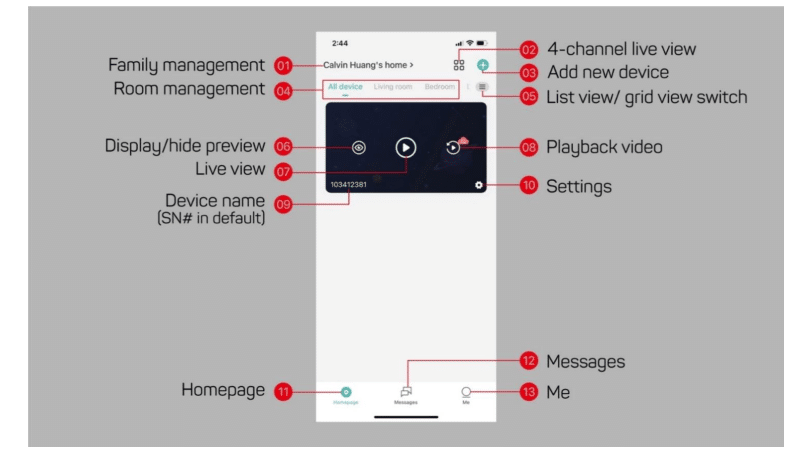
1. Family management: enter the family management page, where you can edit family names, add or delete rooms, and add family members to share the device with.
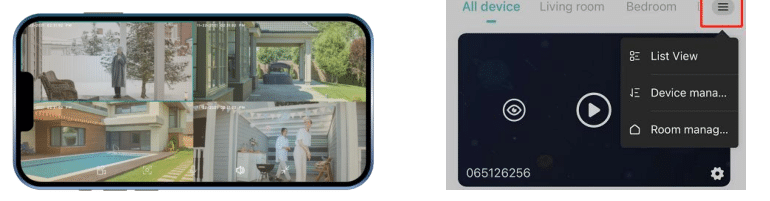
2. If you have added many cameras, tap here to live to view four channels at a time.
3. Tap to add a new device.
4. Select a room to view the devices that have been added to the room.
5. List view/grid view, device management, room management.
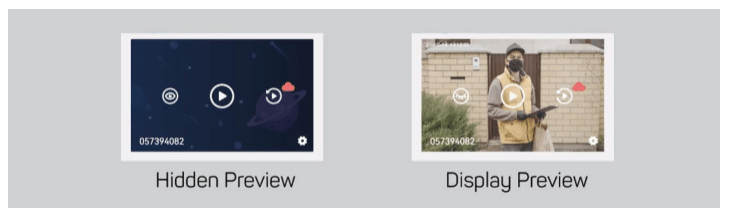
6. Display/hide preview.
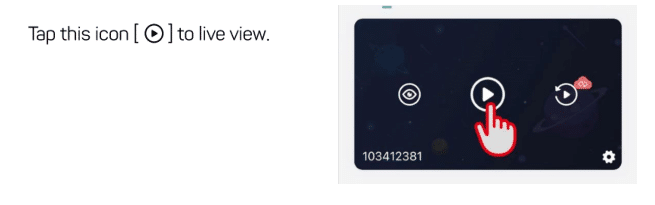
7. Tap to live view. (see to 4.2 live view)
8. Playback footage on SD card/Cloud
9. Device name (S/N number in default)
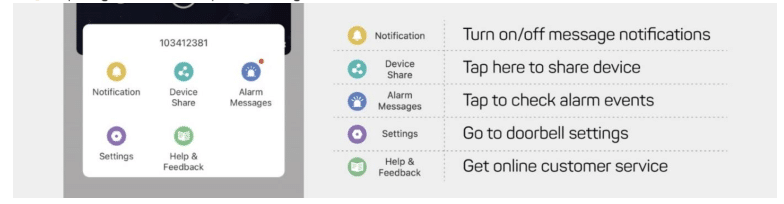
10. Tap to go to doorbell quick settings;
11. Homepage
12. Message
13. Me: Tap to go to account setting
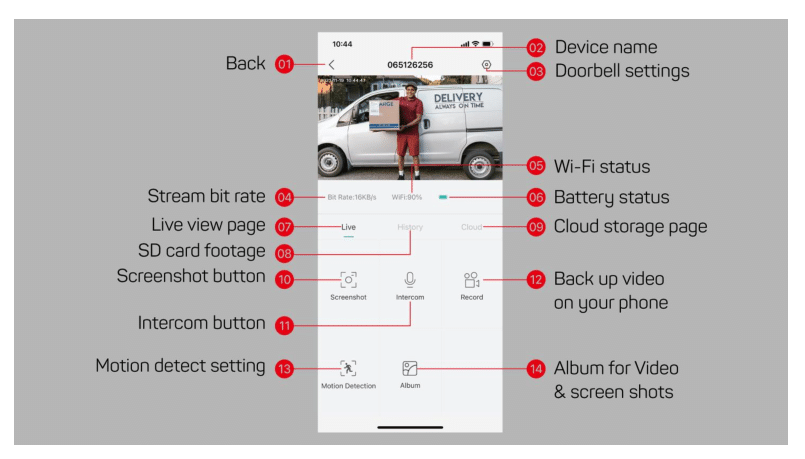
4.2 Liveview
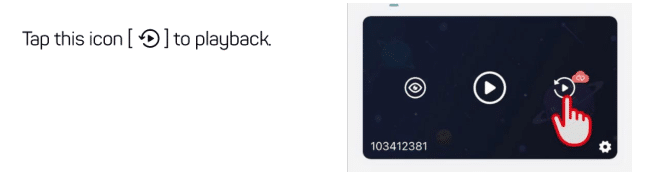
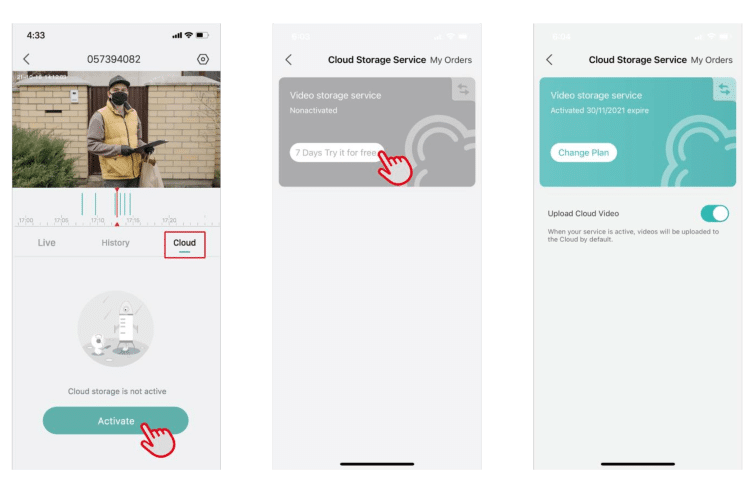
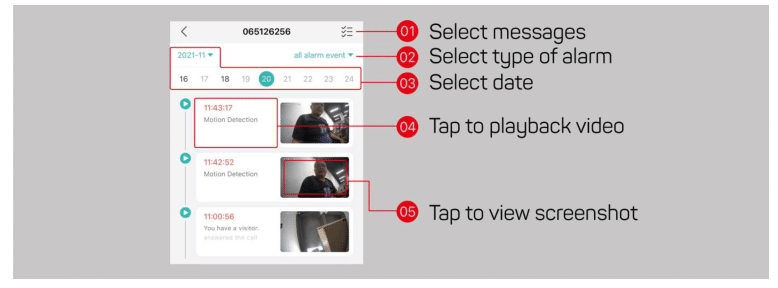
4.3 Playback
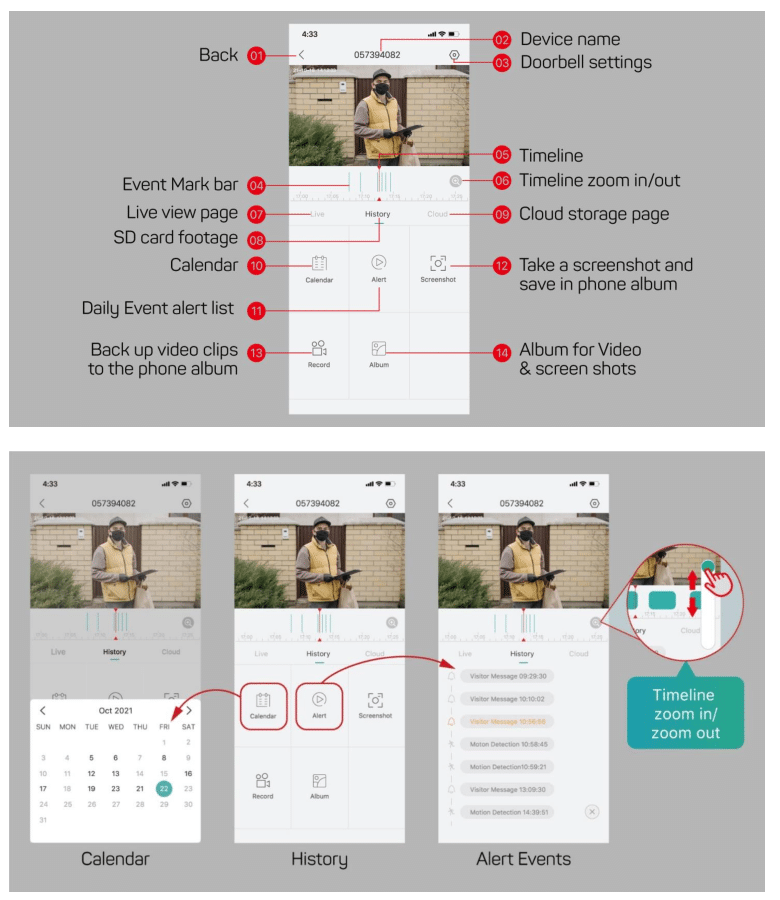
Calendar:
It helps you to search for video recordings by date. The date numbers marked in black indicate that there were event recordings that day. The grey date numbers indicate days without data.
Alert Event
It helps you understand the type of event alert for the day!

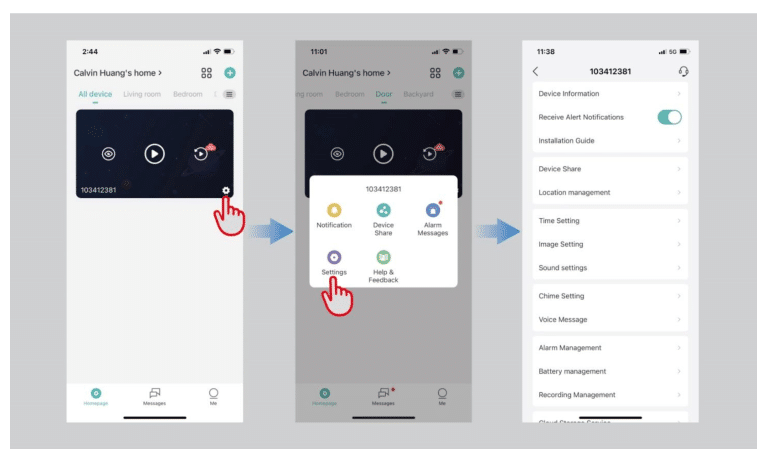
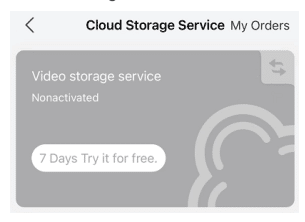
4.4 Cloud storage
Activate cloud storage and back up your event recordings to the cloud.
A 7-day free trial is available for each new device.
Note:
Only the administrator got access to cloud storage. Other users who share the device can only view local footage on the SD card.
The free trial will be deactivated after seven days. Tap [Change Plan], and you can subscribe to your cloud storage plan for your device.
5. Settings
5.1 Go to the setting page
Path 1:Homepage → setting
Path 2: Homepage → Live view/ Playback → Setting icon
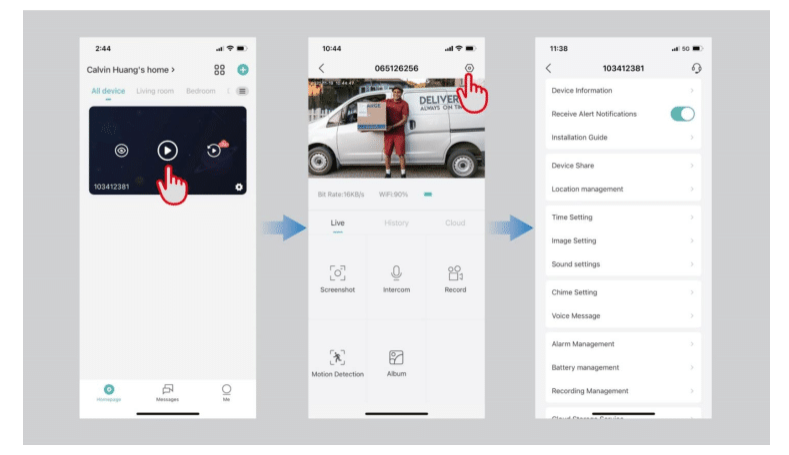
5.2 Setting menu
Device information:
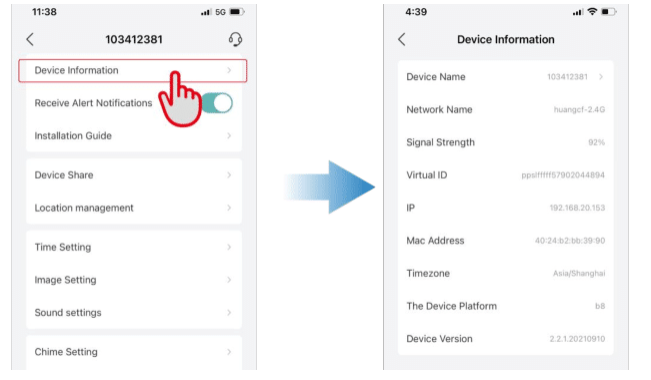
Receive Alert Notification: you can switch off the button to mute notifications.
Installation guide: helps you diagnose your wifi signal.
Device share: Tap here to share your device with other family members.
Location management: Edit device location for Smart Home Automation settings.
Time Settings: Enable/disable the 12-hour Clock.

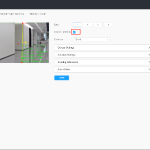
Image setting:
Anti-flicker setting: 50Hz / 60Hz;
Night vision setting: Automatic / ff / On
Sound setting:

Chime setting: Pair it with an indoor wireless chime.
Voice message: Record up to 3 voice messages (max. 10 sec per message) to respond quickly to your visitors.
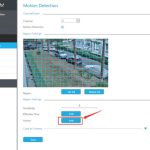
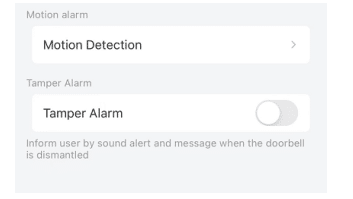
Alarm management: Set motion Detection and Tamper Alarm.
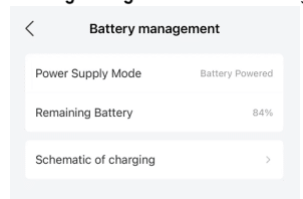
Battery management: check battery status.
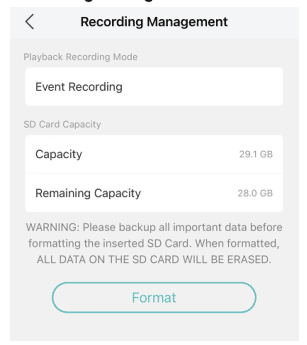
Recording management: check recording mode and Micro SD card status.
Cloud Storage Service: subscribe to a cloud storage plan.
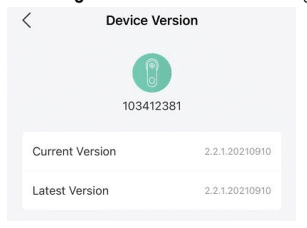
Checking for a New Version: checking for new firmware updates.
Restart Device: Tap to restart doorbell.
Delete the Device: Tap here to delete the doorbell and restore the factory default.
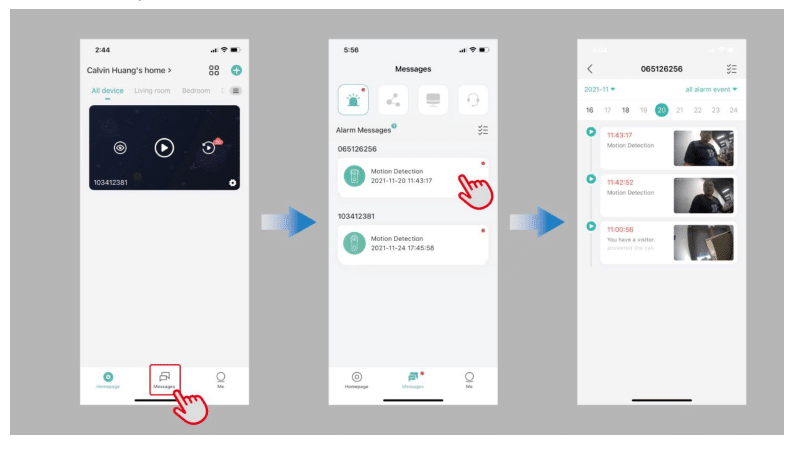
6. Messages
It is the message center that collects all your alert messages, history sharing, system messages, and customer service messages.

6.1 Alarm Messages
All the alarm messages will be listed on this page and is valid for seven days. Alarm messages will be deleted after expiration, whether read or not.
6.2 Sharing History
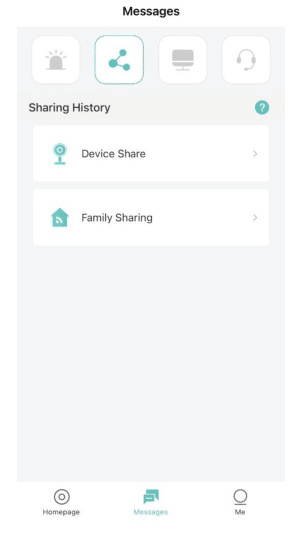
Device-sharing history will be listed on this page
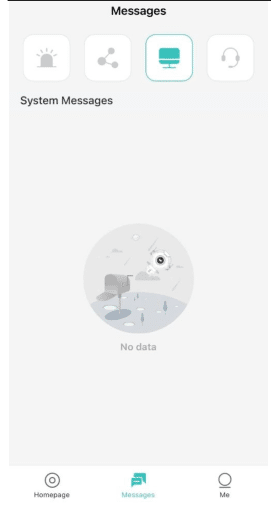
6.3 System Messages
System messages, including firmware update notices and low battery alerts, will be listed on this page.
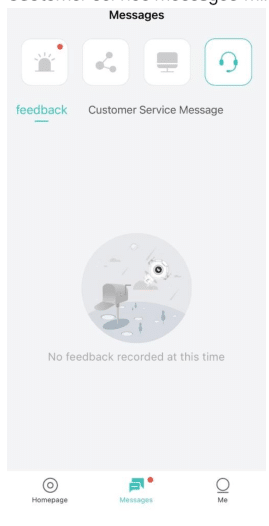
6.4 Feedback & Customer Service Messages
Customer service messages will be listed on this page.
7. Me
Here is the account setting page.
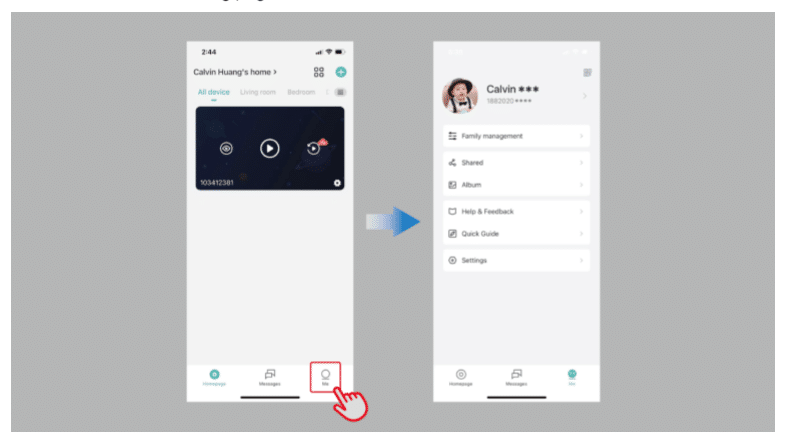
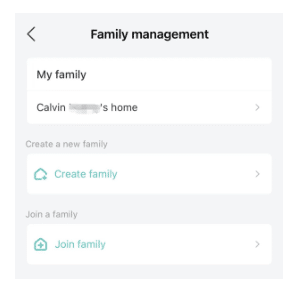
7.1 Family management
You can edit your home name, add members, and create or join a family user group.
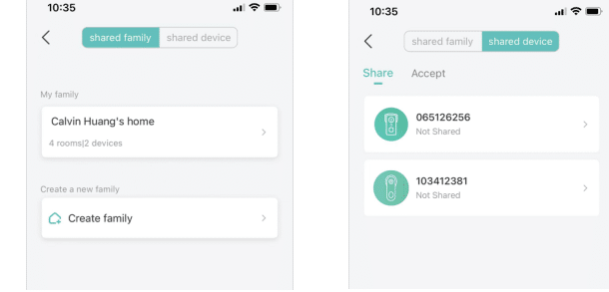
7.2 Shared
You can share your family user group and devices on this page.
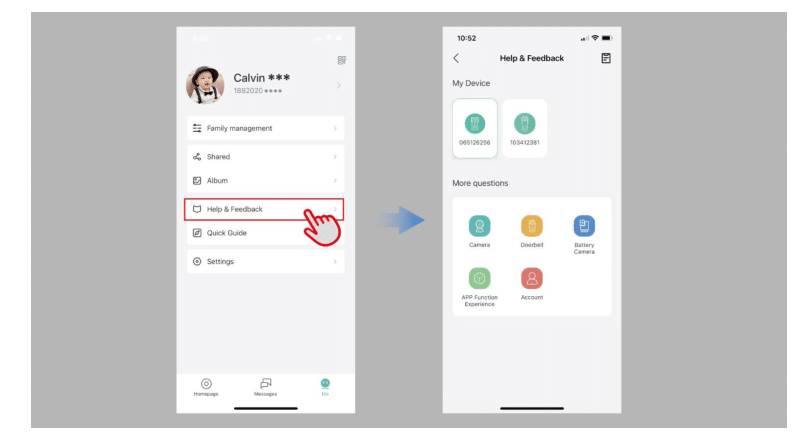
7.3 Help & feedback
You can get online customer service and feedback in this page
7.4 Quick Guide
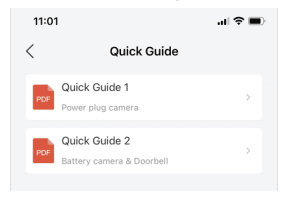
Here are quick user guides on how to add our cameras to the CloudEdge app.
7.5 Account Settings
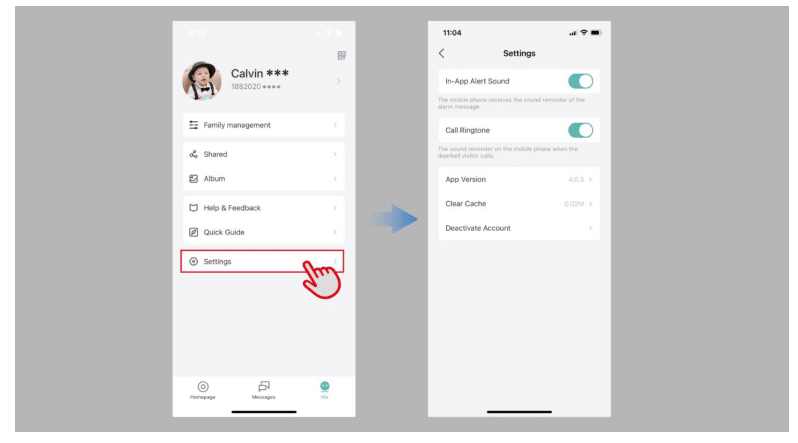
In this page, you can mute the alert sound, doorbell call ringtone, check the App version, clear the cache and deactivate the account
8. Mobile Notifications
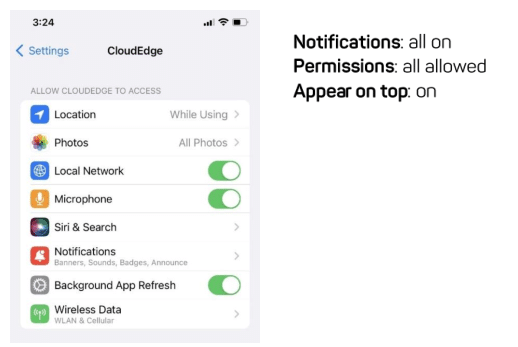
8.1 Manage App Permission
To be able to receive visitor notifications and event alerts properly on your phone, it is important to allow all notifications and permissions. You can check it from your phone settings regarding app permissions and notifications.
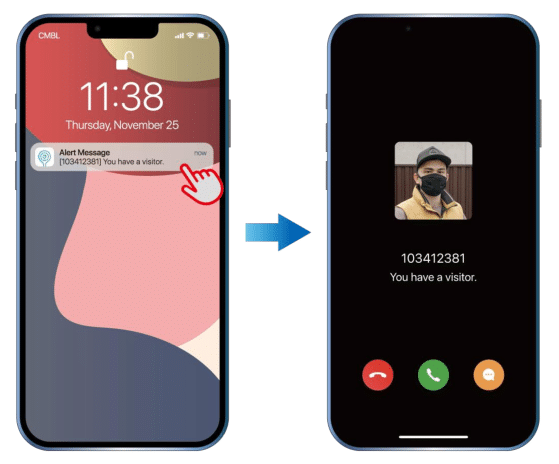
8.2 Notifications on visitor calls.
Tap on the pop-up notification to answer your visitors
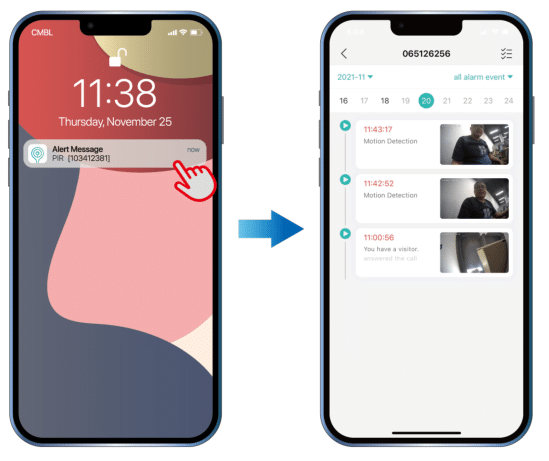
8.3 Motion detection alert
Tap on the pop-up notification to check motion detection events.
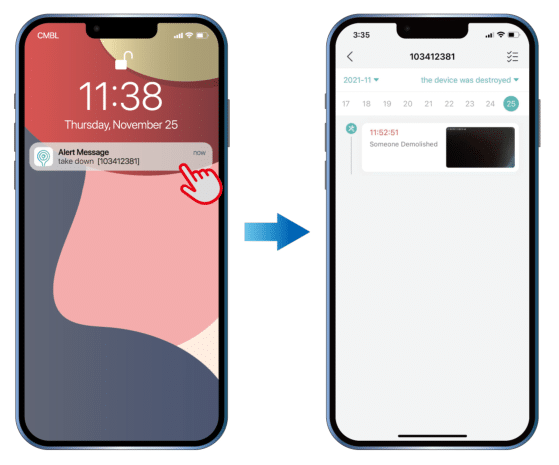
8.4 Tamper alarm
Enable the tamper alarm, and you will receive a tamper alert once the doorbell is taken apart from the mounting bracket.
CloudEdge For PC
CloudEdge does not support computer software, but you can use CloudEdge camera through third-party software.
Install CloudEdge app on computer
Now windows11 system or M1 chip MAC can install mobile app, you can directly install CloudEdge app.
Third party software
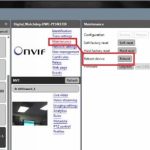
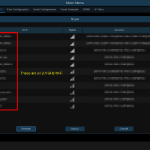
If your camera supports ONVIF, you can use ispy or vlc software to watch live video.
You need to open the camera’s ONVIF settings and set the ONVIF password first.
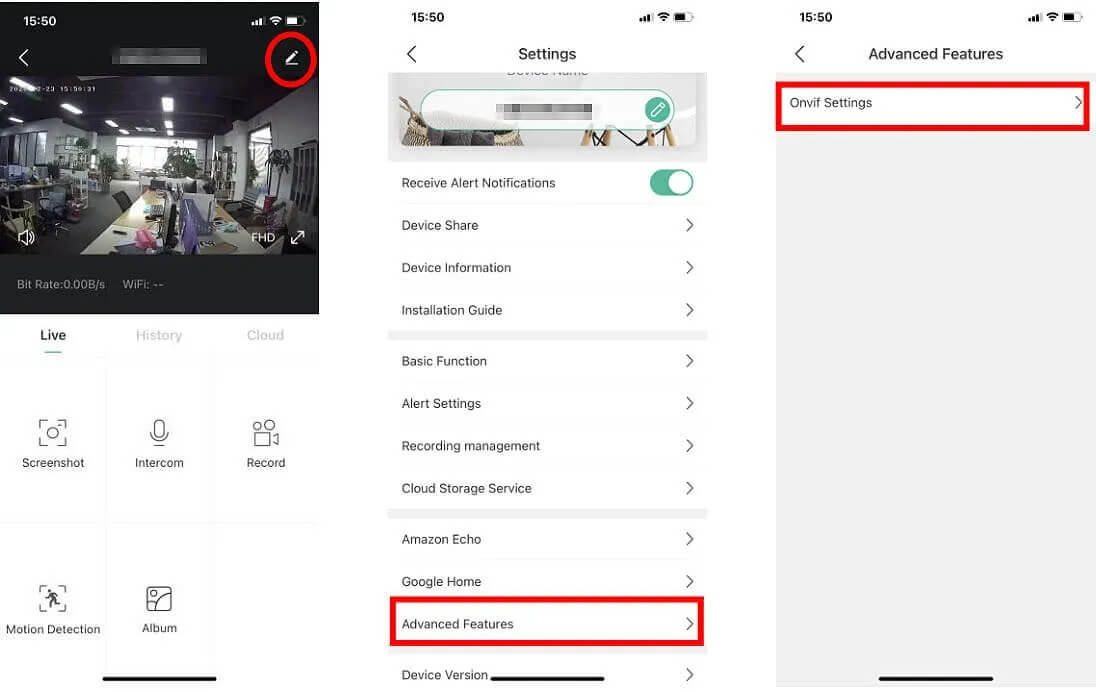

Note: Low-power cameras with batteries do not support ONVIF function
How to connect CloudEdge devices using Bluetooth
1)On the Homepage, tap “Add” or “+” in the upper right corner, and tap “Add Device.”

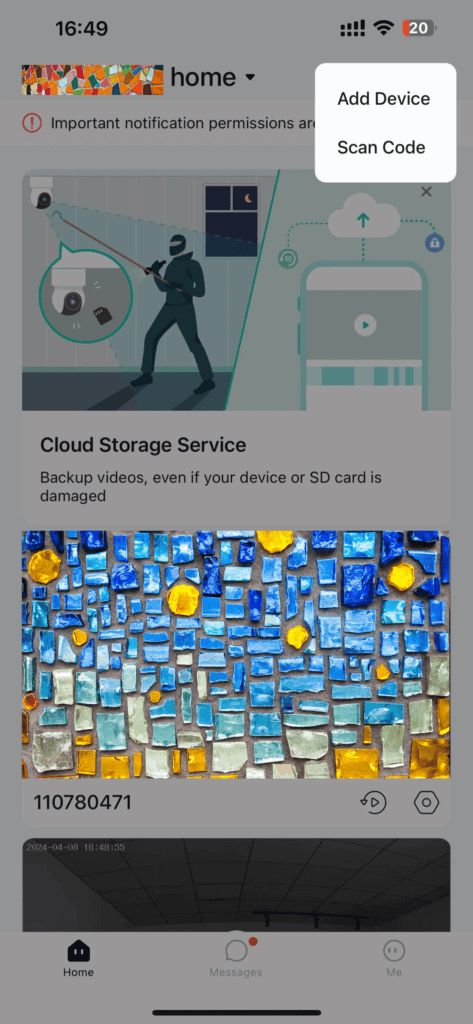
2) If the Bluetooth of the cellphone doesn’t turn on, the app will show a pop-up, so please allow it to turn on Bluetooth.
.
.
3)After Bluetooth turns on, the app will automatically search for devices that are on and not bound. Select the device you want to connect to in the search list.
.
.
4)Select the 2.4GHz Wi-Fi that you want the camera to connect to and enter the password. When the Bluetooth is on, the app will automatically show you the 2.4GHz Wi-Fi that could be connected. 5GHz Wi-Fi will not be shown. Normally, the Wi-Fi name and password of your 2.4GHz and 5GHz Wi-Fi are the same or similar. If you can’t find your Wi-Fi, please contact your router provider to check the 2.4GHz Wi-Fi setting of your router.
.
.
5)The app will automatically go to the page where the Wi-Fi connection is in progress. A sound will be heard. Wait for the connection to be successful and the camera indicator light to change to steady blue. Click “Next” to edit the camera name and choose a family. Click “Done” to finish the setup.
.
.
6)If you failed to connect, check the reason and resolution shown on the app. Long press the reset button until you hear a “cuckoo” sound to reset the camera and start again, or try the other methods below.
APP Function Experience
What should I do if the app crashes?
Click cloudedge APP to crash or crash while in use, uninstall and
reinstall.
Login problem
1.Please check if the cellular network is normal.
2.Indicates whether the appropriate country code should be selected.
3.Whether the account and password were entered correctly.
4.Uninstall and reinstall.
Registration problem
1.Please indicate your phone model and your system version.2.Download an app for other systems. If you
are currently using an iPhone, can you successfully register with an Android phone in the same network
environment?
3.Are you able to register successfully when trying to switch to a different WiFi network?
Account registration failed?
1.Please select the correct country when registering an account.
2.When the account is registered, the cellular network is normal.
3.Determine the network and location permissions of the open app.
What should I do if the APP cannot load the video and shows that the camera is not connected?
Make sure that the app in the phone settings first checks that the camera’s power and network are normal. If this is normal, turn off the camera and restart it. If the connection is still lost after the restart, remove the camera in the APP, do a factory reset and add the device again.
What should I do if the APP asks that the device cannot be accessed?
Please reset the device to factory settings and add it again. If this problem persists, please contact customer service in a timely manner for technical assistance.
What can I do if the app frequently fails to load the video and shows an interruption?
Correct the problem according to the status of the camera’s indicator lamp:
1.If the indicator light is off, it means that the device is not receiving power. Carefully check the power supply and whether the power supply interface is normal. It is recommended that you change the power supply and give it a try.
2.Die Kontrollleuchte leuchtet, es gibt zwei Situationen:
A: The indicator lamp will glow red to indicate that the camera’s network has been disconnected. Check the stability of the WIFI network and restart the router. It is recommended to move the camera closer to the router.
B: The indicator lamp will glow blue, indicating that the camera’s network is normal. Check if the cellphone network is normal. If the cellular network is not smooth, the video stream may not be transmitted to the cellphone It is recommended that the cellphone switch WIFI to try.
Why is there a circle in the center when viewing a video screen that freezes and delays?
The circle means the video is loading and the freeze delay means the network is not working smoothly. Check that the network connected between the camera and the mobile phone is working properly. It is recommended that the camera be located near the wireless router.
How do friends access the camera?
When friends need access to the camera, they need to share the camera with friends. Friends download the app on their cell phone and register a new account. Information on the specific operating method for sharing the camera can be found in the operating video under “Device sharing” in the APP.

Add Comment