For our new T900A DVRs/ H.265 NVRs, below are some basic instructions on how to configure the DVR for your network and enable our free Dynamic DNS service for cases where your ISP is only supplying you with a dynamic IP address.
1. From the Live View screen, move your mouse cursor to the bottom of the screen to bring up the menu bar. Click on the Start button on the bottom left and then click on Settings.
2. Next, click on the Network main title for the main menu choices.
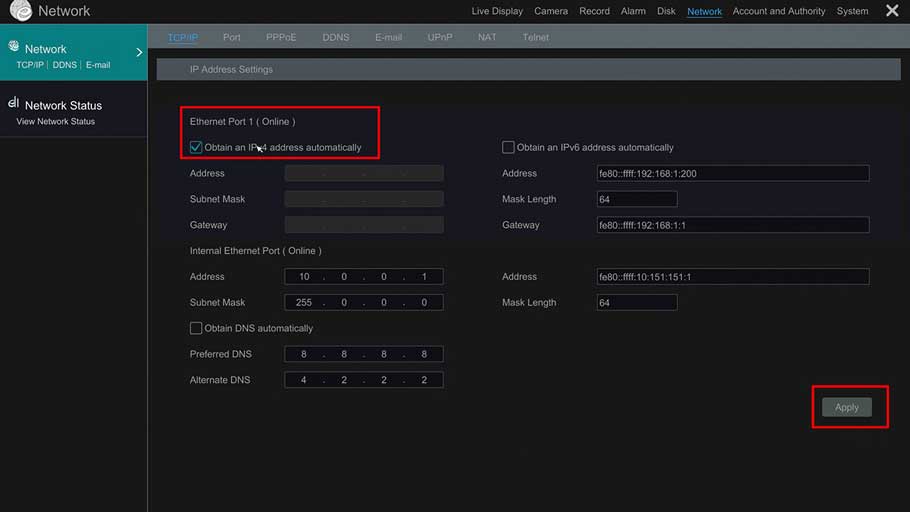
3. Upon entering the Network menu, you should be taken to the TCP/IP section. In this section is where you can configure the IP address of your DVR/NVR. The best option here is to make sure to enable the option to Obtain an IP address automatically. Make sure the checkbox is enabled next to this option and then hit the Apply button.
4. Next, click on the Port link at the top of the Network menu and make note of the ports listed there. The default HTTP (web) port is 80 and the default Server port is 6036. You may choose to modify these to whatever you would like, but make sure to write them down or keep track of them if you decide to change them. These will end up being the ports you will need to forward within your router/modem.
5. Next, click on the UPnP link at the top and make sure that the UPnP option is disabled. If it is enabled, make sure to unselect the checkbox next to Enable and then hit the Apply button.
6. After disabling the UPnP mode, click on the DDNS link near the top of the menu. First, make sure that the box next to Enable is checked. Keep the DDNS Type on “www.autoddns.com” and then click on the field next to Domain Name. Here you can choose a domain name that you will use from now on to access the DVR remotely. After selecting a domain name, click on the Register button to try to register that domain. There might be a possibility that the domain name might be used, so if you do receive an error message, try different domain names to find one that hasn’t already been used. You will not need to enter in a username or password when using our www.autoddns.com site. After you have found a valid domain name to use, make sure to click on the Apply button.
7. After applying all the above settings, we will reboot the DVR/NVR to make sure all changes are in effect. To do this, move your mouse to the bottom of the screen and click on the Start button on the bottom left of the menu bar, and then select Shutdown.
8. Choose Reboot from this menu and then click on the OK button. Your DVR/NVR should now restart and come back after a few minutes.
9. After your system has restarted, move your mouse cursor to the bottom of the screen and then to confirm if your system is online, click on the Network Status icon near the bottom right of the screen to bring up a status window and just confirm that your DVR/NVR is showing the status as Online and that you see an IP address listed. Write down this IP address as this is the address you will need to use to configure port forwarding.
10. At this point, you will now need to configure port forwarding in your router/modem. The ports that will need to be forwarded are the HTTP and Server ports that we had looked at earlier. By default those are 80 (HTTP) and 6036 (Server). If you are comfortable configuring the port forwarding, you can log into your router and configure it yourself, or you can follow along with guides on http://portforward.com/ based upon your model of router. If you are having any issues with this you can also call our technical support line.


hello nice sharing thanks
I really love you
please provide support for me i leave my email address
I really love you
I sent an e-mail from the communication channel. Can you help?
can you help me please
Can you write your contact number?
I can’t upload