Qnap NVR First Time Installation, QNAP provides a variety of industry standard protocols, allowing you to quickly integrate QVP series NVR, QVR Elite, QVR Pro resources with a wide range of IoT devices to build a custom surveillance system. The protocols include ONVIF, RTSP and RTMP for video input/output; event URL and action URL for event input/output; and metadata URL for receiving metadata from the connected devices. QNAP NVR also provides APIs to integrate QVR Pro’s/ Elite’s sources (including videos, camera data, and logs) into your system or to control QVR Pro’s/ Elite’s cameras.
I – Qnap NVR First Time Installatin;
II – How To Add & Config IP Camera
III – How To Find IP Adress of IP Camera: IP Scan Sorftware & Default IP adress, Username / Password For Lilin & Avtech IP Cameras
I – Qnap NVR First Time Installation;
1 – Power On Nas Witout HDDs, and Dont Plug till Qnap Wants you to plug a HDD,
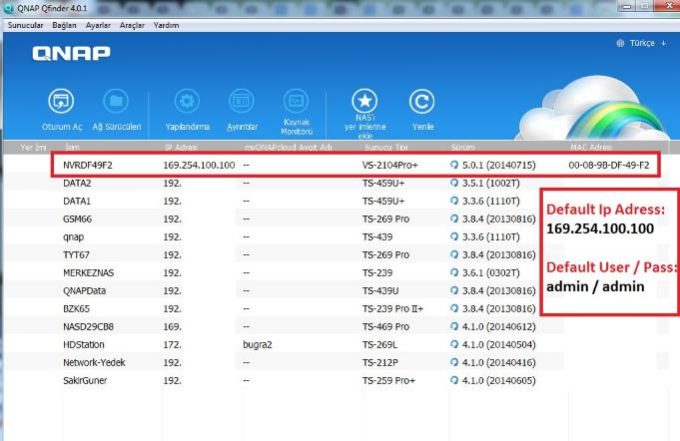
2 – Install Qnapfinder from www.qnap.com
3 – A few minutes later, Qnapfinder should find your NAS. Start the setup.
Default Qnap IP Adress: http:169.254.100.100
Default Qnap Username: admin
Default Qnap Password: admin
.
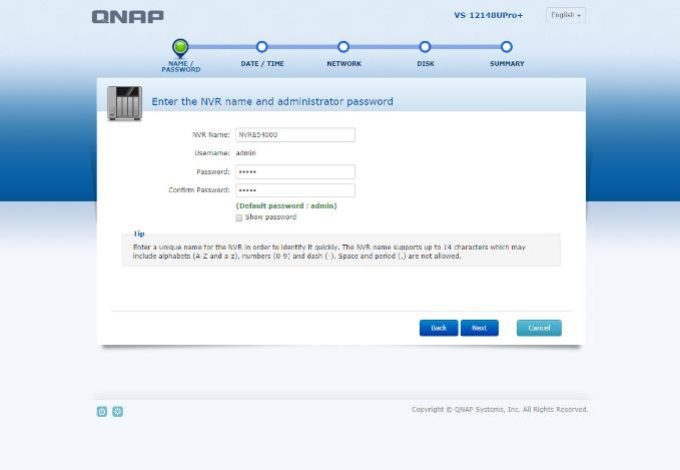
4 –When installation starts, Qnap should ask you questions to login device;
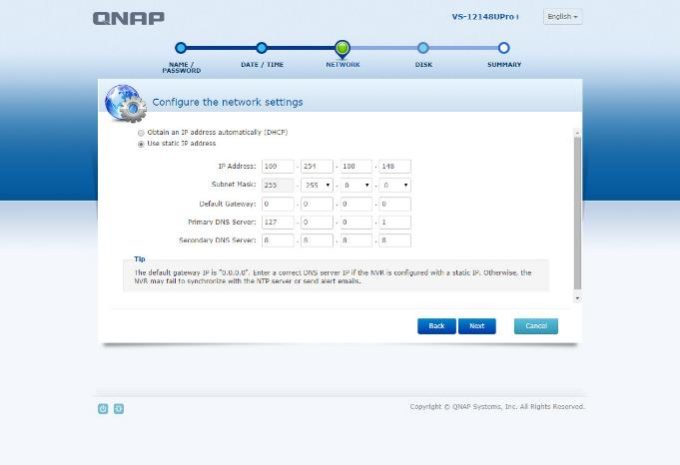
5 – Choose device IP adress (This adress must be at the same subnet with your IP cameras!)
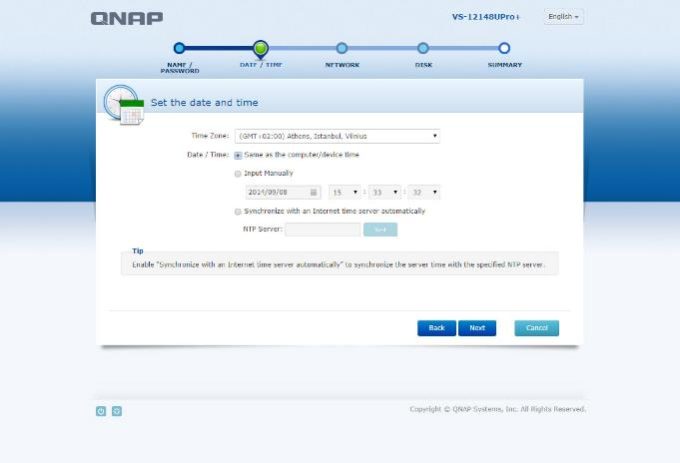
6 – Setup time (Must be right to setup alarm settings)
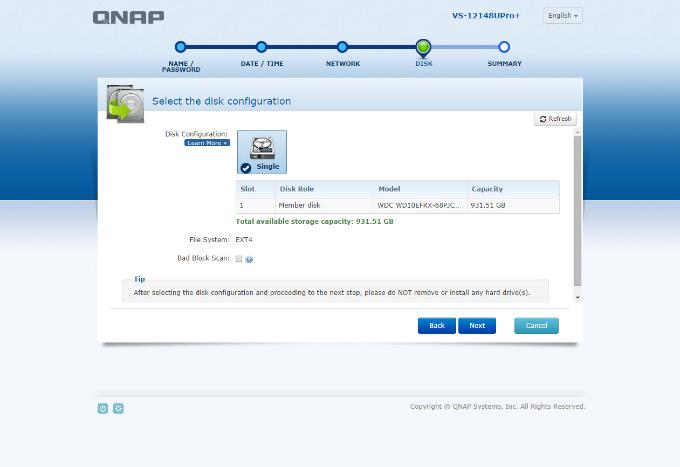
7 – Choose RAID structure (My advice is RAID 5 and this cause you to loose 1 HDD from structure. also you can choose RAID 6 for more secure RAID structure -Which casue you to loose 2 HDD)
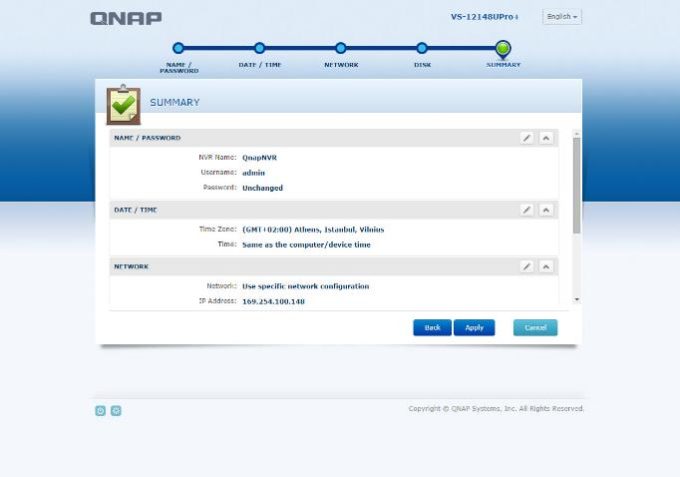
8 – Qnap wil ask you to check final configration (You can change these settings after installation completes)
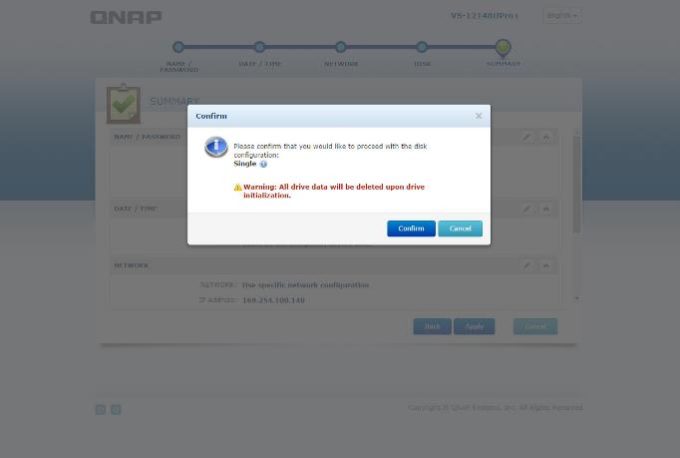
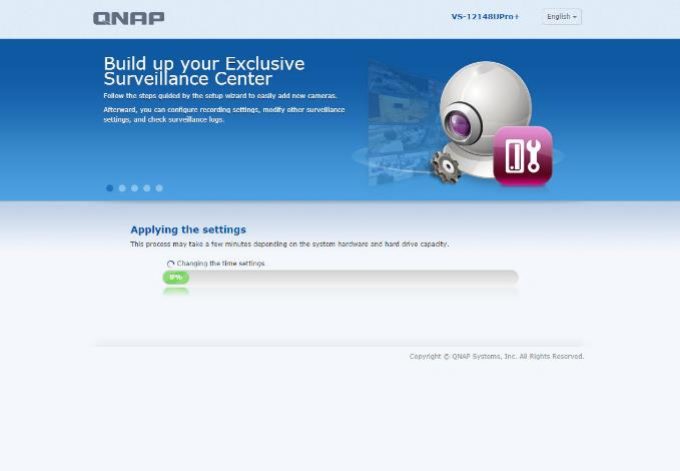
9 – At final step Qnap would format all your HDDs and start to Rebuilding a RAID structure;
10 – After 15 minutes, you can login your Qnap and setup your device, but this RAID rebuilding end around 12 hours so dont expect full performance till this proecess ends;
Qnap NVR First Time Installation
II – How To Add & Config IP Camera
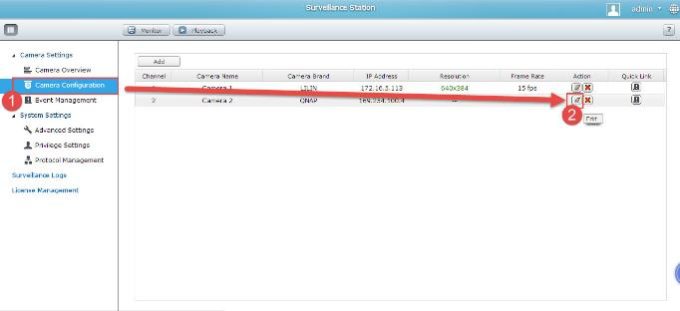
1 – Go to “Camera Settings” -> “Camera Configration” and press “Edit” on the channel you want to add IP camera;
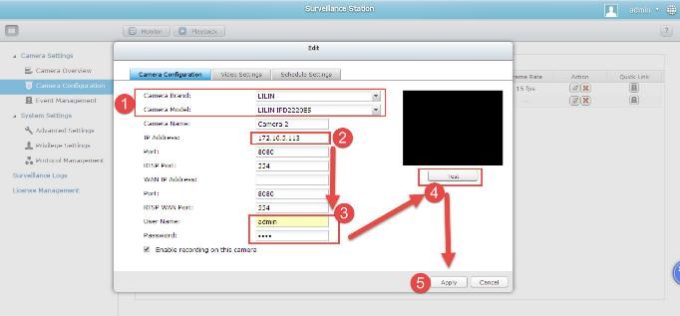
2 – Fill in these options. If your IP camera is not on the list, please use “Onvif” as IP camera brand & model.
Press “test” button after finishing configration, and press Apply to complete.
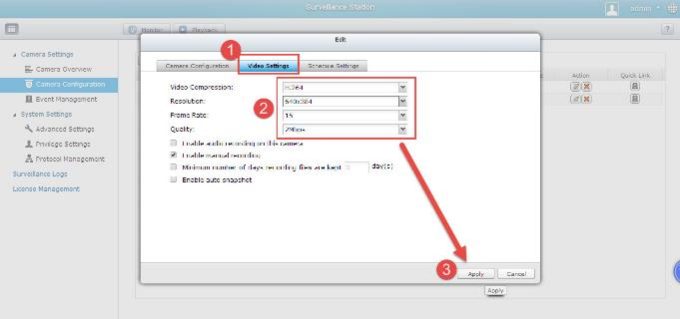
3 – Enter Video Settings to setup recording resolution and press Apply to complete setup
.
III – How To Find IP Adress of IP Camera: IP Scan Sorftware & Default IP adress, Username / Password For Lilin & Avtech IP Cameras
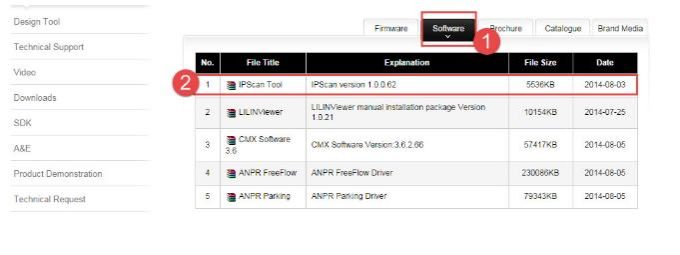
You Can Download IPScan Sortware Here;
http://www.meritlilin.com/webe/html/download/index.aspx?p=D
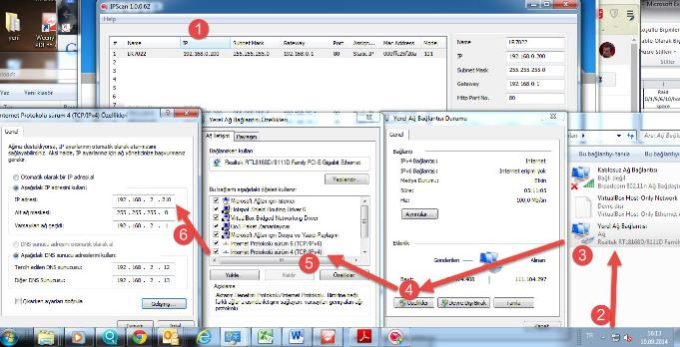
To Login Your IP Camera Interface, Your PC IP Adress Must Be in The Same Subnet With IP Camera:
If you try config Lilin IP camera, device default IP adress is 192.168.0.200, so you Pc Ip adress must be something like 192.168.0.201
Default Configration Of IP Cameras / Wireless Engenius AP;
Lilin Default IP: http://192.168.0.200
Lilin Default Username: admin
Lilin Default Password: pass
.
Avtech Default IP: http://192.168.1.10
Avtech Default Username: admin
Avtech Default Password: admin
.
Axis Default IP: http://192.168.0.90
Axis Default Username: root
Axis Default Password: pass
.
Engenius Wireless IP: http://192.168.1.1
Engenius Wireless Default Username: admin
Engenius Wireless Default Password: admin
Qnap NVR IP Camera Bandwith & Storage Calculator
I – How To Choose NAS / NVR For Surveilance Station
II – Axis Camera Bandwith & Storage Calculator;
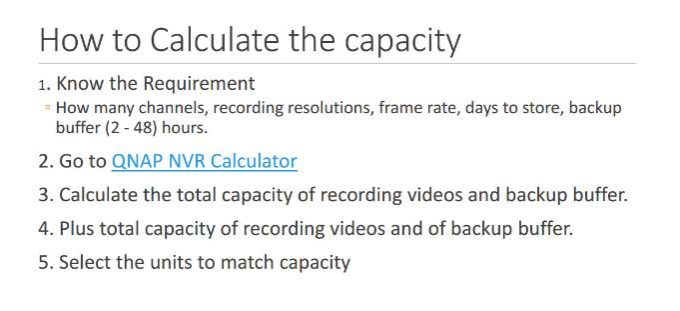
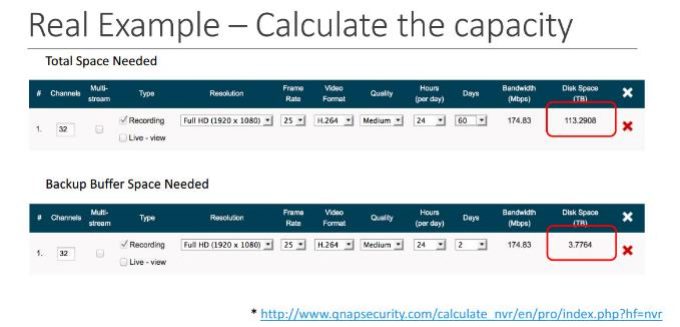
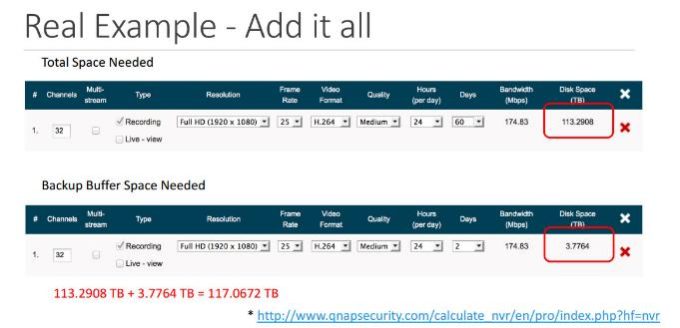
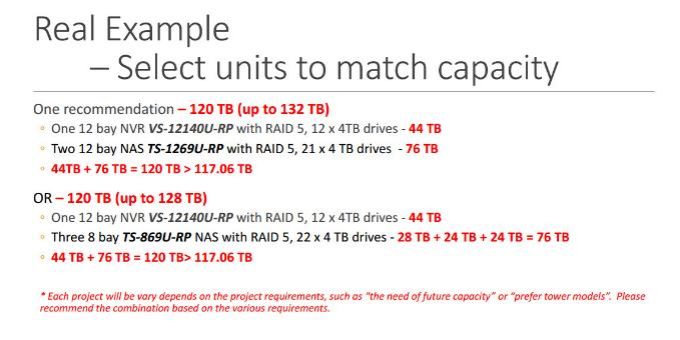
III – Qnap Offical Storage Calculator
.
I – How To Choose NAS / NVR For Surveillance Station
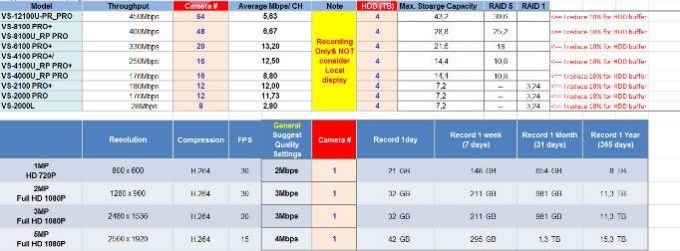
How To Choose NVR?
You can easly choose a Qnap NVR by checking device codes.
If you need 8 HDD and 40 Camera support and a Rackmount case, you should choose Qnap Vs-8140 U-Rp.
.
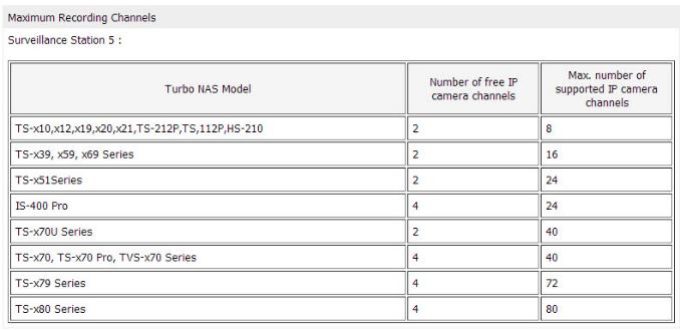
How To Choose NAS For Surveillance Station?
.
Qnap Bandwith Table;
.
Camera Recording Size;
.
II – Axis Camera Bandwith & Storage Calculator;
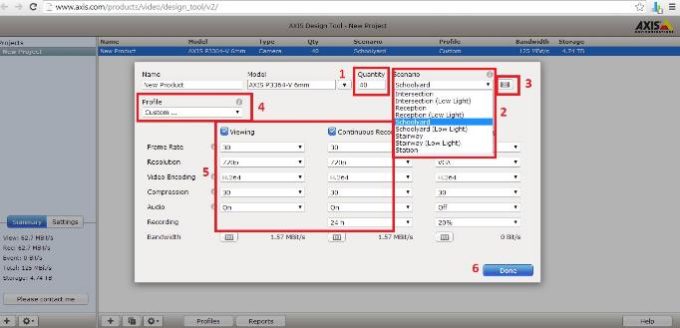
AXIS Design Tool helps you estimate bandwidth and storage needs for your surveillance project. For each camera in your project, you can pick a scenario, and select viewing, recording and compression options to get bandwidth and storage estimates that match your surveillance situation.
The new AXIS Design Tool version 2 combines all of the functionality of the original tool, in addition to these new possibilities:
How To Calculate;
http://www.axis.com/products/video/design_tool/v2/
1 – Choose Setting Down Below and Be Sure To Check These Options,
2 – Dont Forget To Choose How Many Days You Plan To Record;
3 – You Can See Storage How Much Space You Need and Bandwith Rate;
.
II – Qnap Offical Storage Calculator
Choose a Turbo NAS
QNAP provides an easy-to-use Turbo NAS Surveillance Station Selector to help you choose an ideal Turbo NAS that meets your requirement of storage capacity and bandwidth. To learn more about QNAP surveillance solutions, please feel free to contact us by
http://www.qnap.com/calculate/en/pro/index.php
Important notice
The QNAP NAS / NVR selector (hereinafter referred as “Software”) is mainly used for reference only. Please note the estimate and recommendations result from a limited number of test scenarios. The user of Software acknowledges and agrees that every installation of a camera system is unique and that the actual result measured may differ from the estimates produced by software. User will make its own determination as to the suitability for its purposes. QNAP will not be responsible for damages for any nature whatsoever resulting from the use of or reliance upon the results produced by Software.
Disclaimer
The entire risk as to the results and performance of the Software is assumed by you / the user. QNAP disclaims all warranties, whether express or implied, including but not limited to, the implied warranties of merchantability, fitness for a particular purpose, title and non-infringement, or any warranty arising out of any proposal, specification or sample with respect to Software. QNAP and / or its licensor(s) shall not be liable for loss of data, loss of production, loss of profit, loss of use, loss of contracts or for any other consequential, economic or indirect loss whatsoever in respect of use or disposition of the Software.
How to set up the Surveillance Station of QNAP NAS On 3.8.4 Firmware
I – Plan your home/office network topology
II – Set up the IP Cameras
III – Configure the Surveillance Station on the QNAP NAS
IV – Configure Schedule Recording on NAS
V – Playback Alarm Recording
VI – Problems & Solve
.
I – Plan Your Home/Office Network Topology
Write down your plan of the home/office network before starting to set up the surveillance system. Consider the following when doing so:
Your computer, the NAS, and the IP cameras should be installed to the same router in LAN. Assign fixed IP addresses for the NAS and the IP cameras. In this example:
.
III – Set up the IP Cameras
1 – Configure the IP address for both IP cameras by the following steps. I’ll use Lilin “Hybrid D/N 720P CMOS HD IP Camera / IPG012ESX” with Onvif Support at this Example:
2 – TAKE out the CD-ROM from the camera package of your Lilin camera package and install the IP Finder Program.
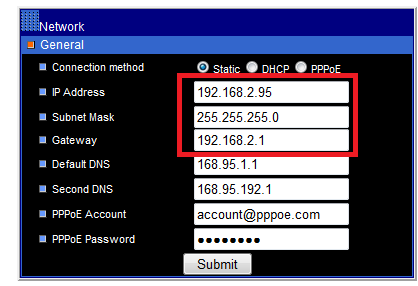
3 – Set the IP address of the camera so that they are in the same LAN as the computer. You will then be able to login the configuration page of the camera with the IE browser. Enter the IP address of the camera as 192.168.2.95. The default gateway should be set as the LAN IP of the router (192.168.2.1 in our example).
|
Note: The default IP of Lilin Hybrid D/N 720P CMOS HD IP camera is 192.168.0.200 |
4 – ENTER the web configuration page of the IP camera.
Lilin Camera Default Ip adress is 192.168.0.200, so type explorer this:
http:192.168.0.200
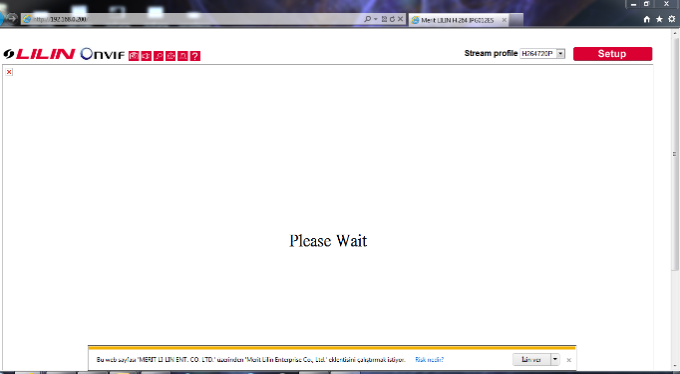
5 – The first time you access the configuration page by the IE browser, remember to install the ActiveX control if asked.
You will then be able to view the monitoring image.
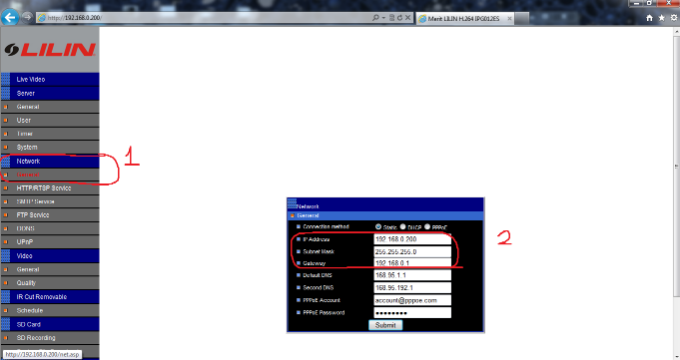
6 – GO to ‘Network -> General” and check the IP settings of the camera.
7 – Change Ip Adress configuration as you plan, and should be look like this:
|
Tip: What if I forget the camera settings? |
III – Configure the Surveillance Station on the QNAP NAS
|
Note: The Surveillance Station Pro is only supported on Internet Explorer 6.0 or above. |
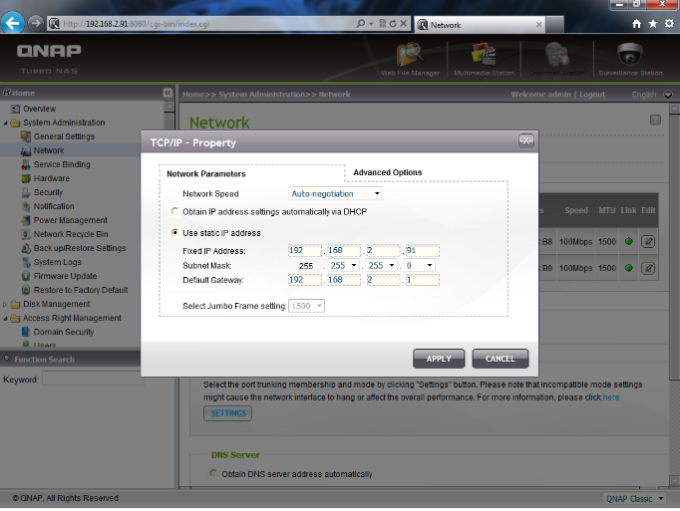
1 – Go to ‘System Administration‘ > ‘Network‘ > ‘TCP/IP‘ specify a fixed IP to the NAS: 192.168.2.91. The default gateway should be the same as the LAN IP of your router, which is 192.168.2.1 in our example.
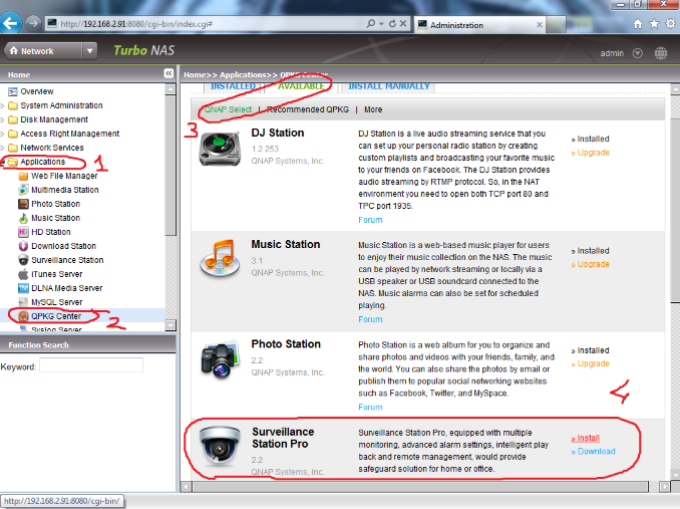
2 – First go to “Applications -> QPKG Center” and install “Surveillance Station Pro” QPKG:
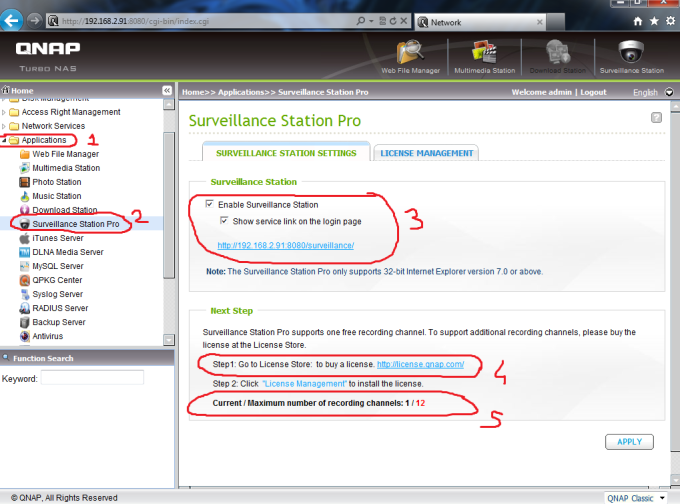
3 – Go to ‘Applications‘ > ‘Surveillance Station‘ and tick both checkboxes of ‘Enable Surveillance Station‘ and ‘Show service link on the login page‘ then click on ‘Apply‘ button to save the settings. Now you should see that the Surveillance Station icon no longer grayed out. ‘Surveillance Station Pro‘ only support 1 camera license, so if you want to add more, click “Step1: Go to License Store: to buy a license http://license.qnap.com/“
Also you can see how many IP cameras your NAS Support at next step. Ex: Ts-469 Pro Supports 12 IP cameras.
Click on
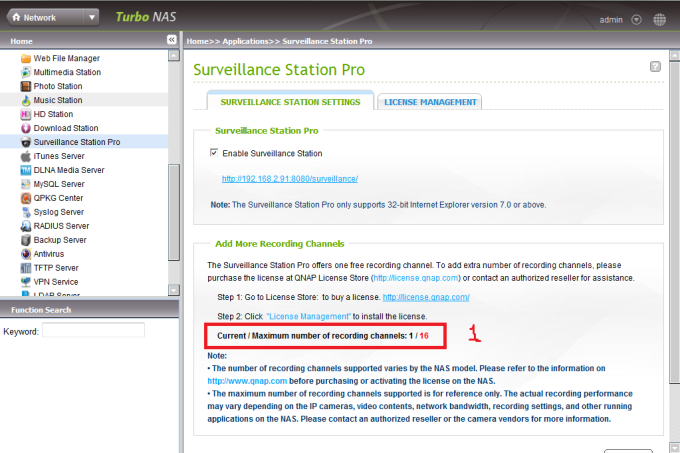
4 – Ps : After updatting 3.8.0 Firmware to 3.8.1, My Ts-469 Pro supports 16 Ip cameras! So Dont forget to update your Qnap to Latest Firmware.
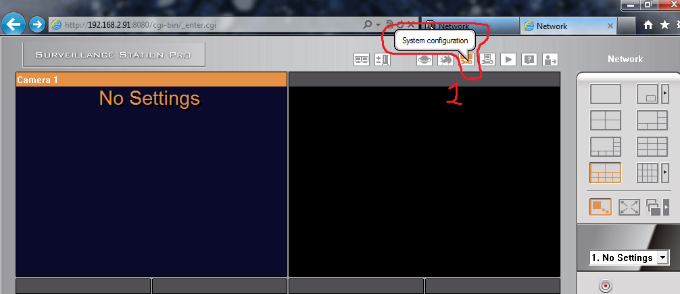
5 – After click on http://QnapIp:8080/surveillance/ link, you can access Surveillance Station user Interface. Goto ‘System configuration‘ -> “Settings”
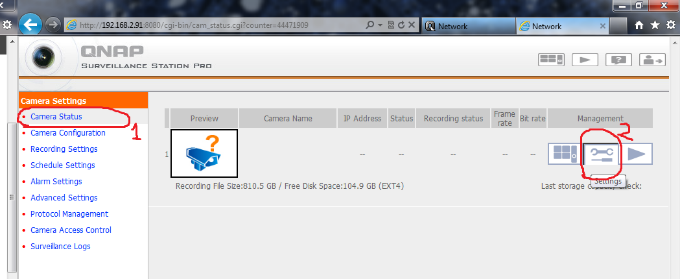
6 – Then go Camera Status -> Settings
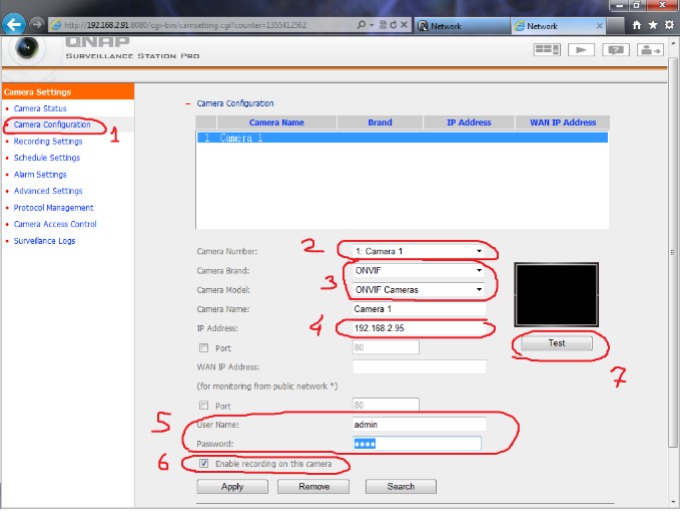
7 – At Recording Settings:
Select your Camera, Camera Brand / Model (At this case I Use Lilin camera on Onvif). Enter your IP Camera Lan IP adress (Or WAN if you have), IP Camera Username & Password and press “Test” Button.
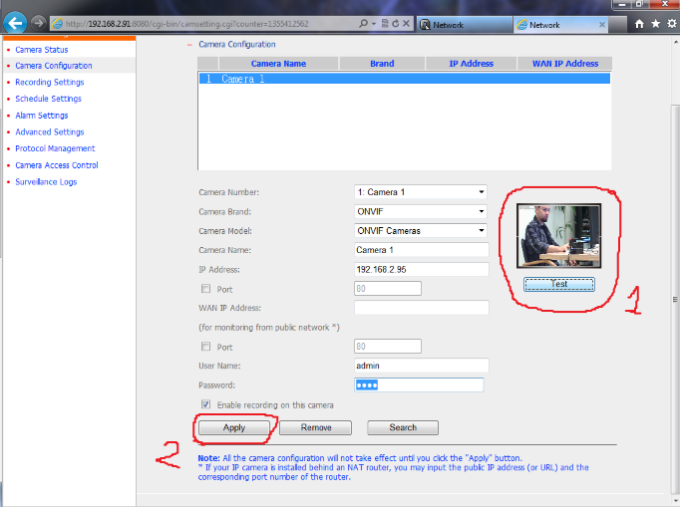
If you do right configration, Camera Recording Image Should be appear like this, and press Apply button.
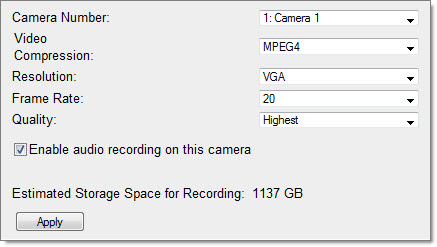
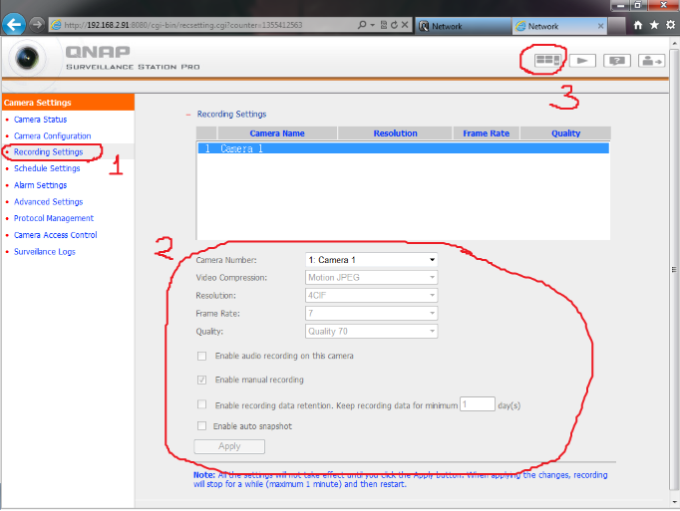
8 – If you want to change IP camera Recording Quality or enable the audio recording option of the camera, go to ‘Settings‘ > ‘Recording Settings‘ page. Click ‘Apply‘ to save the changes.
Note : If you use “Onvif”, your camera may not be support to change these options, so please change this configration from IP camera Settings options on your IP camera.
9 – Now press Live View Button.
10 – After you have added the network cameras to NAS, go to the ‘Live View’ page. The first time you access this page by IE browser, you have to install the ActiveX control in order to view the images of Camera 1 and Camera 2. You can start to use the monitoring and recording functions of the Surveillance Station!
|
Tip: When you click on the monitoring screen of a camera, the frame will become orange. You can use the buttons on the right panel to control the camera. For example, you can take a snapshot of the monitoring image, enable or disable manual recording, enable or disable audio function of the camera, use audio broadcast function, or enter the camera’s configuration page. |
.
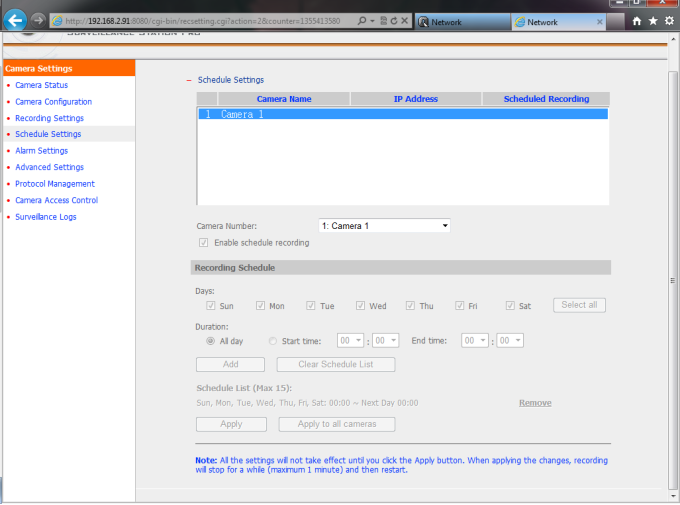
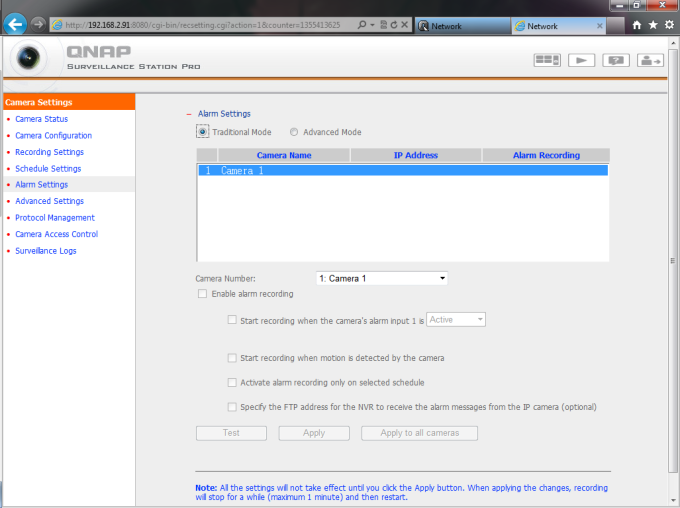
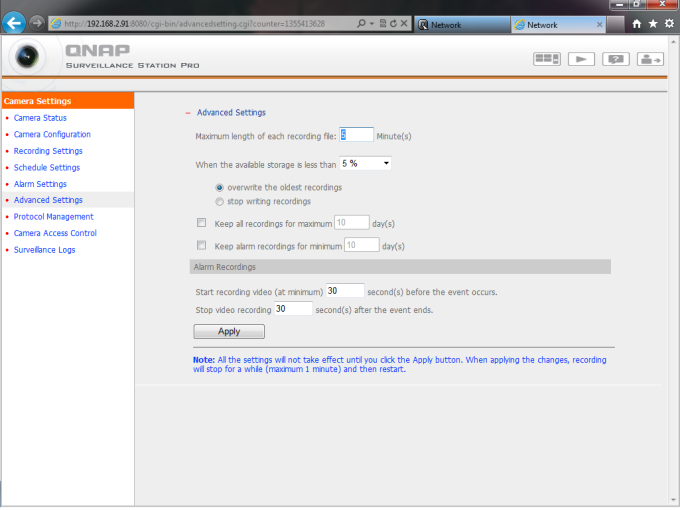
IV – Configure Schedule Recording on NAS
Schedule Settings:
Alarm Settings:
“When overwrite or delete old Records” Opitons
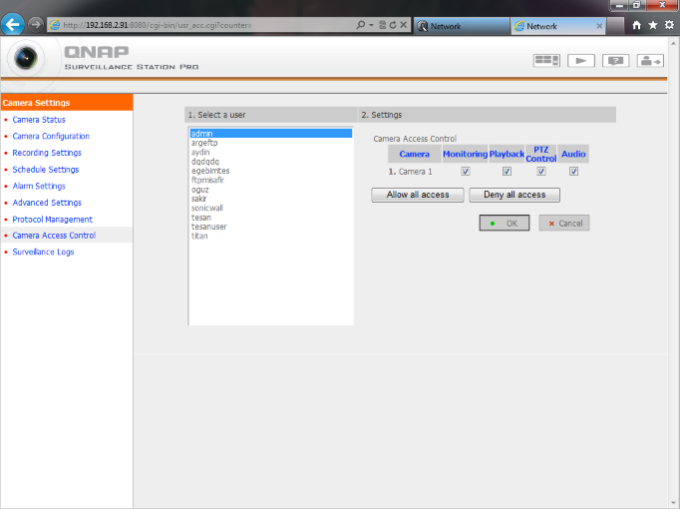
How to give Permissions to users
If you have any Questions, Please contact with Qnap Taiwan Support.
V – Playback Alarm Recording
VI – Problems & Solve
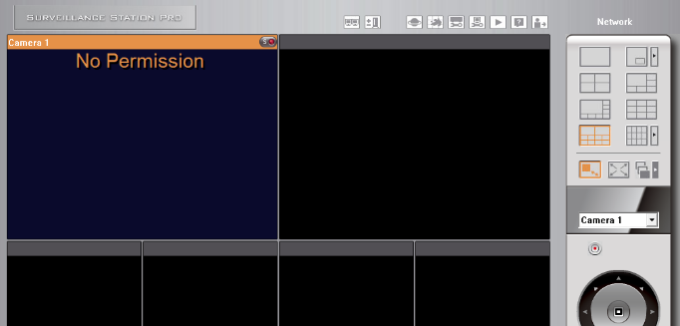
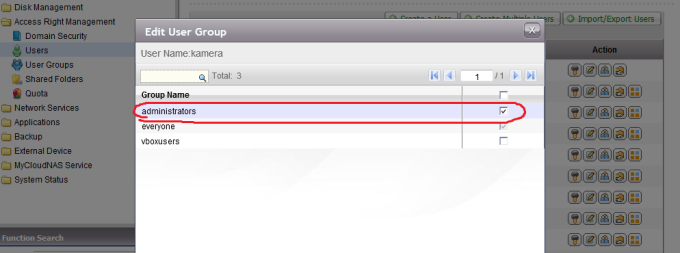
When I login with a user, I Get “No Permission” Error:
Just go users -> user groups and Add this user to “Administrators” Group.
Qnap Doesnt Record:
1 – Check if Qnap and NVR is in the same IP subnet.
2 – enter IP camera Interface and check if IP camera is working
3 – Check if you have enough Free Space
4 – Check if Camera is online Recording is on
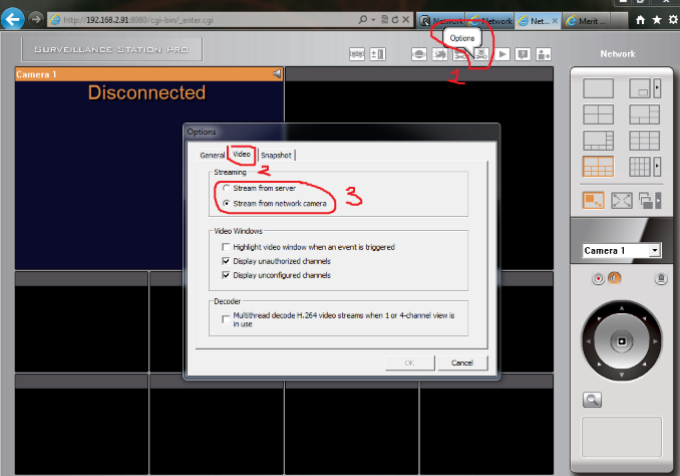
Recordings are very slow:
1 – Go to “Options -> Video” and change streaming settings to “Stream From Server”
2 – Also Check if you have Gbit Conenction.
3 – Check if any heavy data transfer on Qnap
Problem with Camera Lisance;
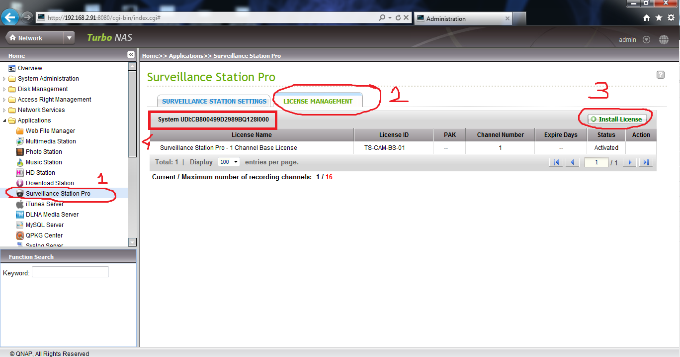
Go Application s -> Surveillance Station Pro -> License Managment and press “Install License”. Also you can see Qnap System UDI number under this page.
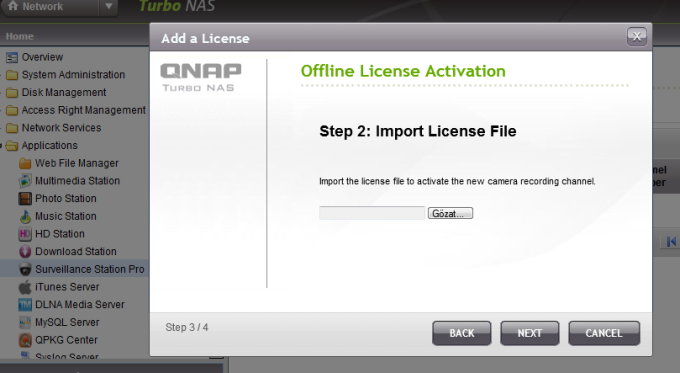
If you already contact and get Activation license, press “Offline Activation” and press next. Chooe your license and finish.
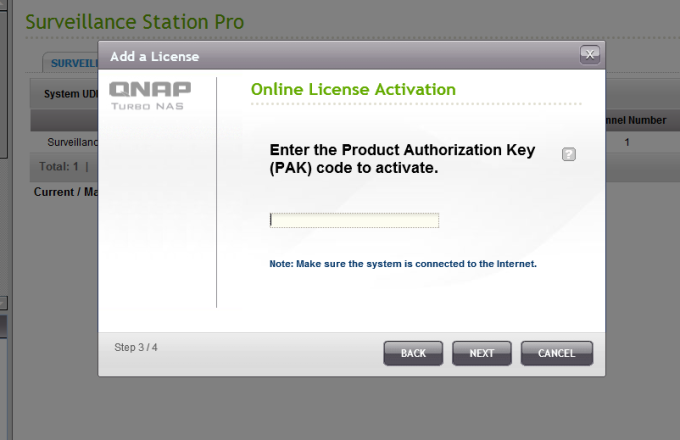
If you havent get a license yet, press “Online Activation”
Enter the Product Authorization Key (PAK) code to activate.
How to Setup Product Authorization Key (PAK)
Note : Request Help from Qnap Taiwan, or follow this document:
(From Wiki)
Below is a quick how-to for implementing public / private key authentication for SSH. This is by no means an exhaustive examination of the subject. *nix distributions vary slightly and further research may be needed.
Why use Public Key Authentication?
Public key authentication is considered a more secure methods of authenticating the Secure Shell than the simple password challenge routine, a method often broken by brute-force attacks. In addition, public key authentication allows for automated login routines between machines, thus enabling a range of scripted jobs (think rsync or port tunneling). It can also simplify the login process without compromising password security.
How does it work?
Public key authentication uses a pair of computer generated keys – one public and one private – to authenticate between a host and a client. The public key is derived from the private key. When authenticating, the host machine compares the public key to the private key in order to verify the veracity of the public key. If the two match, access is granted. Security of the system is predicated on the security of the private key.
Setup Procedures
Step by Step Example
The below setup description assumes that you are able to run terminal or a terminal application like Putty, and that you are familiar with basic commands. It doesn’t take much.
Let’s setup SSH public key authentication between your home computer (hereafter referred to as the “Host”) and your QNAP device (hereafter referred to as the “Client“).
1. Login to the Host via SSH using your preferred terminal application and generate the public / private key pair. In terminal type the following at the command prompt:
# ssh-keygen -t rsa -C “server comment field”
Note: the -C switch is not required. It allows you to insert a comment that will appear in the authorized_keys file. It is helpful for identifying and managing keys within the authorized_keys file on the Client in the event that you have multiple key logins. Replace “server comment field” with a machine name, IP address, date, or task name so that you can easily identify where and why a given key was created.
2. Execute the command and you should see the following output:
# Generating public/private rsa key pair.
# Enter file in which to save the key (/Users/UserName/.ssh/id_rsa):
Note: “UserName” is the user account that you have logged into via SSH. Also note that the actual suggested path may vary slightly depending your system. You should accept the suggested location unless you have reason to do otherwise.
You will then be prompted for a passphrase that will be associated with this key.
# Enter passphrase (empty for no passphrase):
# Enter same passphrase again:
The passphrase can be thought of as a password for the private key – it serves as an extra layer of protection as described below. If you leave this field blank you will generate keys that do not prompt for a passphrase. In other words, you will be logged in automatically via the secure public / private key handshake that you are in the process of setting up. It is highly recommended that you enter a passphrase unless you are setting up automated routines that require automatic login. See more detail below in “Security Notes.”
The keys have now been generated and are stored in the .ssh folder associated with the user account on the Host machine.
3. The final steps are to copy the public key to the Client and append it to the authorization_keys file. There are a number of ways to do this – you can copy the file to the Client and then append it (I like this method being the relative noob that I am. It involves more steps but is the easiest to complete without error.
Those proficient with terminal commands will do it all in one step from the Host). Alternatively, you can open the id_rsa.pub file via a text editor like iv and copy the key text – then open the authorized_keys file on the Client and paste the text directly into the file. I will walk you through the noob method.
In the terminal navigate to the folder that contains the newly created keys – cd /User/UserName/.ssh and use the “ls” list comand to see what is in that directory. You should see the following files:
Type the following at the command prompt:
# scp id_rsa.pub admin@ClientIPAddress /etc/config/ssh/
admin@ClientIPAddress is the address of your QNAP NAS (the Client) followed by the path on the Client where the public key needs to reside. You will be ask you for the password of the “admin” account to login to the Client.
# password:
Enter the password to complete secure copy.
4. On the Client (QNAP NAS) navigate to the /etc/config/ssh folder and “ls” to reveal the contents of the directory. You should see your id_rsa.pub file.
5. Now let’s append this file to the authorized_keys file which needs to reside in this directory. Do not worry if authorized_keys file is not present. We will create it.
Type the following at the command prompt:
# cat id_rsa.pub >> authorized_keys
Note: You have to cut the key in the file to one line, and add ssh-rsa in at the very beginning.
Example
ssh-rsa AAAAB3NzaC1kc3MAAACBAPY8ZOHY2yFSJA6XYC9HRwNHxaehvx5wOJ0rzZdzoSOXxbETW6ToHv8D1UJ/z+zHo9Fiko5XybZnDIaBDHtblQ+Yp7Stx…4loWgV=
That’s it. You should now be able to login using key authentication. Logout of the Client and attempt to login. If you created a passphrase for your id_rsa private key then you will be prompted for the passphrase. If you left the passphrase field blank when generating the keys then you will be logged in automatically.
The first time you login you may encounter a promoted message like below.
The authenticity of host ‘xxx.xxx.xxx.xxx’ can’t be established.
RSA key fingerprint is XX:XX:XX:XX:XX:XX:XX:XX:XX:XX:XX:XX:XX:XX:XX:XX.
Are you sure you want to continue connecting (yes/no) ?
Type “yes” to continue. After you accept the authenticity of the RSA key, the Client information is saved in the /Users/UserName/.ssh/known_hosts file. You will not be prompted again unless you remove this file.
Important
If the destination Client is a x86 series model, please execute the following command on the destination Client (TS-509) to make sure the folder permission has been set correctly. Because there might be a permission problem in earlier firmware versions in x86 model (e.g. TS-509)
# chown admin.administrators /mnt/HDA_ROOT/.config
Note
The procedure is the same when setting up key authentication between two NAS boxes. Simply follow the steps above substituting a NAS device for the Host and Client as per the above example.
Trouble Shooting
O’Reilly provides an excellent reasource for troubleshooting. See: http://hell.org.ua/Docs/oreilly/tcpip2/ssh/ch12_02.htm
Security Notes
You must keep your private key secure! Security of public key authentication is dependent on your ability to secure the private key. You should avoid generating a key without a passphrase. If you have an unencrypted private key (no passphrase) stored on your workstation and if your workstation is compromised, your Client machines have been compromised too! If a hacker can obtain the private key they will have access to any client machines accessible with the public key. Further, in the event that your machine is compromised you should consider strongly the possibility that your keystrokes are being logged and therefore any private keys that ar protected by passphrases have likely been compromised.
In addition, you should never allow root-to-root trust between systems. Unfortunately, the firmware version of the QNAP NAS series is hardwired with a variant of OpenSSH that only permits ssh login by the root (admin) user. You are strongly encourage to update the SSH Daemon With OpenSSH as per http://wiki.qnap.com/wiki/How_To_Replace_SSH_Daemon_With_OpenSSH. You can then setup named accounts for users or roles, granting as little root access as possible via sudo. You should also limit the “from” access of the public keys, and if possible only allow specific public keys to run specific commands.
Original Example
Here is an example which tells you how to set up authorized_keys between two QNAP NAS units. For example, we have one TS-209 (10.8.12.209) & a TS-509 (10.8.12.33), and now I want to make it possible to SSH login to TS-509 from TS-209 without password.
1. SSH login to TS-209 with a console application (e.g. Putty)
2. Execute the following command, secure copy the id_rsa.pub from TS-209 to TS-509, and save it as “authorized_keys”.
# scp ~/.ssh/id_rsa.pub .ssh/authorized_keys
3. You might see a promoted message like below if this is the first time you are trying to access one NAS from another. Simply type “yes” and go to the next step.
The authenticity of host ‘10.8.12.33’(10.8.12.33) can’t be established.
RSA key fingerprint is XX:XX:XX:XX:XX:XX:XX:XX:XX:XX:XX:XX:XX:XX:XX:XX.
Are you sure you want to continue connecting (yes/no) ?
4. And it will ask you for the password of the “admin” account to login the destination host (10.8.12.33), just enter it and finish the secure copy command.
# password:
5. That’s it! Now you should be able to SSH login to the TS-509 from TS-209 without password, the authorized_keys has been saved in the destination host (TS-509) under /etc/config/ssh/authorized_keys
Note
If the destination host is a x86 series model, please execute the following command in the destination host (TS-509) to make sure the folder permission has been set correctly. Because there might be a permission problem in earlier firmware versions in x86 model (e.g. TS-509)
# chown admin.administrators /mnt/HDA_ROOT/.config









Add Comment