EseeCloud Is A Simple, Stylish, User-Friendly And Powerful Mobile Video Surveillance Software. We Are Committed To Continuously Improving Our Video Processing Technology And Video Innovation Technology, And Providing Global Security Products, Professional Industry Solutions And Superior Services To Continuously Create Greater Practical Value For Our Customers.
Access from smartphone
(1)Download APP
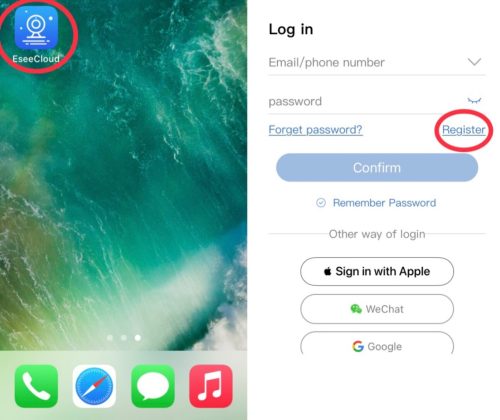
Search and download “Eseecloud” app from App store or Google play on your phone.

(2) Register
If you install and open “Eseecloud” app at the first time, an account need to be registered initially.
 ce”.
ce”.
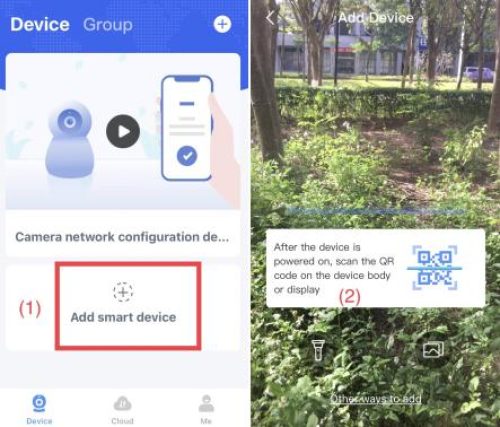
(3) Add device
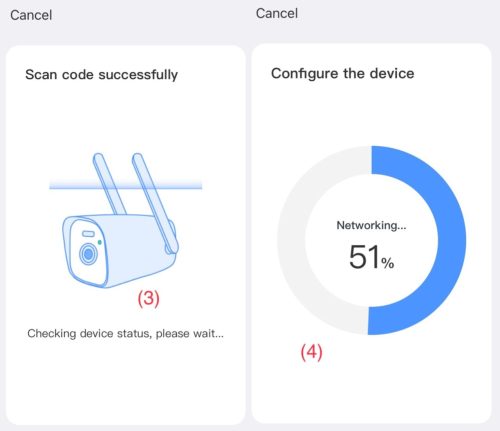
Method 1: Add the device via QR code.
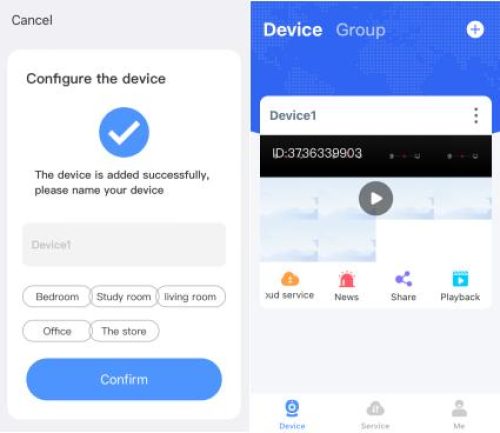
EseeCloud Devices Advanced User Guide
Read Next : EseeCloud Wireless Security Camera System Installation
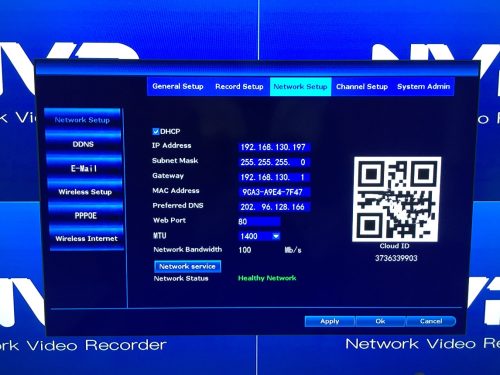
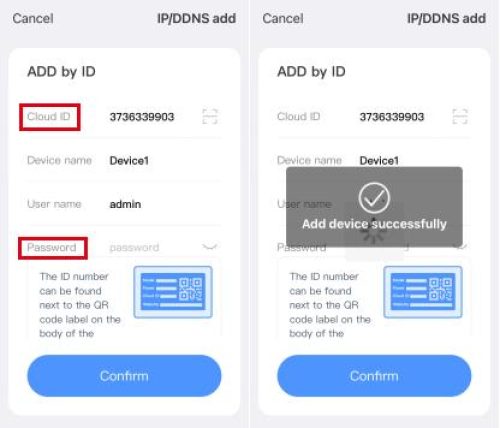
Method 2: Add by cloud ID.
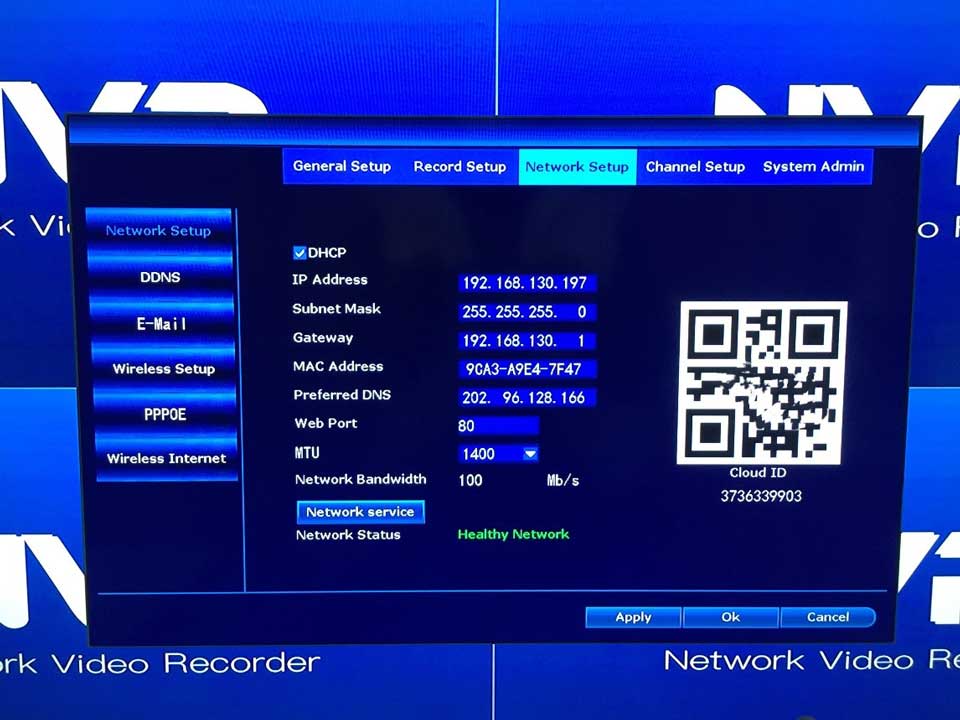
Cloud ID: Enter NVR’s System Setup – Network Setup to input Cloud ID or Scan QR Code)
Device name: Choose a name for your system of your choice.
User Name: Enter the NVR’s User Name (default: admin)
Password: Enter the NVR’s Password (default: NO password)
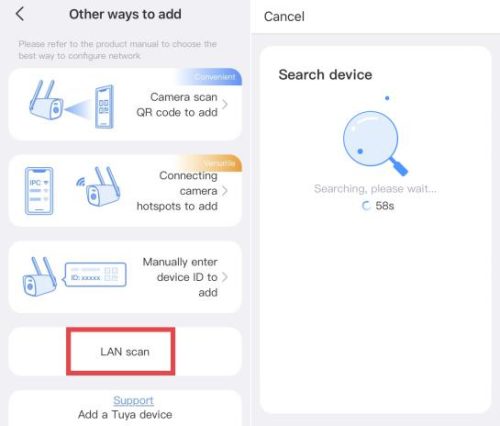
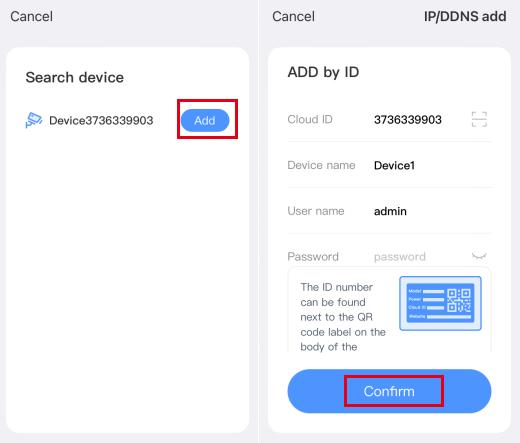
Method 3: Add by LAN scan.
Please make sure you are connected to the same wifi.
Access from remote PC
1. Access from remote PC (Log in with Cloud ID)
Operation Steps: ( We suggest you to use microsoft IE, otherwise some services will be invalid. )
1. Open your browser
2. Enter http://www.e-seenet.com
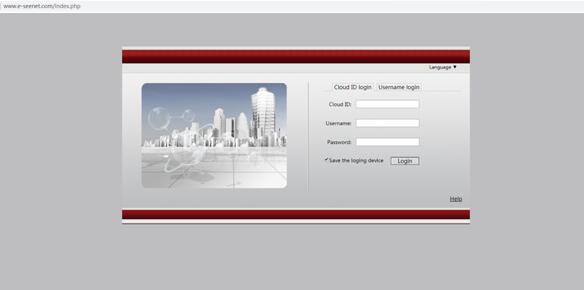
Cloud ID: (Enter NVR’s System Setup-Network Setup to input ID or Scan QR Code)
Username: Enter the NVR’s User Name (default: admin)
Password: Enter the NVR’s Password (default: NO password)
3. Enter the correct device ID, user name and password.
4. Click login to enter live view interface.
Note: To successfully remote access your system, the device ID should be ONLINE.
2. Access from PC Client (CMS)
1. Please download CMS from the below link:
http://www.tontonsecurity.com/download/page_show_67.html

2. Login user: admin, password: (default: NO password, please keep it blank)
3. Please enter “Add” to add device, you can add it “By IP/DDNS” or By Cloud ID”
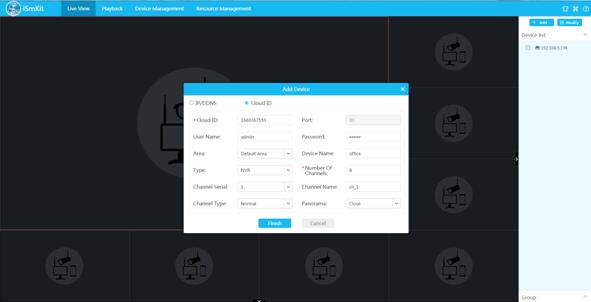
4. By IP/DDNS:
IP/DDNS: (Enter NVR’s System Setup-Network Setup to find IP)
Port: (default: 80)
Username: Enter the NVR’s User Name (default: admin)
Password: Enter the NVR’s Password (default: NO password)
Device name: Choose a name for your system of your choice.
Type: choose “NVR”.
Number of Channels: please input the correct number of the channels.
Click “Finish” and go back to “Preview”, click the device name to view live video.
5. By Cloud ID:
Cloud ID: (Enter NVR’s System Setup-Network Setup to find IP)
Username: Enter the NVR’s User Name (default: admin)
Password: Enter the NVR’s Password (default: NO password)
Device name: Choose a name for your system of your choice.
Type: choose “NVR”.
Number of Channels: please input the correct number of the channels.
Click “Finish” and go back to “Preview”, click the device name to view live video.
Add the IP camera to the NVR by matching code
1. When you use Match Code
1.1 Add new add-on cameras to your system
1.2 Re-pair camera to NVR when they lose connection. You need to delete the
Network Unreachable channel at first, then re-pair the camera to an unoccupied
channel. (unoccupied channel always shows No Video Source under Status.)
Tips: The IP cameras in pre-packed kits have already been paired to the NVR. So the
cameras will automatically connect to the NVR once they are plugged in power.
2. Add camera by matching code.
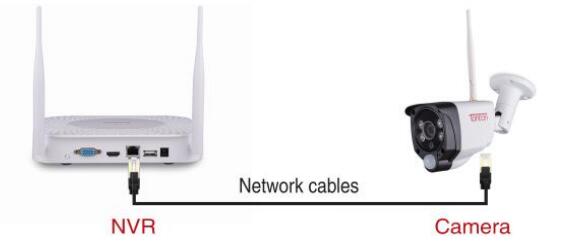
2.1 Power on the camera which has no video, and connect this camera to the NVR
via Network cable.
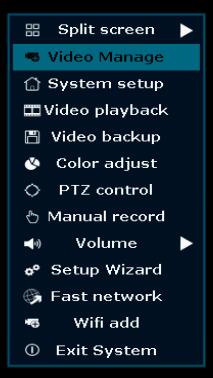
2.2 Right click mouse on the main interface, select “Video Manage“
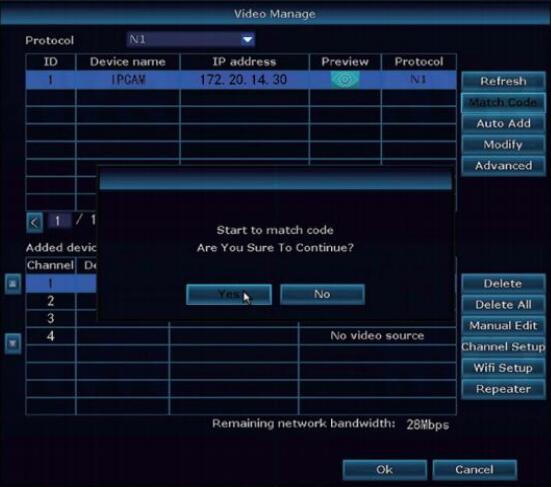
2.3 Click “Refresh“, find the camera’s IP. Click “Match Code“, then click “Yes“, the
NVR will start to match code to the camera.
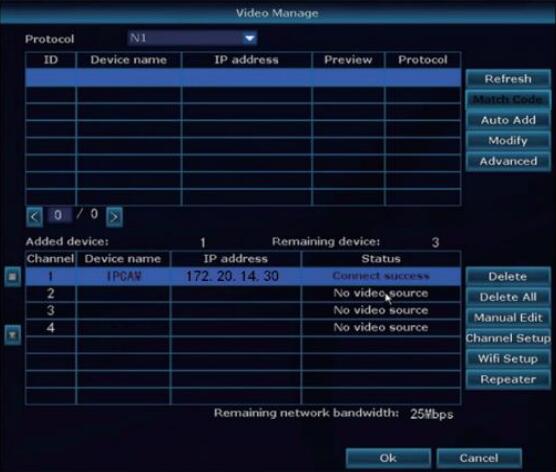
2.4 After matching code successfully, the “status” will show “Connect success“.
Then you will see the camera is added to the NVR and display video on the screen.
What is the WiFi distance of the wireless kits?
Between each camera to the NVR:
In open space we tested 350m (1150ft) working distance;
With normal obstacles like 1-2 walls, we tested 35m (115ft) working distance.
For distance we only have theoretical values.
No certain distance can be guaranteed due to different environments applied in.
It varies depending on obstacles and signal interference.
on the contrast, if there are many blocks and signal interference between, the distance could be closer.
What if your NVR system keeps beeping?
1. Please right click your NVR mouse, then click System Setup – General Setup – Error setup, make sure that “Enable” and “Buzzer” are unchecked.
2. Please right click your NVR mouse, then click System setup – Channel setup – Video detection, make sure that “Buzzer” is unchecked for all channels.
3. If you have checked above 2, and none of the buzzer are checked.
Follow below to stop the beeping:
a. Right click your NVR mouse, then click System setup – System Admin – Factory setting, uncheck WiFi Reset, then click Apply to reset NVR settings.
b. If you cannot view the cameras on the NVR after resetting, please right click your NVR mouse, then click Exit system, choose shutdown. Follow on-screen message to unplug NVR from power and then re-plug it back to NVR. Wait for NVR to initialize.
Then the cameras shall come back.
How to upgrade the NVR system
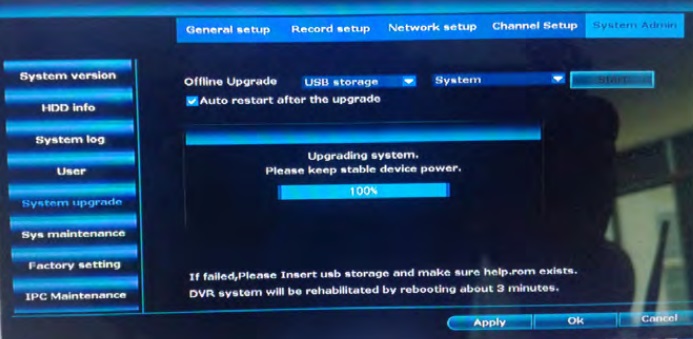
1. Please download the update file to your computer and unzip it, then plug the USB flash drive,and move the unzipped update file to the root directory of the USB flash drive.
Note:
1)Please move the update file to the root directory of the USB flash drive, do not move the subdirectory.
2)Do not change the file name.

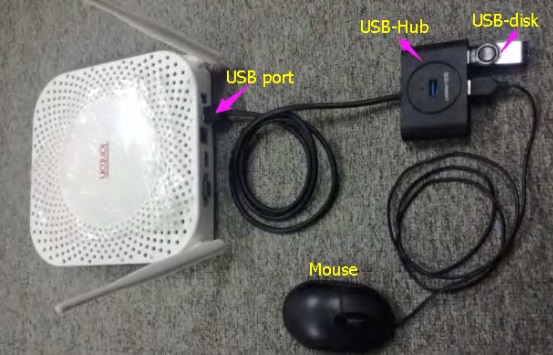
2. Connect USB-disk/mouse and USB hub with NVR shown as flowing.
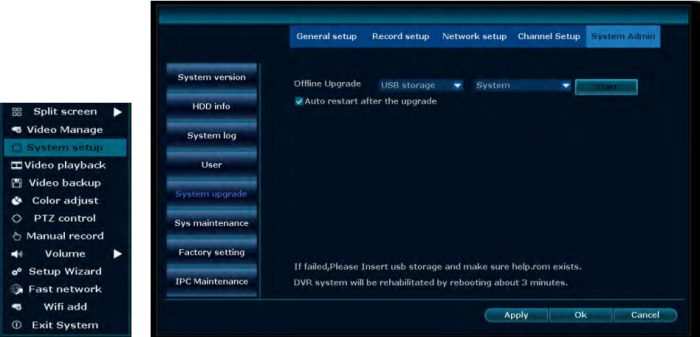
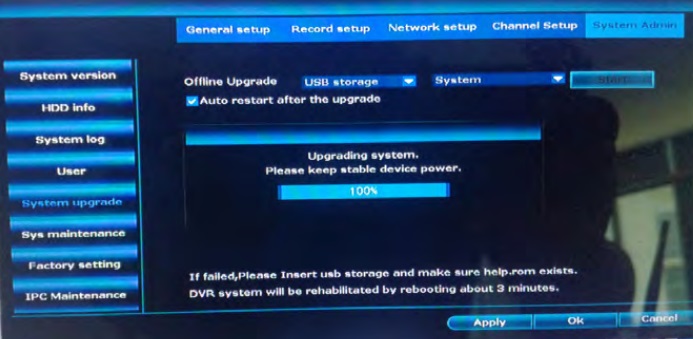
3. Enter the NVR’s menu (System setup\System Admin\System upgrade),
Click “Start” to begin upgrading.
Note: Please keep power supply well during the upgrade.
4. Once the upgrade is done, NVR will restart system automatically.
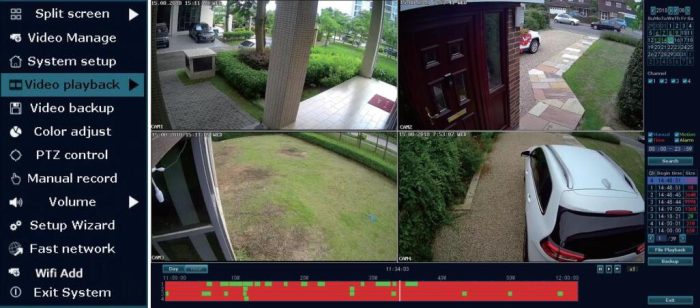
How to view playback on NVR system
1. Right click the mouse , choose video playback
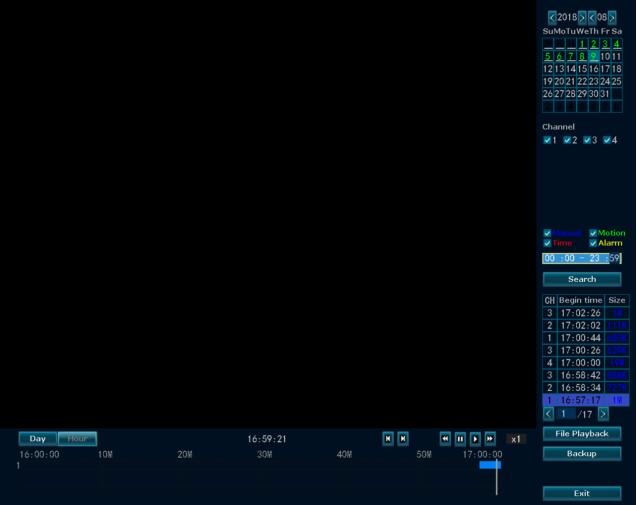
2. In the menu bar on the right, choose record type/channel/data to search what
you want to and click playback.
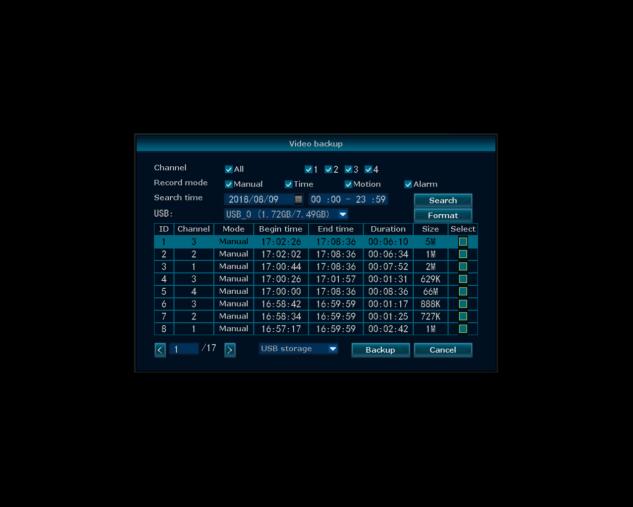
3. Click Backup and the video will be saved in USB storage
How to Add C8601 Cameras to Tonton NVR System
or
How to connect and set up the Wireless Network Camera System?
1. Connect the DC 12V/2A power adapter to the Power port of the NVR.
When Power indicator light is on, NVR starts to work.
2. Use VGA / HDMI cable to connect your NVR and Monitor / TV, then preview interface can be seen.
3. Plug the network cable and mouse to the ports of NVR rear panel.
4. Connect the DC 12V/1A power adapter to the IP camera (IPC).
Each camera has one 6ft length power adapter.
5. After finish connecting, the NVR will search the IPC automatically and start to initialize the connection.
When completed connection, the images will display.
6. Login this system:
Username : admin
Password: (there is no password, please keep it blank)
(Note: if you want to change the password, you can go to NVR’s System Setup – System Admin -User management – Set password to change it.)
7. Then you can follow up the below steps to set up on your phone:
If you want to view the cameras remotely, the NVR should be connected WAN network, Please ensure DHCP in your Router is open.
If you don’t know how to enable the Router’s DHCP, please input the IP Address of your
Router to IE browser, then you will find the network information, you can enable the “DHCP”.
After that, please go to NVR’s System Setup – Network Setup to enable “DHCP”
Then the system will obtain the IP Address, DNS from your Router automatically.
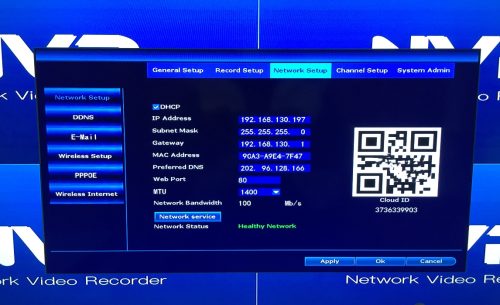
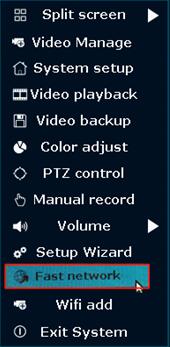
Or you can go back main menu to select “Fast Network”, Then the system will connect the WAN network automatically.
8. Access from smartphone
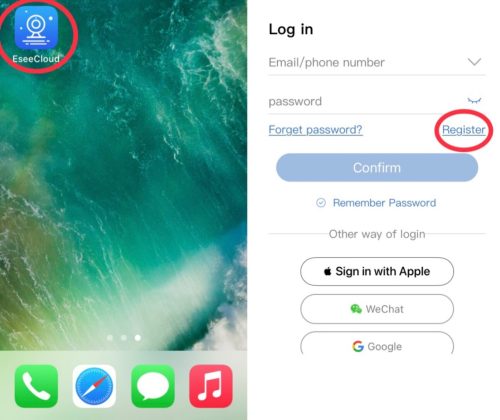
(1). Please download “Eseecloud” app from App store or Google play on your phone.

(2). If install and open “Eseecloud” app at the first time, an account need to be registered initially.
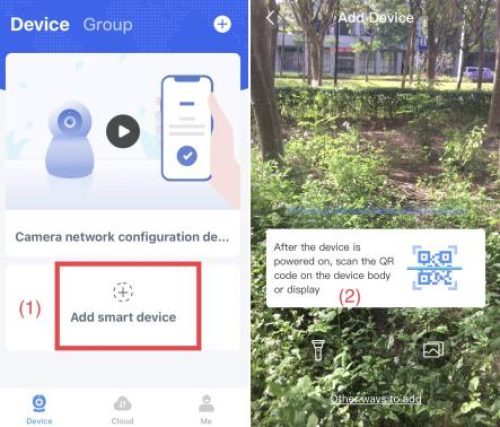
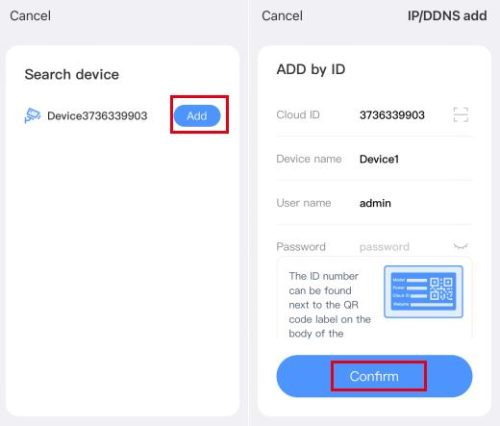
(3) Add the device.
Method 1: Add the device via QR code.
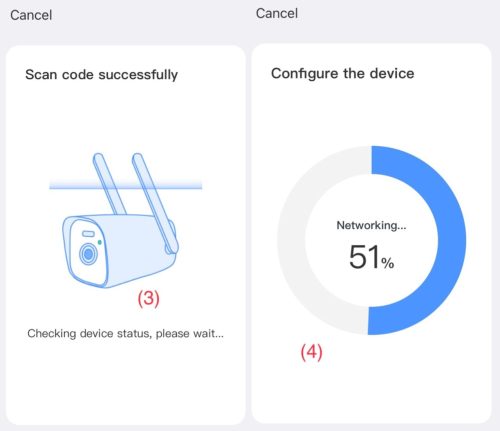
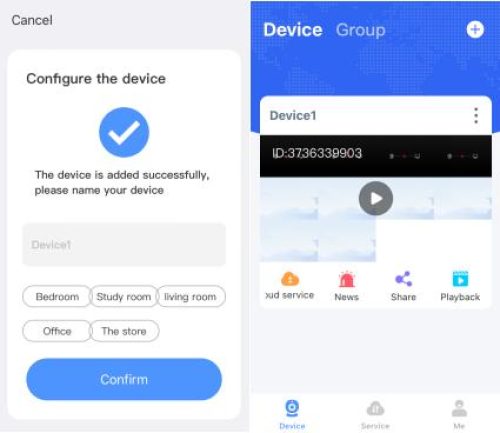
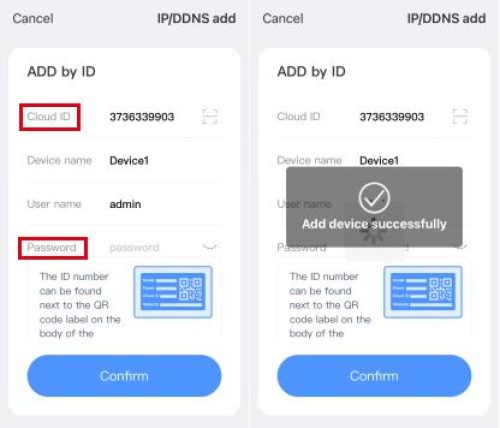
Method 2: Add by cloud ID.
Cloud ID: Enter NVR’s System Setup – Network Setup to input Cloud ID or Scan QR Code)
Device name: Choose a name for your system of your choice.
User Name: Enter the NVR’s User Name (default: admin)
Password: Enter the NVR’s Password (default: NO password)
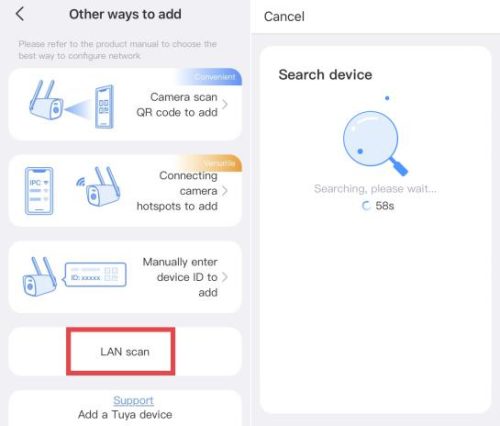
Method 3: Add by LAN scan.
Please make sure you are connected to the same wifi.
9. Access from remote PC (Log in with Cloud ID)
PC : our item only support IE browser, please input “www.e-seenet.com” to IE Browser to view your cameras.
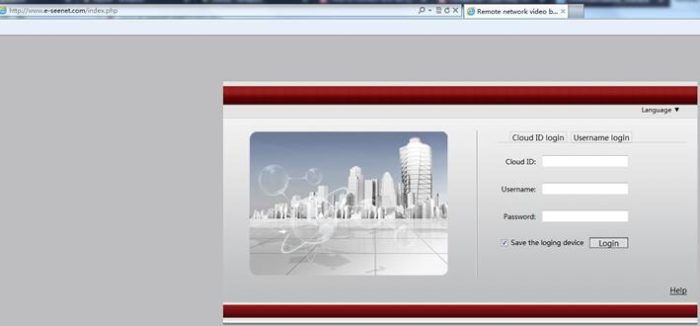
Cloud ID: (Enter NVR’s System Setup – Network Setup to input ID or Scan QR Code)
Username: Enter the NVR’s User Name (default: admin)
Password: Enter the NVR’s Password (default: NO password)
(Input the correct Cloud ID, user name and password, click login to enter live view interface.)
NVR video backup.
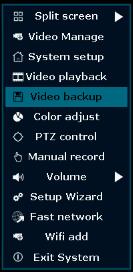
1.Right click mouse > select Video backup.
2. Enter into the interface of Video backup.
Select Channel, Record mode and Search time.
Click “Search”. After that, the chosen video will display in the list.
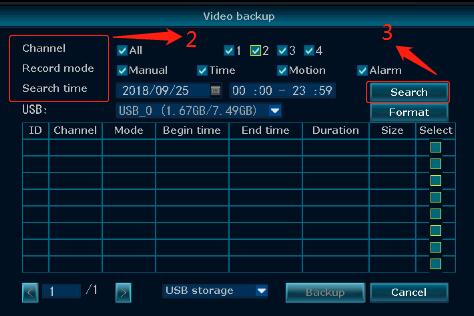
3. Select the section which you want to backup.
Then, click the bottom “Backup”.
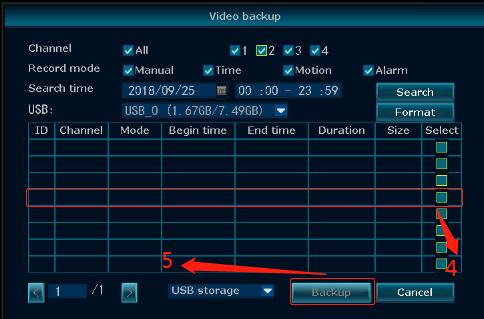
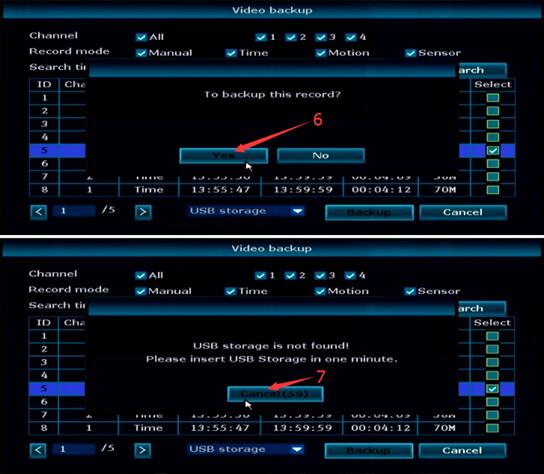
4. Next, there will pop up a dialog box asking are you sure to backup this record.
Click “Yes” if you are sure.
Before start to backup, system will inform you to insert U disk within one minute.
If you want to cancel the operation of backup, you can click “Cancel” to withdraw.
NOTE: The NVR only one USB port, so you have to unplug the mouse
and plug the U disk within one minute.
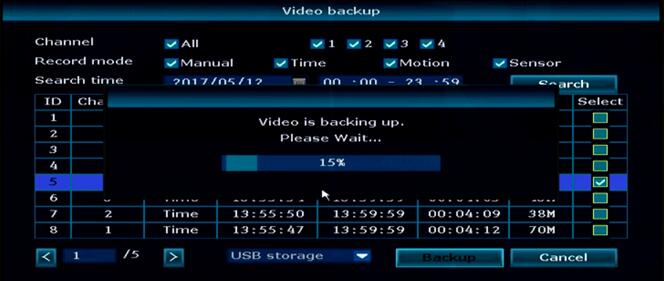
5. After you insert U disk, what you should do is just wait a moment.
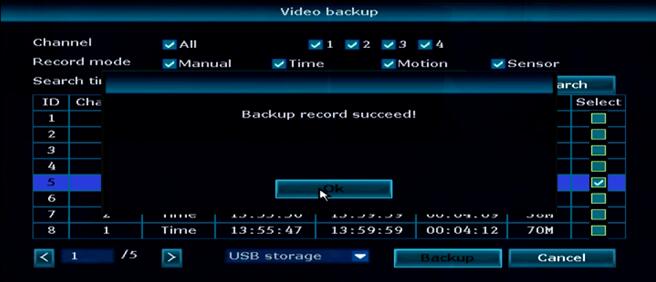
6. Backup is completed when system inform you “Backup record succeed“.
And you can unplug your USB disk at that time.
How to setup audio function?
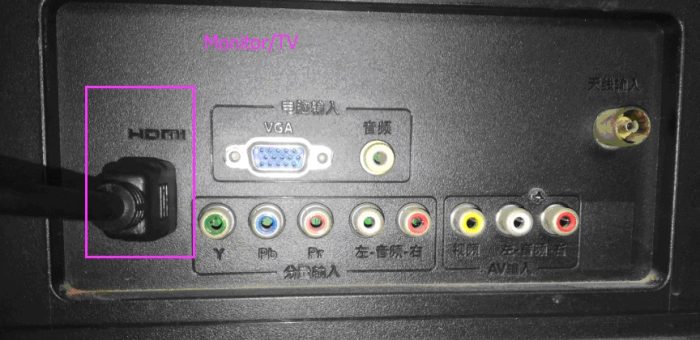
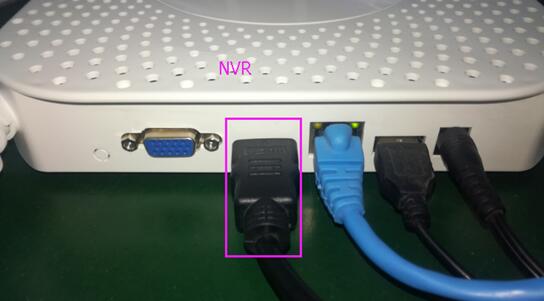
1. System connection
(1) The monitor must have HDMI input port.
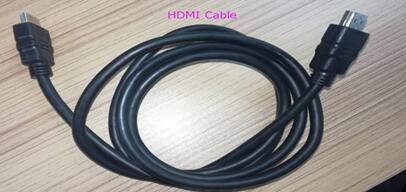
(2) Connect the HDMI port on both sides with the included HDMI cable.
2. NVR setup
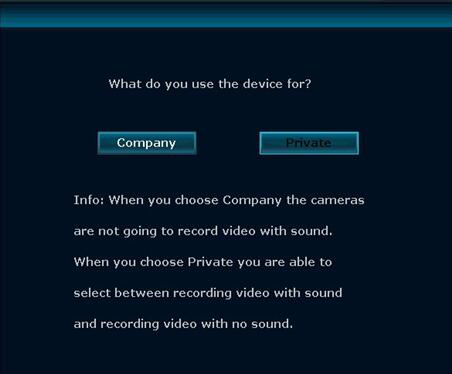
(1) Choose the option “Private” on this interface during NVR’s restarting. It allows you select audio or not.
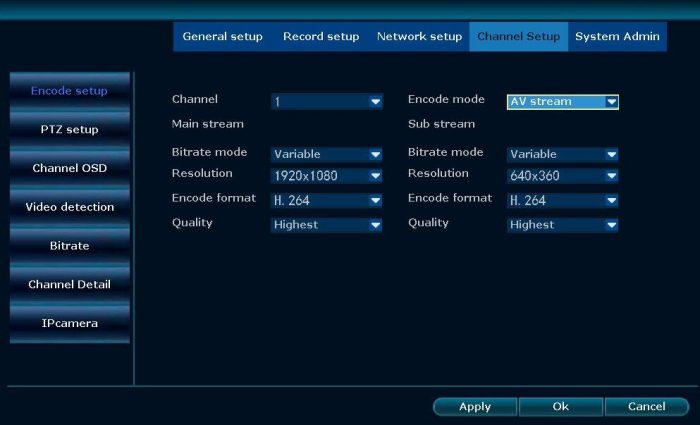
(2) Check whether the encode mode is “AV stream” or not.
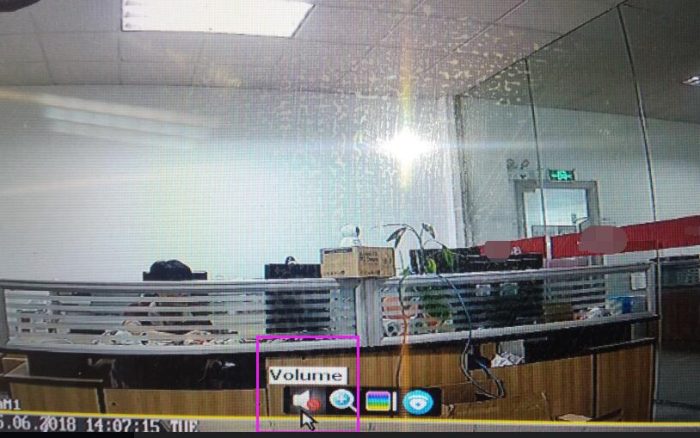
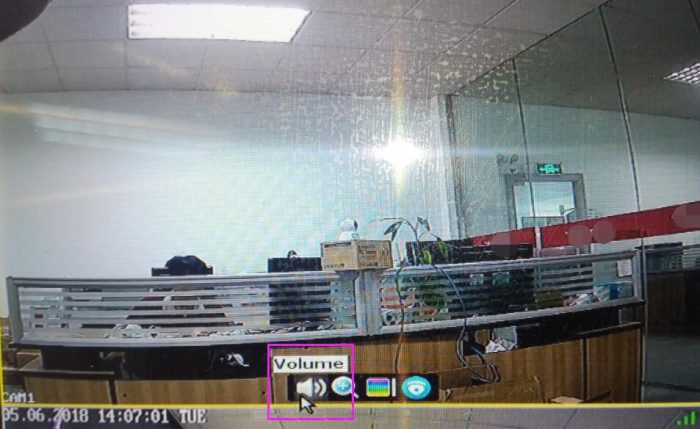
(3) On the live window, click mouse to select any channel to pop-up the hidden volume icon like a speaker, click it repeatedly to hear or mute the sound from camera.
How to use a new Gmail mailbox account to set NVR mail alarms?
How to use a new Gmail mailbox account to set NVR mail alarms?
1.Register a new Gmail mail account, and log in.
2.Get into your mailbox>click the “![]() ” in top right of page>get into “My Account“.
” in top right of page>get into “My Account“.

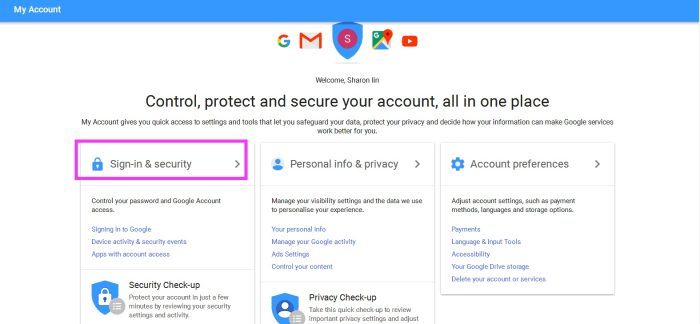
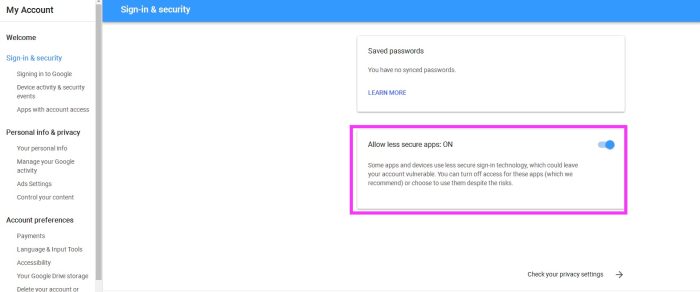
3. Click “Sign-in&security” and enter the interface,Turn on “Allow less secure APP on“.
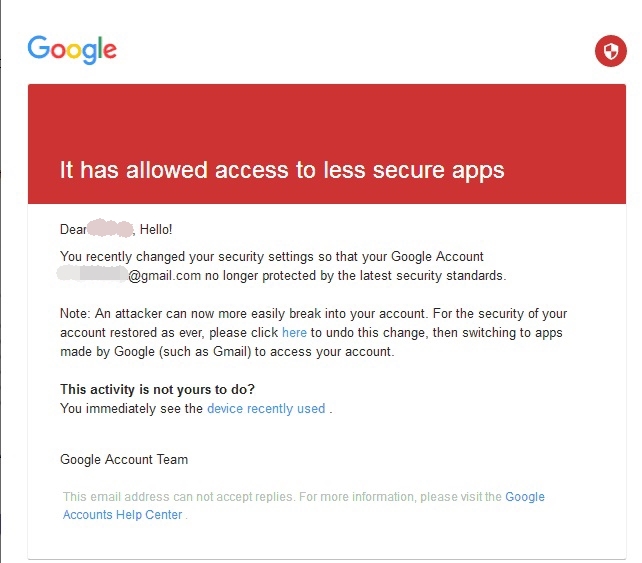
4. After that, you will receive an email from Google, which means “less secure sign in” has been turned on.
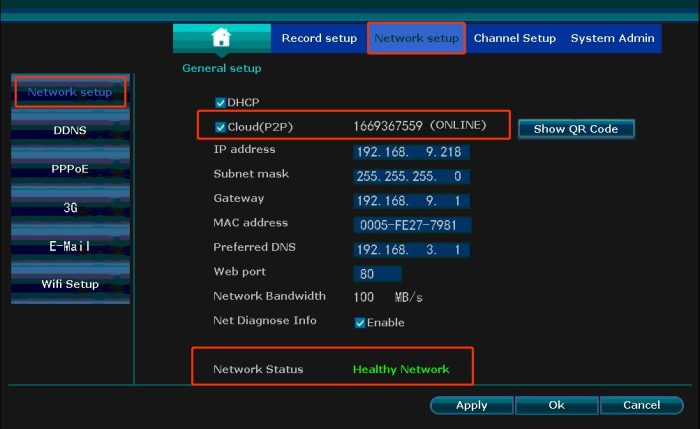
5. Get into NVR system. Right click mouse>select System setup>Network setup>Network Status.
Check if your NVR’s network connected successfully.
Before operate what mentioned above:
Make sure Cloud(P2P) display “ONLINE“.
Make sure the Network Status display “Healthy Network“.
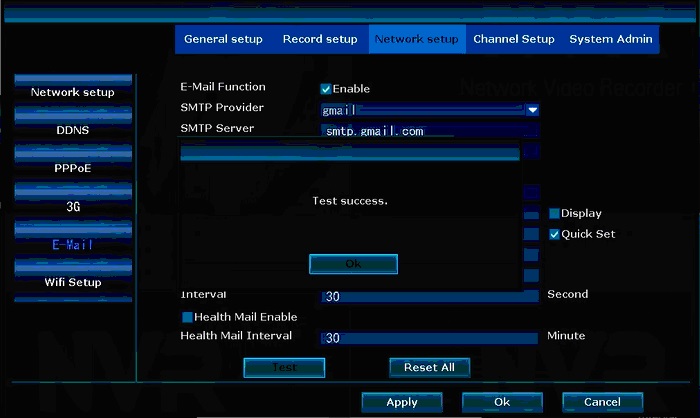
6.Then, click the “E-Mail”.
Input your Gmail SMTP Server (smtp.gmail.com) in ” SMTP Server” Input your Gmail account in “Username” and “Sender”.
Change the “Encryption Type” to “TLS”.
Input your Gmail password in “Password”
Input your two inbox address in “Sendee 1\2”
After that, click “Apply”>click “Test”.
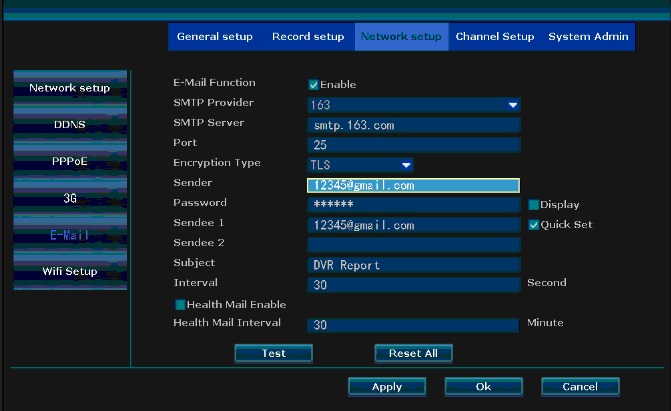
7. When the system remind you “Test successful”, which means NVR’s mail alarm is set successfully.
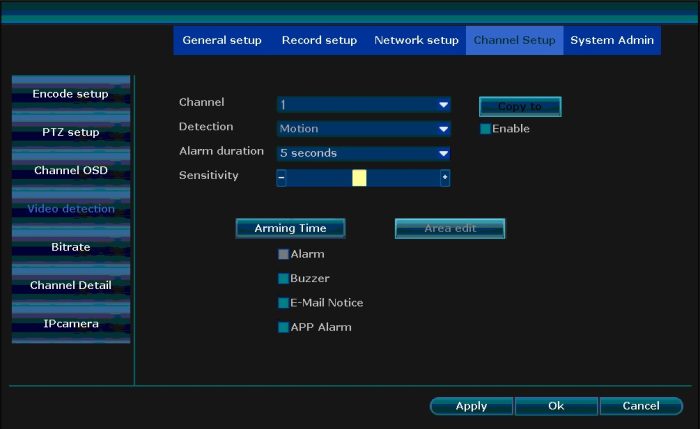
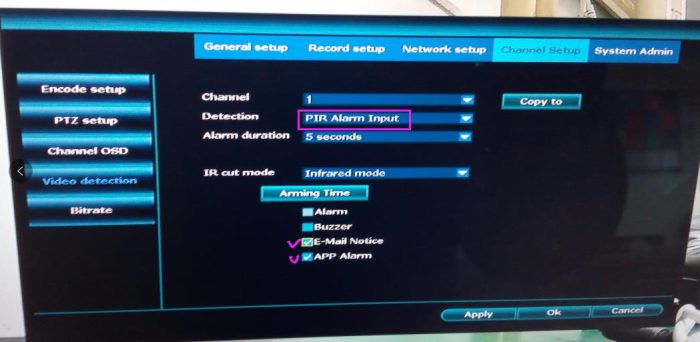
8. PIR video detection setting as below picture:
(1). Click “Channel setup” and “Video detection”
(2). Choose Motion Detection, disable it
(3). Choose PIR Input Armed Detection, Enable E-mail Notice
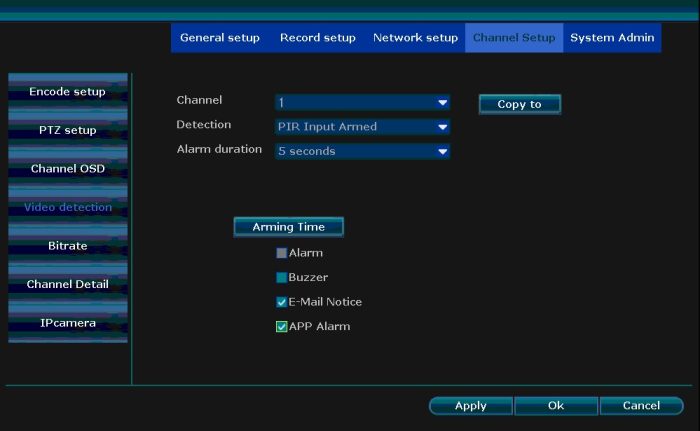
9. After finished setting, When alarm is triggered, you will receive email from NVR.
PIR alarm setting
Only PIR detection recording setup
1. Disable motion detection function, click ok to save
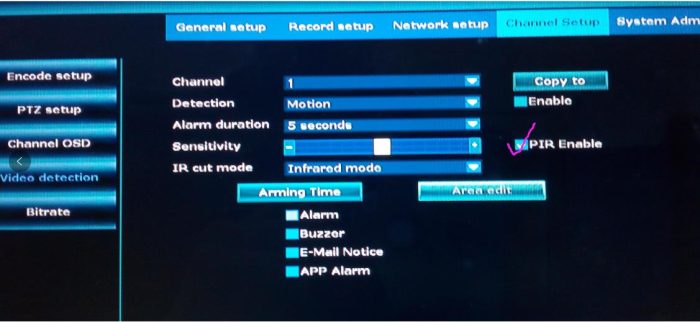
2. Choose Detection Model with PIR Input Armed.
Please noted: If you want to set Buzzer, Email notice or App alarm, you can enable them, in this way, you will get notification on email or App.
3. Press “Reset” to clear default setting
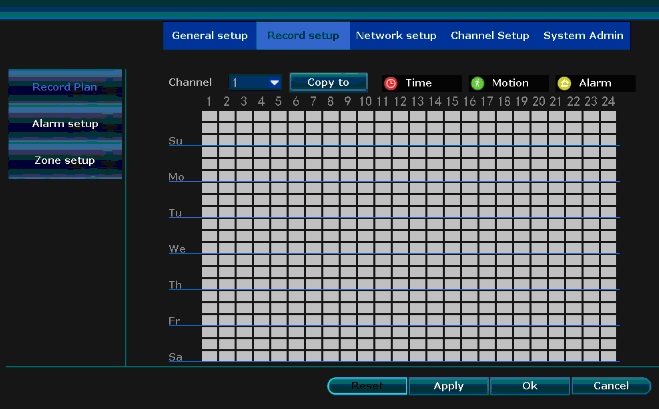
4. Click the icon “Alarm”

5. Press and drag the left button of the mouse to select needed schedule.
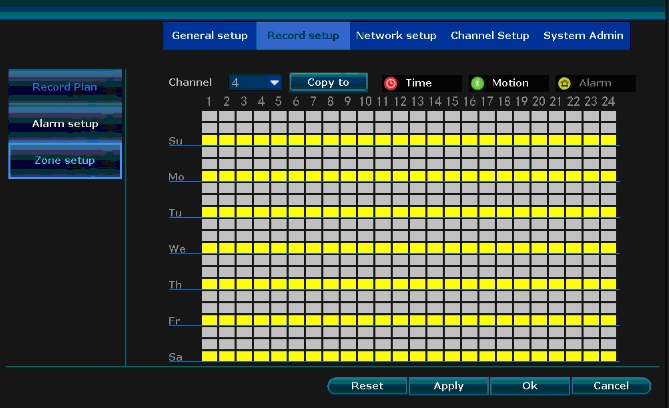
6. Click ok to save
7. Cancel the manual recording mode
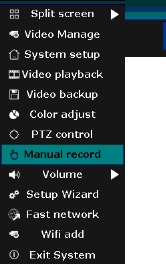

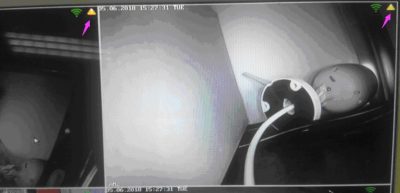
8. Once the PIR detection is trigged, the live window will display an icon like below, it means PIR recording is running
How to Reset NVR’s Password
Reset NVR’s Password
1. The interface when you log in.
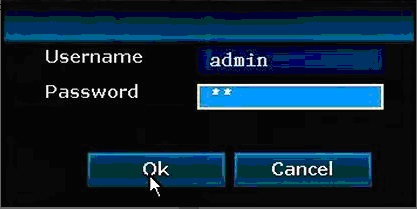
2. Click “OK”. If you input incorrect password,
monitor will display “Username/Password Is Incorrect!”.
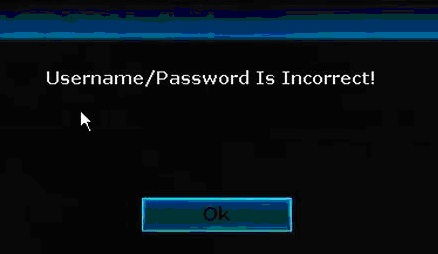
3. Continuously and successively click left button and right button in blank space of prompt box for six times.After that, monitor will display “Restore default user”.

4. Click “Yes”, and you will access to the interface where you can reset NVR’s password.
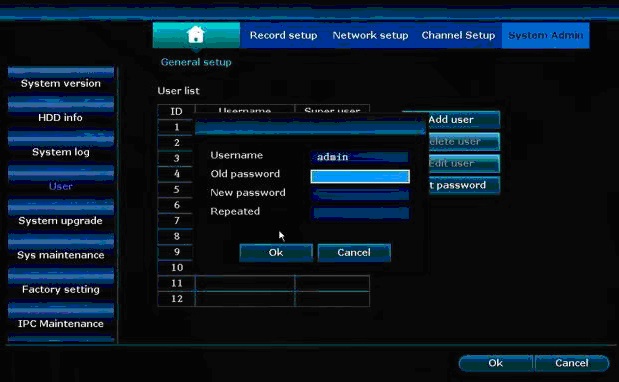
Tips: 1. The username must be “admin”, or else the password won’t be retrieved.
2. If you want to make new password, please leave it blank in column of “Old password”.
3. Delete the old password after reset the new one.
4. If you have set a new password for NVR, remember that NVR password cannot exceed 10 characters, or the NVR will not save it correctly.
reset NVR’s password click to download video
How to install iSmkit PC client
How to install iSmkit PC client Click here to download
Gmail Mail Configuration Guide
(DE) Gmail Mail-Konfiguration Anleitung
(FR) Guide de configuration de Gmail Mail
(CN) Gmail邮件配置指南操作步骤20230922
(EN) Gmail Mail Configuration Guide
Email SMTP and POP3 settings
Solve the problem of the white light always on(Applicable to 3.6.60 and above Version)
Precautions:
1. Please check your IPC version first, only 3.6.60 and above version can be solved the problem through upgrade.
2. The camera must be able to produce the image, if the camera can’t be viewed or resetted, it can’t be upgraded.
Check IPC Version:
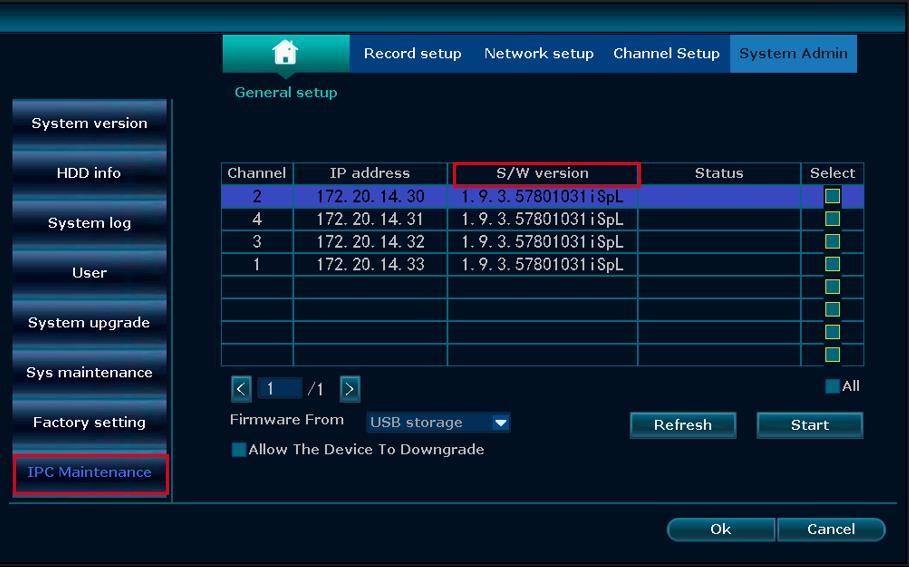
Go to “System Admin” – “IPC Maintenance” to check the version of the problem camera. Please note: Don’t upggrade the version 3.6.16 and below version with these upgard file.
Download the upggrade file:
For 3.6.60 Version: Download Link
For: 3.6.60 Above Version: Download Link
Upgrade Method
1. Upgrade the IPC via NVR system
(1)Please download the update file to your computer and unzip it, then copy the update file(IPCAKV3C_xxxxx.rom) to a USB flash drive. Please note: Don’t change the file name
(2)Plug the USB flash drive to the NVR’s USB interface
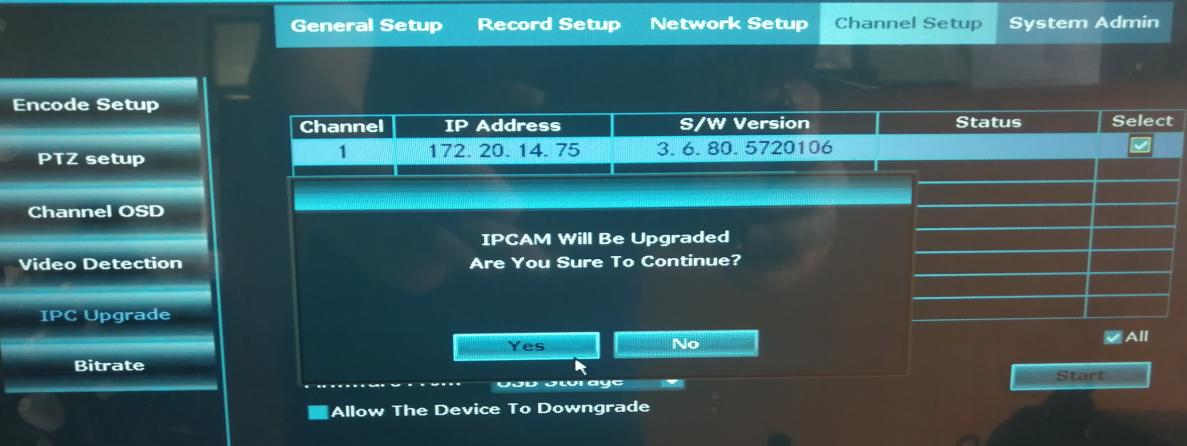
Enter the NVR’s menu (System Setup-> Channel Setup-> IPC Upgrade)
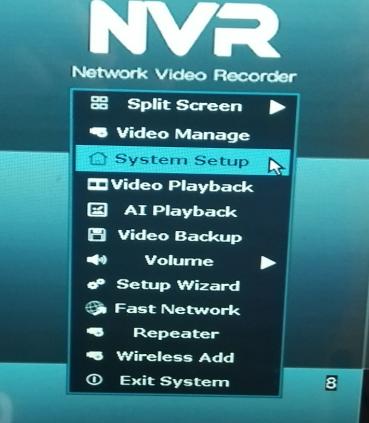
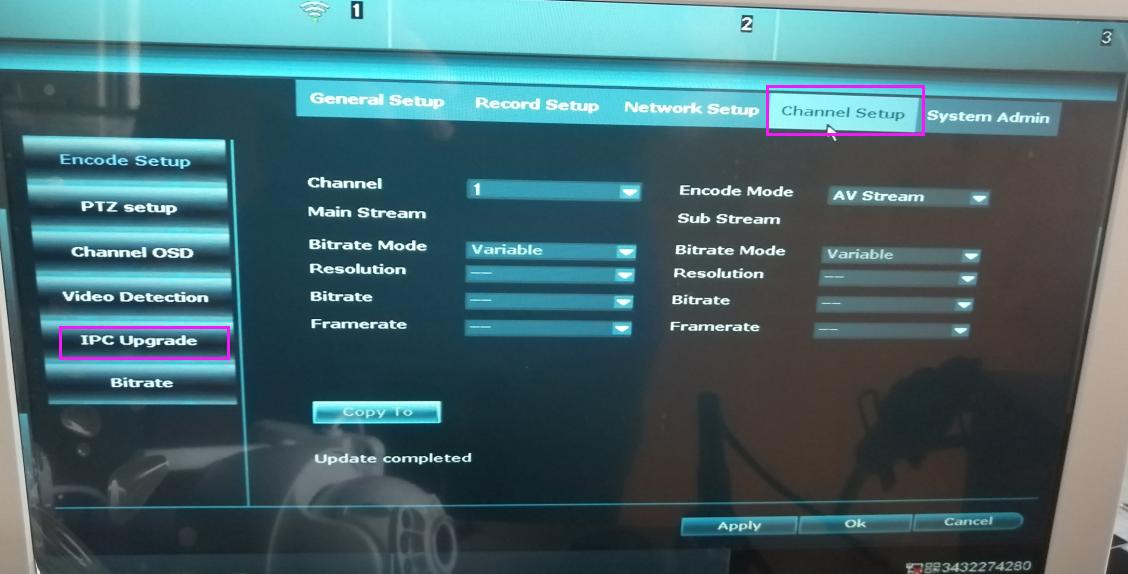
(4)Click the “Channel” and select the upgarde channel of the IPC.
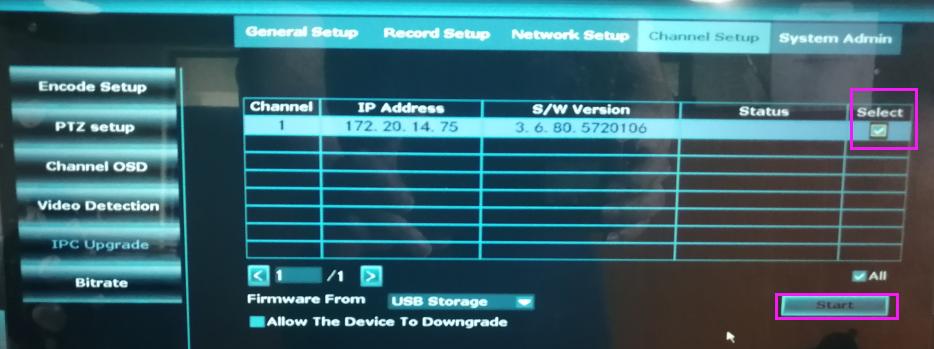
(5)Click “Start” and “Yes”, the IPC will be upgrading. Please note: During the upgrade, please don’t power off the NVR and the camera.
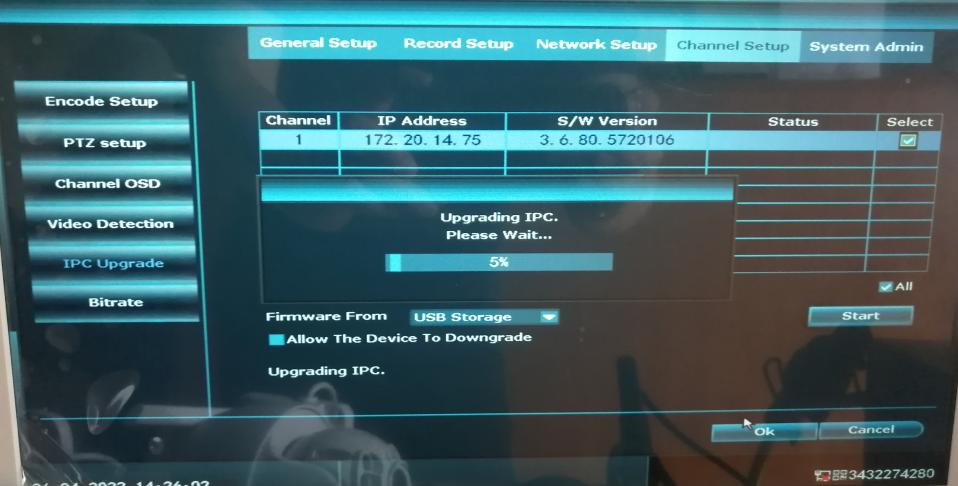
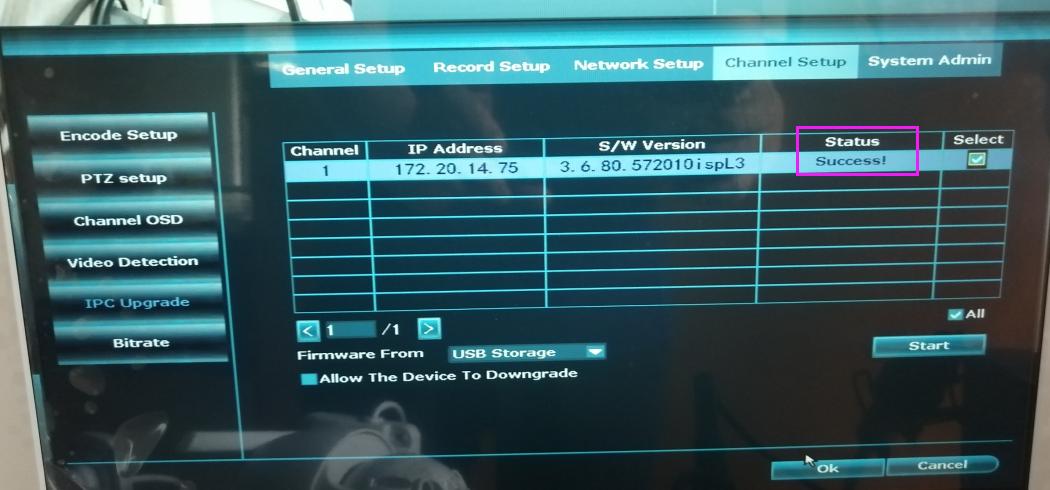
(6)If the camera upgraded successfully, the Status will show “Success!”.
2. Upgrade the IPC via TF card.
(1)Unzip the upgrade file, then copy the “help.rom” file to the TF card. Please don’t change the file name and move it to the root directory, do not move the subdirectory.
(2)Power off the camera, then insert the TF card to the TF card slot. Then power on the camera.
(3)Waiting for about 1 minutes, the camera will start up. Then press 3 times continuously of the reset button for the camera(In order to prevent operation errors, you can press several times, which will not affect the upgrade).
(4)About 2 seconds later, the camera will makes a sound for an upgrade. Then waiting for about 2-3 minutes, if the camera restart and works normally, it means that the upgrade is successful.
New Manual for Dual light
If the IP camera doesn’t work with NVR system,please check …
1. First of all,please confirm both of the camera and the NVR are powered on .
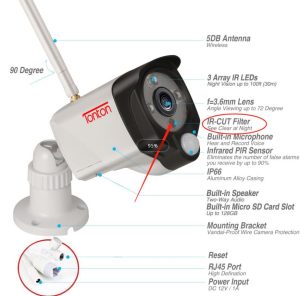
(1) Camera is powered on: Please plug the power adapter to the camera ,and then cover the IR-Cut with your hand (See picture), finally to check if the night vision will be activated or not .
(2) NVR is powered on : Please plug the adapter to the NVR ,and then see whether the power indicator is on.
2. Secondly please enter NVR system — Video Manage ,and check if the status of camera is connected successfully or disconnected.
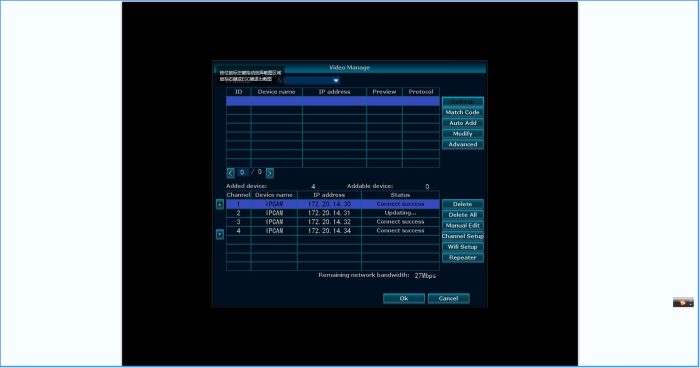
3. Thirdly, if the camera is disconnected,please confirm the distance of the camera and NVR system. The far distance will affect the signal transmission.Please follow the below steps to fix the issue:
(1) . Please enter NVR system — Video Manage — delete camera (The same page as the Step 2)
(2). Remove the camera and take it next to the NVR system,and prepare a network cable and start to match code for the camera and the NVR.
(3). How to Match code :
A. Connect this camera to the NVR via Network cable.
B. Right click mouse on the main interface, select “Video Manage“
C .Click “Refresh“, find the camera’s IP. Click “Match Code“, then click “Yes“, the NVR will start to match code to the camera.
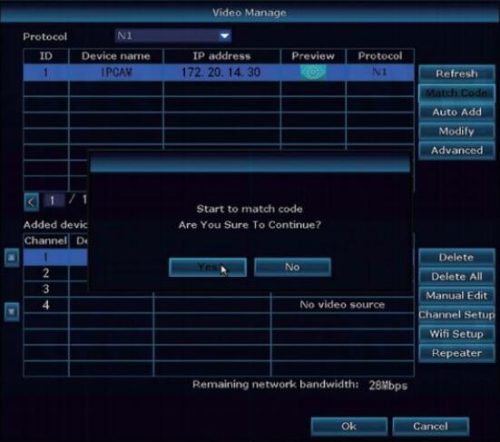
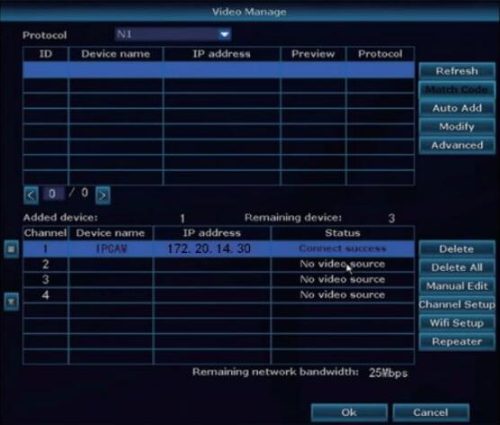
D. After matching code successfully, the “status” will show “Connect success“.Then you will see the camera is added to the NVR and display video on the screen.
4. Finally, you could unplug network cable and put the camera to the place where you want .
How to change the channel
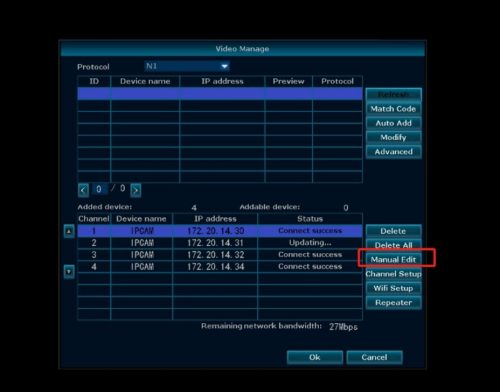
1.Please click “Video Manage”.
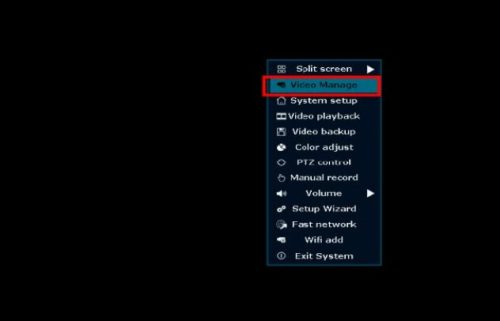
2.Make a note of the camera IP address you want to change.
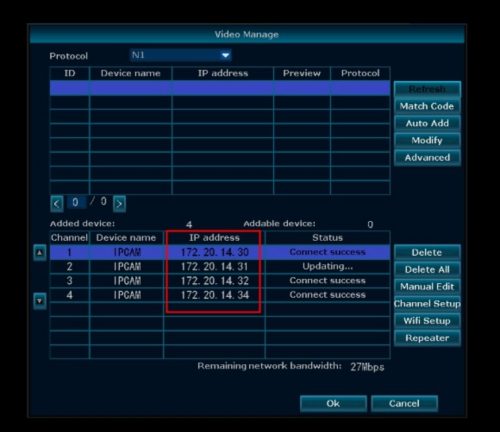
3.Click “Manual Edit” and enter the IP address on the corresponding channel.
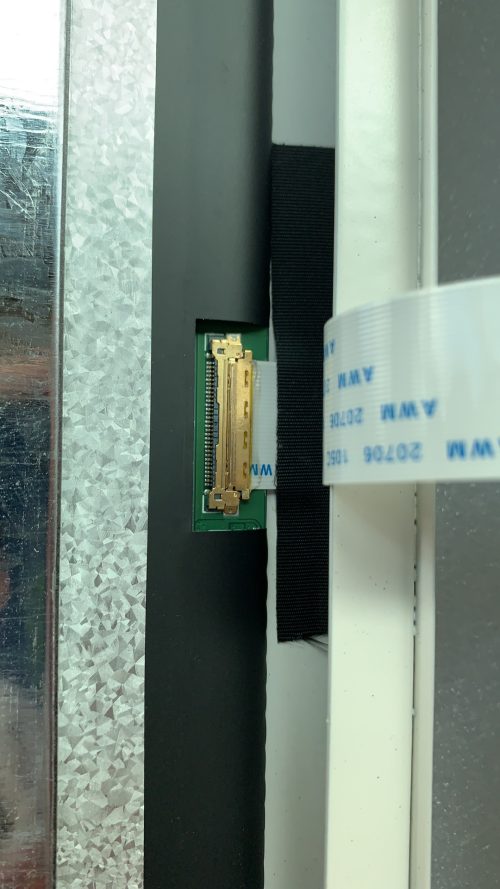
How to fix black screen Monitor for 10” /15.6”NVR
click here to download the operation video
How to get the NVR system ONLINE?
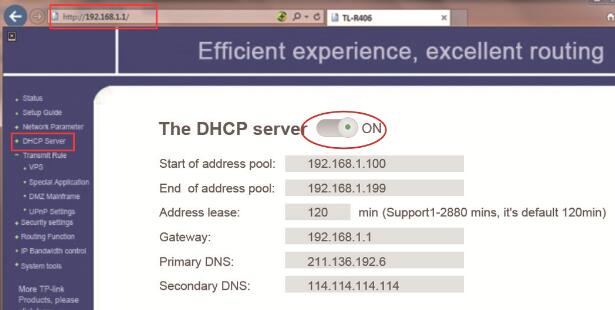
1. Please make sure you enabled DHCP of your Router.
2. If you don’t know how to enable the Router’s DHCP,
please input the IP Address of your Router to your computer browser,
then you will find the network information, you can enable the “DHCP”.
3. After that, please plug a network cable to the WAN port on back of NVR.
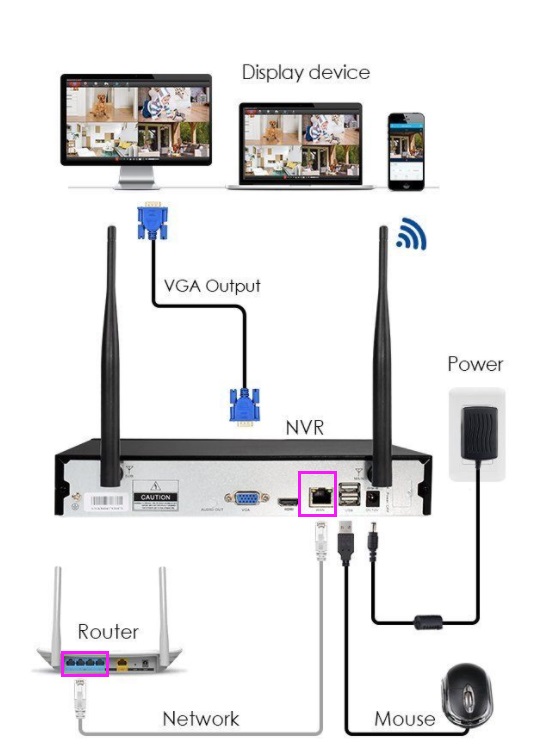
4. If the system refuses to go ONLINE?
Basic troubleshooting:
(1). Check if your network cable can work well.
If NVR is getting signal, there should be flash light. If not, please check the connection and cable.
(2). If the port is right and NVR is still OFFLINE, then it should be DHCP issue.
Enable DHCP on your NVR.
Click right button of mouse, go to NVR’s System Setup – Network Setup – check the DHCP and enable it,
apply and save it. Wait for 1 minute to see if the status on bottom right corner changes to ONLINE.
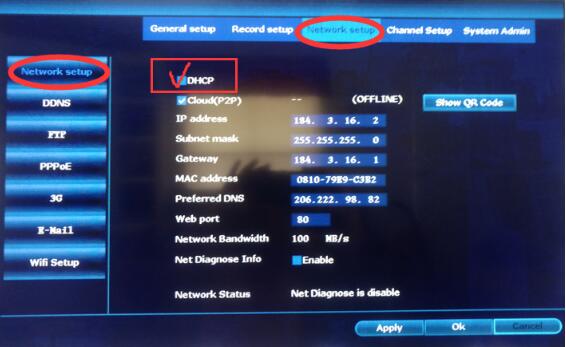
5. Or you can go back main menu to select “Fast Network“,
Then the system will connect the WAN network automatically.
Within 1 minute, you shall see NVR status changes to ONLINE and the NVR is ready to be viewed
from anywhere anytime.
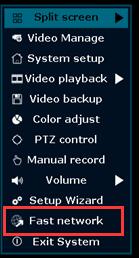
6. If this can’t help you, probably your Router disabled DHCP or block new devices from connecting.
What DHCP does is: when Router find new device connected, DHCP allocate new IP to the device
and connect it to the Internet.
An easiest way to know if your router enables DHCP:
When you connect a new device to your WiFi for Internet service (or a visitor/ friend wanted WiFi
connection), does it require WiFi password only? If only password required, then your router has
DHCP enabled; if that requires not only password but also some settings, then your Router is secured
from connecting new devices. Please ask people who secured the WiFi (who set password) to enable
the NVR to connect.
The Step 4 and Step 5 should enable 95% users to get NVR ONLINE.
Even if the status shows OFFLINE after all this, we suggest you to use APP and access the Cloud ID
to see if it works.
Note: Always wait for 1 minute after any change.
Advanced troubleshooting
If the basic steps above does not solve the issue. Follow below steps to do further troubleshooting.
1. Make sure the cable you connect to NVR has Internet access.
Please use a laptop or any PC has RJ45 port
· Disable the wireless connection of laptop.
· Unplug the network cable from NVR and plug it into the PC, see if the PC can access the Internet via the cable.
· If it does, then the cable is good; if it does not, change a cable.
· If cable is good yet no Internet connection, please ask help from your network administrator
· to give the cable Internet access.
2. Enable DHCP of your router, please refer to Step 2.
If you don’t want to use DHCP, or you want to set up a static IP Address for your NVR system,
you can follow the below steps to set up:
Well, we can allocate IP manually for the NVR and connect it to Internet.
1. Know your router gateway.
This is the IP that goes to the menu of your router.
This will vary slightly from manufacturer to manufacturer, and will be listed in the documentation.
Here are some common IP addresses for various routers:
Linksys, 3Com, Asus, Dell, US Robotics: 192.168.1.1
Qwest (AKA CenturyLink), DLink, Netgear, Trendnet, Senao: 192.168.0.1
Belkin, Microsoft, and SMC: 192.168.2.1
Apple: 10.0.1.1
If you have misplaced your documentation, and you do not see your router listed here,
search on Google for your router name and “default IP address” to find the correct information.
Another way to locate your router’s IP address: on a PC, open the command prompt (click on Start >
Run/Search for cmd) and enter ipconfig. Look for the Default Gateway line, and try that number.
On a Macintosh, open the Network control panel (System Preferences…, Network) and look for Router:
This is your router’s IP address.
2. Go to NVR’s System Setup Network Setup
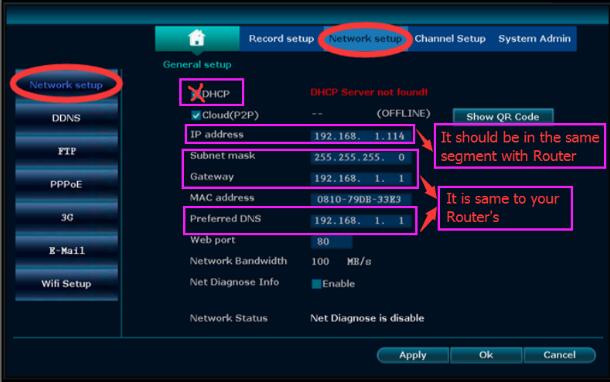
How to switch wireless connection to wired connection
1. Please connect IP camera to NVR by net cable
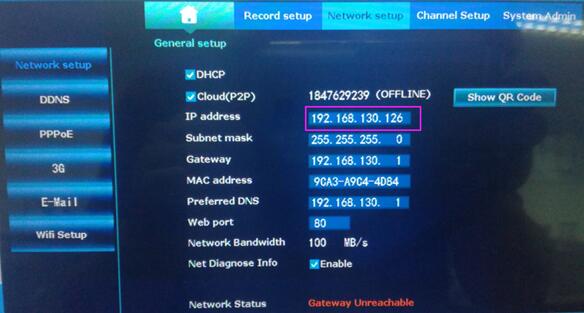
2. Checking the Network setup of NVR, remember the network segment of the IP address with NVR
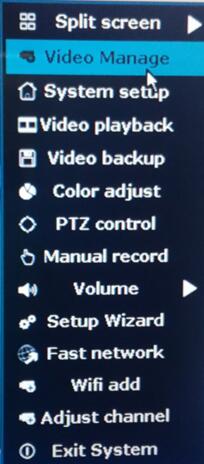
3.Right click mouse, Enter into VIDEO MANAGE
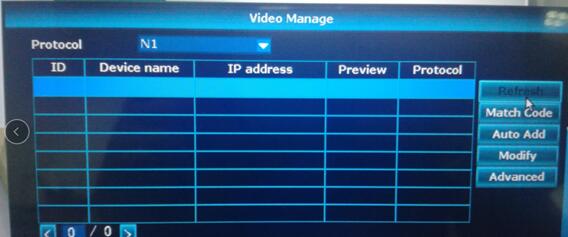
4.Click Refresh, search the IP address of camera which connect to NVR
5.When you find the IP camera on NVR, please click Modify, revise the IP address of camera to the same network segment with NVR
Please noted: The IP address of camera can’t conflict with the IP address of other devices
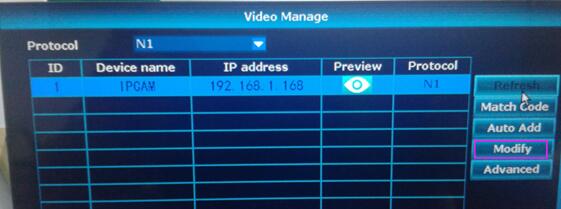
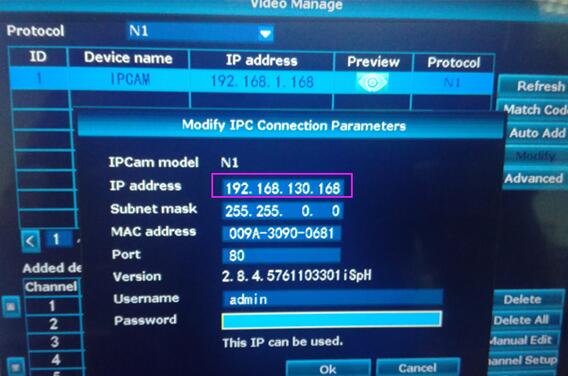
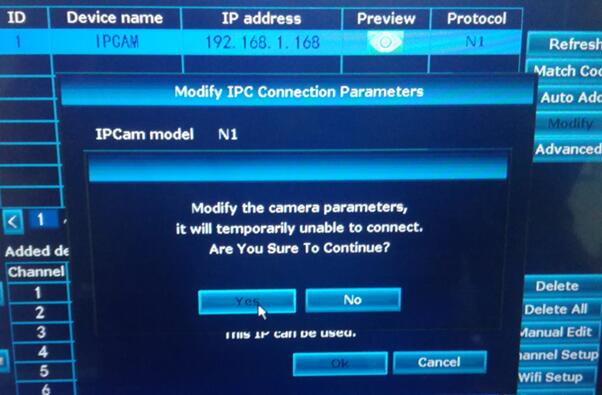
Click Yes to save
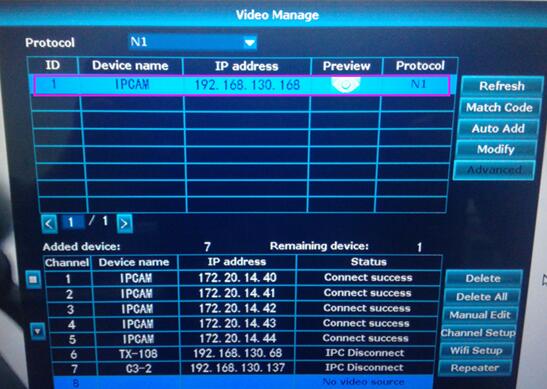
Double click the IP address, the camera will connect to NVR automatically
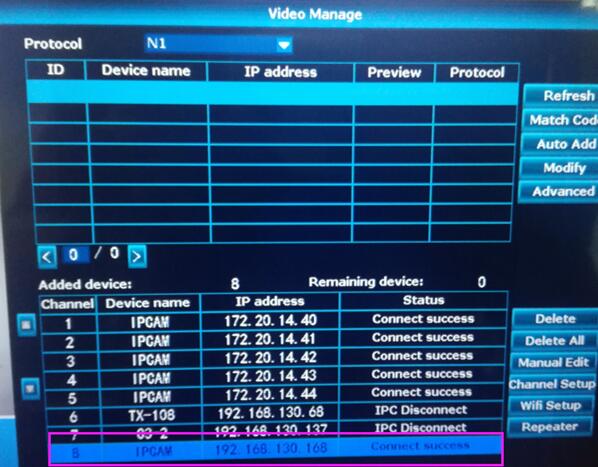
6. After setting the IP camera, connect NVR and the IP camera to the same router by net cable, Refresh NVR, search for the IP camera, then add it to NVR, in this way, the IP camera will connect to NVR by wired
When 3MP IPC is added to NVR, it prompts “resolution too big”
When adding a 3MP camera to the NVR, if the “resolution is too large” prompt appears.Please modify the NVR resolution, the detailed operation is as follows:
1.Please click “Video Manage”.
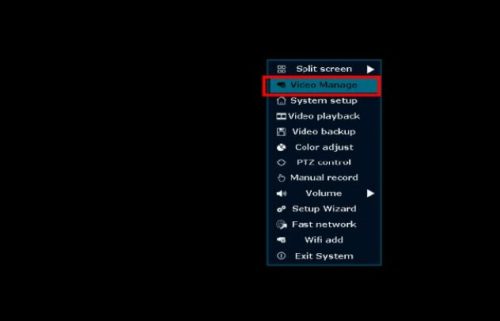
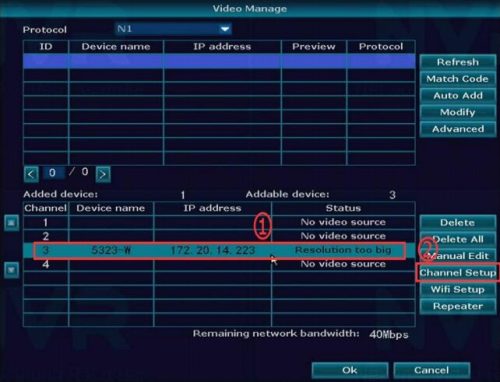
2.Select the camera that appears “Resolution too big”, and then click “Channel Setup”.
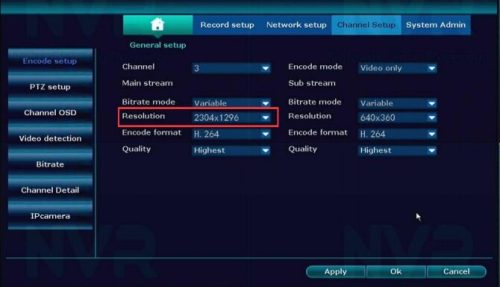
3.In “Channel Setup-Encode setup”, modify the resolution to 1920*1080, and then click “Apply” to save the settings.
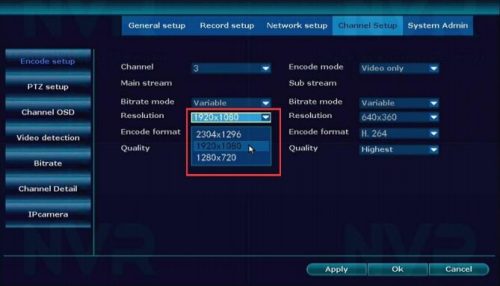
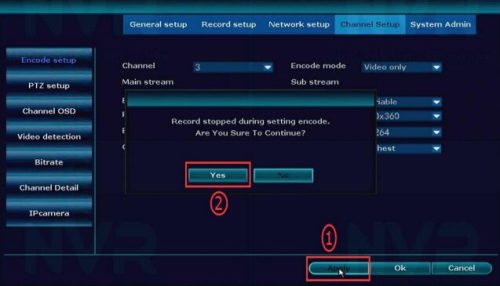
4.Disconnect the power of the camera and restart it, after adding the camera, the camera can be used normally.
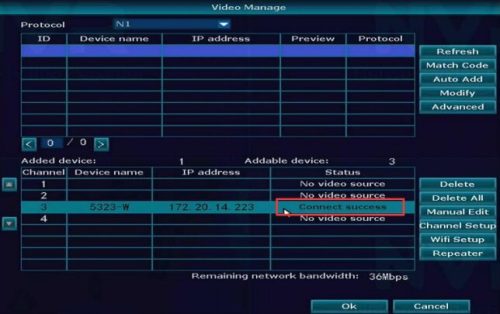
Dual light and AI function setting instructions
iSmKit CMS user manual
How to upgrade the 8CH NVR to 10 Channel(Only for Version 3.1.8.0M)
1. Comfirm your system version if is the version 3.1.8.0M first.
Note: This update file only supports NVR version(3.1.8.0M) to update to 10 channel, if your system version is not 3.1.8.0M, please don’t use this update file to upgrade your system, otherwise it will cause the system not work.
Go to “System Admin” – “System Version” to check.
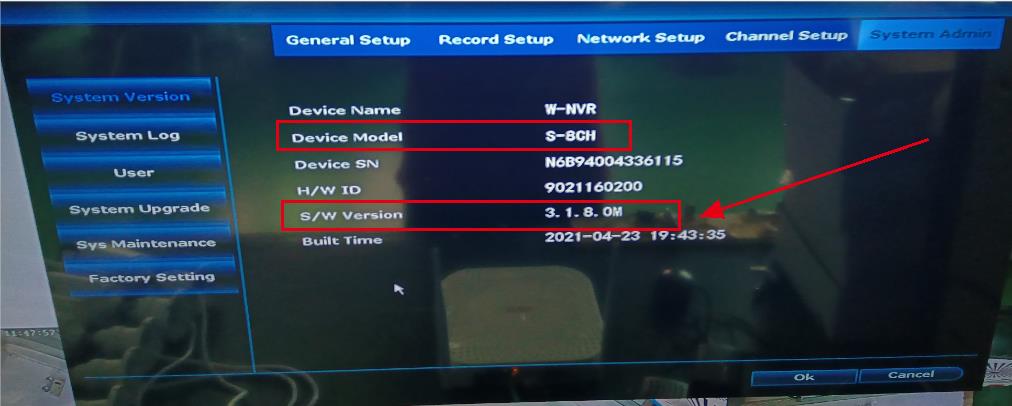
2. Download the upgrade file to your computer. Click here to download
3. Unzip the upgrade file via rar or zip, then plug the USB flash drive, and move the unzipped update file to the root directory of the USB flash drive.
Note:
1)Please move the update file to the root directory of the USB flash drive, do not move the subdirectory.
2)Do not change the file name.

4. Connect USB-disk to the NVR.
5. Enter the NVR’s menu (System setup\System Admin\System upgrade), Click “Start” to begin upgrading.
Note: Please keep power supply well during the upgrade.
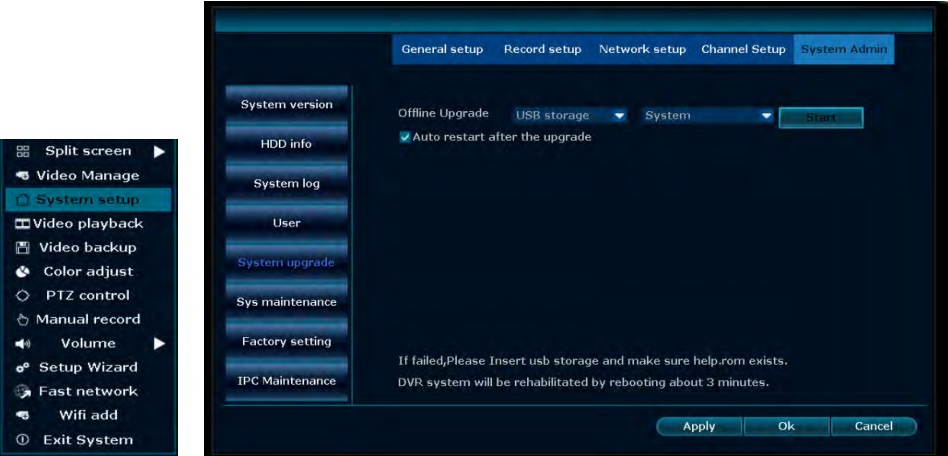
6. Once the upgrade is done, NVR will restart system automatically.
Effective Troubleshooting for Non-Functional 16-Inch Monitor
Effective Troubleshooting for Non-Functional 16-Inch Monitor
Youtube Video: https://youtu.be/QVtIkMScO0Q
1. If the indicator lights in the bottom right are OFF, replace the monitor’s 3A power supply.
2. If the indicator lights in the bottom right are ON, but the screen is black, check the screen cable.
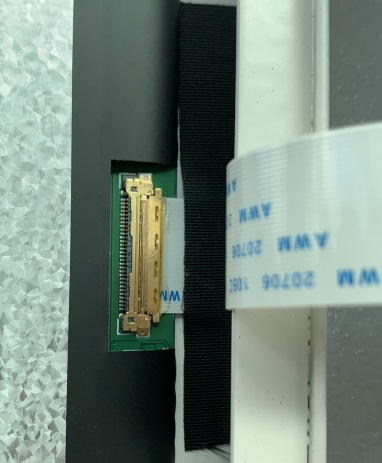
If the display shows “Power Saving,” there are two possible scenarios:
3. For “No Signal → Power Saving”:
When there is no signal, immediately press the “Auto” button. This will bring up the signal source selection menu. Use the “←” or “→” keys to navigate to the first option (“Auto select”), then press the “Menu” button to confirm.
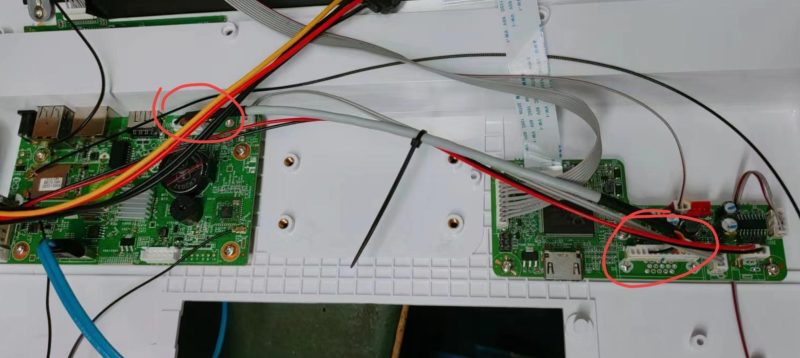
4. For “No Cable → Power Saving”:
Please check the two connecting cables in these locations.



help,how do i delete videos from my iphone ,hiseeu support no help.