Safire NVR Setup Guide,Network recorders capable of ultra-high resolution 4K cameras or high efficiency H.265+ encoding. Monitoring up to 2 Ch@4K or 8 Ch@1080p with auto-adaptive mode that achieves simultaneous display of a large number of cameras without exhausting graphics resources. Maximum utilisation of UHD monitors from the 4K HDMI output. Relay/alarm connections for physical integration of other devices. Versions with integrated PoE power supply and auto-add-on mode for simplified and centralised installation.
Safire NVR Setup Guide
Read Next :
Email settings in Recorders and Cameras: Gmail and Yahoo
Let’s explain how to add these two servers to a recorder or camera, bearing in mind that it may be easier to do so with Yahoo as there are fewer steps to configure.
GMAIL
The data of this mail server are the following:
Smtp server: smtp.gmail.com
SMTP Port: 587
Enable TTL
It’s also important to enable POP and IMAP in your mail.

It is also necessary to activate the sending of emails from less secure applications, from this tab: https://www.google.com/settings/security/lesssecureapps
IMPORTANT: Do not enable two-step gmail protection
Example: brand Safire Safire with Gmail

YAHOO
Smtp server: smtp.mail.yahoo.com
SMTP Port: 587
Enable TTL
Example: X-Security brand with Yahoo

VCA (Area Intrusion Detection) configuration concepts from a SAFIRE video recorder

Threshold: Time, in seconds, that the target must remain within the detection zone to generate an alert.
Sensitivity: Inverse of the percentage of the target area entering the detection zone, relative to the total target area, to generate an alert. The formula that describes this concept is A/A+B>100-S, where A is the target area within the zone, B is the target area outside the zone and S is the sensitivity. A value of 80 will only trigger the alert when at least 20% of the target enters the area.
Percentage: Minimum area (in percentage) of the detection zone that has to be occupied to generate an alert.
Follow a guide in English for installation and configuration of VCA rules
Slot for SD card in camera SF-IPSD6525UAWH-2
To find the space dedicated to the SD card, follow the hereby attached scheme:

Activate PIR detection and alarm sound on SF-IPCU202AWH-2W
With this configuration the PIR will alert our mobile device and the camera will emit an alarm sound in case of detection or event.
These two options can be managed from the camera’s own web interface.

To arm and disarm the PIR notifications, it is possible to configure it from the app (while the sound management has to be managed by web).
Installation and Configuration manual of TrueSense technology
Please find attached the document in which the installation and configuration guidelines for these devices are explained, in English language.
Unlink SAFIRE from the local P2P cloud
From the attached software interface, select the device and click on the “Unbind” tab at the top of the mask:


Add the device’s credentials and then copy the “CAPTCHA” code and confirm.
Download SADP
Another way to unbind a SAFIRE recorder from the P2P directly from the recorder:
For this it is necessary that the device has a recent version, therefore we must follow the FAQs on how to update the firmware of a Safire recorder.
After the update, we will access the NETWORK / PLATFORM ACCESS options and then check the availability of the UNBIND button and perform the procedure.

How to reset the password of SAFIRE devices
There are two procedures to recover the password of Safire recorders, and each procedure depends on the system of the HTVR, DVR, NVR or camera you want to recover. In both cases the SADP software is used.
1- Install the SADP from the manufacturer’s website:
2- Run the device finder, which will find the devices by MAC address.
3- Select the device to be recovered and click on the Forgot Password button (bottom right button)
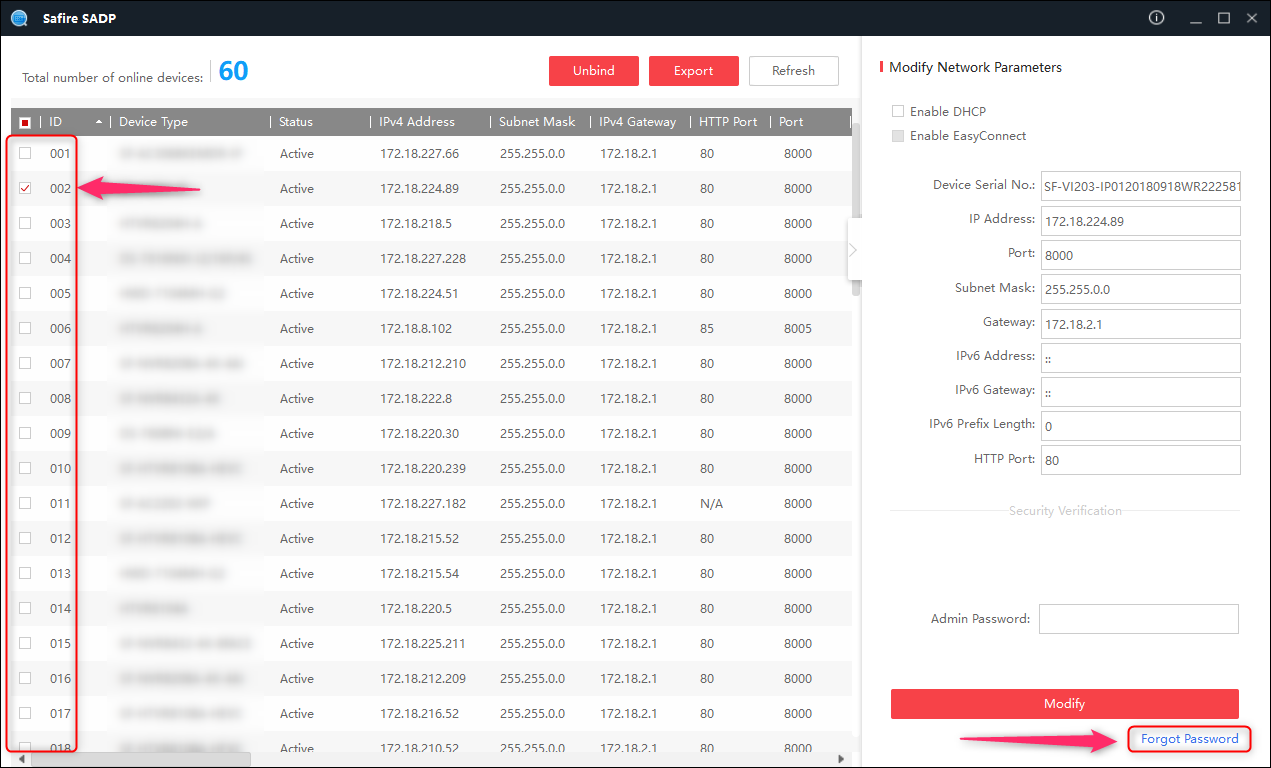
If the software indicates to export a file, follow the procedure from step 4 to 7, while if the software indicates to enter a Security Code follow the procedure from step 8 to 12.
Procedure 1:
4- We are asked to export a file (Export File). Click on the Export button, and select the path where the file is to be saved; confirm.
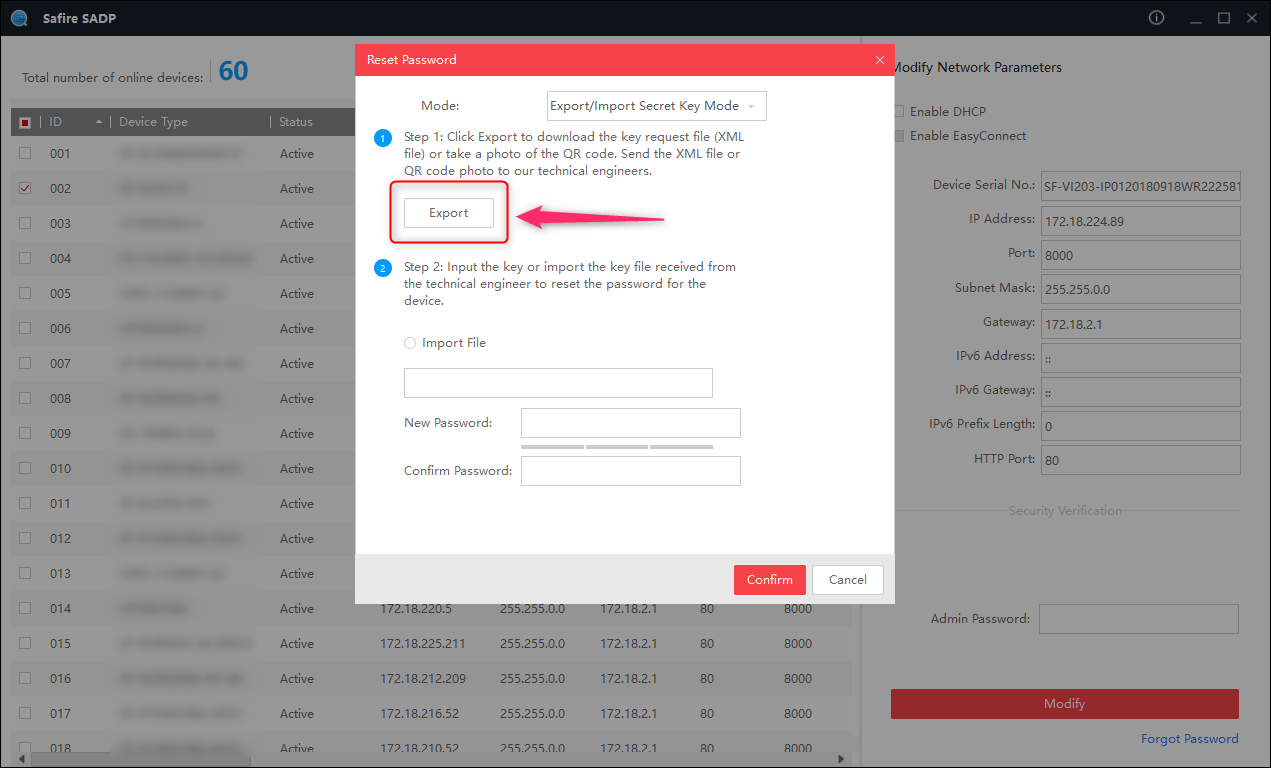
5- El fichero se descargará al Pc. A continuación envíe un correo al nuestro servicio técnico para que se lo mandemos al fabricante y genere el fichero de recuperación de contraseña: no apague el grabador en ningún momento desde el momento de generar el fichero hasta que se lo devolvamos.
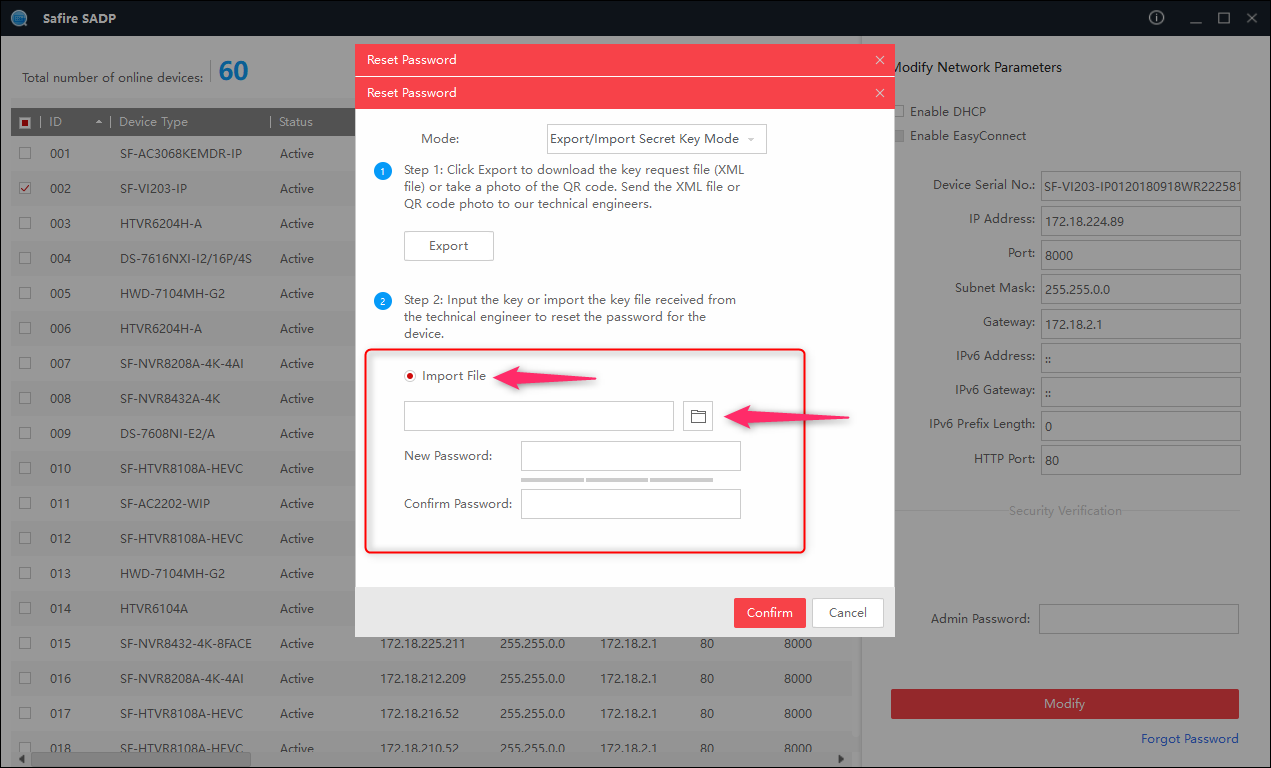
6- After importing in the same tab the recovery file, enter the new password for the recorder and repeat it. The password must be identical in both boxes (New Password and Confirm Password), otherwise, it will not allow you to continue.
7- Confirm the import and wait for the file to load. If you have done the procedure correctly, a window will appear with the following text: Your recorder’s password has now been reset.
Procedure 2:
8- You are asked to enter a Security Code9-
Press the Cancel button, and go back to the SADP, you have to take the Serial number and the Start time, and send them to our technical service
.
This can be achieved in two ways:
a. Go, within the SADP list, to the device from which you want to retrieve the password and look at the data in columns 4 and 5.
b. Click directly on the Export button, to generate the Excel file to be sent to us (to avoid errors when entering the data)
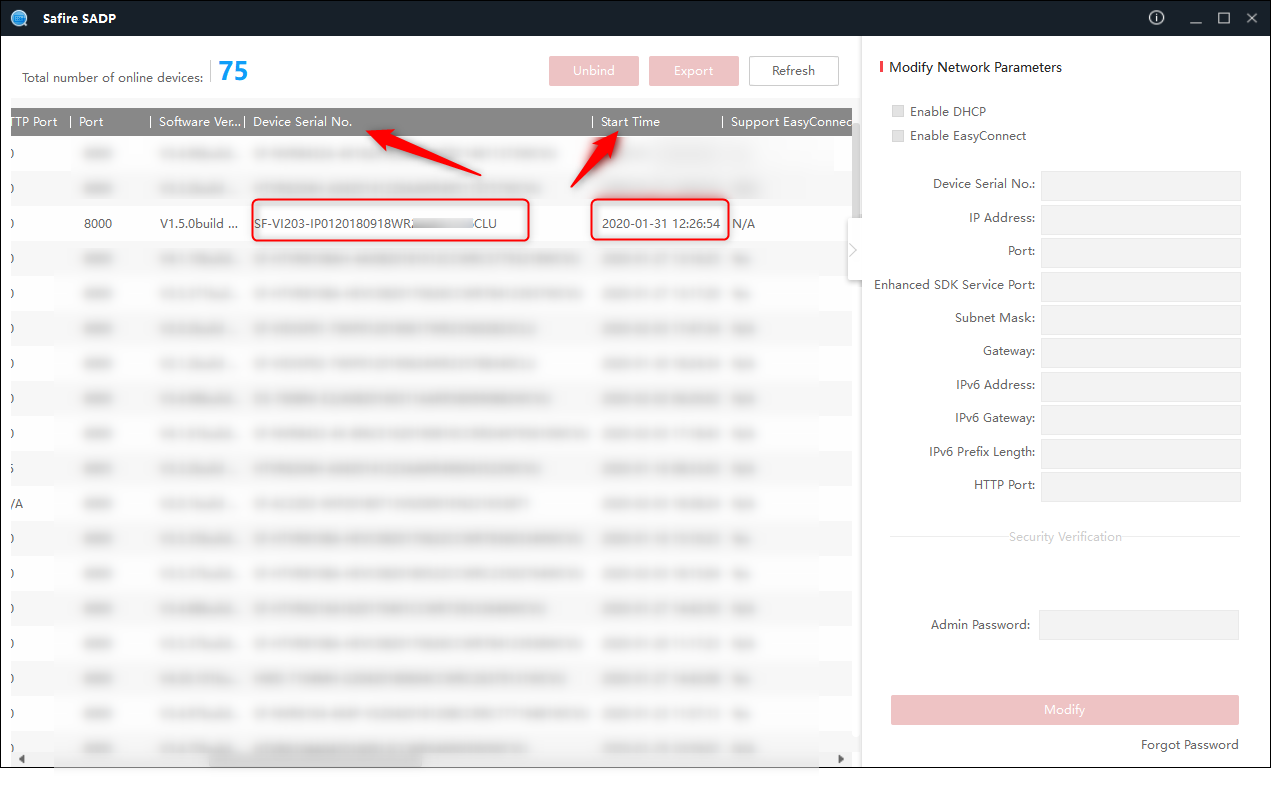
10- Safire will send us some security codes, go to step 3, then step 8 and enter the code according to the date you are in.
We remind you that the correct code for the date (Today) will return the equipment to the factory password, which is “12345”
EXAMPLE
If you request the codes, for example for the 7th of October and you are only going to have access to the equipment on the 9th, you have to use the code corresponding to the 9th of October. It is important that the recorder is not restarted until the password is reset.
The password will be the factory default (User: admin / Password: 12345).
IMPORTANT: When sending the file or the required data, the device cannot be turned off under any circumstances, otherwise the procedure would have to be redone
Change Video, Audio and Compression Format Settings via Web Browser (Cameras)
To change the video and audio settings from a browser, we have to enter the IP of the camera in the address bar:

After accessing the camera with your credentials, we must access “CONFIGURATION” and then the left menu, VIDEO AND AUDIO.

Remember that in some models of IP cameras the image is not encoded in H265 or H265+, therefore the option to modify the compression format may not offer the options mentioned above.
In this other field is where you can modify the values of Bitrates, frames and bit rate type to save the bandwidth used by the camera.
In the image below we can see that the bitrate has decreased a lot by just changing the Video Enconding to H.265 and then enabling H.265+.

We could save even more bandwidth by changing other parameters (such as image resolution), but that depends on each installation, it is not always mandatory.
Create double verification of access to recordings to a non-administrator user
This function is only supported on 8 Series NVRs.
It is sometimes required to restrict access to certain privileges to an operator user, where a coordinator without administrator permits can temporarily allow access to those blocked privileges.
Example:
Configuration:
How to configure the NTP server in SAFIRE
Note:
This test was performed with an SF-XVR6108AS-1FACE recorder firmware version V4.24.001 build 201015
1. Open the Settings page through the web browser or in the SCC (Sgo to Control Center)
2. System settings
3. Time settings
4. Select time zone
5. Enter the address of the time server (NTP)
You have to specify the time zone and domain name, as follows:
European NTP servers:
uk.pool.ntp.org (UK)
de.pool.ntp.org (Germany – Deutschland)
fr.pool.ntp.org (France – Française)
es.pool.ntp.org (Spain – España)
it.pool.ntp.org (Italy – Repubblica Italiana)
nl.pool.ntp.org (Netherlands – Nederland)
no.pool.ntp.org (Norway – Norge)
pt.pool.ntp.org (Portugal – Portuguesa )
se.pool.ntp.org (Sweden – Sverige)
6. Save
Example: XVR

Example: NVR

Example: IP camera

ADAM module configuration with Safire NVR
The ADAM relay module is compatible with the SF-NVR8xxx-4K, excluding the -FACE and -AI
It is very important to check the NVR firmware, it must be version 4.50 or higher
IP CONFIGURATION ADAM MODULE
It is only necessary to set the IP for the ADAM module, for this purpose use the ADAM Net Utility software
The device is detected, the factory IP is set to 10.0.0.1 and the password “00000000”, it is added to the software and when selecting it, it will ask for the password:


In the Network section the appropriate IP is set and the changes are applied, with this the module would be ready to be added to the Safire NVR

ADDING THE MODULE TO THE SAFIRE NVR
Remember that it must have a version 4.50 or higher
In the Alarm Extension section the IP of the module will be added, the maximum number of inputs and outputs in the NVR can be 6 (even if the module has more). A maximum of 5 ADAMs can be added

Once added, the inputs and outputs of the module are already available in the recorder and can be used as any relay of the NVR itself:


How to make Edge run in Internet Explorer mode
Note:
This article is created on Windows 10 Enterprise Version 21H1 with a 2.20GHz Intel(R) Core(TM) i7-8750H CPU.
1. Open the “Edge” browser
2. Go to the top right and click on the options icon
3. Scroll down to Settings section

4. Within the settings go to “Default Browser”
5. On the right hand side, select “Allow”

6. Click on “Reset”

7. When “edge” has restarted, open the URL to be run in “Internet Explorer” mode.
8. Click with the mouse on the tab and “Reload tab in Internet Explorer mode”

Note: Not all options may be available with some devices
Endpoint request timed out
The RTSP protocol itself does not have encryption, for that there is SRTP or proprietary implementations, but it is not common in the streams of the main CCTV providers.
RTSP requires authentication with username and password, but it is not transmitted directly encrypted, if encrypted transport is required it would require the use of a tunnel with SSL encryption for the communication channel.
When accessed via Hikvision or Safire P2P service, a verification code is used to encrypt the video stream transmission communication channel, but it does not affect whether the RTSP port is accessed directly (directly on LAN or remotely via NAT).
SAFIRE: Continuous recording combined with event recording
For this FAQ we use the:
Recorder: SF-NVR6104-4K4P-VS2Firmware
: V4.30.005 build 201028Safire
Control Center V3.2.0.57 build 20210726
step 1 – Check that the recording schedule is in Continuous mode.

2nd Step – Configure a VCA or Motion Detection rule.

Check also if the “Notify remote center” option is checked and if the Trigger Recording corresponds to its respective channel, in our case D1.

Once we have these settings we can wait a few minutes and check the events.
With the “SAFIRE CONTROL CENTER” running, go to DEVICE MANAGEMENT and add the recorder to the Software.
3rd Step – Check events generated, choose “EVENT CENTER”

Once in the Event center, select REAL TIME EVENT and then we can check the events in real time.

Once confirmed that there are events we can do a search of the recordings.
4th Step – Check recordings, choose the “REMOTE PLAYBACK” option.

We choose the date according to the search need, the NVR channel and below all the type of Event, in our case we should choose “LINE CROSSING DETECTION”.

We will have a result in which we can choose the files on the right side and below in the line of events, we can choose directly the point to reproduce.

How to install Safire Connect on an Apple Mac laptop or PC with an ARM M1 processor
How to install Safire Connect on an Apple Mac laptop or PC with an ARM M1 processor.
1. Open App Store

2. Search for Safire Connect in iPhone and iPad apps
3. Click GET
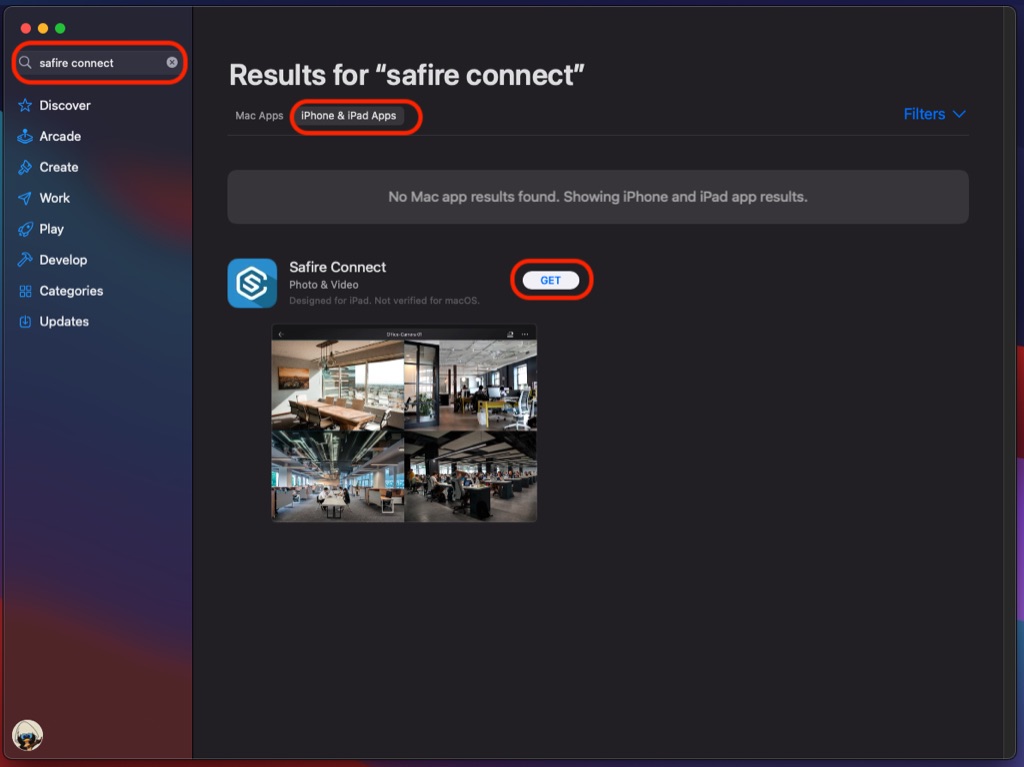
4. Open the Safire Connect app

5. Login with your credentials.
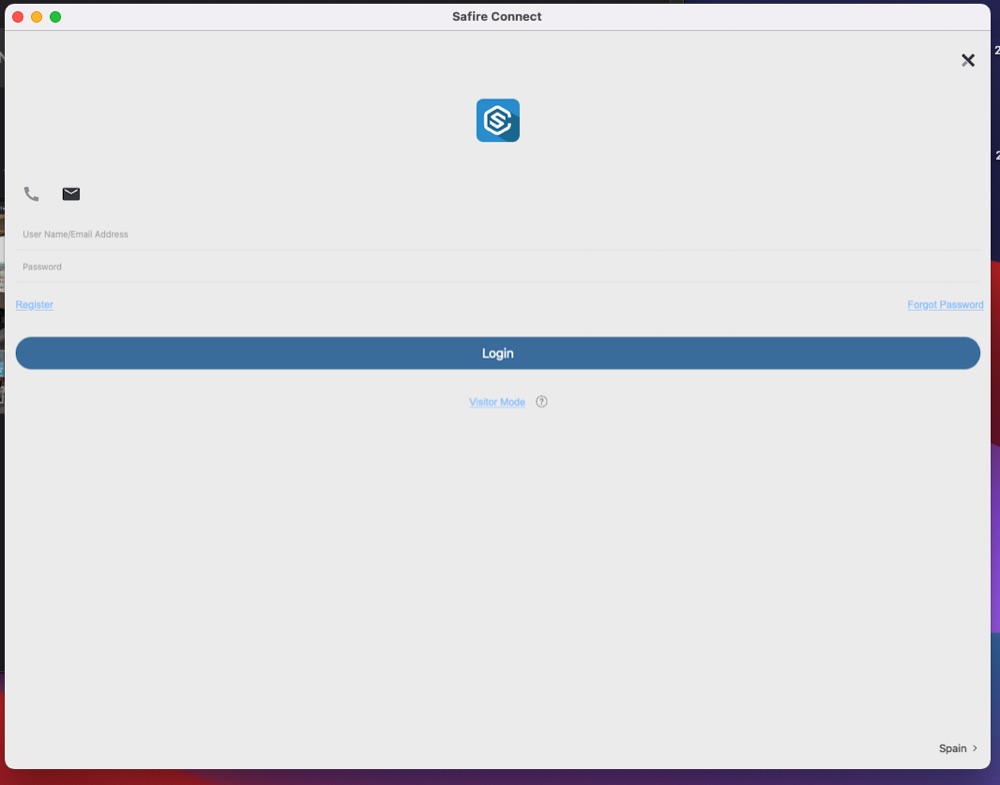
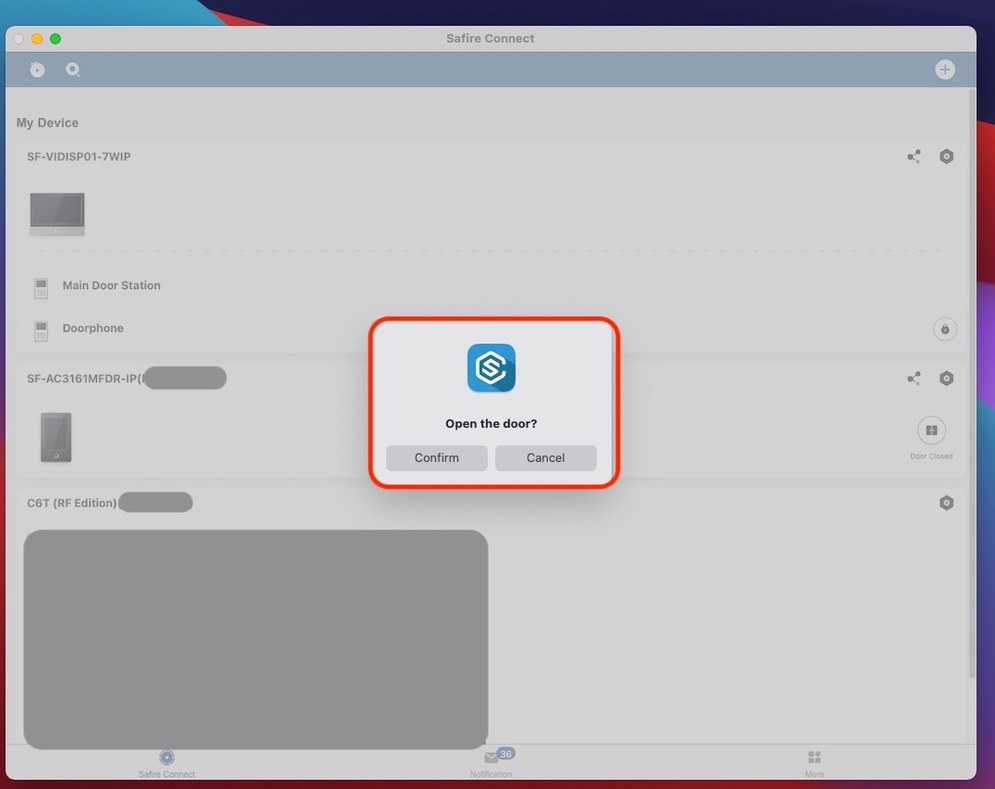
6. You can now use the app similarly to your mobile device.
Safire – Access IP camera web interface from NVR with built-in PoE switch
If you need to access an IP camera that is connected directly to a NVR PoE switch, you don’t need to connect the network cable from the PC to the NVR PoE switch, just enable the NVR Virtual Host.
1 – Access the advanced network settings / Other and then enable the option indicated, remember that each time you restart the recorder the option will be unchecked, you will have to enable it again.

2 – Access the Camera Management option and click on the link that the recorder enables to access the camera.

This way, the maintenance procedure to the camera will be easier than connecting and disconnecting cables.
First configuration of the Safire Control Center
When you want to connect to your Safire cameras using a PC or laptop with Windows installed:
1. You need to have a Safire IP camera or a Safire recorder
2. The recorder or cameras need to be connected to the same computer network as your PC
3. When 1 and 2 are correct continue.
4. Download and install Safire Control Center
- To download the Safire Control Center, use the link – (latest version as of 7/19/2021)
- Safire Control Center V3.2.0.57 build 20210702
5. Unzip the downloaded file
6. When the download is finished double click on the file“Safire_Control_Center_v3.2.0.57_build_20210702.exe”
7. Follow the installation steps from the installation window
8. Then click Finish
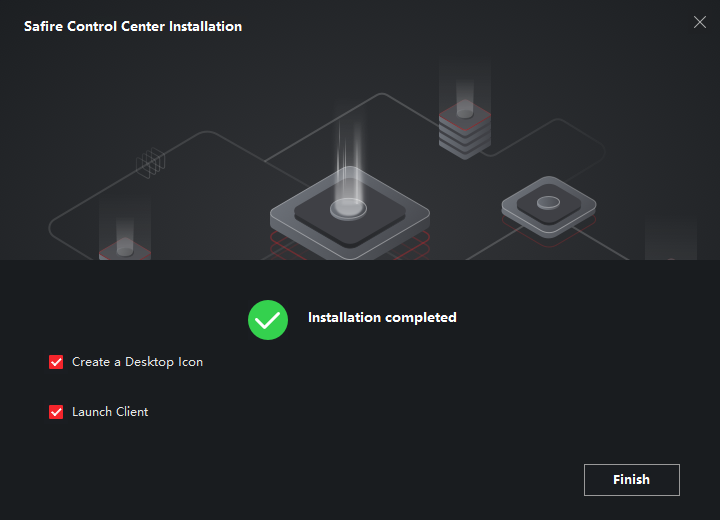
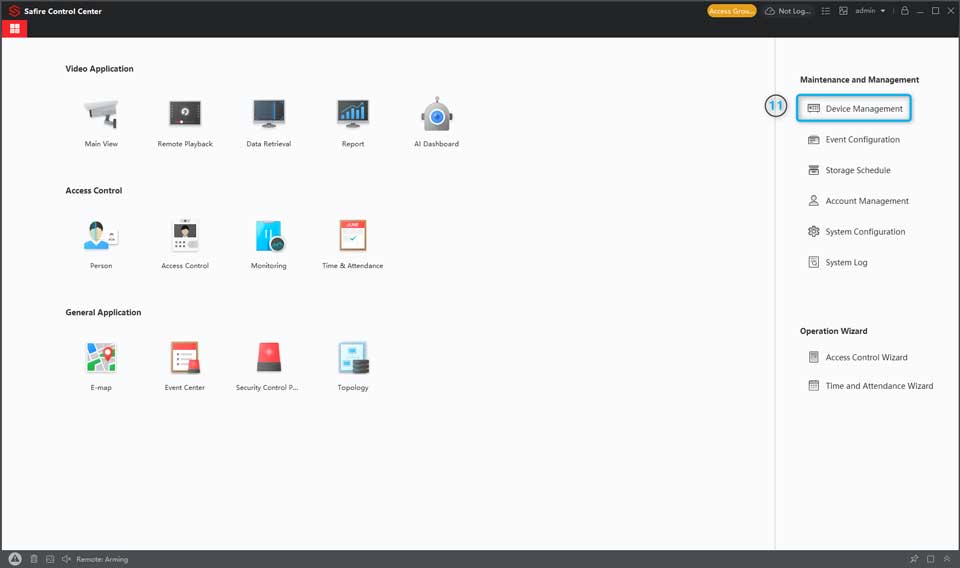
9. When you select “launch client” the Safire Control Center is launched
10. Click on Device Management
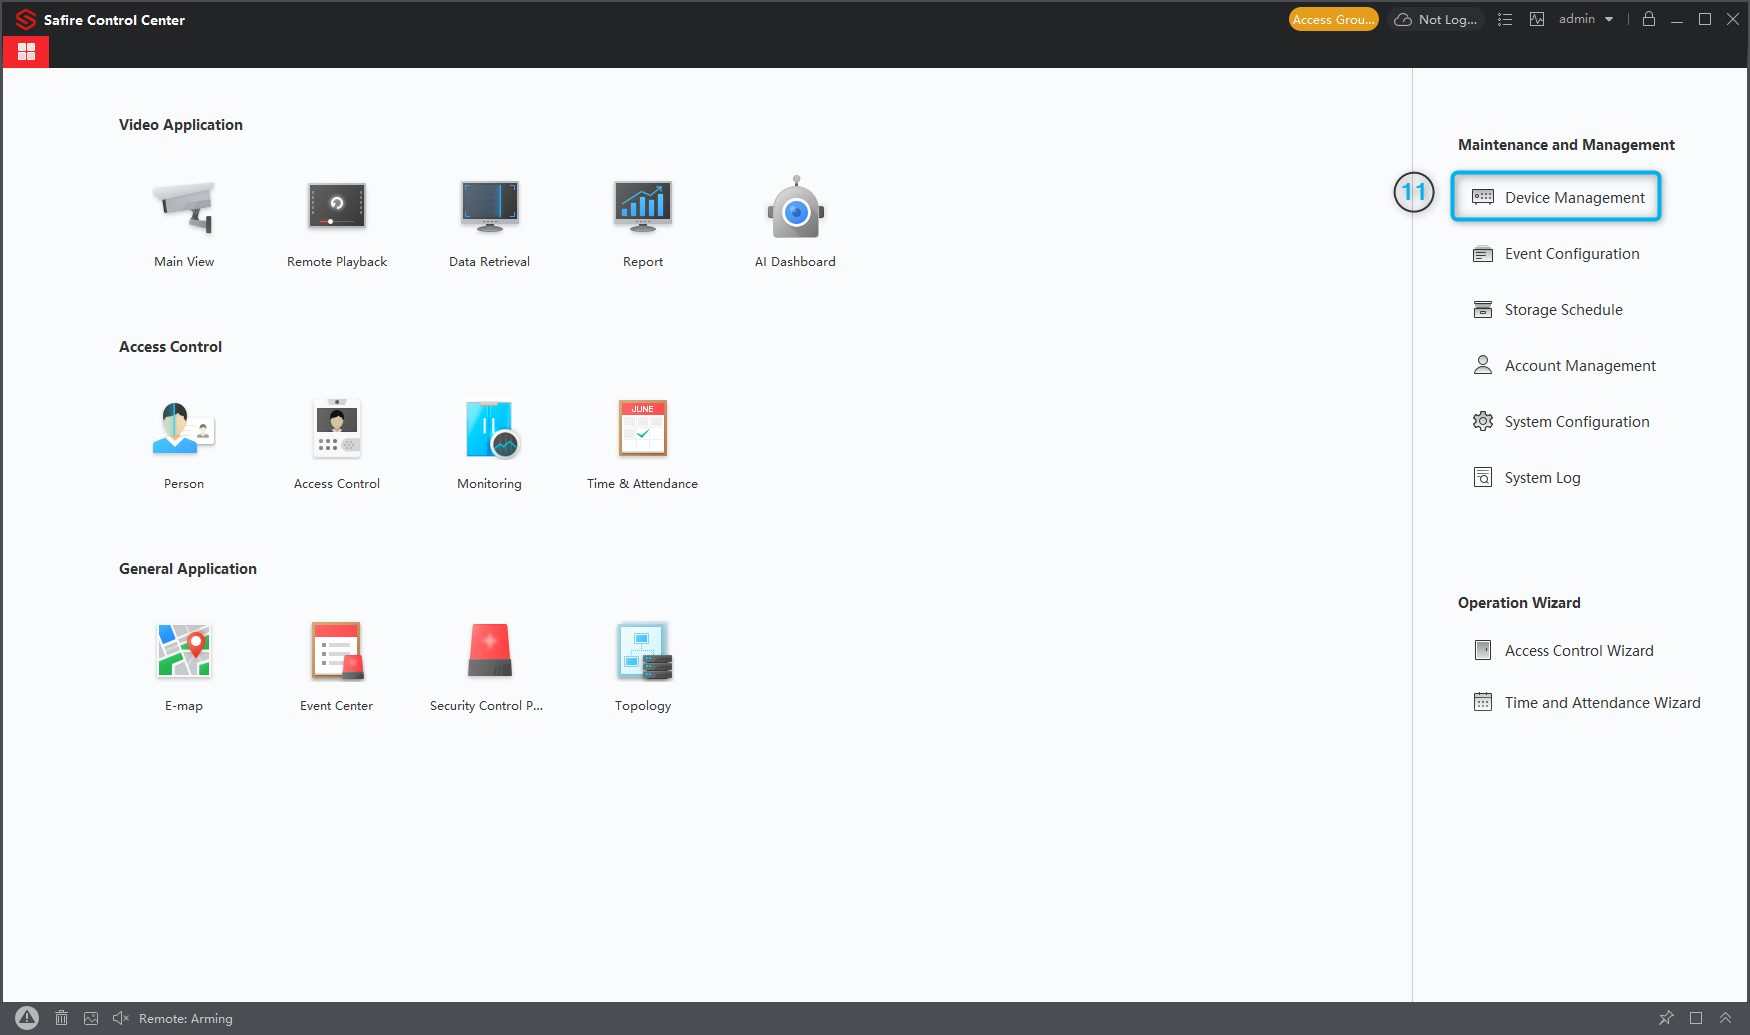
11. At the top left, click Online Device to search for all Safire devices on your network.
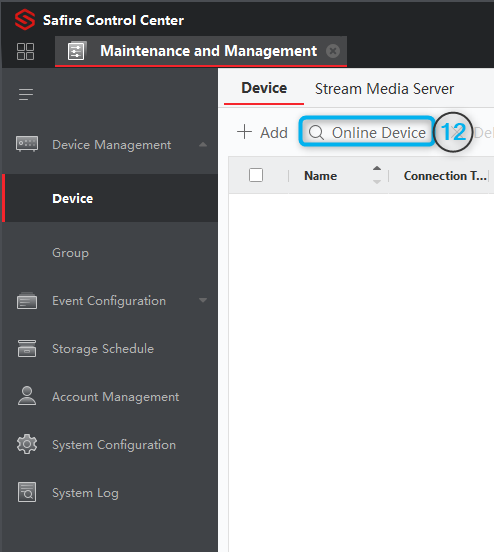
12. Select the devices you want to add
13. And click Add
14. A new window will appear
15. Use the credentials that were created for your devices
16. Click “Add” and the devices will appear at the top
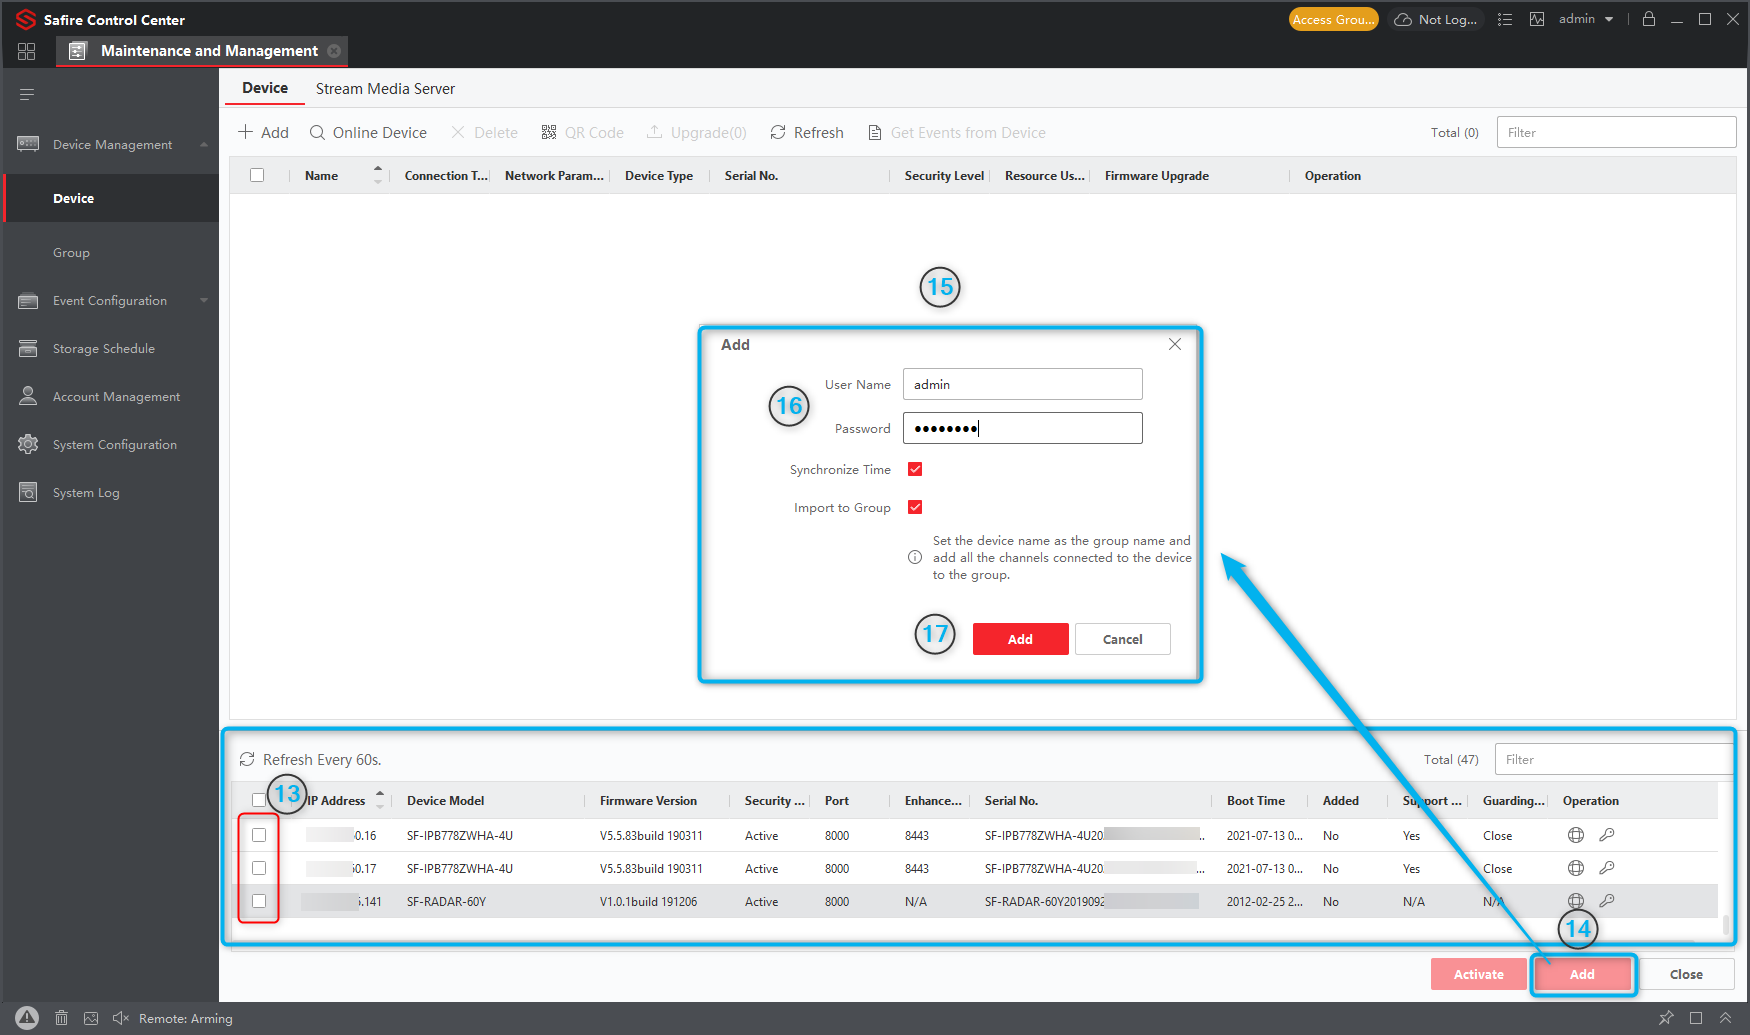
17. Click the start button in the top left corner
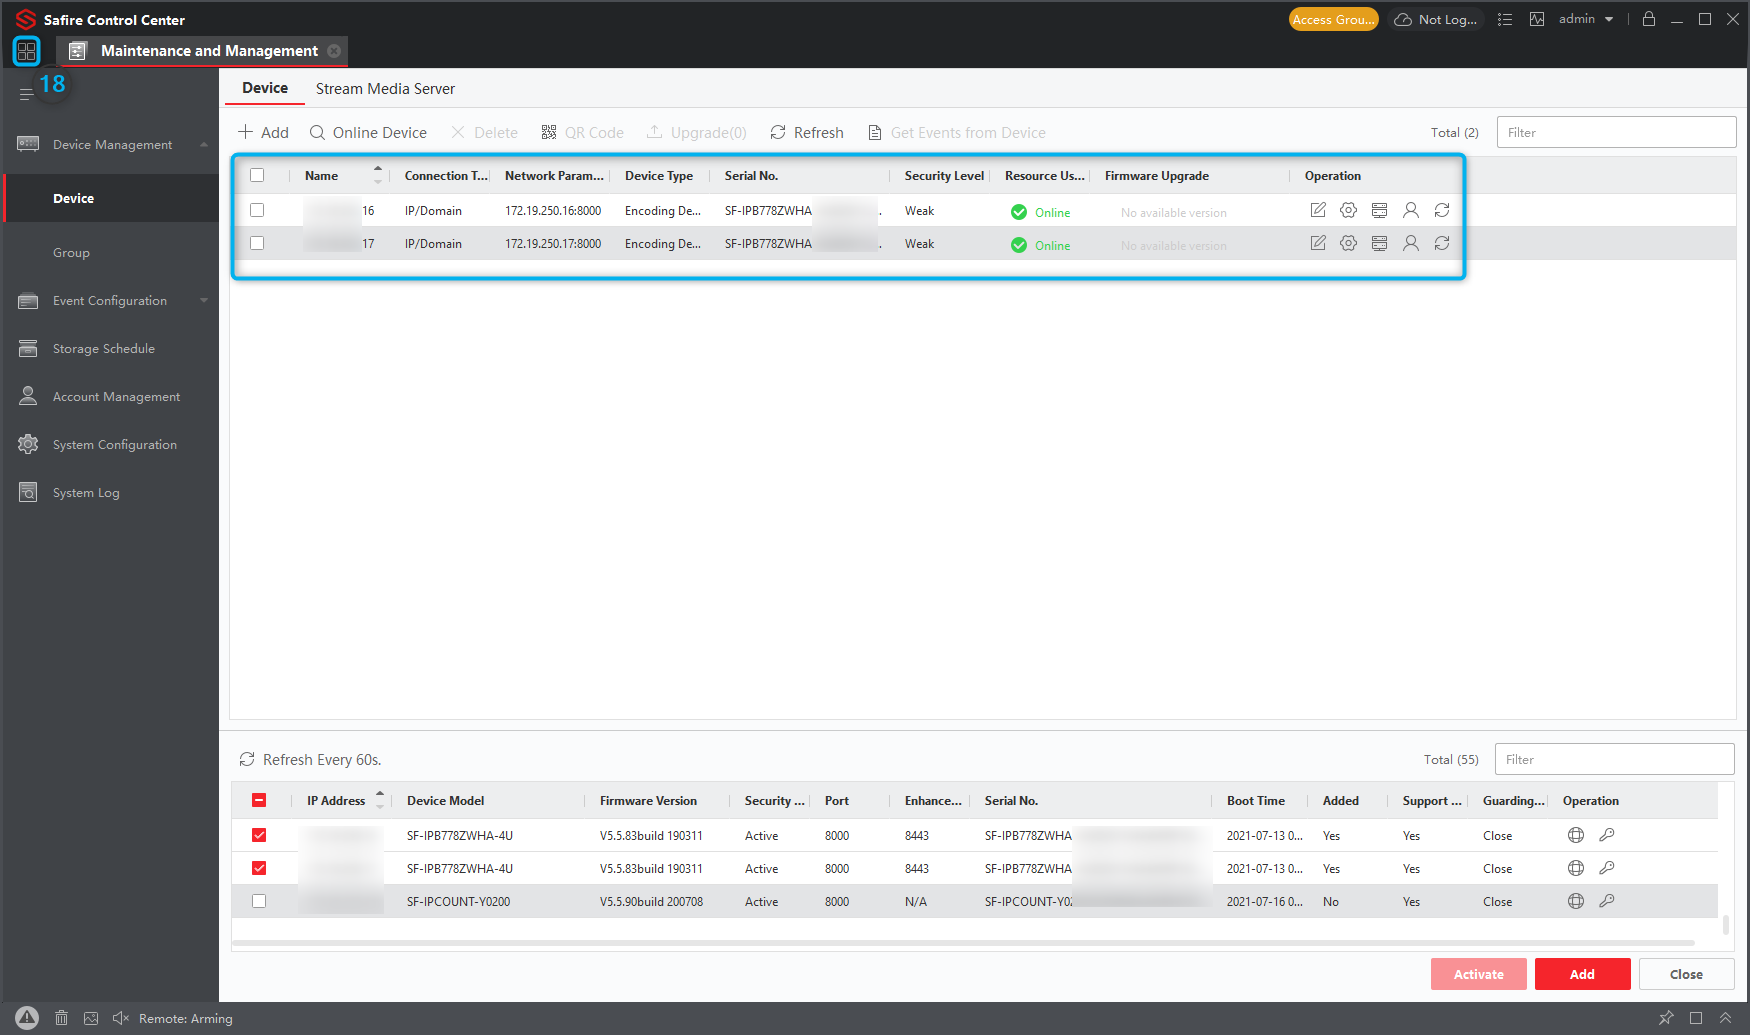
18. Press the home button in the top left corner to return to the home screen
Creating auxiliary screens in SAFIRE CONTROL CENTER
If necessary, the SAFIRE CONTROL CENTER can create up to 3 additional screens to the main software, that is, a total of 4, always depending on the decoding capacity of our PC.
The maximum preview of the auxiliary screen is 3, so a total of 4 windows can be seen with a maximum of 64 cameras per window.
Select the MENU option in Safire Control Center and then select the last option “Auxiliary Screen Preview”.

The result is an auxiliary window where we have the option to drag it to another screen and have it displayed on both screens 
This FAQ has been made with software version V3.2.0.57 build20210526
What is the public IP address of Procloud services?
The SafireService platform architecture is designed to expose only the services that need to be consumed by client applications, i.e. the frontends that render to web browsers and the backends that process requests from these frontends. More complex services such as those that perform device checks do not expose any IP publicly.
GPU Image Decoding in SAFIRE CONTROL CENTER
To have a smoother video display in SAFIRE CONTROL CENTER, it is recommended to enable the option for preferred GPU decoding, if the PC has a dedicated graphics processor.
Open “SAFIRE CONTROL CENTER” and select “SYSTEM CONFIGURATION”

Access “IMAGE” and enable the option marked “Hardware Decoding Preferred”.

Close the software and open it again for the changes to take effect.
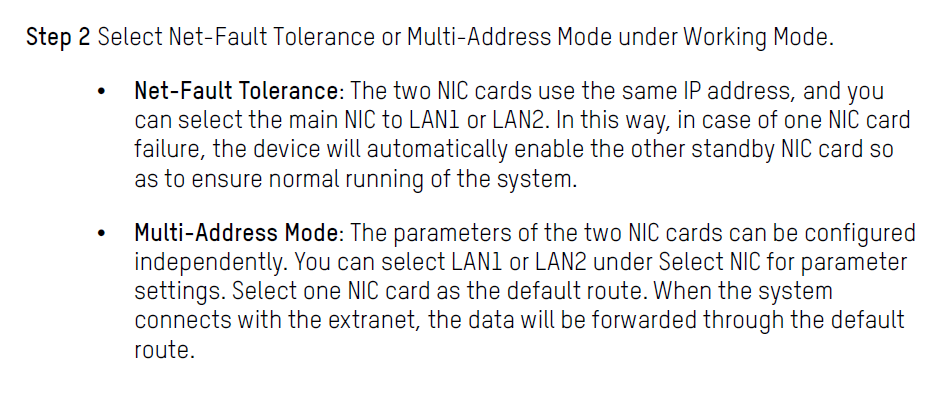
How it works when the recorder has two RJ45s in SAFIRE
Safire’s dual RJ45 NVRs can work both ways, one port backing up the other (fault tolerant mode) or independent networks (multi-direction mode), each with its corresponding IP range (similar to an NVR with integrated PoE ports, whose network segments are independent)
HTTPS access on a device from Safire
HTTPS access on Safire computers is disabled by default, to enable it you have to create a certificate, the easiest way is to create it with your own signature:

The data to indicate can be whatever you want, but the Hostname/IP section must be the address of the equipment, so if you indicate the local IP of the same I can only access by HTTPS using that address, not being able to do so remotely; another section to consider is the validity which will expire HTTPS access after these days:

Once this data has been saved, HTTPS can be activated:

To access the equipment will be done indicating https://IP:PORT, the port if it has not been modified and remains the 443 is not necessary to specify it, if it had been changed then it is essential to put it.
When accessing the browser will give us a warning that the connection is not private, this is because the certificate signature is self-signed, just go to the next section to have access:


TrueSense System Configuration to Detect People and Vehicles
EasyConnect (P2P) configuration on a SAFIRE recorder
To access a Safire recorder remotely without the need to open ports, EasyConnect (P2P) must be enabled by following the procedure below:
Accessing the recorder via web interface

1 – Click on Configuration
2 – Advanced settings
3 – Enable by checking the option “Enable” and then a pop-up will appear, click on OK.

4 – Define a password for the Video stream encryption:
We recommend a complex password and preferably different from the “admin” password, it is very important to know that this password is not linked to the recorder administrator’s password.

5 – Very important to check if the STATUS is really ONLINE.

6 – If the device does not connect to the P2P server, check the DNS.

Exporting and importing backups from Safire Control Center software
The steps to export and import the Safire Control Center software backup would be as follows:
- Export the software configuration file:

This file is a compressed file that does not need to be unzipped. It contains all the software information
- Import the file into the new software:

IMPORTANT: for the backup uploading to work it is essential to close the software, but also the Safire Control Center SERVER service which does not close automatically when closing the software:

When restarting the software we must have all the terminals and configurations of both cameras, video door phones and access controls of the previous software
Limitations of FACE recorders
Face Recognition = Face Capture + Face Comparison

If the face capture is performed by AI2 cameras, we will have face recognition in X channels, where X is the number of -XFACE containing your reference. To make a face comparison, a face capture is required, so it is important to know the number of channels that the recorder has available to make face capture.
Ex
:SF-NVR8216-4K-8FACE8ch
with Face Recognition using AI2 Cameras
Configuration recommendations for proper functioning of push notifications in Safire Connect Android
Under Settings – Applications – Safire Connect we must ensure that we have granted all camera, speaker, microphone, etc. permissions and that we have not been denied any.
In addition to this: also make sure that we allow you to use mobile data, as well as wifi
and that in the notification section we have everything marked.
Also in the battery section of your mobile device, make sure that Safire Connect is allowed to work in the background.
All this is usually already activated on many phones, but there are others, especially Xiaomi, where some of the above features may be missing.
Adding Safire cameras or recorders to a SAFIRE NVR remotely
The only point of attention we have to take into account is to open the ports in the router corresponding to the installation of the cameras. And then add that public IP address in the NVR with the proprietary protocol port (which in Safire is 8000).
If it is a recorder that you want to add, by adding the public IP address (with port 8000) of the secondary recorder, a message will appear that allows you to choose specifically which channels of the secondary recorder you want to acquire in the primary recorder.
This option is the most recommended, instead of choosing a NAS, PC-Recorder, ftp, etc… since an NVR is a more reliable computer from this point of view, sinc it is:
– dedicated to this function;
– a kind of device that consumes less energy;
– a device which is managed from the same applications as the rest of the cameras or recorders in the installation, being easier to visualize and from which it’s easy to extract the information in an intuitive way, as well as its configuration (by an ecosystem similarity principle);
– a device which does not involve the payment of licenses;
– a device that can be monitored through the ProCloud service of http://safire.services.
How to set up NAS as a backup disk on a SAFIRE computer
The NAS has to support NFS protocol.
1. Adding the NAS to the team
1.1 Go to the configuration section of the hard disks and click on the button at the bottom left
“Add”.
1.2 In this window, we are going to compile the fields “Network disk IP” and “Network disk direct” with the NAS information.

2. Changing the storage mode of hard disks
2.1 Go to the advanced settings and choose “HDD Group” as the storage mode.
2.2 Click on “Next” and the computer will ask you to restart. We say yes.

3. Formatting the NAS hard drive
When the recorder restarts, it will ask us to format the NAS hard drive. We will accept and go to the configuration section of the disks. From that section we will be able to monitor the progress of the formatting process.

4. Configure the NAS hard drive as a backup
4.1 When the formatting is finished, click twice on the line of the NAS hard disk or on the icon for editing.
4.2 In the window that appears, choose the “Redundancy” option as the status and save the changes by clicking on OK.

5. Finished configuration
If everything has been configured correctly, we will find ourselves with a configuration of this type:

Extra. Viewing the NAS recordings
In case we need the recordings from the NAS, we can access the network drive through Windows Explorer and open the files through the VSPlayer software.

How to configure the SNMP monitoring service on SAFIRE (or Hikvision) equipment
The steps to follow are hereby presented:
– install the specific MIB search engine
– log into the recorder via another search engine (e.g. Internet Explorer)
– navigate the machine menu as follows: Configuration–>Network–>Advanced Settings–>SNMP, and once entered the section of interest click on Enable SNMP v2c


– insert in the Trap Address tab the IP address of the computer on which the MIB has just been installed and click on Save

– click on File and then on Load in the MIB search engine

– open the SNMP file you want to use

– insert, in the upper left bar, the IP address of the recorder and click on Advanced Parameters

– fill in the fields of the window that opens with the same data as previously set in the configuration menu of the recorder (except for the IP address, clearly) and click on Ok

– click on File again, then on Save Session and choose a path to save the configuration

– click on the created path, then click on Walk; further on Tools and Trap Receiver to also configure that port (in particular in Tools–>Option), which in the example above we had configured in the recorder as the 162


In this way we can already visualize, in the bar called Operations, all the start/restart/stop events of the recorder.

Video Tampering in SAFIRE
Video Tampering is normally used to detect when the camera is covered, preventing us from seeing the scene properly.
The function can be configured within the basic event section, associated to motion detection:

Different reactions of the device can be configured when detecting video tampering; sending an email, triggering a relay output of the recorder or of the same camera, triggering a recording of any channels, moving to a PTZ preset or sending a push notification to the app.
It is also possible to set the video tampering as active by schedule.
Configuring a RAID1 in a SAFIRE videorecorder
- We enter the HDD section, then we navigate the Advanced section and change the mode from quota to group and select the cameras that we want to record in the secondary hard disk’s space.

- Once the previous step has been completed, we enter in general and click on the edit button on the hard disk; a screen will appear where we’ll have to check the redundancy box and choose the group that we had previously configured with the desired channels.

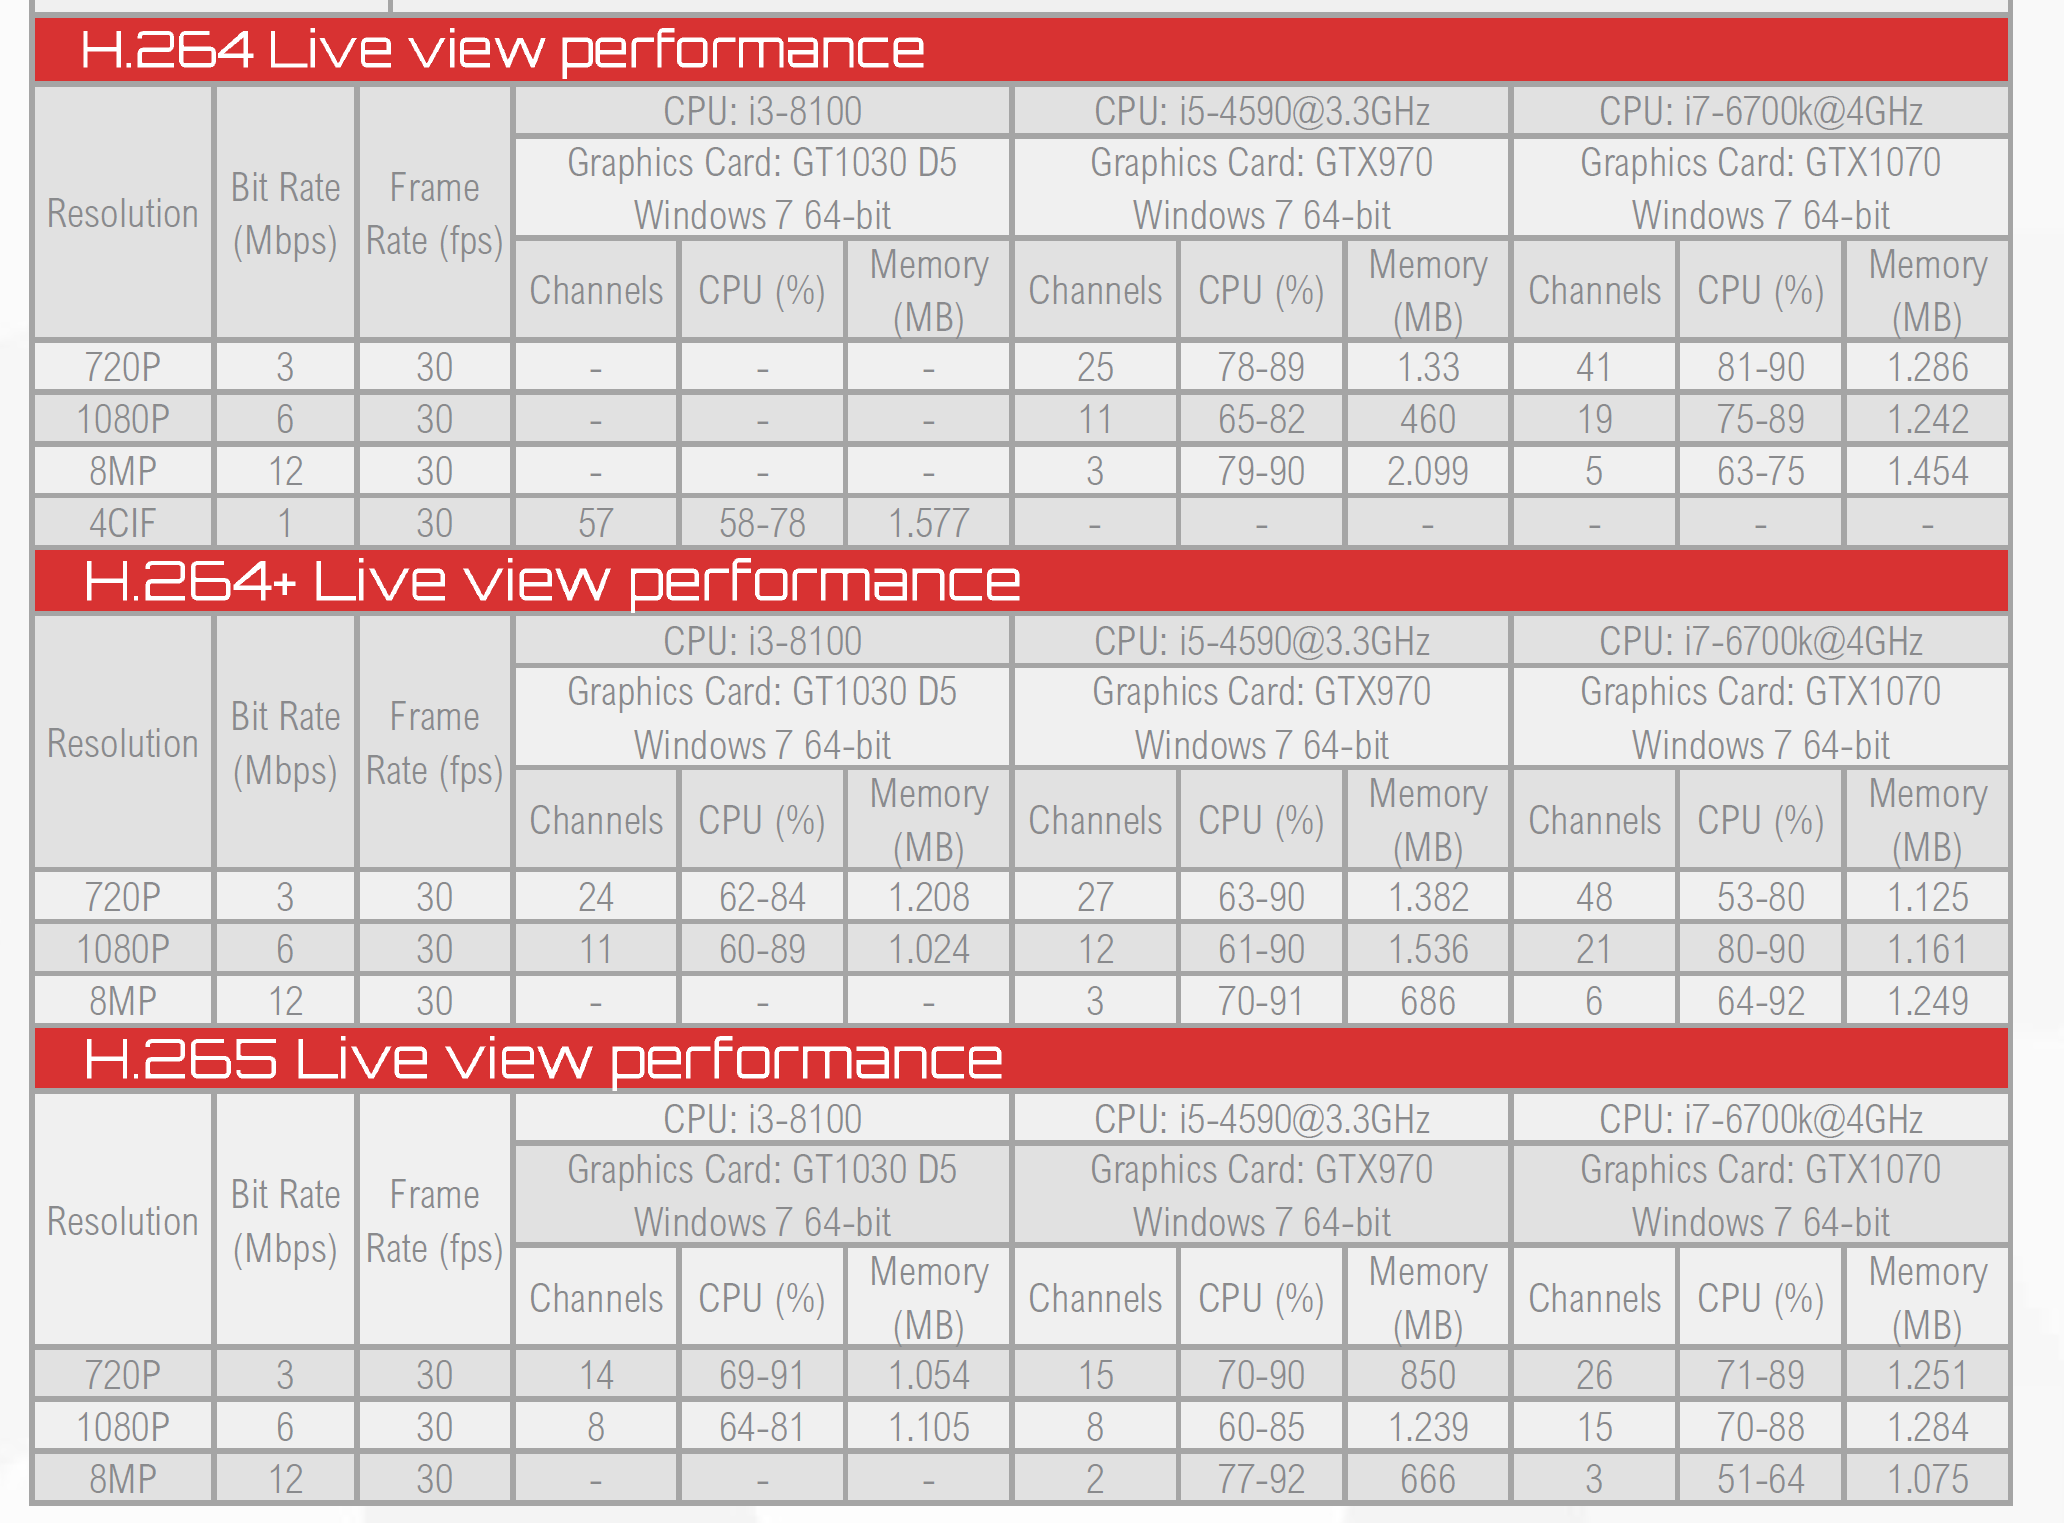
PC requirements by number of channels, coding power and video quality for SAFIRE Control Center
Specifications, including sample performance, are available in every Download section of Safire products.
https://athena-visiotech.s3-eu-west-1.amazonaws.com/g1WHVnEBNOqssiu8YU0y/SCC_Datasheet_EN.pdf
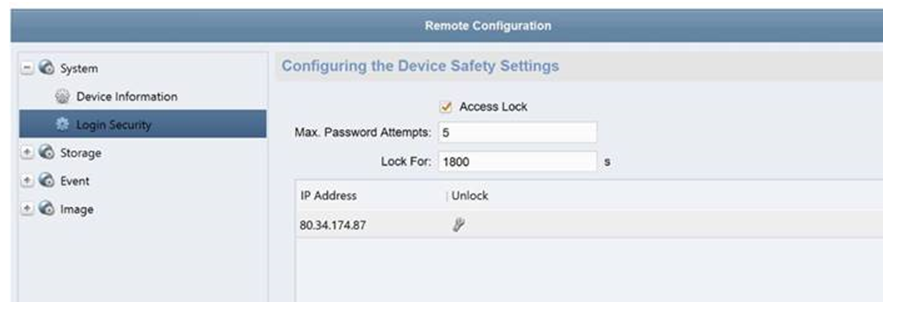
Error 153 in Safire Connect
The error is due to a problem in the app that causes it to misinterpret video stream requests to the recorder and to consider them as consecutive access attempts to the computer, which causes the device to lock itself up (in fact, error 153 is usually generated by illegal accesses).
The way to prevent this error from occurring is to uncheck the “Illegal login lock” option. Unchecking it does not take into account illegal access attempts, and therefore the above error does not occur.
In some recorders it can only be done from the Safire Control Center (thus from PC), while it cannot be done from the local menu of the recorder itself.
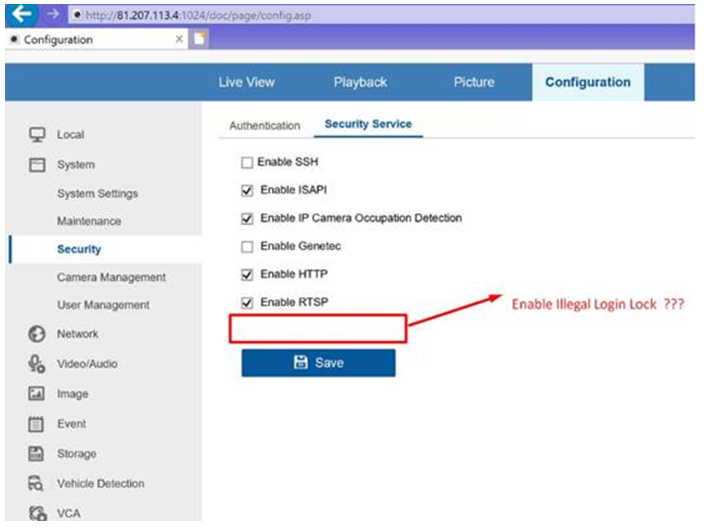
In cameras, the menu is presented as in the image below:

EasyConnect – P2P device sharing
To share a Safire device with other users, be it an IP camera or a recorder, the procedure is the same.
Let’s demonstrate how to share from a Browser.
Step 1 – Access the website that gives access to the Safire Cloud, http://easyconnect.safirecctv.com/
We’ll be accessing our Cloud account soon.

Once inside our account, we choose the product to share and click on the SHARE option.

A new window will open, and then we will have to enter the email address of the person with whom we want to share the product. In addition, it is very important to define what kind of permissions the person will have.

In this example, our product is a SAFIRE Video Door Phone, therefore if we do not apply all the permissions, the user who benefits from the compartment may not be able to speak or receive the alarms.
So it is very important to apply the permissions correctly.
Safire: Activate an alarm using the IP address from an IP camera.
For this guide we have used a Safire SF-HTVR8108A-HEVC recorder and an IP camera with alarm input.
To activate an alarm input of a recorder remotely from a wireless IP camera is very simple, to do this first access the recorder and go to the menu Camera Management.

1 – CONFIGURATION
2 – SYSTEMS
3 – CAMERA MANAGEMENT
4 – IP CAMERA
5 – ADD

Once the IP camera is added, we proceed to the configuration in the recorder. To be sure that the connection is stable and that everything works, we check that the STATUS of the camera is ONLINE.

In the recorder we will access the following menu:
1 – CONFIGURATION
2 – EVENT
3 – BASIC EVENT
4 – ALARM INPUT

The next step is to set the alarm input:
1 – Alarm input number
2 – Alarm type: We can choose between NO and NC

At this point we already have the Alarm input of our IP camera linked directly to an alarm input of the Recorder.

In LINK METHOD we can choose what to do when the alarm input is activated, such as activating an alarm output of the recorder, moving a PTZ or generating an audible warning on the recorder.
In this way, we have connected the alarm input of an IP camera to an alarm input of the recorder and saved ourselves the wiring.
Checking and updating Firmwares in SAFIRE IP Cameras or video recorders
In this procedure we will use the Internet Explorer browser, we are going to access via IP address to the camera:
After introducing the IP camera address and logging in, let’s click on CONFIGURATION.

In the CONFIGURATION menu, we have to access SYSTEM SETTINGS, and check the device model and firmware version in the BASIC INFORMATION menu.

Then look for the camera model on te VISIOTECH’s website.

Download the file and then extract the update file from the compressed folder you just downloaded. The update file is called digicap.dav. After the file is unzipped, enter the path of the unzipped file folder in the camera’s Upgrade&Maintenance menu.
Click on MAINTENANCE and then on Browse to find the location of the file; once selected, click on Upgrade. A message will appear indicating that the camera will automatically restart after the update. Click OK.

When rebooted, return to the SYSTEM CONFIGURATION menu, and check the version to make sure that the camera has been updated.









Add Comment