Swann Security Troubleshooting All Devices
Remote Access – Basic Troubleshooting
If you’re having trouble with setting up your Swann unit for remote viewing, or the remote viewing was working but has since stopped, here are some simple steps for you to try.
1) Reboot the recorder or camera
Rebooting the device both clears the memory and sets up the basic network parameters of the recorder or camera again. This can help if the router has “lost” the device from the routing table or if the device requires a new local IP address.
2) Reboot the modem and/or network connection devices
There may be an issue with your modem or network connection that is preventing the Swann unit from contacting the internet correctly. Rebooting these devices can correct these issues.
3) Reconnect the network cable and/or try a different one
For some Swann units such as recorders, the network (Ethernet) cable connects your device to your internet connection devices such as a modem or a router. Sometimes the contacts may become loose requiring you to replug the cable for the recorder to start working again. We suggest testing the cable on a different LAN port, located behind your modem/router. If this also fails, then your cable may be defective and may need to be replaced. If you have a spare network cable lying around, try switching the cable to see if it helps.
4) Reset the recorder or camera
For recorders – While this step is rather drastic, it can also be of use where the recorder’s settings have been misconfigured or if you have changed or reconfigured your network or internet hardware. This will clear all the settings from your recorder, including your network settings which could be causing the issue with your local/remote access from phone or computer.
If this step seems like a lot of work to recover from, do not forget to export the settings of your recorder to a USB stick before you proceed. That way, if the reset does not correct the issue, you can easily recover the settings lost. Also, if the reset did solve the issue, you can reapply the settings to see if that was what caused the issue. Check your recorder’s user manual for configuration export instructions.
For Wi-Fi cameras – if your camera has settings related to network, it might also be misconfigured or something has changed internally. Be aware that there is no exporting of settings here therefore, if you will reset your camera, you might re-do the first time setup.
Load More :
Swann Security – Error: Device has been disposed
NOTE: This guide is for the following recorders : DVR-4480G, 4480RN, 4480V, 4580G, 4580RN, 4580V, 4680, 4680RN, 4680A, 4680X, 4680XN, 4685, 4685RN, 4780V, 4980, 5580, 5580A, 5580G, 5580G2, 5580RN, 5580RU, 5680, 5680A, 5680RN, 5680X, 5680XN, NVR-8580, 8580RN, 8780, 8780RN, NVW-650, 800
This error message means that the username and/or password you entered on the app doesn’t match your recorder’s credentials.
| To resolve this, you need to go to the recorder itself and try to log in – this is to ensure that you have the right username and password of your unit.
Once you have it, you may try to add the device again and carefully enter its credentials on the app. In summary, you need to:
|
You may find this video useful but most importantly, you need to have your recorder’s username and password with you as this is needed when pairing your recorder.
Setup Cloud storage to OS 5 recorders
NOTE: This guide is for the following recorders : DVR-4480G, 4480RN, 4480V, 4580G, 4580RN, 4580V, 4680, 4680RN, 4680A, 4680X, 4680XN, 4685, 4685RN, 4780V, 4980, 5580, 5580A, 5580G, 5580G2, 5580RN, 5580RU, 5680, 5680A, 5680RN, 5680X, 5680XN, NVR-8580, 8580RN, 8780, 8780RN, NVW-650, 800
Swann’s OS 5 recorders now has the feature to save images or recordings through Cloud which might be more accessible to you without being on the unit itself. This can serve as another way to get notified when there’s a movement detected on one of your cameras.
Couple of things to prepare:
- Make sure to have a Dropbox account ready. If you don’t have one, visit Dropbox and register first.
- Then make sure your recorder is connected to the internet. Not having this will obviously not send the recordings on the Cloud or even give you access online.
Setup
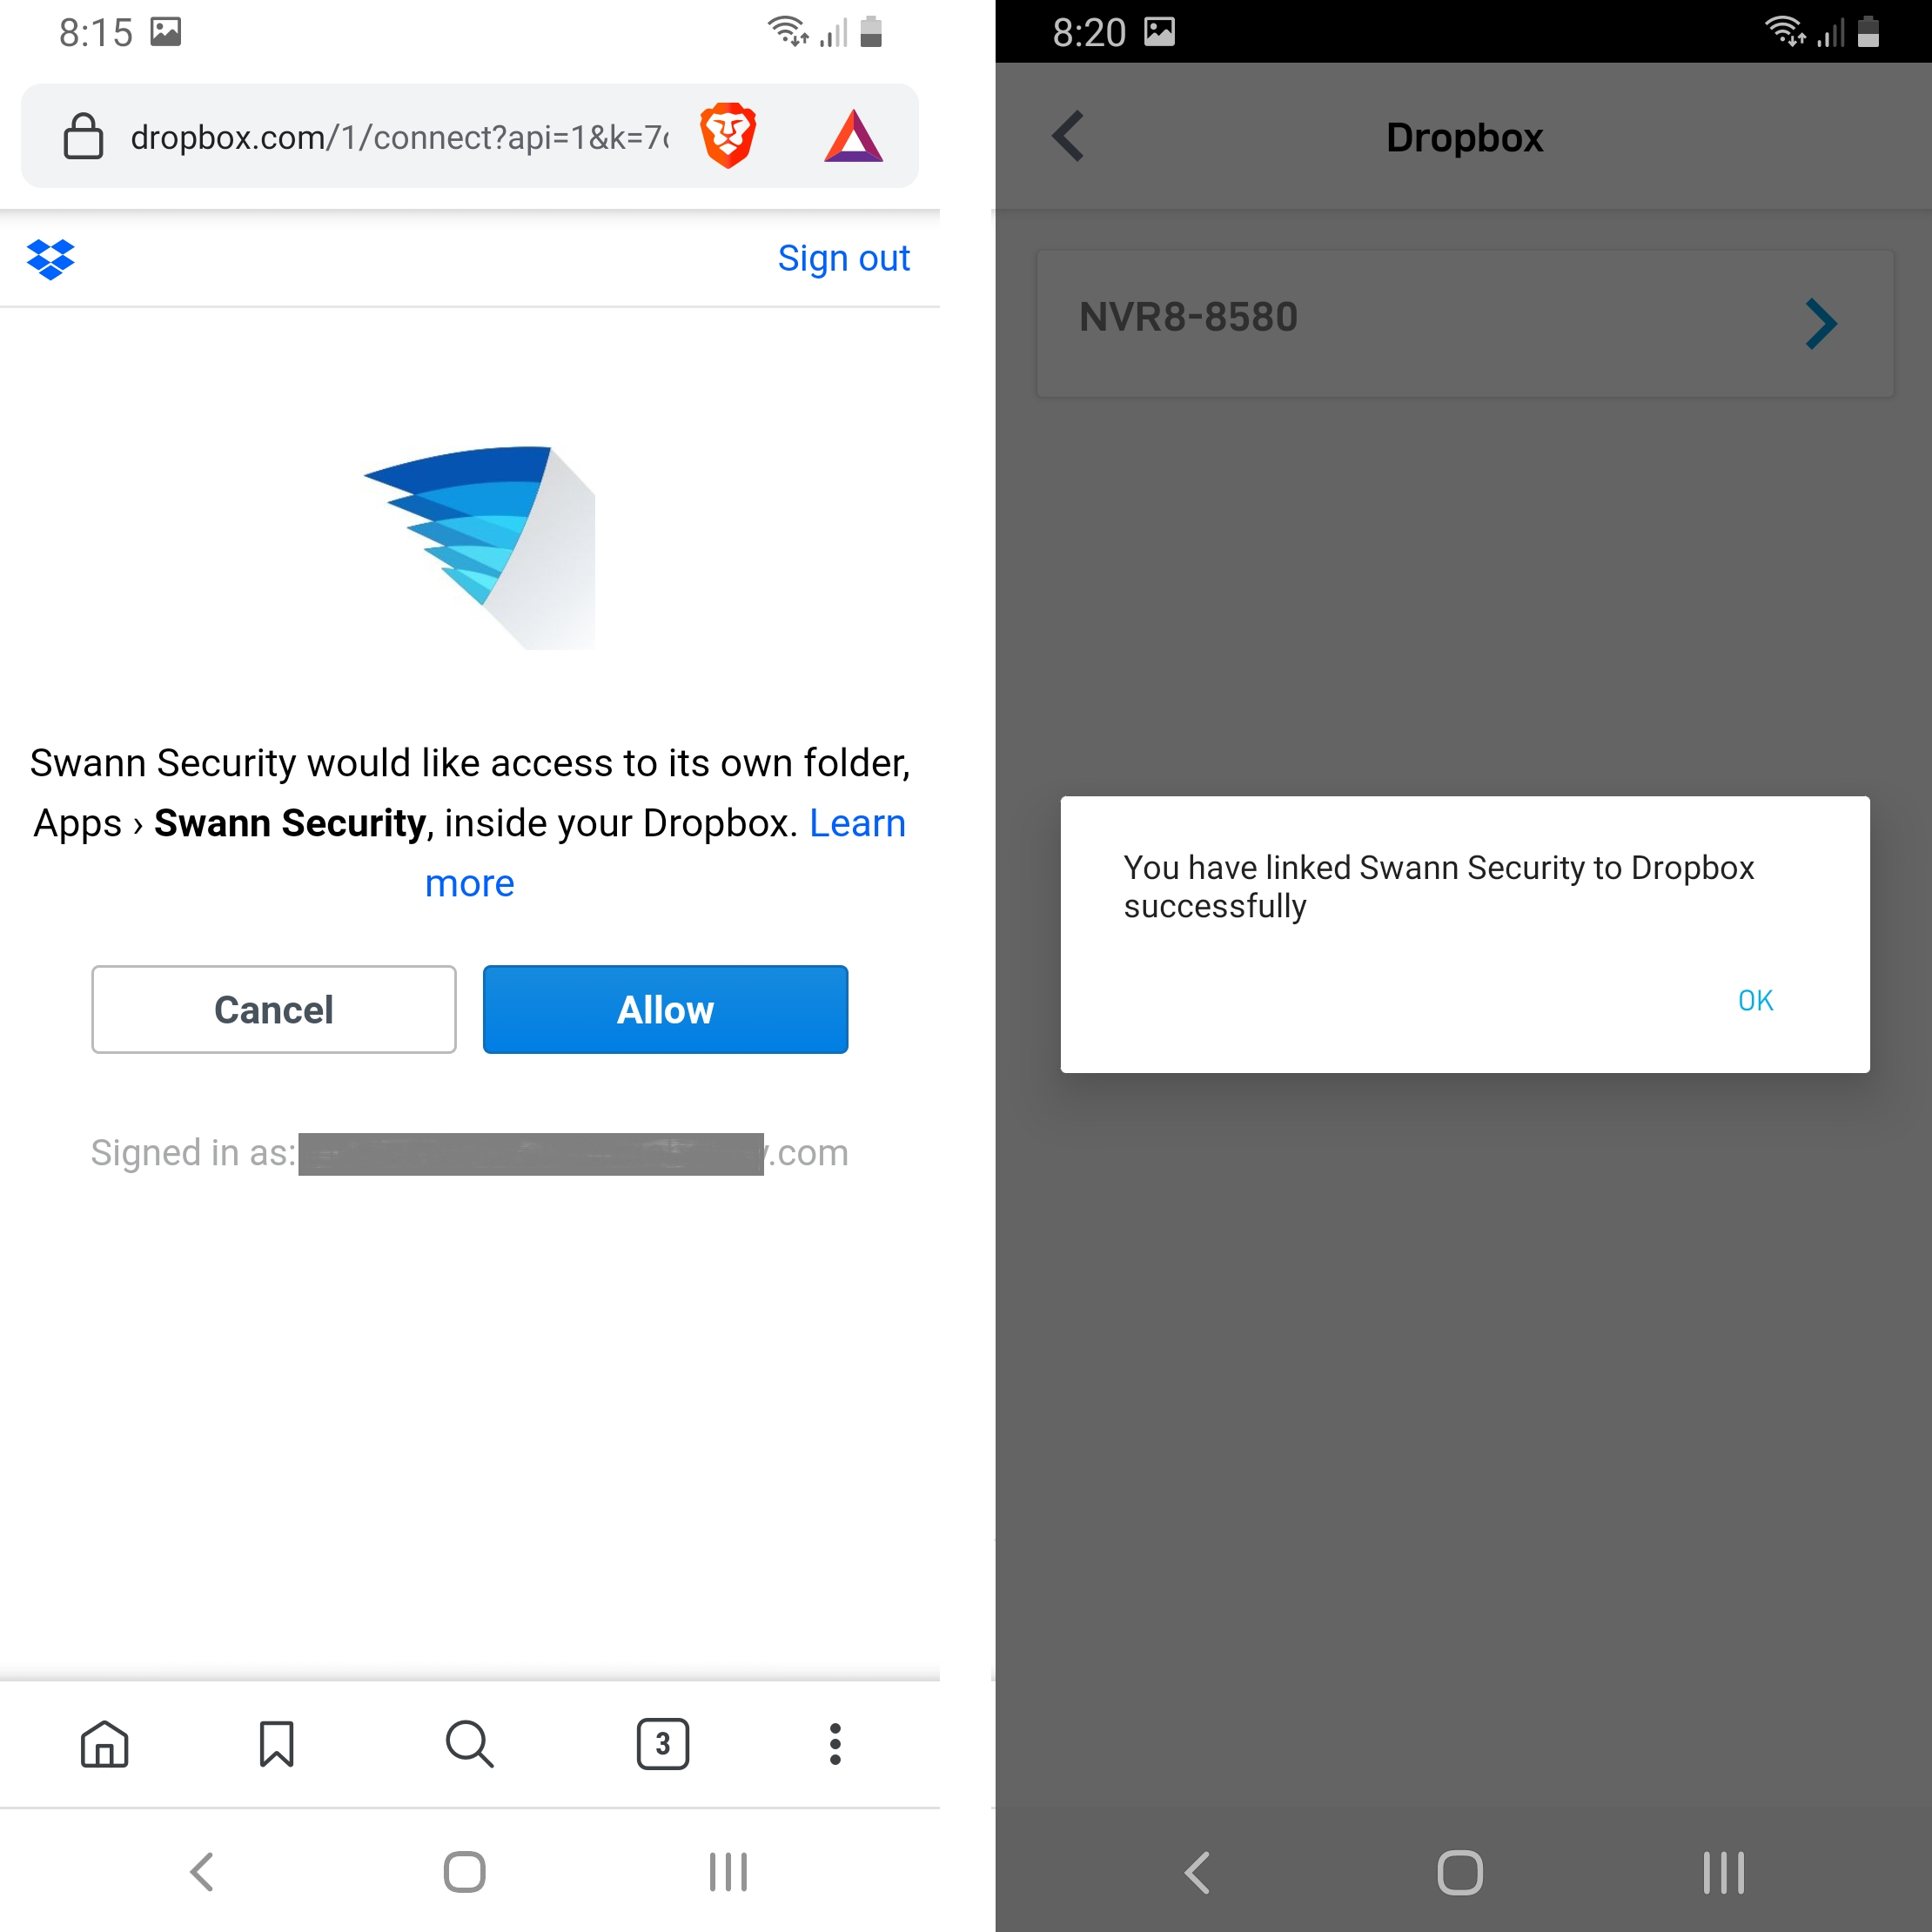
- On Swann Security app, go to Menu > Dropbox.
- Choose your recorder that you want to setup.
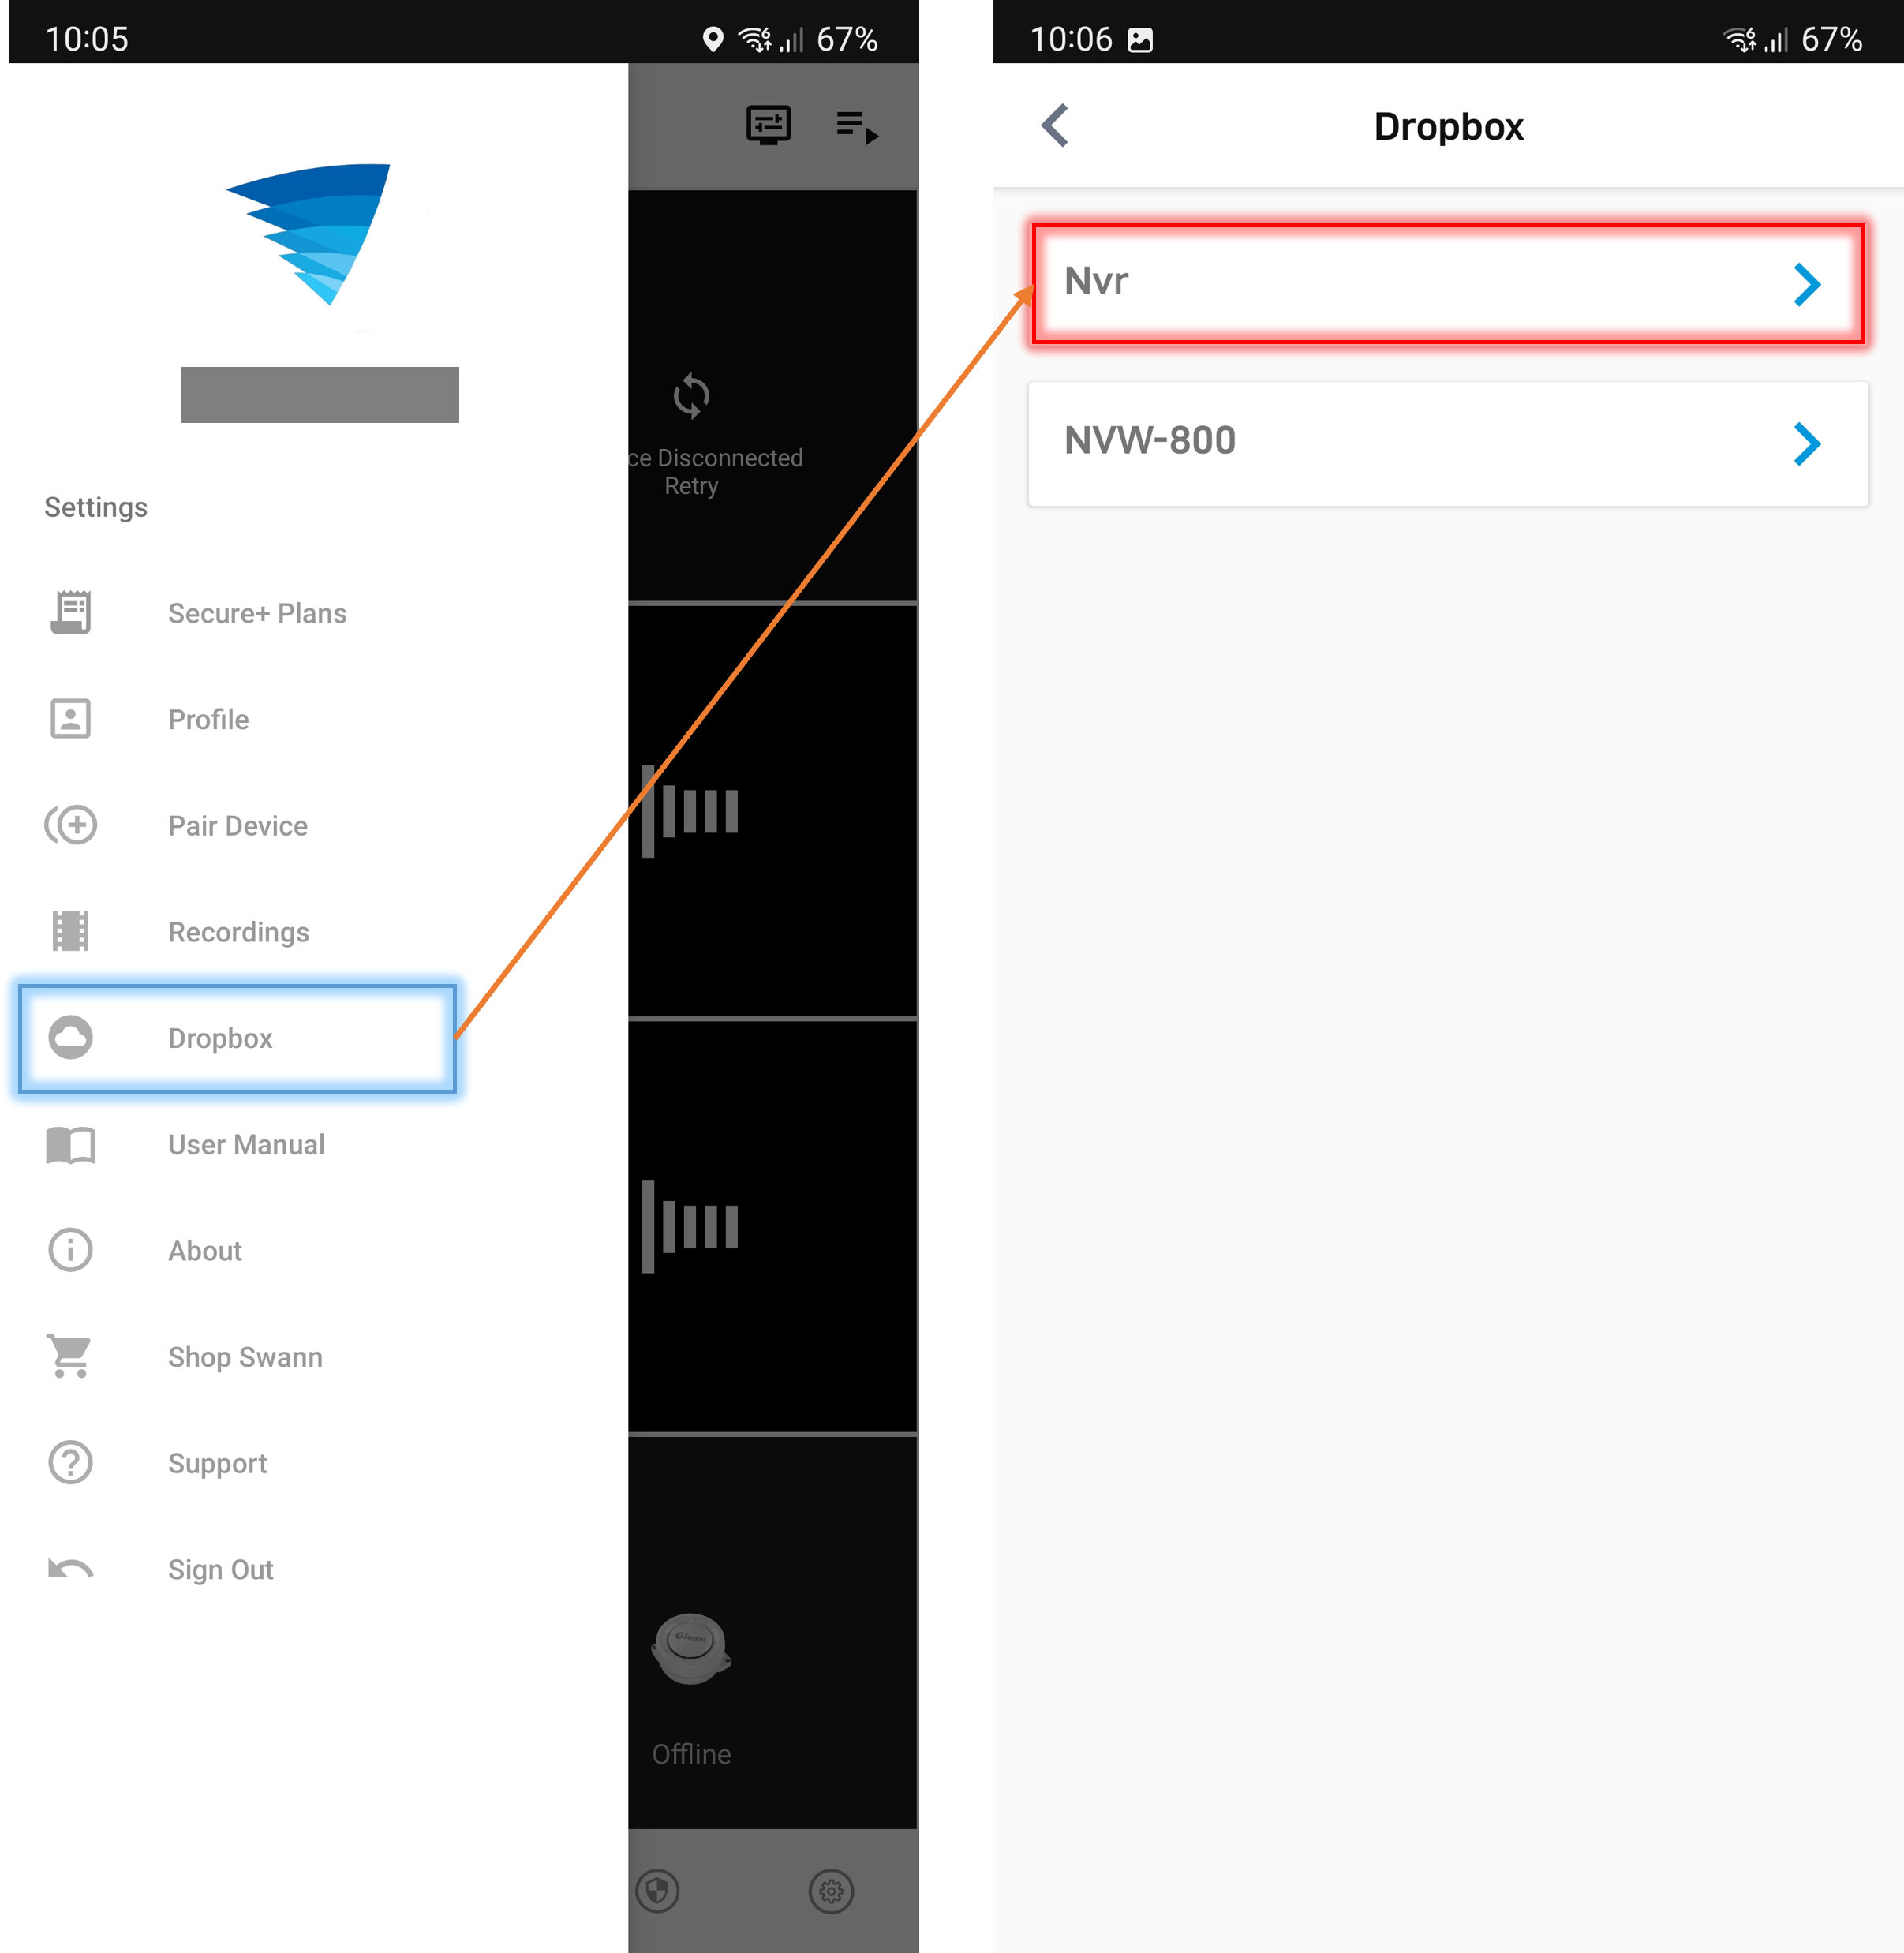
- It will open Dropbox app or Dropbox website will open (depends on what you have) – make sure you are logged in to the Dropbox account where pictures or videos will be saved.
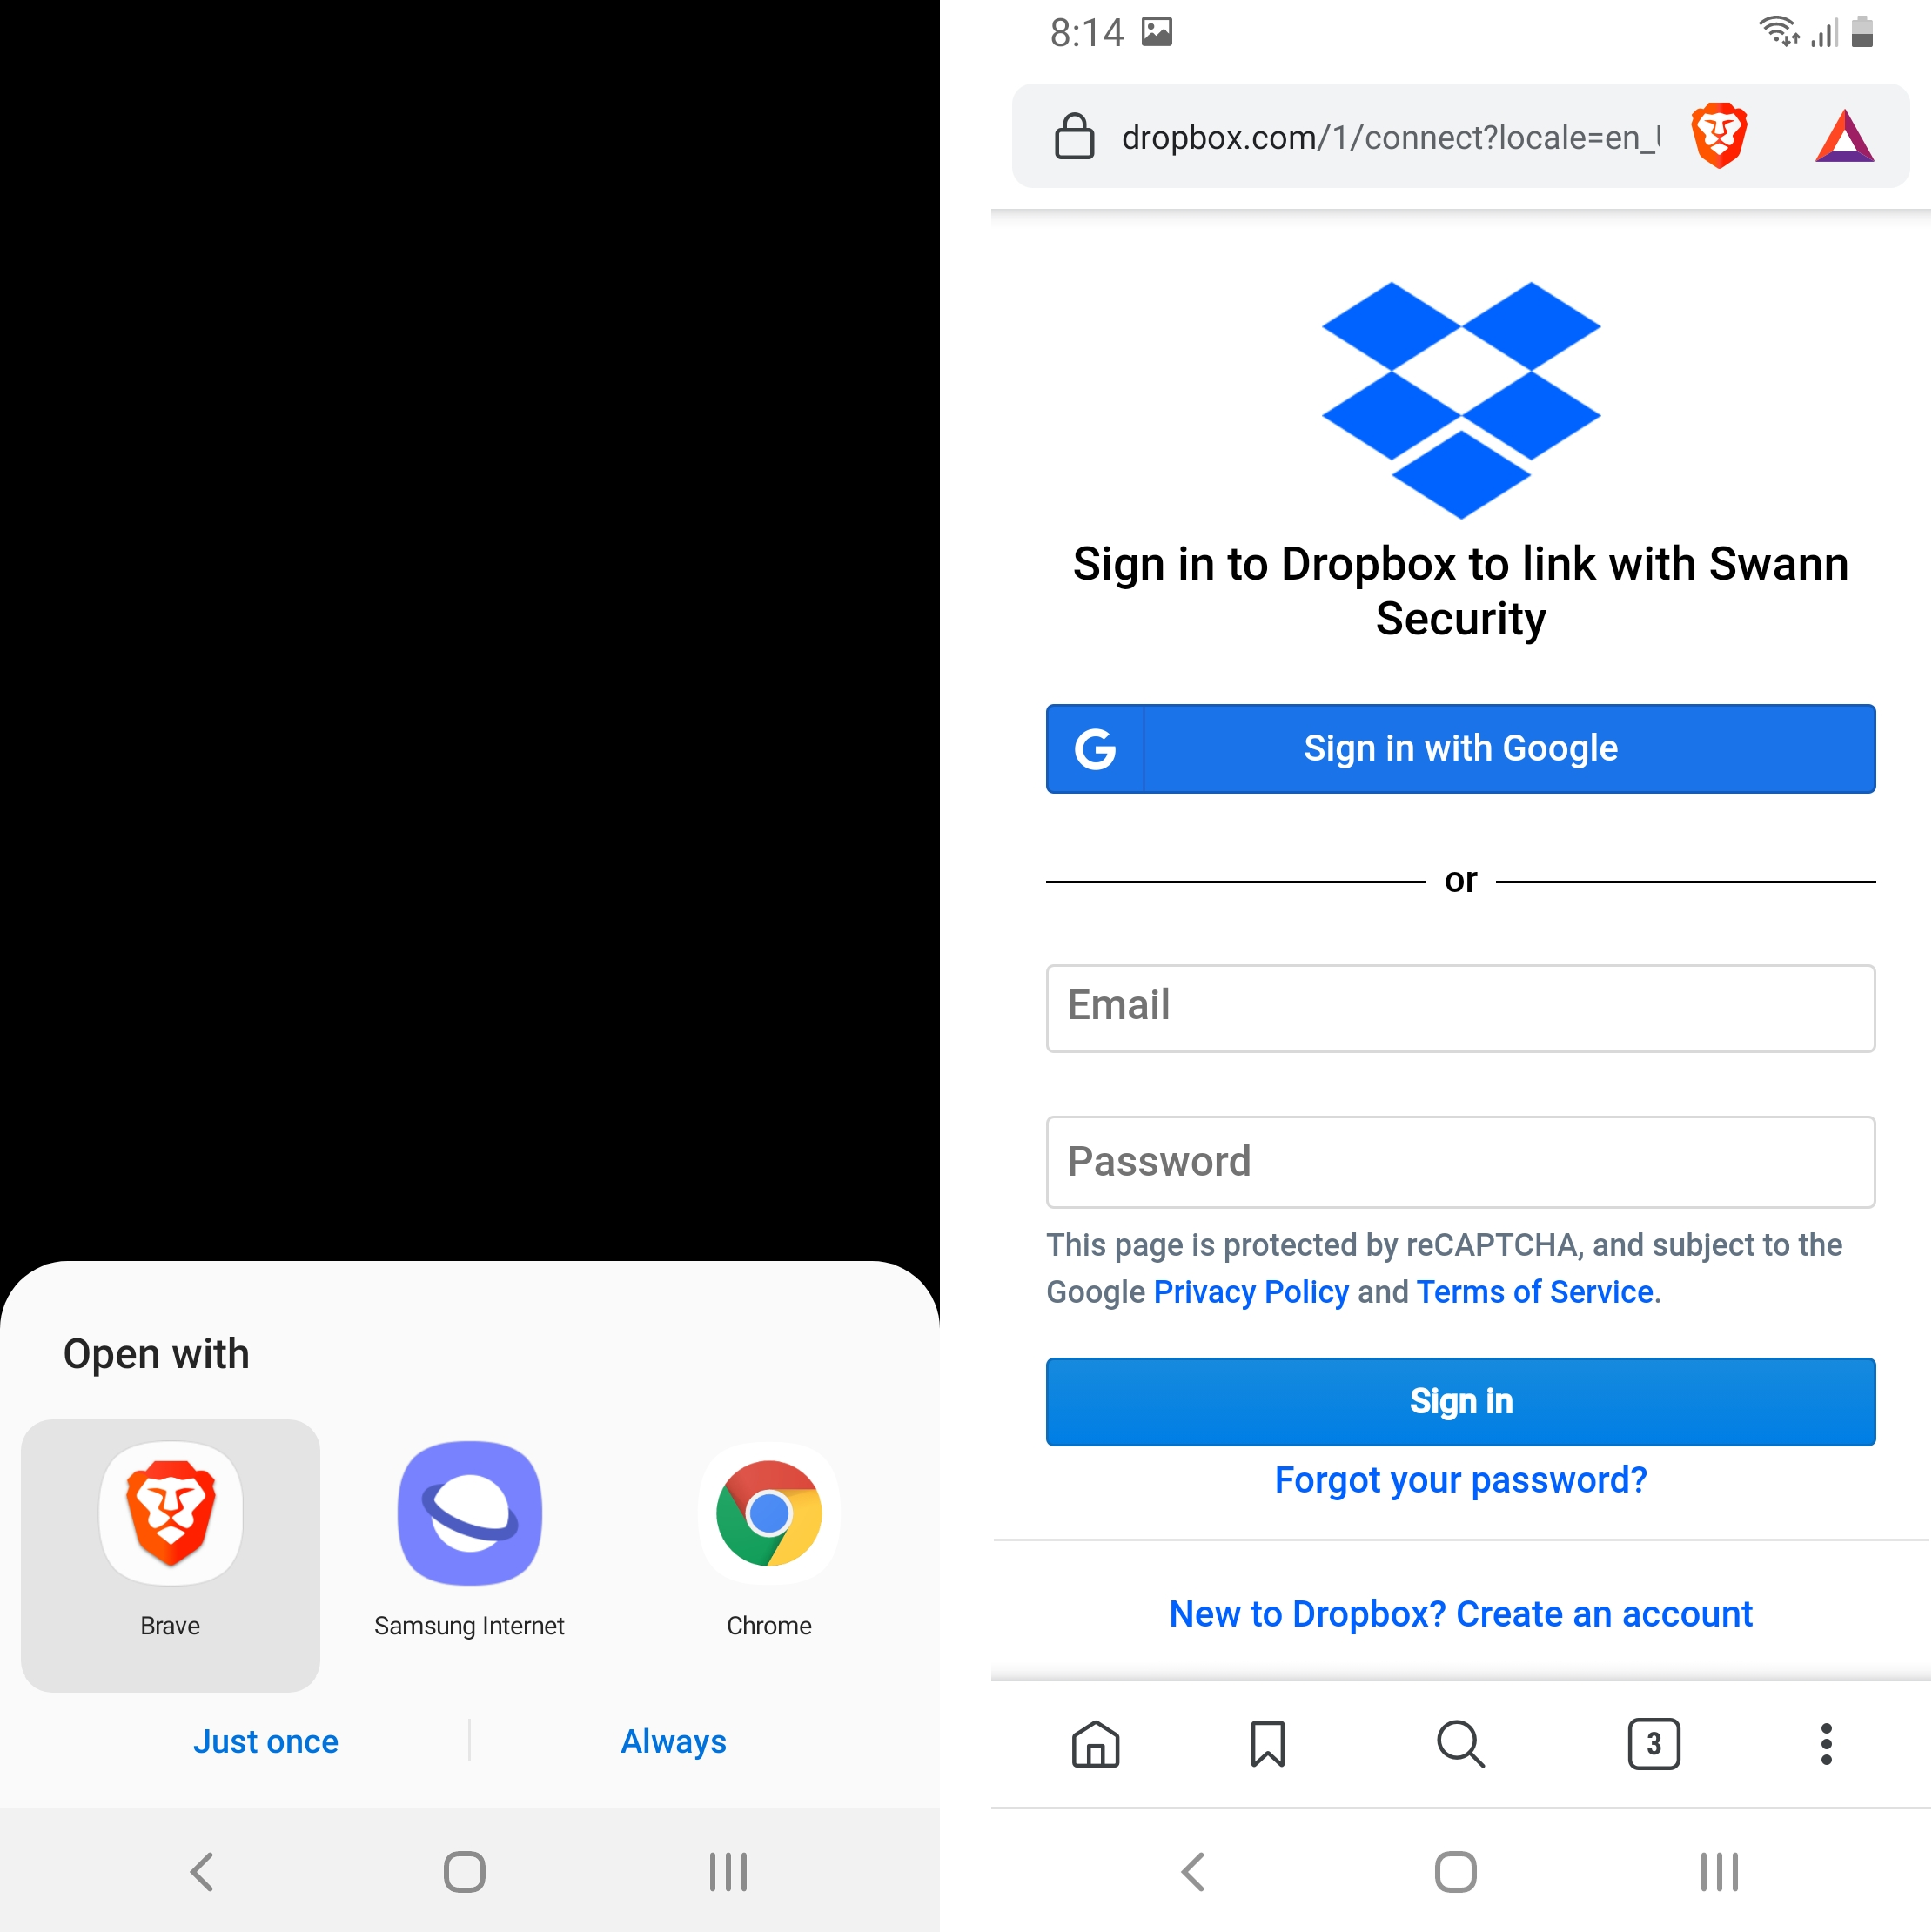
- Allow – choose this to allow Swann Security to gain access on Dropbox.
- COMPLETE! – it will go back to the Swann Security app once you chose Allow. Tap again the recorder and this message (image at the right) should appear.
In case it repeats step 3, just cancel it or go back, then you’ll see this message (image at the right).
Enable Cloud Notification
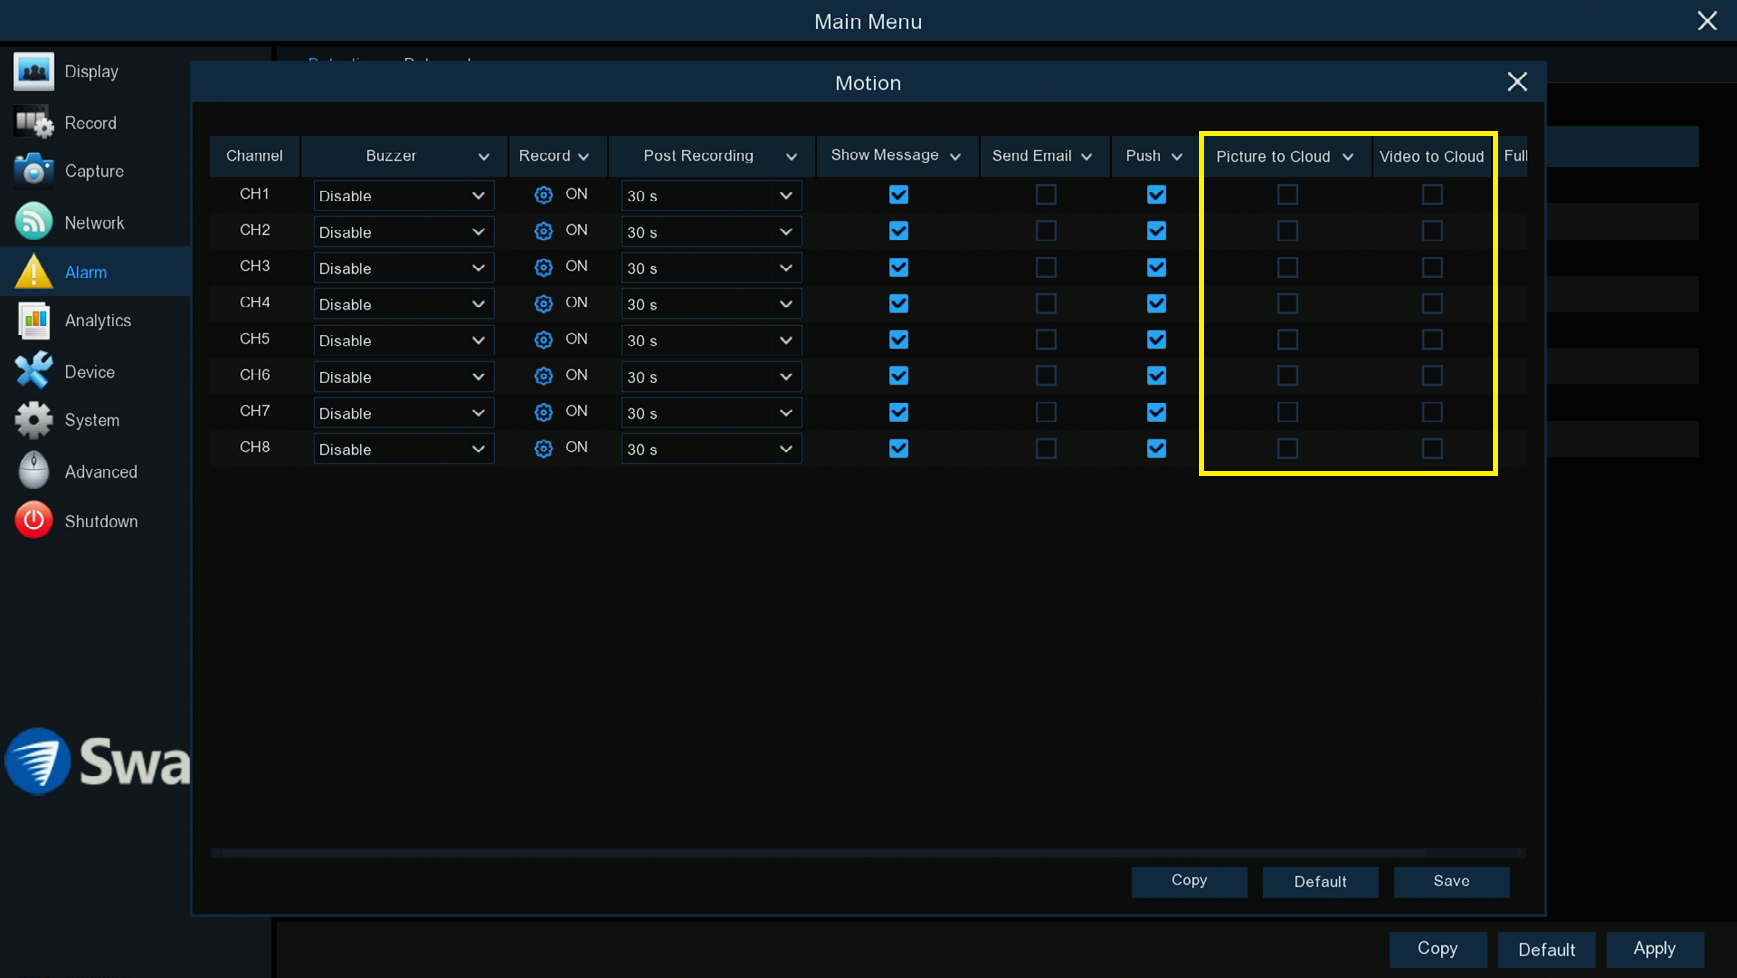
- Go to Menu > Alarm > Detection
- Click on Action
- Enable Picture to Cloud or Video to Cloud on selected Channels.
…and you’re DONE! Now every time the recorder detects movement, it will then send it to your Dropbox.
Be aware of the following:
- Default Dropbox storage has limited storage space
- Not all channels can be selected to upload video
- Uploads to Dropbox consume upload data, be aware of potential additional charges when using an internet connection with caps/data usage charges
- Consider using the Overwrite option to select a timeframe that the Cloud storage uses, to keep the storage from filling up. Note that if the storage fills up before the Overwrite deadline, that it will operate the same as Auto
- Be aware that a desktop PC with the Dropbox software installed may download any recordings to the Dropbox folder on that PC
Password Reset for SwannBuzz Account
This article will guide you on how can you reset the password of your SwannBuzz account.
 |
Open SwannBuzz then tap Forgot Password? below the Password field. |
 |
Enter your registered email address then tap Get New Password. |
 |
Now check your email (even your Spam or Junk folder) to get the temporary password.
In the app, tap Return to Sign in |
 |
Get the new password.
Go back to SwannBuzz app then log in using your email and new password. |
 |
Once logged in, it will ask you to set a new password. Enter it on both text fields.
Tap OK and that will now be your new password. |
NOTE: If you didn’t receive an email and you are using a private email similar to .gov or .edu emails, please contact your IT or the domain.
OutbackCam: Why detection angle different to viewing angle
The OutbackCam utilizes a passive infrared motion sensor so that the system is able to run in a stand-by mode. This means the battery life of the system is extended from what would otherwise be hours, into weeks and/or months. When activity is detected by the motion sensor, the camera component that was previously switched off is now activated and takes one or more snapshots. Due to the time difference between when motion is detected and when the camera is able to take its first photo, we have extended the detection angle so that an object moving through the shot will be captured despite the activation delay.
Having said that, passive infrared motion detection is not a flawless technology. You will get times where the sensor detects motion when there is none. When passive infrared motion detectors are used outdoors, there is a higher likelihood of false alarms due to a large number of varying environmental variables such as temperature, wind speed, time of day and lighting conditions.
If you believe this renders the system unusable, you could try using race tape (a.k.a. gaffer tape) to tape either side of the white passive infrared sensor until you have an acceptable detection angle.
How to get the MAC address of a recorder using an Android device?
If you forgot your password but needs to login to your recorder, you most probably need the MAC address of the recorder to enter. We have couple of articles to help you with that HERE but all of those require a computer.
This article will help you get the MAC address of your unit by the use of an Android device and a 3rd party app called Fing.
Scan this QR code and install the app:
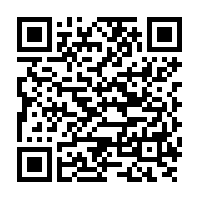
or go to Playstore and search for Fing.
Once the app is installed, here are some requirements:
- You must be at the location where the unit is.
- The Android device must be connected to the same router where the recorder is connected.
- You must have a monitor and mouse connected to the recorder to input the MAC address later.
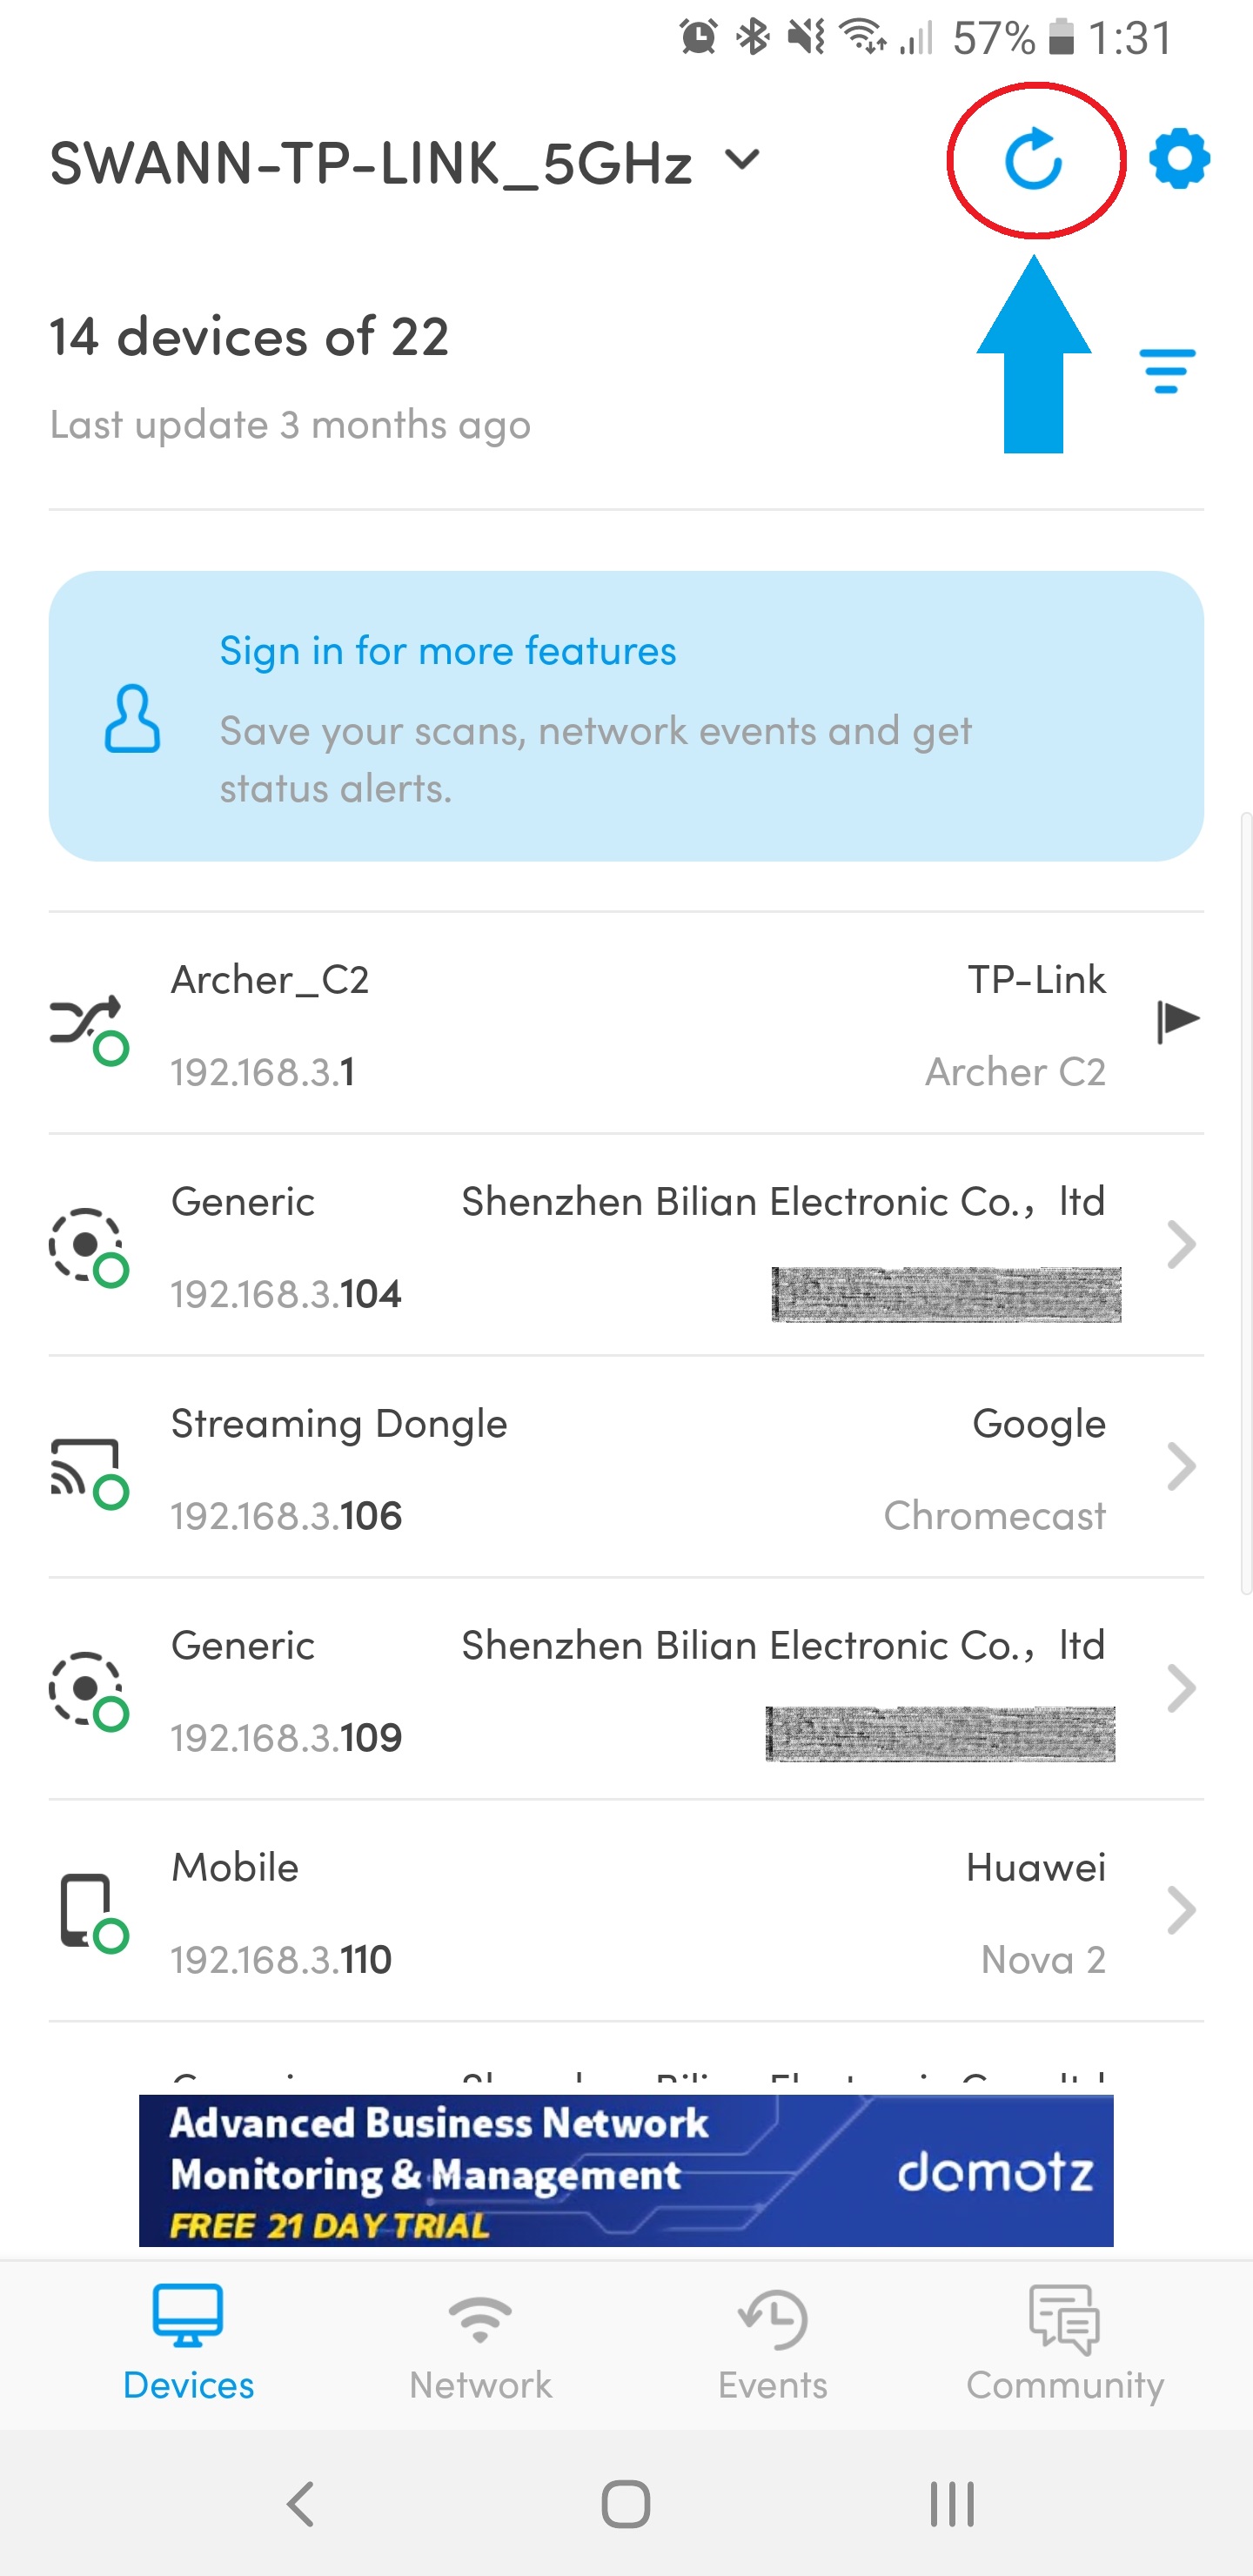 Now, open Fing then tap on the Refresh button at the top.
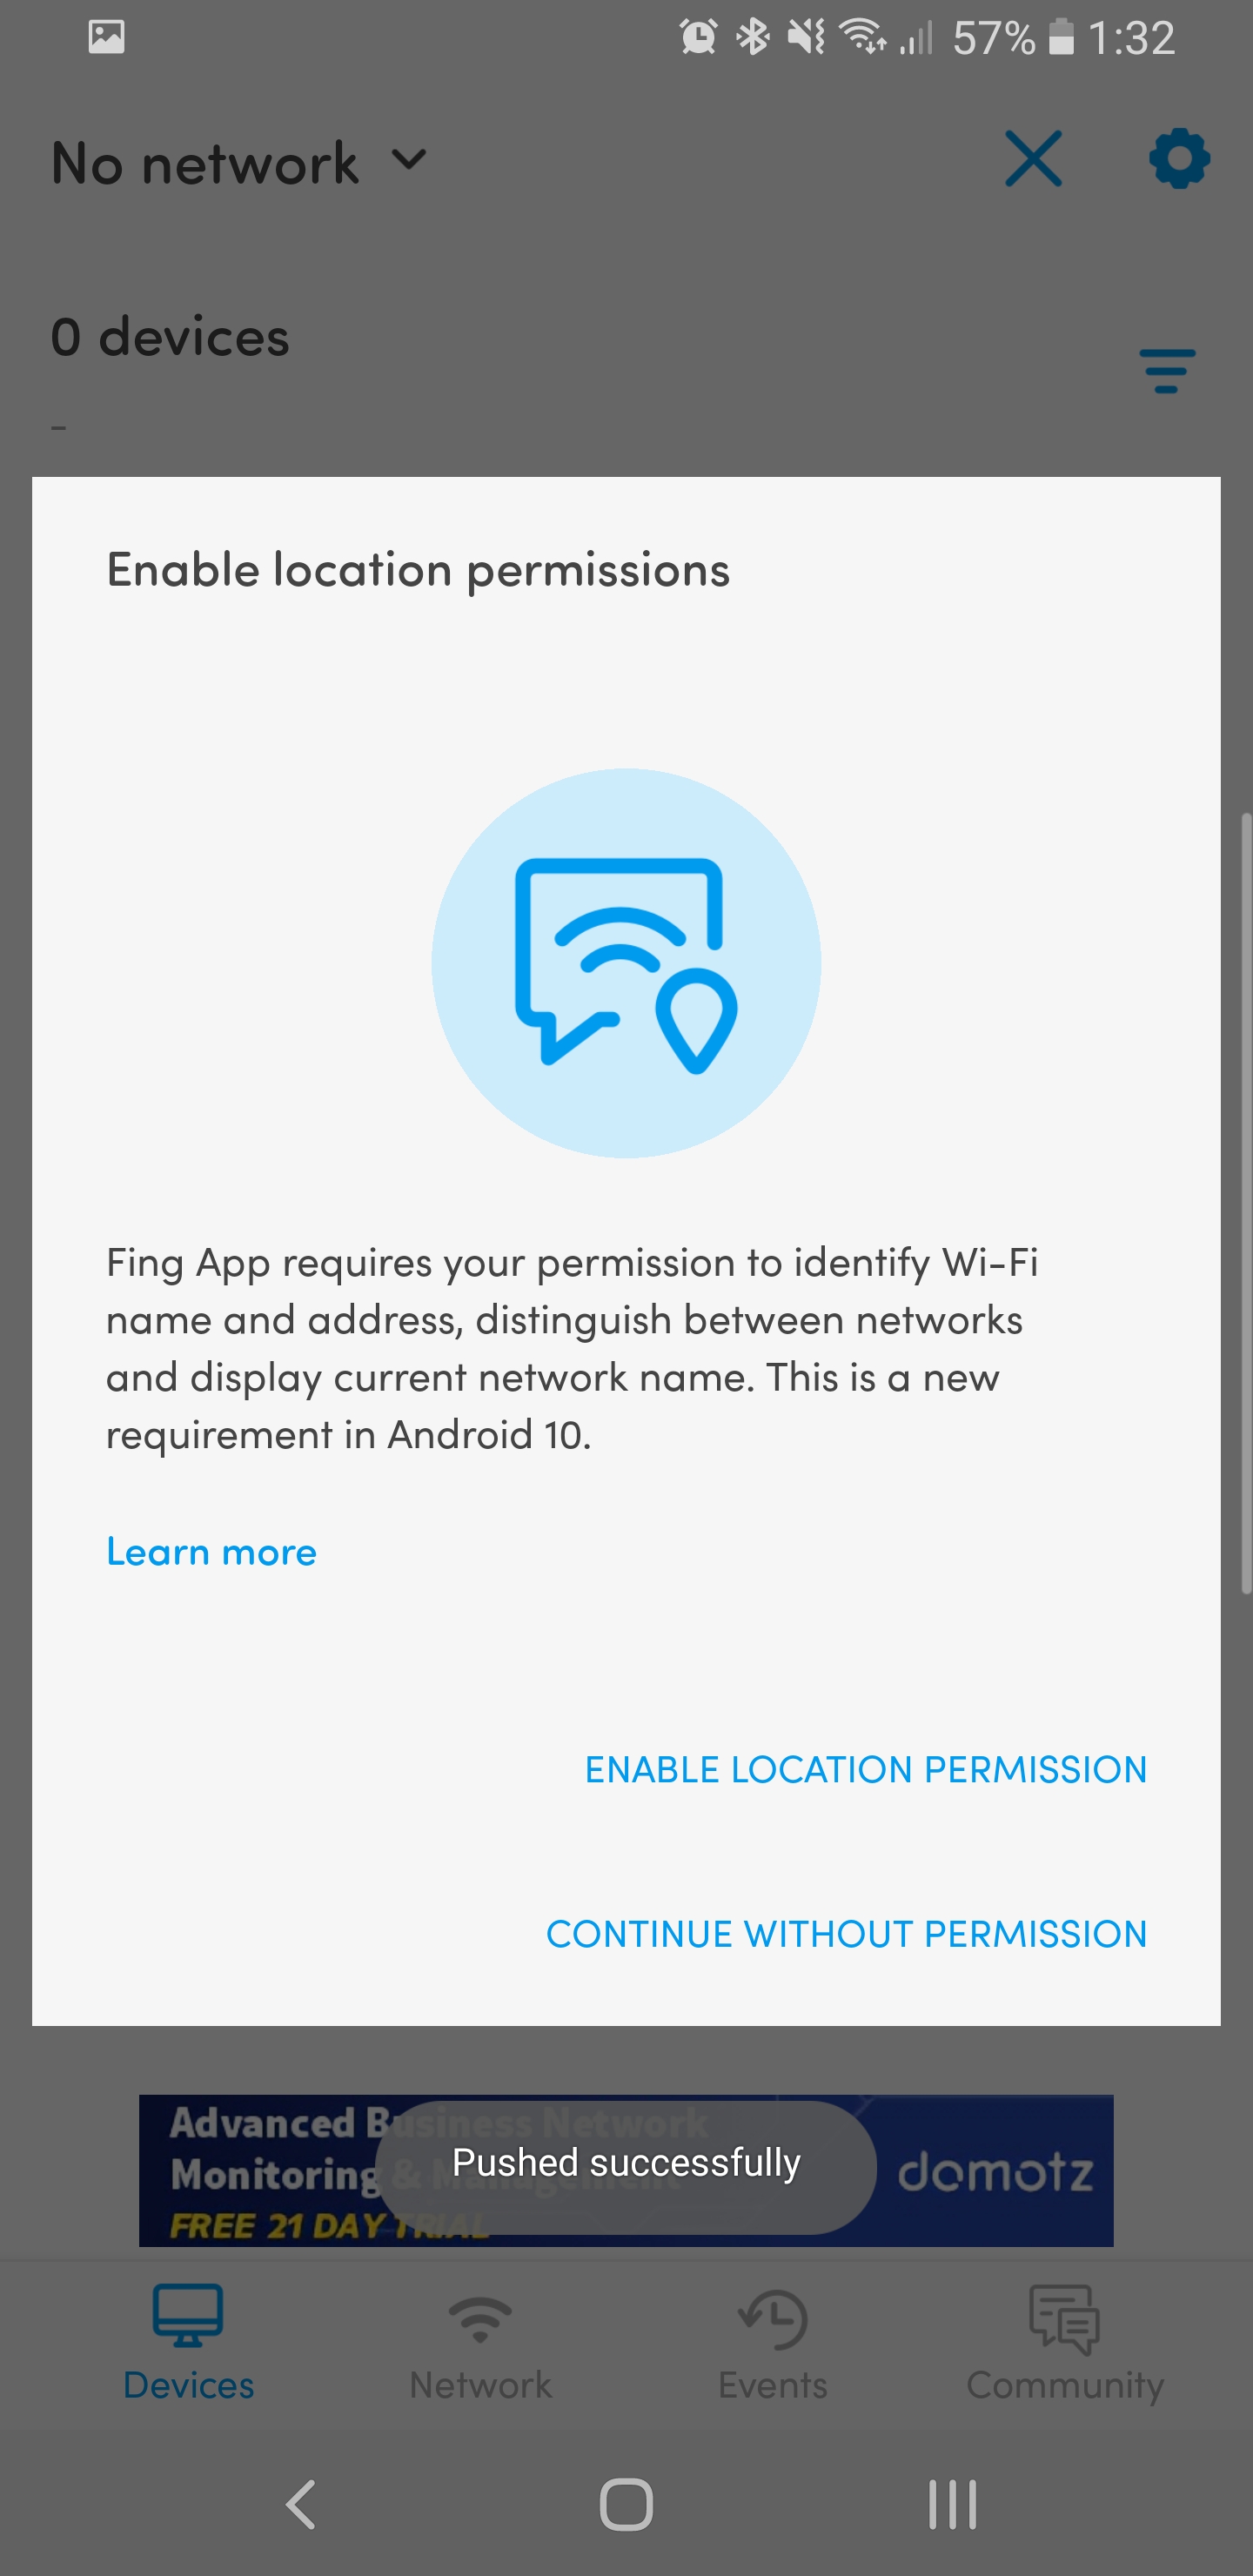 If it asks for permission, select Enable Location Permission.
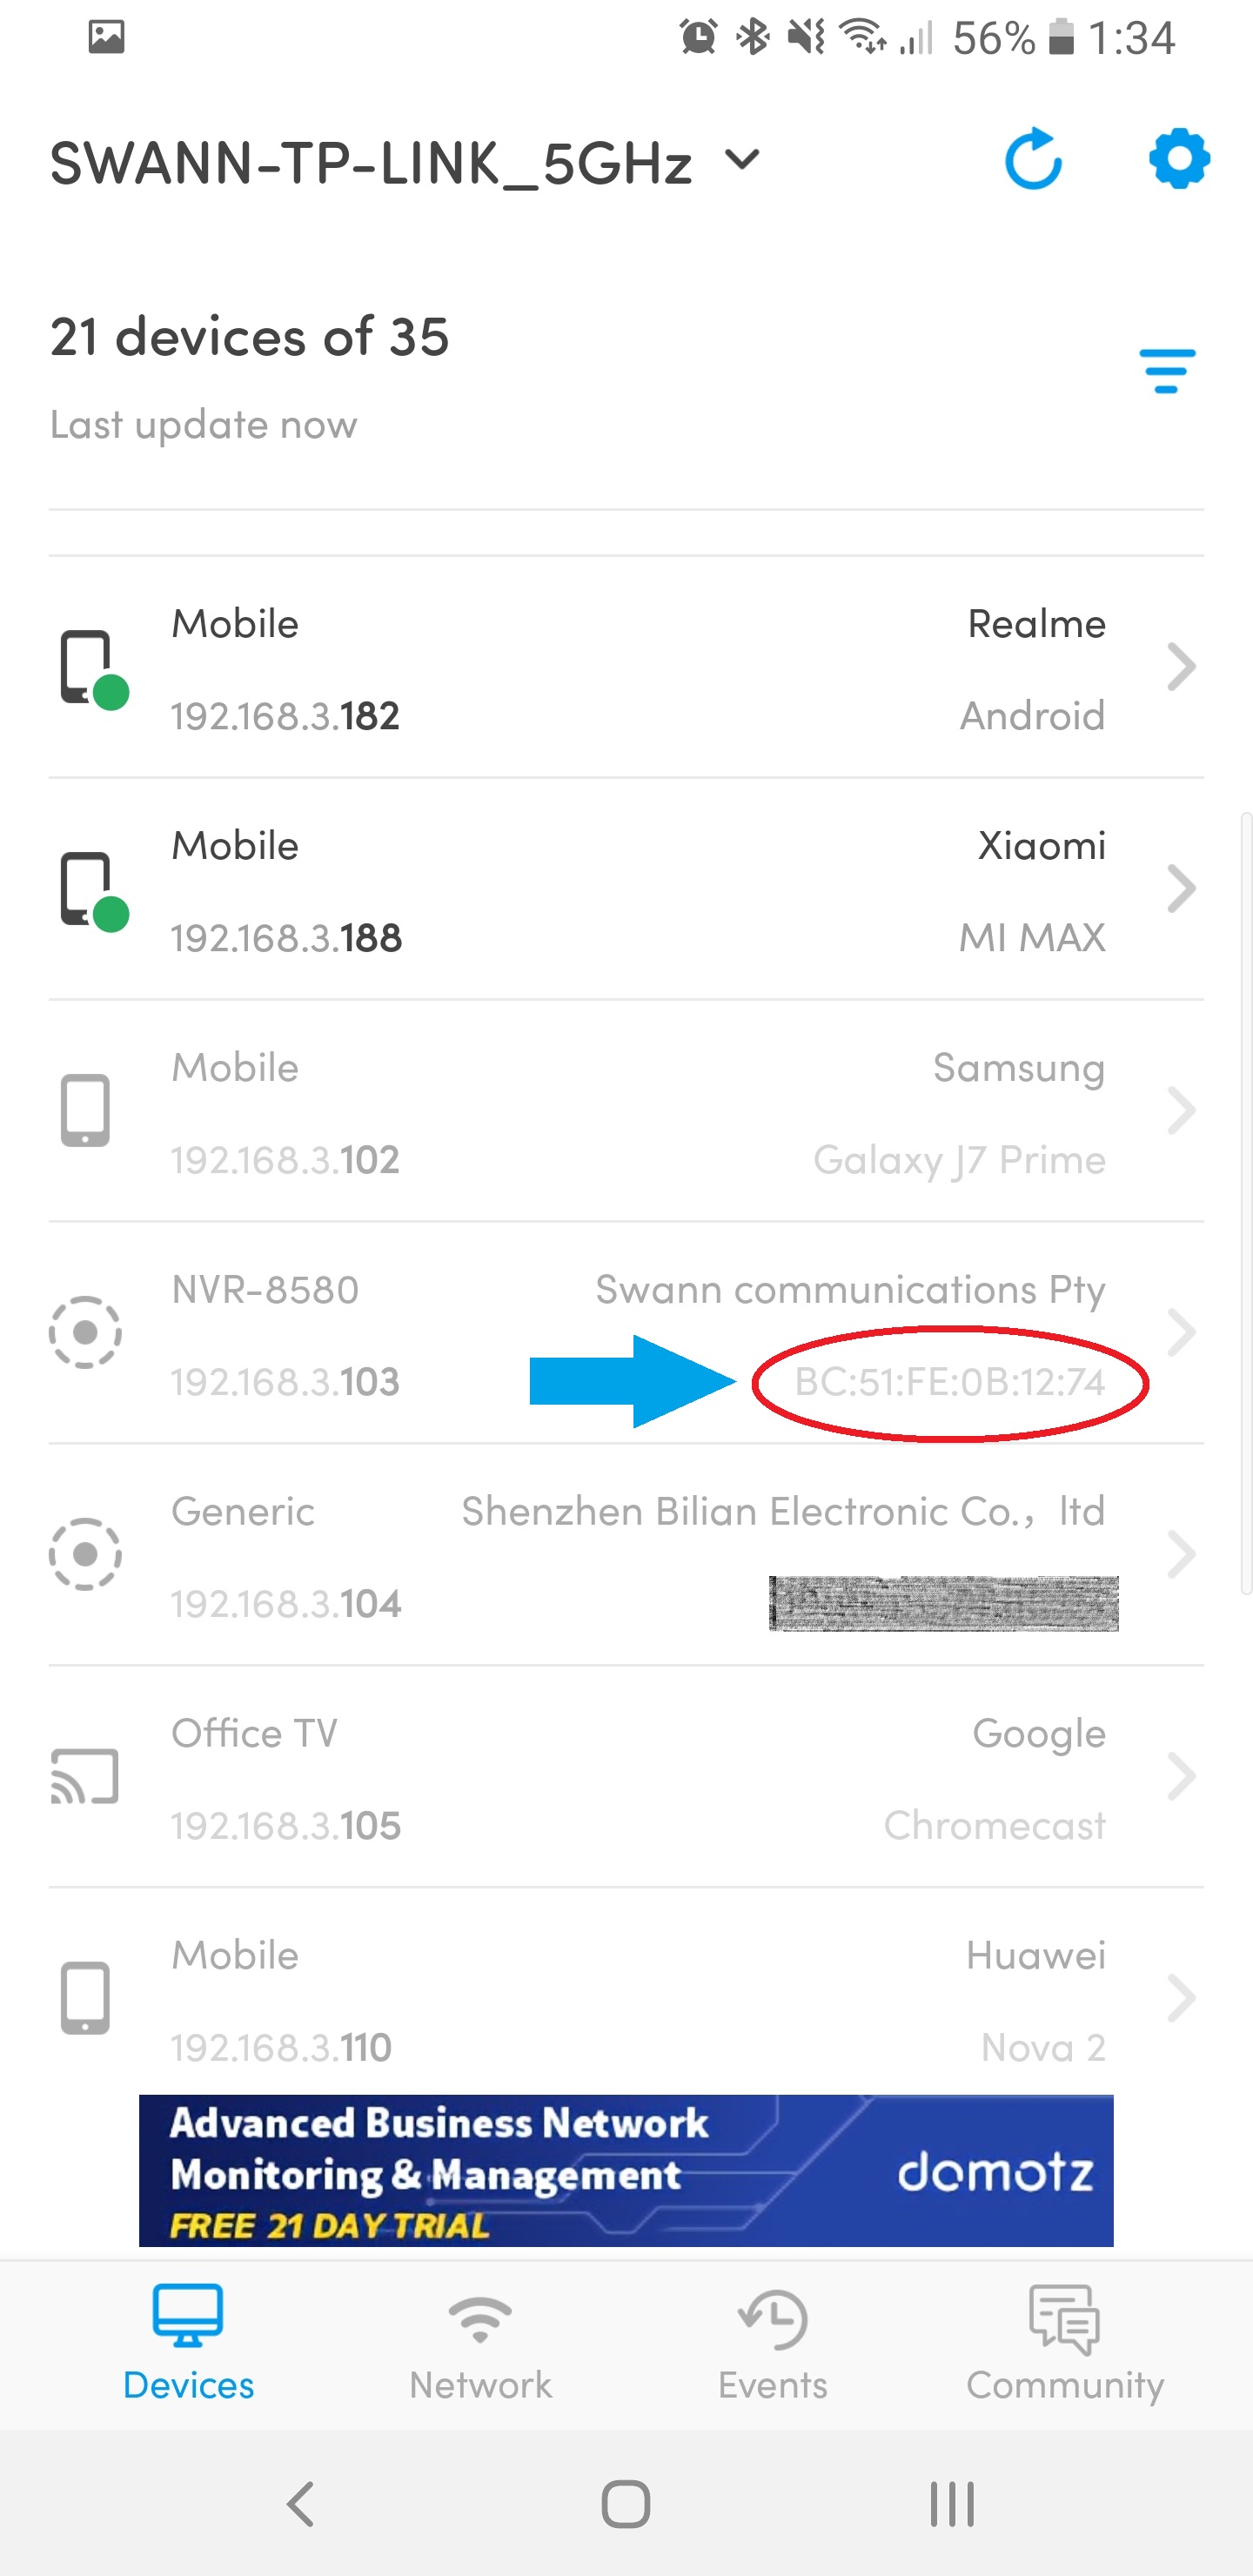 After that, you will see a list of devices detected on your network. Look for a Device that has Swann or with MAC address that starts with BC:51:FE or EC:71:DB.
Once you got your MAC Address, visit the article that is meant for your device HERE to know how to reset your password.
How to enable push notification of Swann apps in iOS?
Upon installation or while using the app, it will ask for some permissions to be allowed.
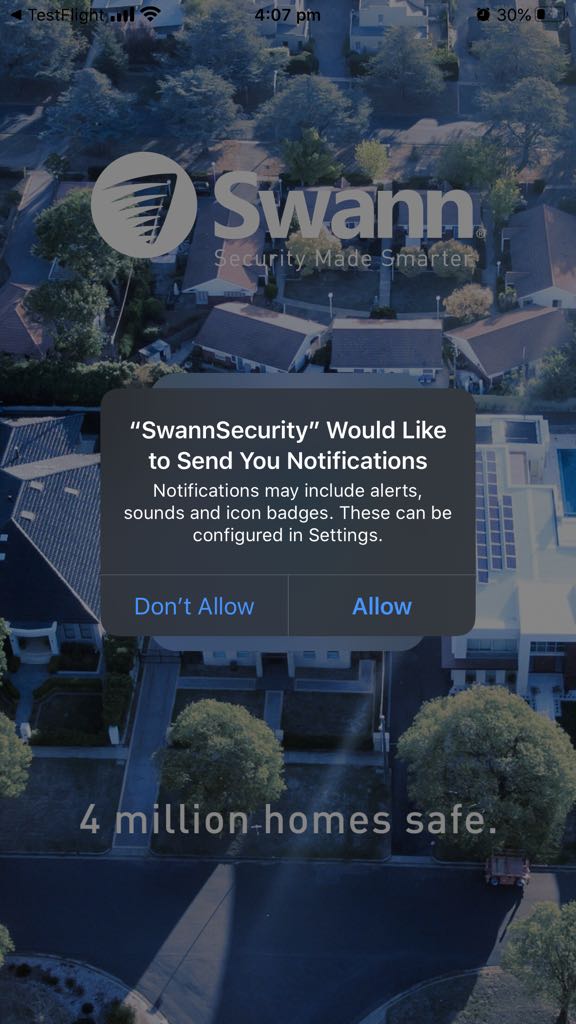 |
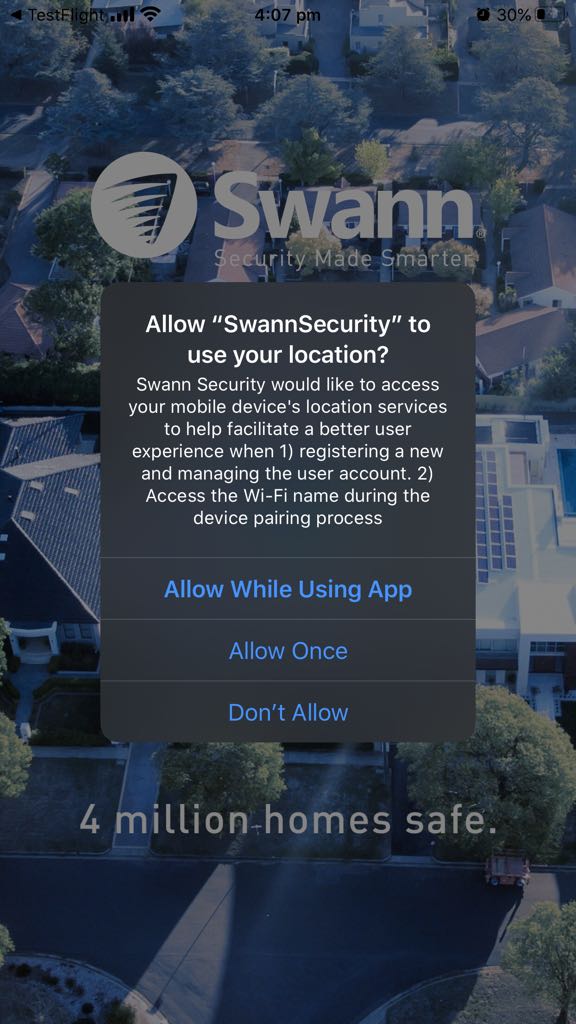 |
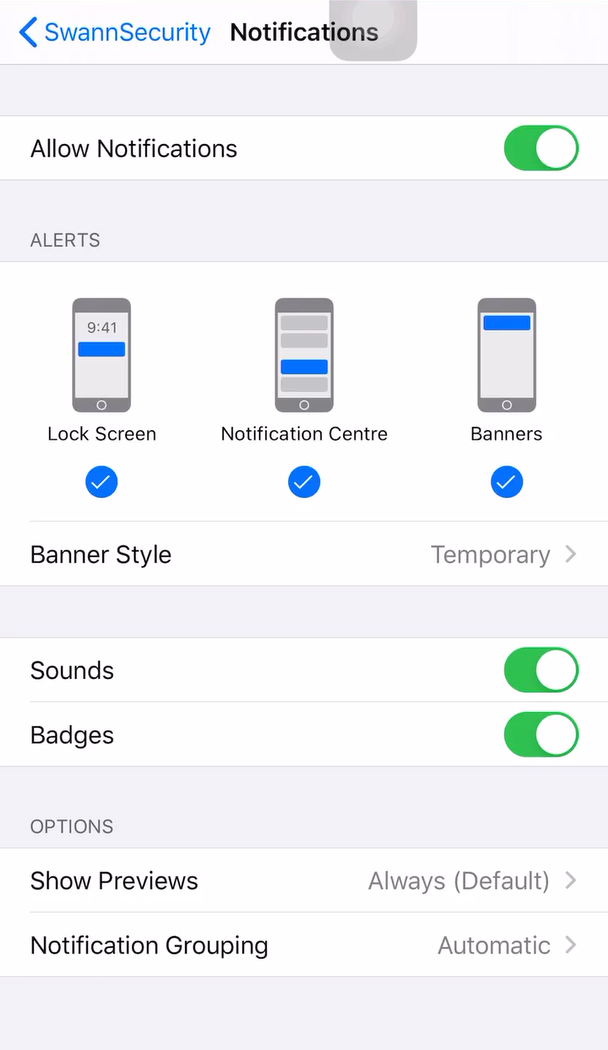
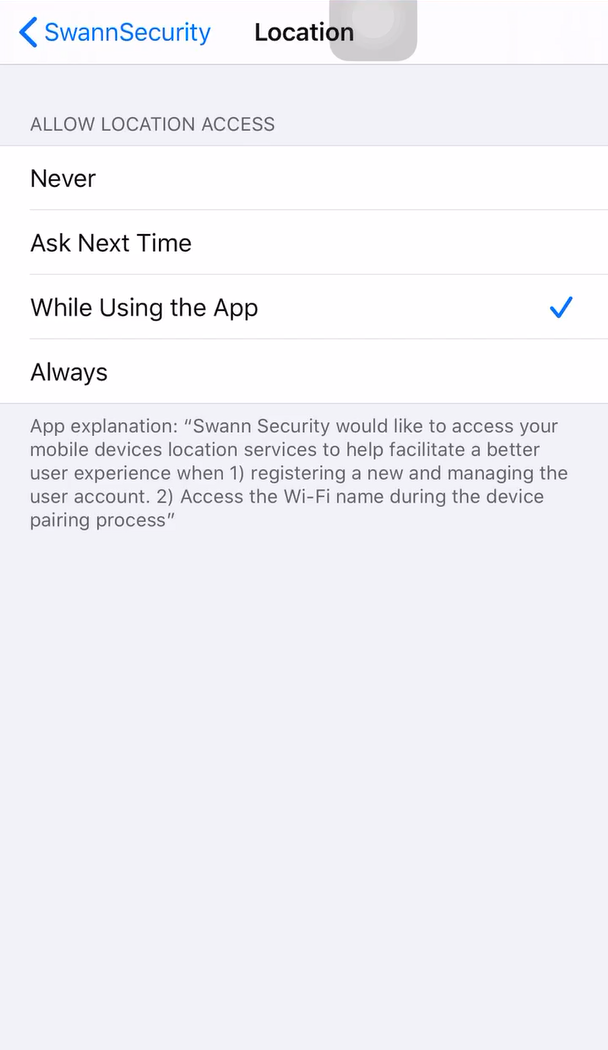
Check the instruction below if you chose Don’t Allow on the initial setup:
Phone Settings
- Go to Settings on your phone and select Swann Security.
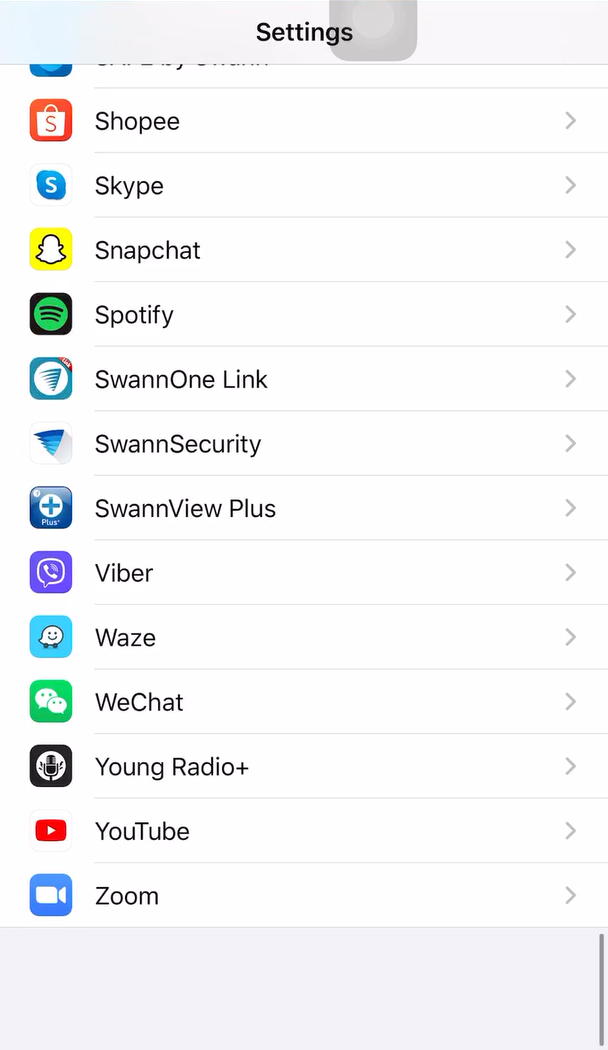
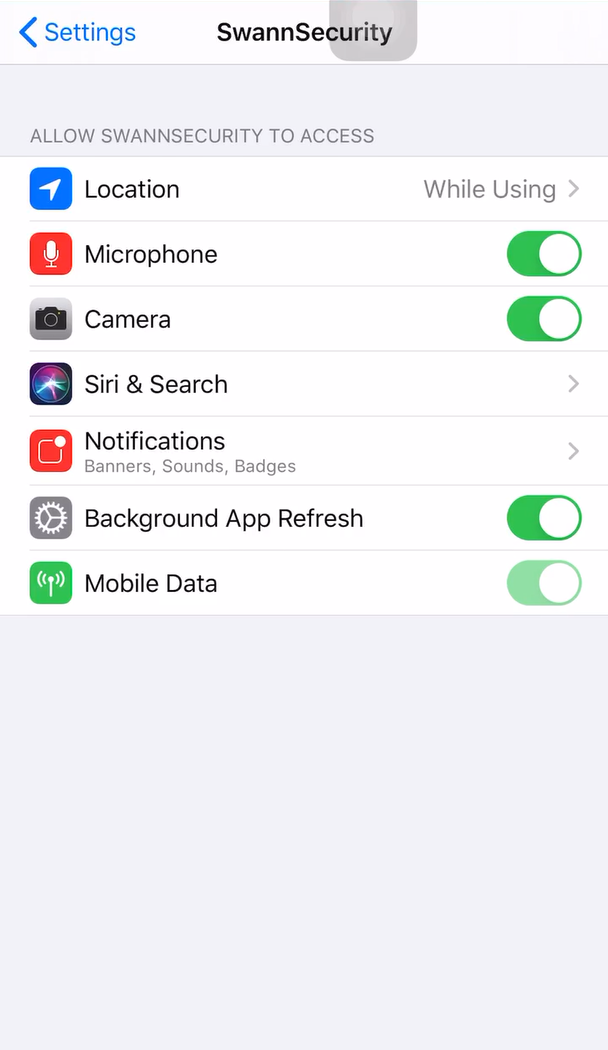
- Enable Notification and Location – as for Location, choosing either Always or While using the app works fine.
App Settings
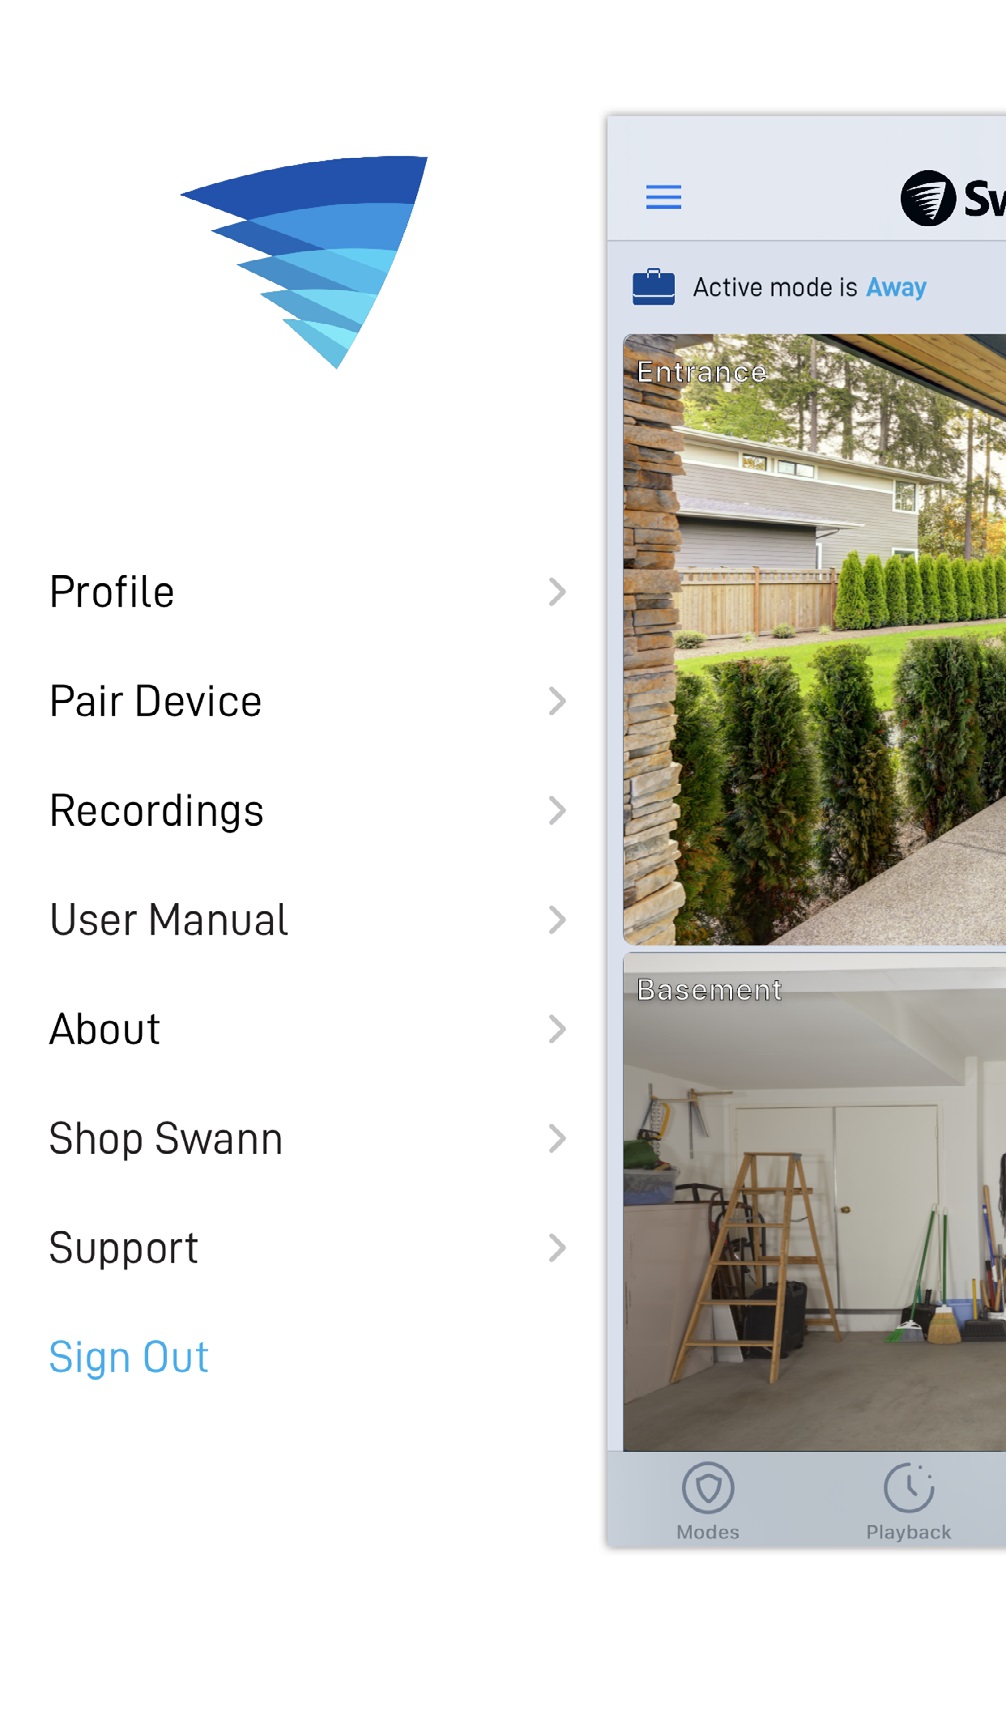
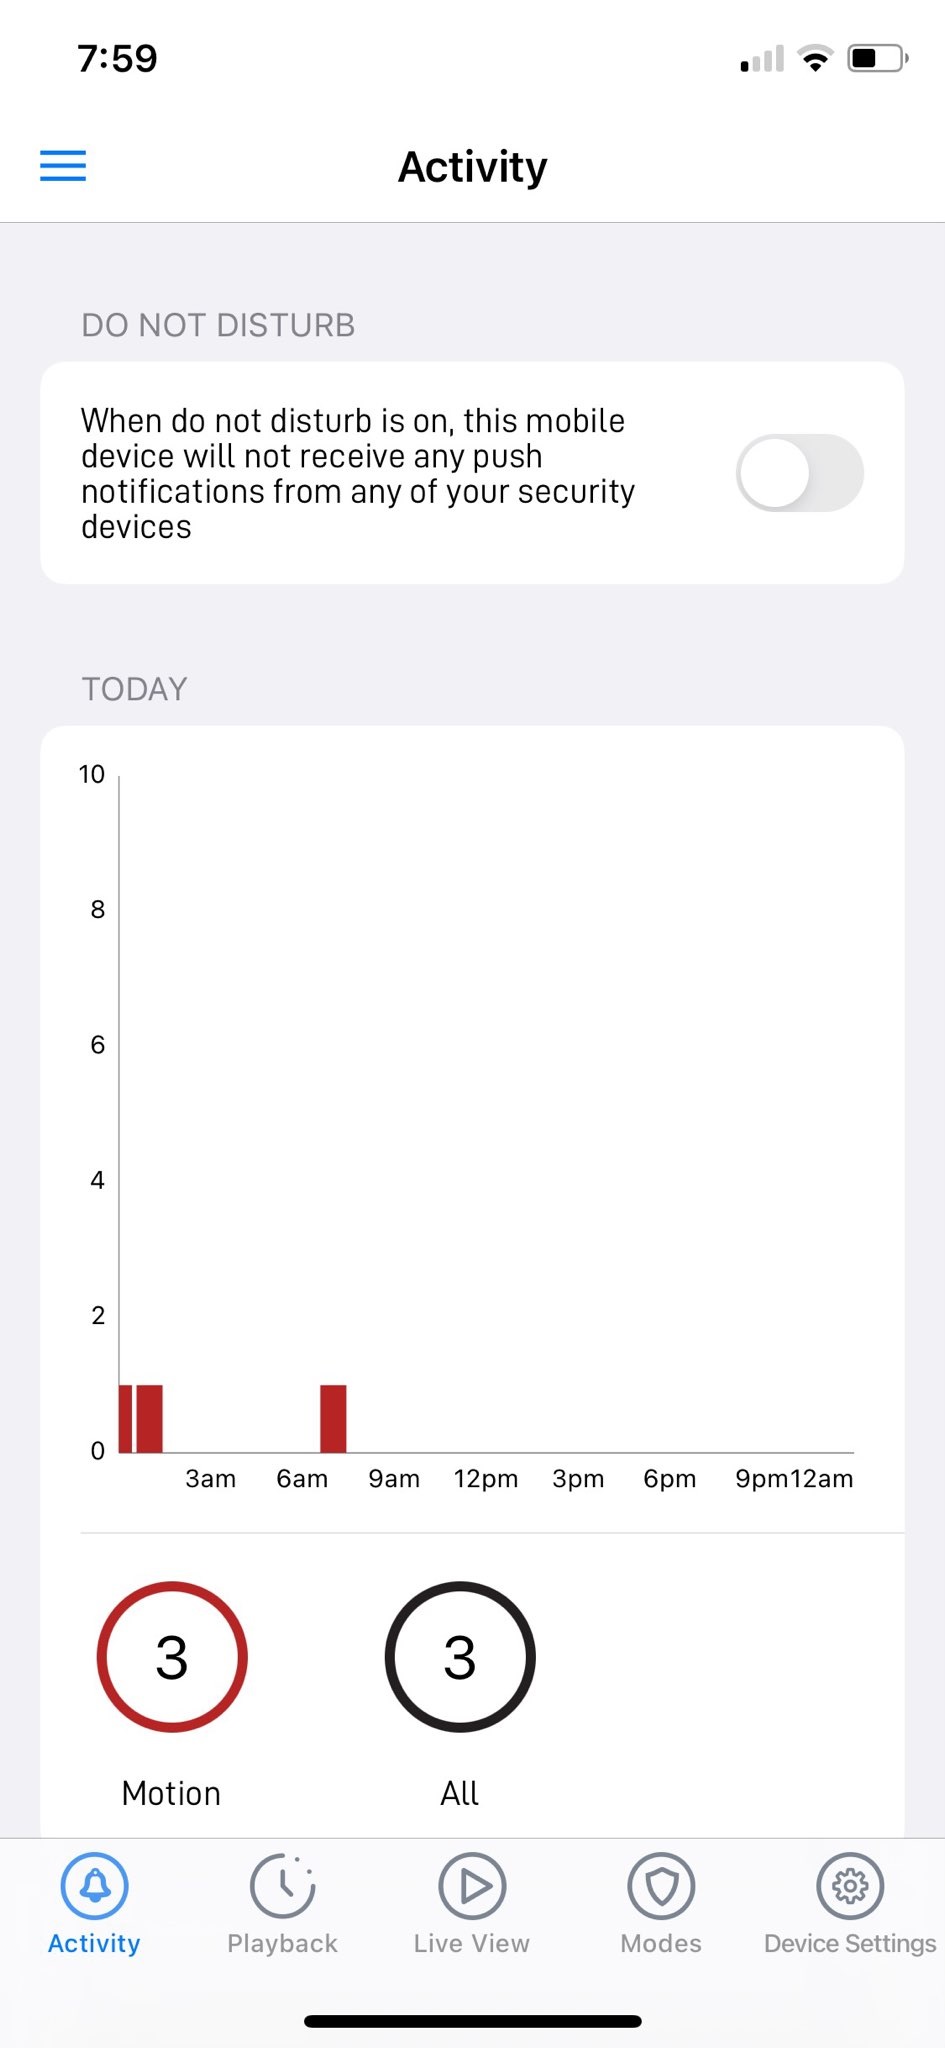
This applies to Swann Security only; go to the Menu then select Notification. Make sure it is enabled.
 |
 |
Recorder Settings
For recorders compatible to Swann Security, check this article: How to enable push notification on recorders with V8 firmware?
How to change the position of the Date and Time display bar on my DVR
You can adjust the position of the OSD from the menu display of the DVR. It has to be done directly from the DVR, using the monitor that is connected either to its VGA or HDMI output.
You simply open the menu of the DVR, go in the menu display, and then, from the camera tab, click on SET next to the OSD Display Position.

Afterward, with the mouse connected to the DVR, left click on the date and time display , hold down the button and drag the display wherever you wish .
The position chosen for the Date and Time Display will be reflected on the live view on your computer screen, should you access the DVR through the Network Interface ( and also on the recorded videos if you have enabled record date from the Display menu of the DVR ).
How do I improve my remote viewing performance?
If you’re experiencing any intermittent connectivity issues when streaming or playing back videos from your recorder, on either the computer software or phone app, then the problem may be related to a limitation with your internet connection speed.
It is important to consider the amount of bandwidth needed when viewing your cameras remotely.
Increasing the video quality of the stream also increases the amount of data needed to upload the video onto your phone or computer.
You can use this article to help you check your speed before continuing to adjust your settings.
The diagram below summarizes the data transfer process of when a video is being uploaded to the server and then downloaded onto the user’s phone.
- The recorded video is encrypted and uploaded onto the server (internet)
- The file is then downloaded onto the computer or phone.
This is why the download and upload rate is important when streaming videos from a remote location. The higher the quality of the recordings, the more data is needed to be upload onto the server.
There are a couple of things you can change on the recorder to help improve the streaming service.
- Reduce the streaming quality, on the phone.
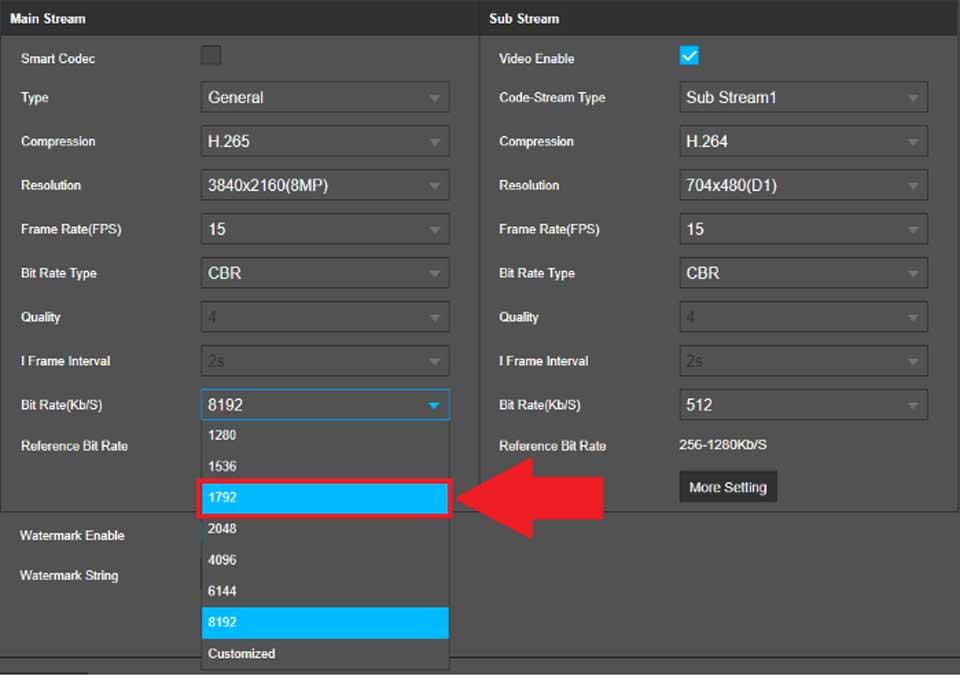
- Reduce the sub-stream resolution and bitrate, on the recorder.
See instructions below.
Stream on Fluent
This step is necessary for us to use lower bandwidth when streaming the cameras.
You may want to keep in mind that the quality will be lower than expected to lessen intermittent connections and get a smoother experience when viewing the cameras.
These are the things you can do using the software or app.
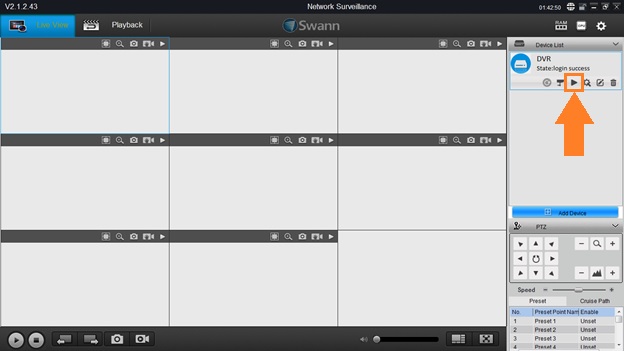
- If you are accessing the recorder using SwannView Link software, click the Play button at the right and choose All channels fluent.
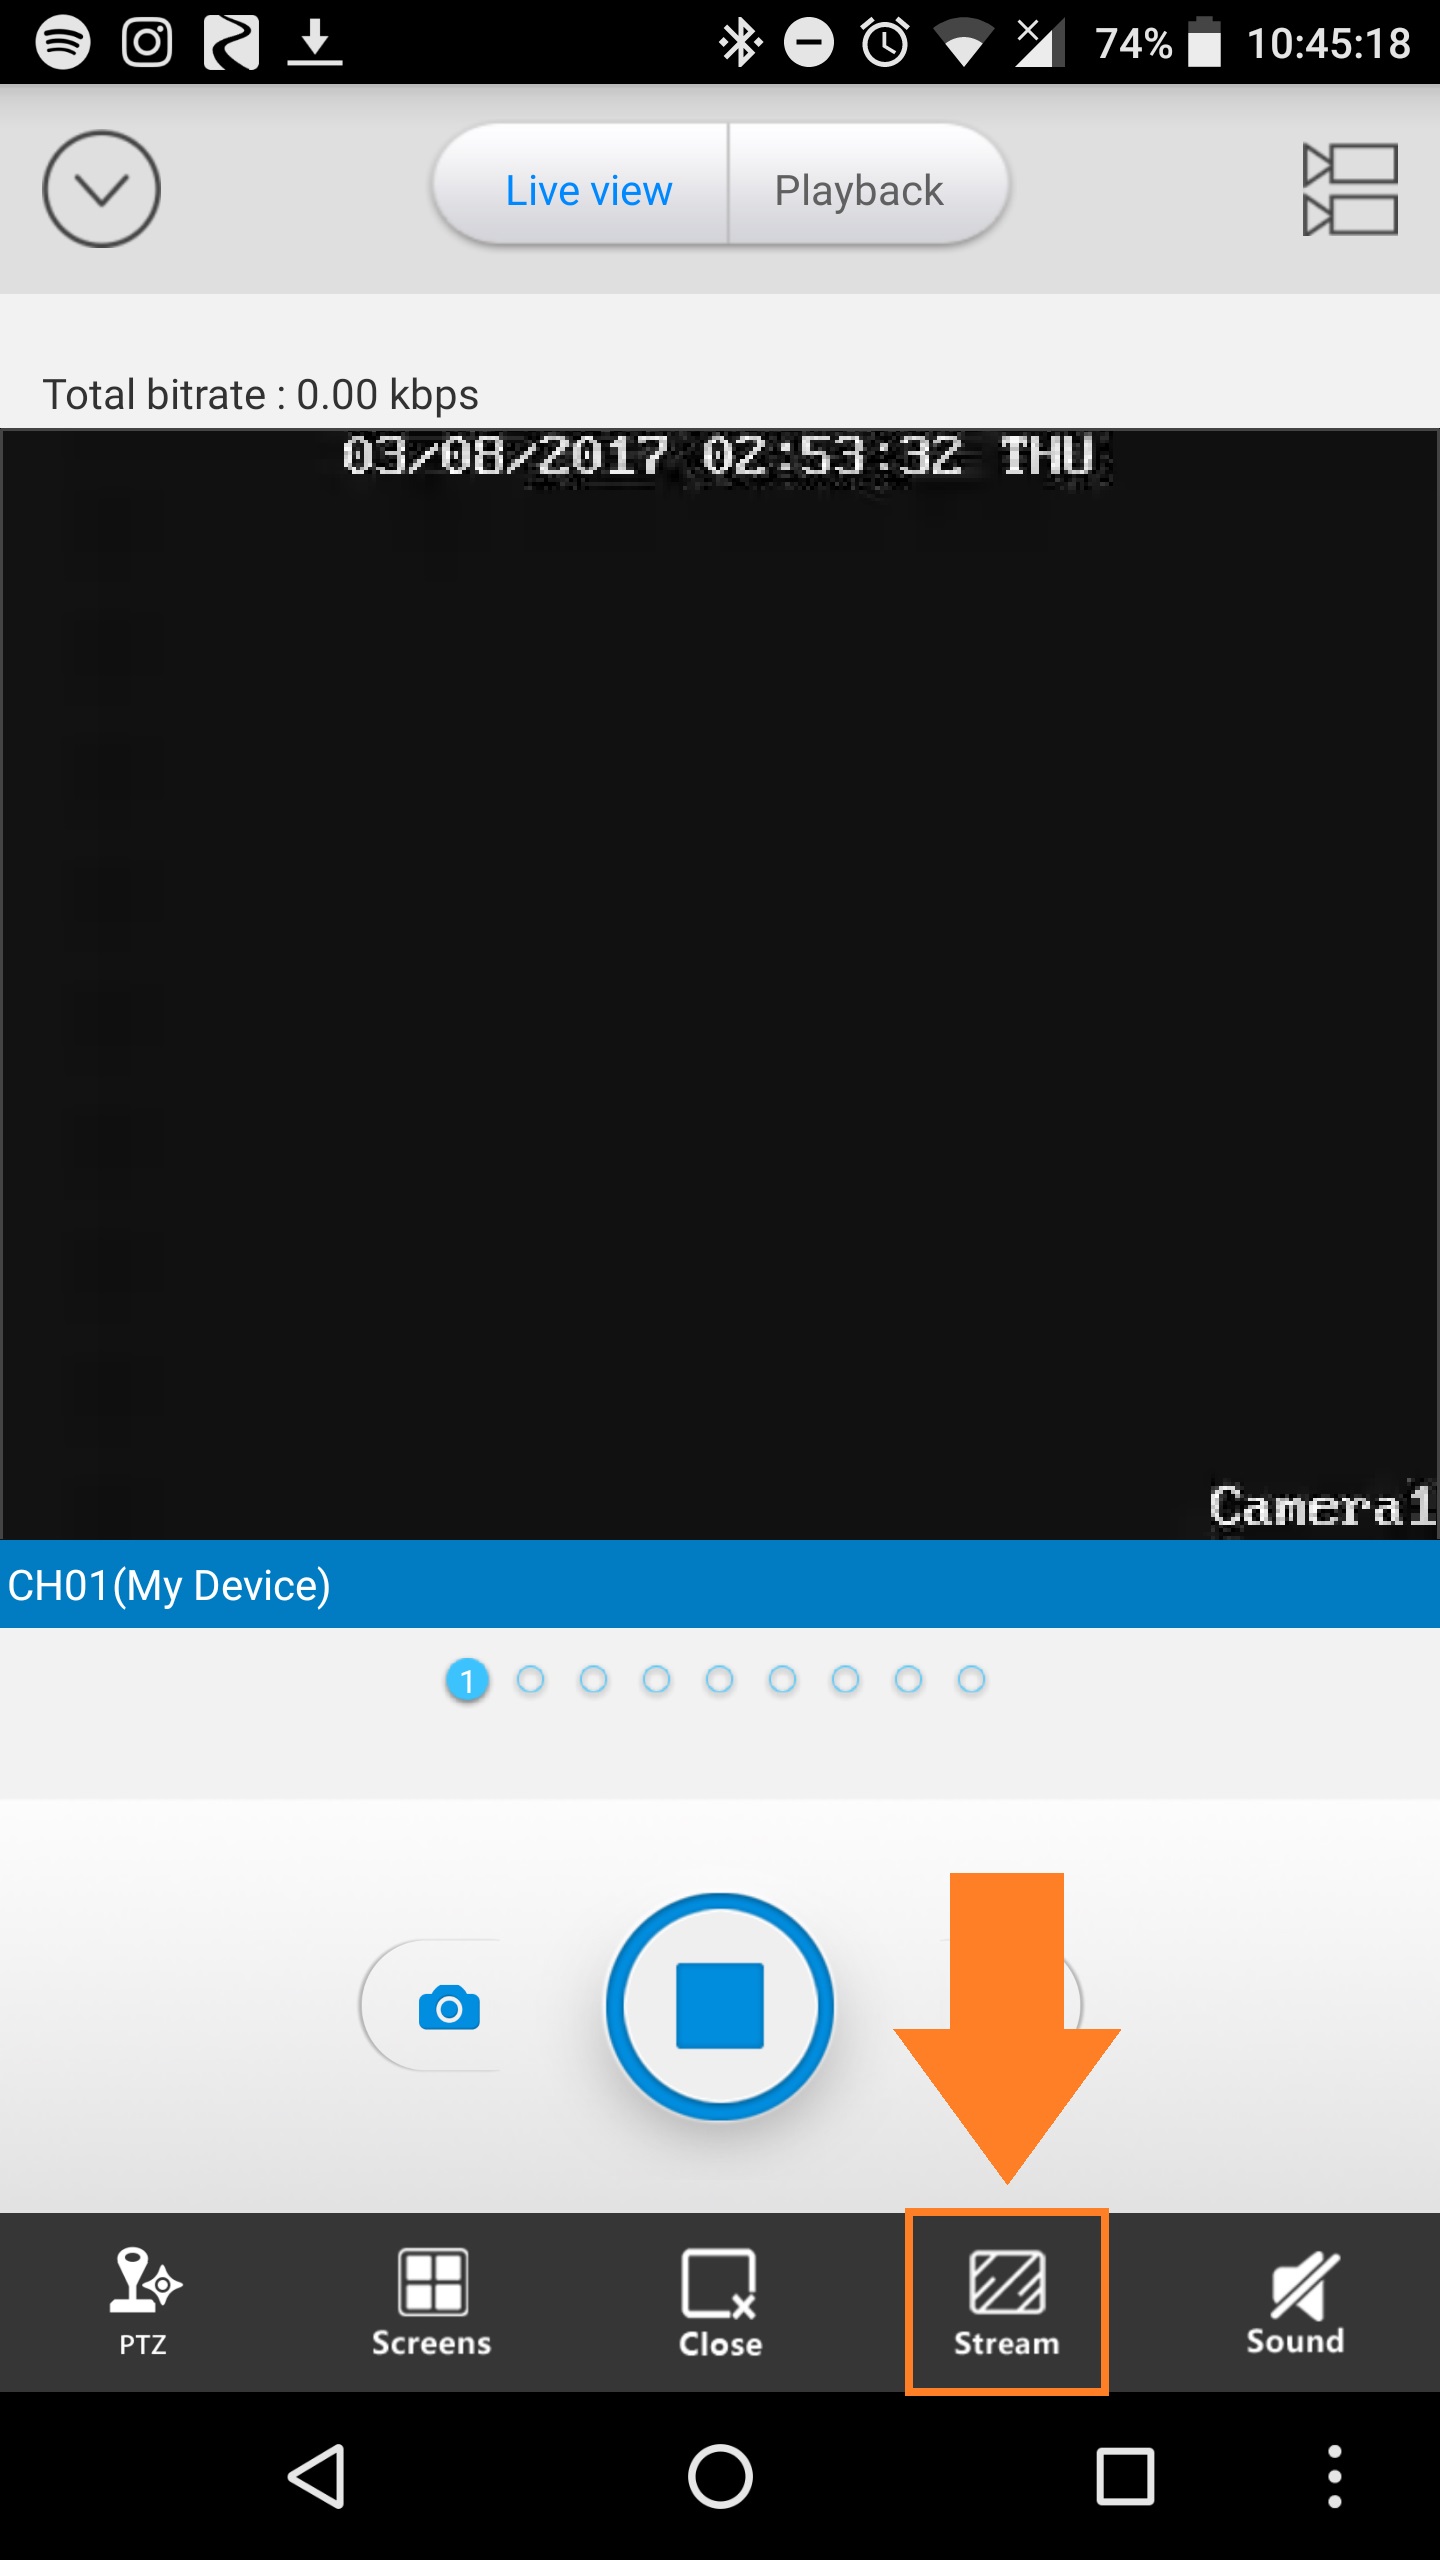
- If you are using SwannView Link app, tap Stream and choose Fluent.
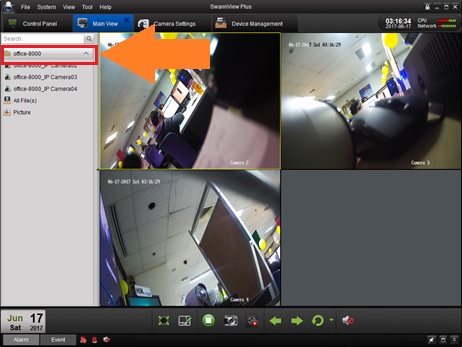
- If you are accessing the recorder using SwannView Plus software, right-click on the recorder at the left side and choose Set Sub-Stream To All.
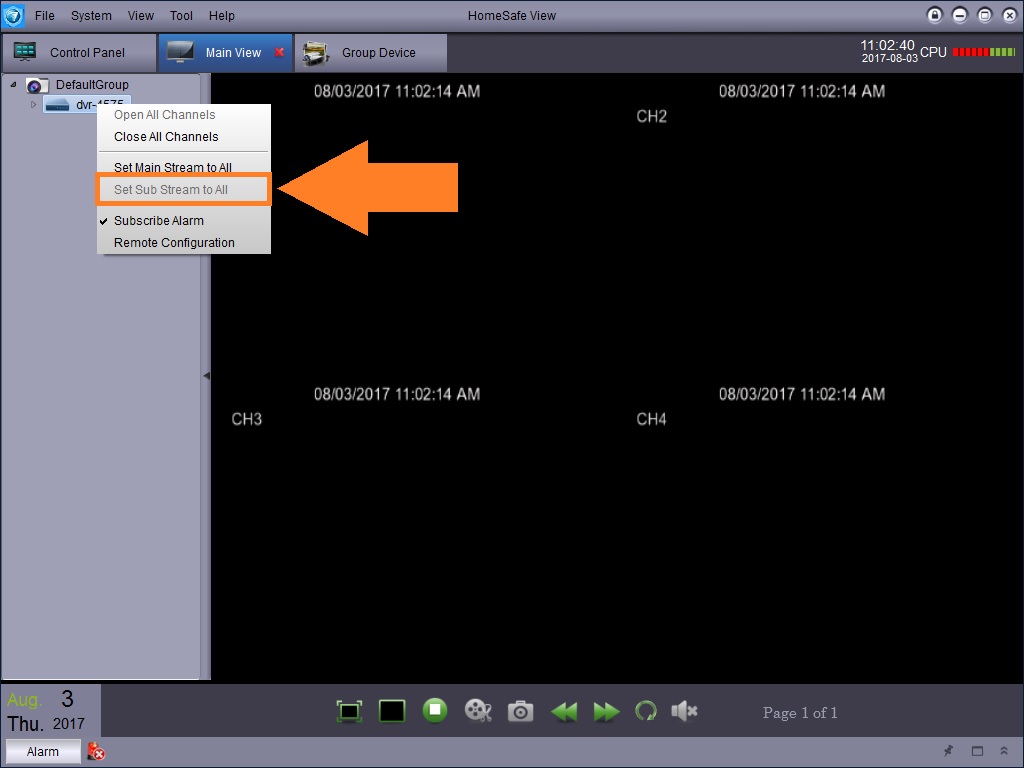
- If you are accessing the recorder using HomeSafe View software, right click on your recorder at the left, and choose Set Sub Stream to All.
- If you are accessing the recorder using HomeSafe View app, tap on the Stream icon and choose Substream.
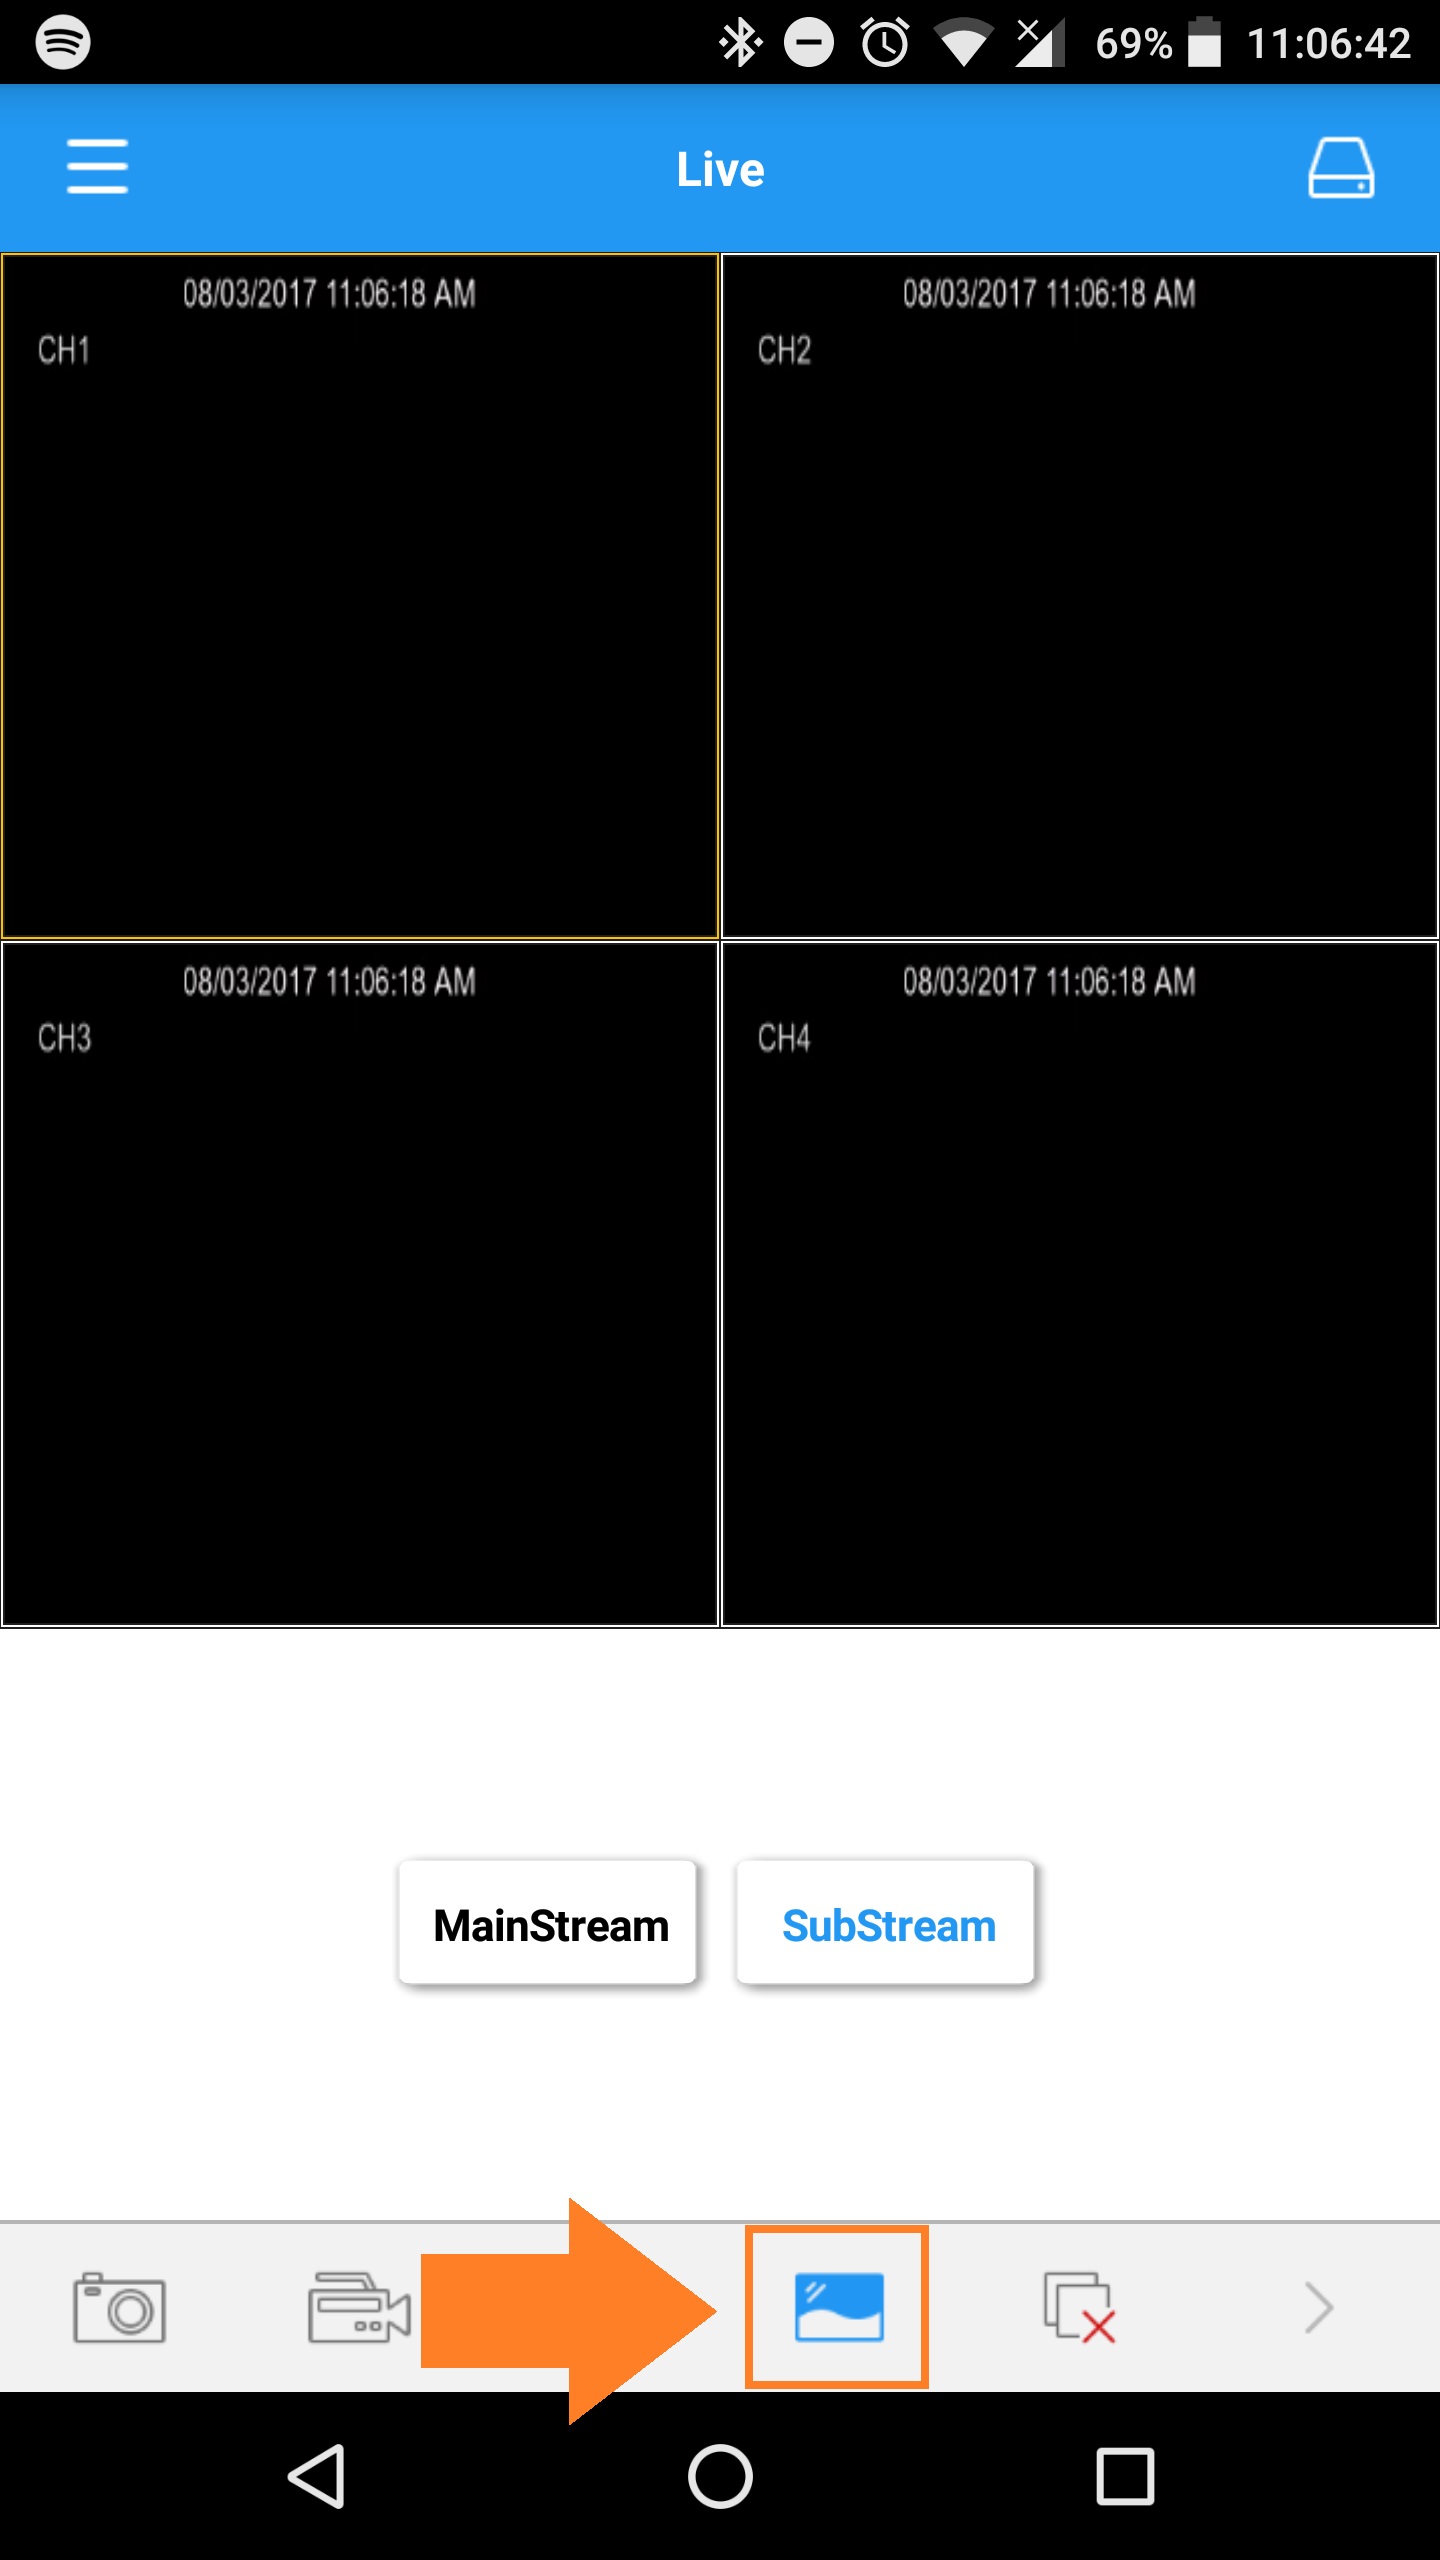
Changing substream resolution and bitrate
If the previous steps didn’t help, here is another thing we can do and that is changing the resolution and lowering the substream bitrate. Once again, you will see difference in quality after doing this step.
For SwannView Link users
- Go to your NVR and access the Menu.
- Proceed to RECORDING > Encode.
- Change the Encoding Parameters to Substream for us to deal with just Substream settings.
- Change the resolution to CIF.
- Set the bitrate to the 128kbps.
- Click Copy To and select all channels to copy the settings.
- Click on Apply to save the settings.
For SwannView Plus users
- Go to your NVR and access the Menu.
- Proceed to RECORD > Parameters > Substream for us to deal with just Substream settings.
- Change the resolution to CIF.
- Set the Video Quality to the 128kbps.
- Click on Apply to save the settings.
- Click Copy To and select all channels to copy the settings.
- Click on Apply to save the settings.
For HomeSafe View users
- Go to your NVR and access the Menu.
- Proceed to RECORD > Substream for us to deal with just Substream settings. Be sure the Channel selected is CH1.
- Change the resolution to 352×240 or 352×288.
- Set the Video Quality to the 128kbps.
- On the Copy section below, first selection should be CH1 and second selection should be All. Click Copy to copy the settings to all channels.
- Click on Save to save the settings.
Repeat the steps 1 to 6 but on step 2, proceed to RECORD > MobileStream.
The idea of this procedure is to set each camera to use 128kbps when streaming on substream or fluent.
This also means that if you have:
- 2x cameras – recommended upload speed of your internet connection is 256kbps
- 4x cameras – recommended upload speed of your internet connection is 512kbps
- 8x cameras – recommended upload speed of your internet connection is 1Mbps
General Port Forwarding Guide
The first step to port forwarding is to determine which ports you need to open. You should able to tell by reading the documentation that applies to your Swann product, or by simply having a look through the network configuration menu of your Swann system.
Our systems will use, by default, one or more of the following ports:
80
85
554
8000
9000
18004
The next step is to open those ports. In order to have a port forwarding setup that will keep working, it is important to ensure that the IP address of the DVR inside your Network will remain fixed so that the port forwarding rules are not invalidated.
You can either set a static IP address (Static LAN IP) on the DVR instead of relying on the Dynamic Host Configuration Protocol (DHCP) of your router or, if your router permits it, you can reserve a LAN-IP address for the DVR through the settings of your router. Some routers call it a Static IP allocation, some call it an IP reservation.
If you know how to set up a Static IP address on your recorder or if you have already successfully done so, please go ahead directly to the port forwarding step.
A simple way to set up a Static IP address on the recorder is to look at the network information that your router has given to the recorder and then modify it slightly. You will find that in the network configuration menu of your recorder.
1) Take note of the IP address (IPv4) of the DVR when it is on DHCP mode.
2) Take note of the Gateway address (this is the address of your router on the network).
You will notice that there are 4 sets of up to 3 digits per address, separated by 3 dots.
The 3 first sets of digits for the IP address (IPv4) and the gateway are the same. Only the last set of digits is different. It is important that it remains so.
When you choose your Static IP for the DVR, keep the same 3 first sets of digits the same as they were when on DHCP mode. Then choose a number between 200 and 254 for the last set of digits of the IP address. This should in most circumstances ensure that you are not going to create an IP conflict later since it will almost certainly be outside the DHCP pool that the router uses when it automatically assigns addresses to other devices connected to your network.
Keep the Gateway address the same as it was when on DHCP mode. This is basically the address of your router, and we need to preserve this if you want to connect to the DVR from outside the network.
Keep the Subnet Mask exactly as it was on DHCP as well.
The preferred DNS (DNS1 or primary DNS) should be the same as the gateway address.
We normally suggest to set the alternate DNS (DNS2) as 8.8.8.8 (008.008.008.008).
This is a DNS server provided by Google as a free public DNS. This will ensure that your DVR can communicate with the Internet Addresses optimally.
Port Forwarding:
Now that the DVR has a LAN IP that is configured to remain constant, it is time to access the router and to set forwarding rules on it. The ports will be forwarded to the LAN IP address of the DVR.
You should already have the address to access your router through your browser. It is basically the gateway address that you have found on the DVR.
Type that address in the address bar of your Browser and this should bring the login page of your router.
You should know the credentials to access your own router. If you do not, it is possible that it is recorded on a label on the router. If you cannot find your router credentials, contact your router supplier.
All routers are different, so it’s near impossible to include in one single guide how port forwarding is done on thousands of different routers. You should refer to the documentation that came with your router for the exact method for port forwarding on your particular router.
If you are unable to find the instructions for your router, or you are unable to configure the ports, please contact your router supplier for more information.
After having applied the port forwarding rules on your router, you should check that the ports have been correctly opened.
To see if your ports are already open, we advise you to visit a website such as www.canyouseeme.org from a computer that is connected to the same network as your recorder.
You can use the port checker tool of that site to check whether or not your ports are open.
The IP address displayed on this website is the one provided to your router by your Internet Service Provider (WAN IP).
Upon clicking test port, it will either say ‘success’ or will inform you that the tested port is not yet accessible.
If your ports are already open, you can skip a bit of text and go straight to the remote access section.
If the ports are still closed, keep in mind that many routers need to be restarted before new settings start working. Many router have a restart or reboot button in their maintenance or system page. If you cannot find it you can switch it off and switch it back on . Most routers have a on/off switch. If yours do, it is best to use it. Otherwise, you might want to resort to unplugging its power cord and then reconnecting it a few seconds later.
Give it a few minutes to restart and then test once more whether the ports are opened.
If the ports are still closed, then you may have a complex network configuration, and you will need to contact your router supplier for support.
Remote Access:
Once all the ports are open, you should already be able to access the DVR remotely .
However, keep in mind that many Internet Providers give their customer a Dynamic IP address.
This means that your IP address might sometime change , sometimes sooner than later.
If your Public IP is a dynamic IP or If you are unsure whether your Public IP is static or dynamic, we advise to set up a DDNS address first. Go straight to the DDNS setup section.
If your know that your Public IP address is Static (you may want to call your ISP to verify) then you are ready to access the System remotely.
Computer access with a browser:
If your Swann Product has a Web port or a HTTP port, you should be able to access it remotely through your Web Browser with an address in the following format:
The Public IP is the IP address given to your Internet Connection by your Internet Service Provider.
You can see that address on that status page of your Router or you can also see it from sites such as www.canyouseeme.org or www.whatismyip.com if you access the site from a computer connected to the same router as the Swann recorder.
For example, if the http port number is 85 and the Public IP is 99.99.99.99, you could access your system through a browser with that address: http://99.99.99.99:85
(Note that Internet Explorer may be the only browser supported depending on the product that you have)
Computer Access with the software:
To access the Swann Product with the computer software that would have come with your product (if there was any), you will typically need to use the server port which more often than anything will either be 8000 or 9000.
For example, if the server port is 9000, you would put the following in the login screen of the software:
Address: 99.99.99.99
Port: 9000
user: admin (by default)
password : the admin password of the recorder
Computer Access with a smartphone app:
Most of our Swann systems have mobile access capability. Some of the older models are not equipped with this feature, or support phones that are no longer current.
First you must ensure that your Swann system supports mobile access and if so, which app you need to use.
You also need to know what port you will need to use.
See from the documentation whether you need to use the server port or a special mobile port such as 18004 on some systems.
Typically the port to use for mobile access is either 8000 or 9000.
Only on rare instance would you be able to use a web port to access the Swann device with a mobile app.
You will typically enter the following information in the device setting page of the app.
Device Name : choose_any_name_you_like
Address/ Host /Server: Address: 99.99.99.99
Port: 9000
user: admin (by default)
password : the admin password of the recorder
Channels: number of channels on your recorder (this is sometimes not entered, but automatic after saving the information)
DDNS Setup
If the IP is to change and you then do not know what new IP address the Network Infrastructure of your ISP has assigned your Internet connection, then you will then be unable to access your system remotely until you find out what new address you have. Again, you could find the new address from websites such as www.canyouseeme.org or www.whatismyip.com but this is not best way to go . If you have a Dynamic IP address, we recommend you to set up a DDNS Domain Name. Both the Domain Name and the Public IP address are considered to be an Internet address. While the principles of DDNS are quite complex, one can make use of it quite easily. It is hardly more complex than browsing the World Wide Web from your personal computer everyday.
You can make it so your Public IP address has a domain name linked to it. The DDNS services provided by www.dyn.com are easy to use, inexpensive and are widely supported by a number of routers. Please visit their site for more information on setting up a DDNS account.
How to access the System Remotely with a DDNS address :
Computer access with a browser:
(Internet Explorer may be the only browser supported depending on which product you have.)
If your Swann Product has a Web port or a HTTP port, you should be able to access it remotely through your Web Browser with an address using the following format:
http://<dyn.com hostname>:webportnumber or http://<dyn.com hostname>:httpportnumber
for example, if the http port number is 85 and the domain(host) name is mydvr.dvrdns.org, you could access your system through a browser with the URL: http://mydvr.dvrdns.org:85
Computer Access with the software:
To access the Swann Product with the computer software that would have come with your product (if any), you will typically need to use the server port which more often than anything will either be 8000 or 9000.
For example, if the server port is 9000 and your domain(host) is mydvr.dvrdns.org, you would put the following in the login screen of the software:
Address: mydvr.dvrdns.org
Port: 9000
user: admin (by default)
password : the admin password of the recorder
Computer Access with a smartphone app:
Most of our Swann systems have mobile access capability in addition to access from a PC, however, some of the older systems don’t provide this feature with current handsets.
First you must ensure that your Swann system supports mobile access and if so, which app you need to use. You also need to know what port you will need to use.
Check the system’s documentation to determine if you need to use the server port or a special mobile port such as 18004 on some systems.
Typically the port to use for mobile access is either 8000 or 9000.
You will typically enter the following information in the device setting page of the app .
Device Name : choose_any_name_you_like
Address/ Host /Server: Address: mydvr.dvrdns.org
Port: 9000
user: admin ( by default )
password : the admin password of the recorder
Channels: number of channels on your recorder (this setting can be automatic depending on the device)




Add Comment