How to record for Motion Detection:
1. Go to Main Menu Setting Storage Schedule. In schedule option you will have to select MD option to set motion detection recordings. As given in the below figures.
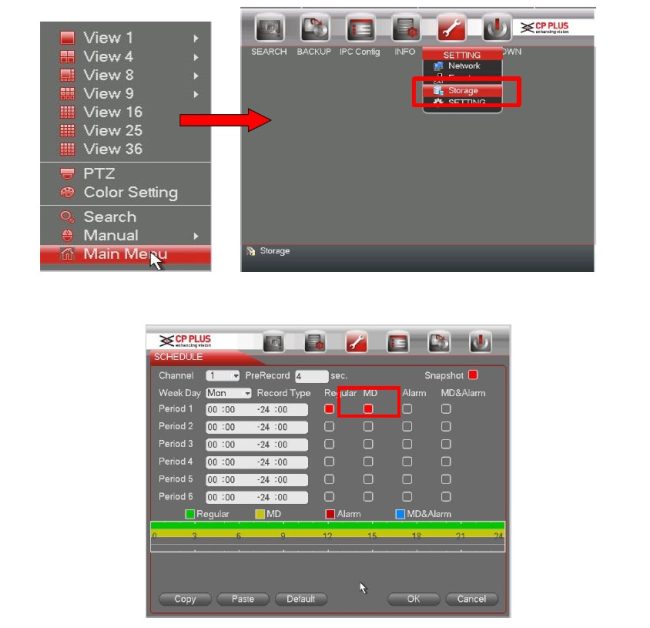
Lines in timeline of schedule option which have yellow colour indicate the motion detection schedule.
After you create schedule for MD recording. Then
Go to Main Menum Settings Events Motion Detection.
Detection menu is shown below Figure
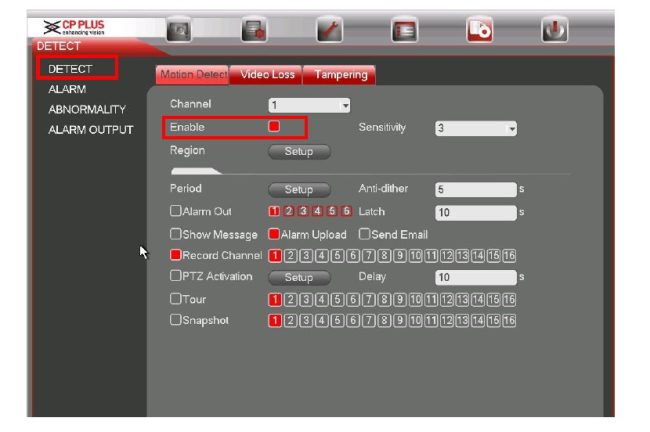
• Event type: From the dropdown list you can select motion detection type.
• Channel: Select a channel from the dropdown list to set motion detect function.
• Enable: Check the box here to enable motion detect function.
• Region: Click select button, the interface. Here you can set motion detection zone.
• Sensitivity: System supports 6 levels. The sixth level has the highest sensitivity.
• Period: Click set button. Here you can set motion detect period. System only enables motion detect operation in the specified periods.
• Anti-dither: System only memorizes one event during the anti-dither period. The value ranges from 5s to 600s.
• Alarm output: when an alarm occurs, system enables peripheral alarm devices.
• Latch: when motion detection complete, system auto delays detecting for a specified time. The value ranges from 1-300(Unit: second)
• Show message: System can pop up a message to alarm you in the local host screen if you enabled this function.
• Alarm upload: System can upload the alarm signal to the network (including alarm centre) if you enabled current function.
• Send email: System can send out email to alert you when alarm occurs.
• Record channel: System auto activates motion detection channel(s) to record once an alarm occurs. Please make sure you have set MD record in Schedule interface (Main Menu- >Setting->Schedule)
PTZ activation: Here you can set PTZ movement when an alarm occurs. Such as go to preset, tour &pattern when there is an alarm. Click “select” button.
• Record Delay: System can delay the record for specified time after alarm ended. The value ranges from 10s to 300s.
• Tour: Here you can enable tour function when alarm occurs. System one-window tour
• Snapshot: You can enable this function to snapshot image when a motion detect alarm occurs.
• Buzzer: Highlight the icon to enable this function. The buzzer beeps when alarm occurs.
• Test: Click it to test current motion detect setup (do not need to save). Click Select button after
Region, you can set motion detect area. The default setup is whole region. The blue zones are the selected area. Please set sensitivity and click Test button, you can see system only display motion detects status of the blue area. The red flashing area is current motion detect.
Please highlight icon to select the corresponding function. After all the setups please click save button, system goes back to the previous menu.
Note:
In motion detection mode, you cannot use copy/paste to set channel setup since the video in each channel may not be the same






Can you write your contact number?
can you help me please
can you help me please
can you help me please
can you help me please
I sent an e-mail from the communication channel. Can you help?
please provide support for me i leave my email address
I really love you
hi how can i do
Can you write your contact number?