For our new T900A DVRs/ H.265 NVRs, below are some basic instructions on how to download a video clip to a USB Flash drive connected to your DVR.
1. From the Live View screen, move your mouse cursor to the bottom of the screen to bring up the menu bar. Click on the Start button on the bottom left and then click on Playback.
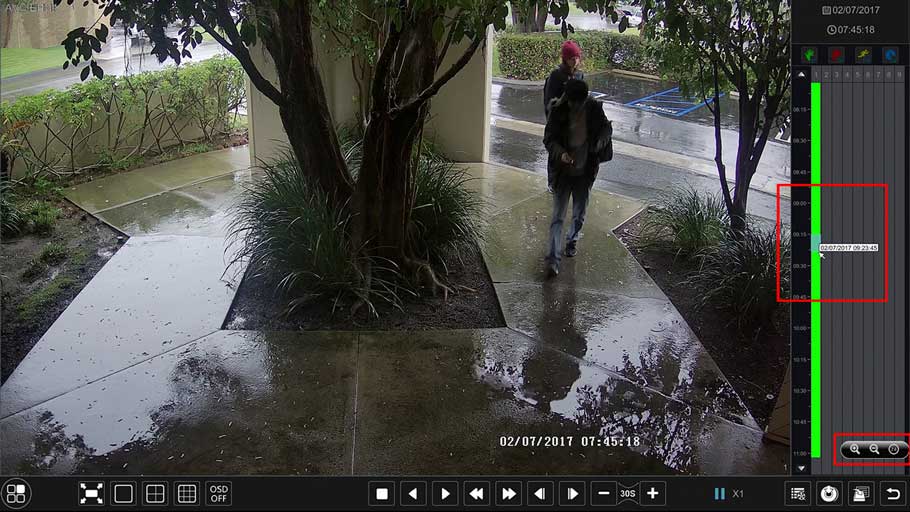
2. Within the Playback menu, you will see a vertical timeline from 12:00 am of the current day you are on until 12:00 pm of the same day. By default, our T900A/H.265 NVR systems will record in a constant recording (24/7) mode, so you should see the timeline filled in green. At the top of the timeline column, you will see 4 buttons. Each one is selected by default when you enter the Playback screen, but you can choose to view only certain types of recordings such as Constant, Alarm based, Motion based and Scheduled. To select any of those to exclude or include, you must stop all clips that are playing first and then either check or uncheck the boxes for the type of recordings you want to show.
3. Above the timeline section of the column, you will see the current date displayed. If you want to choose a different date, click on the date and a calendar should appear. Any dates you see filled in with a blue color will be dates that have at least some recorded footage on them. Choose the date you want to review footage from and click on the OK button.
4. Normally, the easiest way to pull a clip is to just click and drag using the left mouse button and you can select a period of time that way. If you need to find a clip at an exact moment in time on the date you selected, you can click on the time listed under the date and this menu will appear. From here, click on the exact time you would like and then hit the OK button.
5. Clicking anywhere in the timeline for the date selected will start playing the video so that you can immediately review footage.
6. After reviewing footage and finding a possible clip of interest, you can simply click and hold the left mouse button over the timeline for a certain camera and then drag up or down to select a period of time. Once you let go of the mouse button, the system will keep that period of time marked with a blue color as seen above. You can use the zoom buttons to zoom into the timeline to have more accurate control of the clip time period.
7. Once you have selected a time period you want to backup/save to a USB flash drive, you can either right-click with the mouse on the area selected in blue, or click on the Backup button (A), which will bring up the Backup window (B). You should see the Start and End time, duration and data size for the clip you selected. When you are ready to save the clip, click on the Backup button (C).
8. After clicking on the Backup button, the Record Backup window will appear. If you have already inserted a USB flash drive, you will see it listed in the Device Name field. If you have not inserted a USB flash drive yet, insert it and click on the Refresh button, which will instruct the DVR/NVR to re-scan for connected USB flash drives.
9. Once a working USB flash drive has been inserted and scanned, you should see a listen of any files on it as well as a listing of free space available. If you would like to create a new folder to place the video clips in, you can click on the New Folder button.
10. If you chose to create a new folder and clicked on the New Folder button, you will see the New Folder window appear. In this window, you can enter in the name of the new folder you want to create and then when you are satisfied with the name you can click on the Add button.
11. Once you have found the folder that you want to save the video clip(s) to, confirm that from the Format drop-down menu, AVI is selected. This will save the files in the most compatible file format for playback on other computers. As a good measure, you can also download our codec back for these DVRs here. When you are ready to start the backup process, click on the Backup button.
12. The backup process will start in the background, but you can bring up the progress window by clicking on the Backup Status window on the bottom right of the display. From this window, you can see all backup processes lined up or currently in progress and you have the ability to pause or delete the backup. When you see the progress bar hit 100% for all backup processes, you can then safely remove the USB Flash drive connected to the DVR/NVR. When you are done with everything, you can click on the Close button to return back to the Live View.


It was a great sharing
please provide support for me i leave my email address
can you help me please
please provide support for me i leave my email address
hello nice sharing thanks
I can’t upload
can you help me please
It was a great sharing
hi how can i do
problem not solved thanks
hello nice sharing thanks
please provide support for me i leave my email address
problem not solved thanks
I can’t upload