Streaming IP cameras to YouTube is definitely one of the best ways to live stream events.
Also, it is efficient and secure:
You are able to go live on the popular video platform and get as many as people involved without giving them access to your security cameras.
So, how to set up IP camera live streaming on YouTube? Can you stream directly to YouTube or need an encoder instead?
Continue reading, check out the step-by-step guide below and live stream CCTV camera to YouTube on your own within minutes.
Let’s get going!
A Detailed Guide on How to Stream IP Cameras to YouTube
Still searching tutorials on how to stream your IP cameras to YouTube Live?
Now you’ve got one.
Follow the detailed guide below and get ready to go live in a breeze!
What You Need to Live Stream Security Cameras on YouTube
• An IP security camera or a security system with NVR that supports RTSP stream
• A verified YouTube account
• Broadband Internet with fast upload speed
• A computer (Windows, Mac or Linux)
• An encoder
Below we will take a Reolink RLC-410 security camera as an example.
Step 1. Make Sure Your IP Security Cameras Are Connected to Stable Network
To launch an IP security camera live stream on YouTube, you need to check if your IP cameras are connected to the stable network first, just the same as setting up security cameras for remote viewing.
Note that a stable network connection allows you to access your CCTV cameras via smartphones or PCs and watch video live feed smoothly.
If you have encountered network failures, check out this post to locate and solve the network issues.
Step 2. Build the RTSP/RTMP URL of Your IP Cameras
An RTSP or RTMP URL is required to live stream an IP camera to YouTube.
To construct a correct URL, it is best to consult the staff of your security camera brands about which mode your surveillance equipment supports and the detailed URL as well.
For example, Reolink IP cameras support RTSP stream and the URL is as follows:
Main stream: rtsp://(user name):(password)@(ip address):554/h264Preview_01_main
Sub stream: rtsp://(user name):(password)@(ip address):554/h264Preview_01_sub
So, you may check out the IP address of your security camera in Reolink App or Client first, which is 192.168.123.109 in our example.
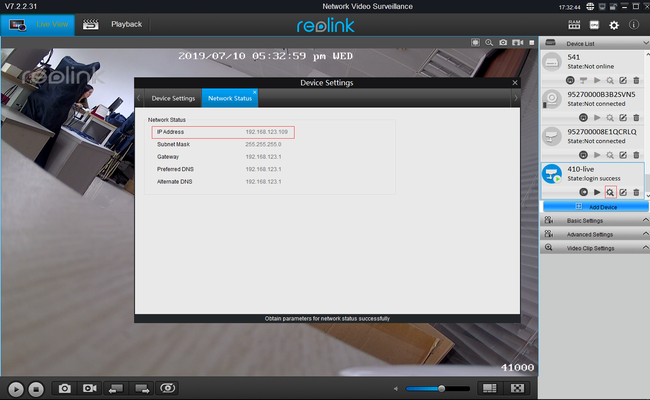
Combined with the username “admin” and password “111111”, then the RTSP URL will be:
Main Stream: rtsp://admin:111111@192.168.123.109:554/h264Preview_01_main
Sub Stream: rtsp://admin:111111@192.168.123.109:554/h264Preview_01_sub
Also note that this applies to a security camera system with NVR as well. By changing the figure at the end of the URL, you are able to live stream the IP camera connected to any other channels of your NVR.
To illustrate: Supposed that you want to stream the Channel 3 security camera on your NVR to YouTube, then the RTSP URL will be:
Main stream: rtsp://(user name):(password)@(ip address):554/h264Preview_03_main
Sub stream: rtsp://(user name):(password)@(ip address):554/h264Preview_03_sub
Editor’s Tip: To make the live streaming setup easier, it is best to copy and paste the stream URL in a notepad or any safe locations after building one.
Step 3. Verify Your YouTube Accounts & Obtain Stream Key
Before you are able to live stream an IP camera to YouTube, you need a verified YouTube account.
If you don’t have an account, go to the homepage of YouTube and click Sign In.
Supposed that you have an unverified account, navigate to YouTube verify screen and get your account verified.
Generally speaking, it takes 24 hours for the video platform to activate your account for live streaming.
Once activated, you are able to obtain the stream key and configure the streaming setup with the following steps:
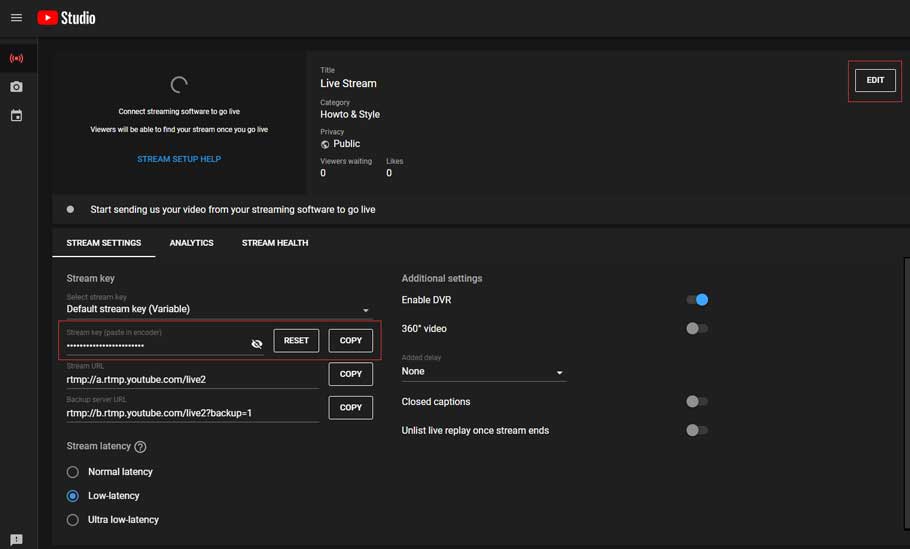
#1. Click Create button on top right menu –> Go Live. Choose to start streaming right now or later date with built-in webcam or streaming software. For Reolink cameras, you need to choose streaming software.
#2. Clcik EDIT to enter the title and description and change Privacy settings (private, unlisted or public).
#3. Scroll down and find the Stream Key in the Encoder Setup section. And the stream key is hidden in most cases. Click the eye button to see the key.
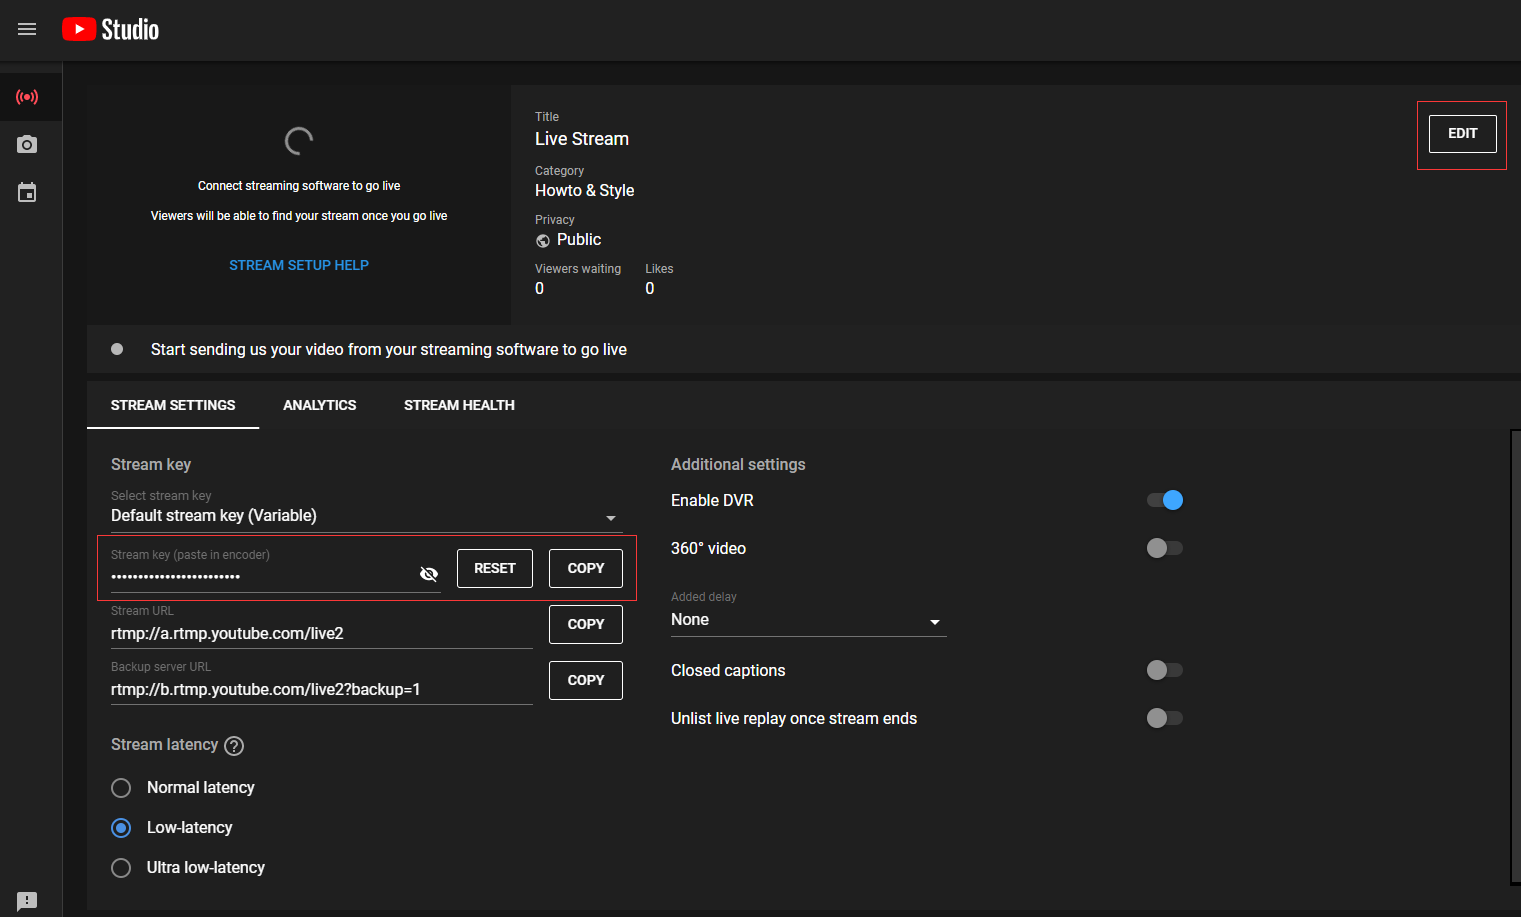
#4. Copy and paste the key to a notepad or any other safe location.
Editor’s Tip: Do not share it with someone you don’t know. Or else, others may take advantage of your account and live stream to your YouTube channel.
Step 4. Install & Set Up Encoders to Stream IP Cameras to YouTube
Important: Some security cameras that support RTMP push allow you to live stream IP cameras directly to YouTube without using any encoders. So, it is best to contact the staffs of your security camera brands and ask them whether an encoder is needed for YouTube live streaming.
YouTube has made up a list of several reliable encoders and we will take Open Broadcast Software (OBS), a free and open source, as our example.
#1. Download OBS to your PCs or laptops.
#2. Open the program and click + –> Media Source in the Source section to add video source.
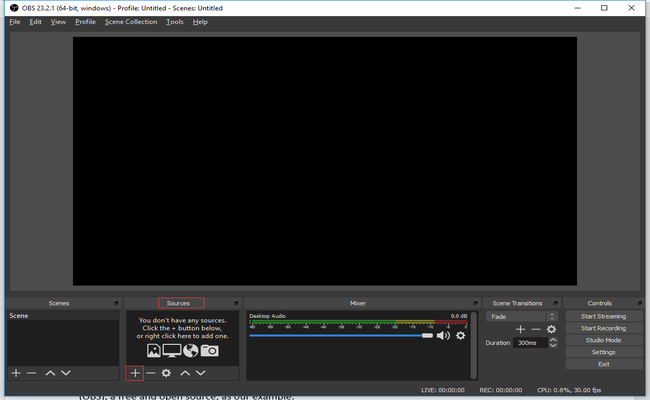
#3. Create a new source and type in a name like “IP Camera Live Stream”. Make sure that you check the Make source visible at the bottom.
#4. Uncheck all the choices and enter the RTSP URL in the Input field.
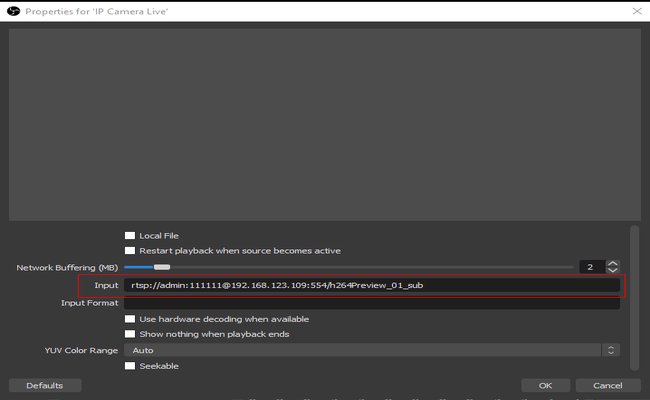
#5. Then your IP camera live feed will show on the OBS screen. Right-click the live feed and click Transform –> Stretch to screen to adjust the video size.
Step 5. Configure Live Streaming Settings in the Encoders
After setting up the encoders, now you are really close to launching a successful security camera live stream on YouTube.
#1. Hit Stream in the Settings section (on the right-hand sidebar) and choose YouTube/YouTube Gaming under the Service section.
#2. Type in the stream key that you obtain from YouTube in the field and click OK.
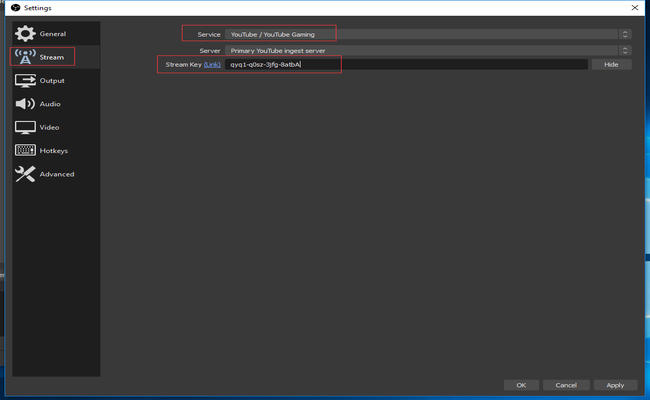
#3. Click Starting Streaming in OBS and navigate to your YouTube account to check if you are on live now.
#4. If you want to stop IP camera live streaming on YouTube or when the event terminates, stop streaming in OBS.
And that’s it!
Before starting an IP camera live streaming on YouTube, you’d better test if the settings work.
Thinking about how to improve the performance of your YouTube live stream? Find some of the possible tips & solutions in the next part.
Streaming IP Cameras to YouTube: 4 Essential Tips to Improve Viewing Experience
Following the detailed guide above to stream IP cameras to YouTube is never the end of successful live streaming.
Poor image quality or slow Internet connection, these are the common problems that you may encounter when going live on YouTube.
To provide a smooth viewing experience to your audience, check out the 4 useful tips as follows.
Tip 1. Choose Security Cameras with Extra Clear Image Quality & Sharp Night Vision
What would you do when finding out the security camera live streaming on YouTube comes with the low image quality?
Click the settings and select the highest resolution, right?
And that is what viewers will do as well.
To deliver sharp images with great details on your channel, it is best to choose a megapixel security camera that captures images with the resolution of 1080p, 4MP and even 5MP both day and night.
Aside from the resolution, you may also check out the specifications listed below in security camera product pages:
#1. Field of view: The wider the viewing angle is, the larger monitoring area your surveillance camera can cover.
If you would like to broadcast every corner of the rooms, gardens or construction sites on YouTube, choose a PTZ dome security camera that is able to rotate and cruise with a designated patrol path.
Hold Up: Check out the following two live streaming with Reolink RLC-423, a versatile PTZ IP camera, in Portugal & Poland respectively.
The spectacular view of the fantastic bay of Machico, Funchal in Portugal is now live on netmaderia.com. Check it out!
② Wojciech Bandurowski from Internet Serwis is live streaming a roundabout in Poland on the website. Click here to learn more.
#2. IR range: This specification indicates how far your security cameras can see in ambient lighting. To ensure the quality of your YouTube live streaming at night, it is best to choose a security camera with long range night vision like 100 feet or even farther.
#3. IR cut filter: Your CCTV camera won’t be able to capture images and videos in accurate colors in both day and night without an IR cut filter. So, if you are planning to stream surveillance camera to YouTube during night time, it is best to choose a security camera with a qualified IR cut filter.
#4. 3D DNR: This feature helps reduce image noise in both static and moving images, offering clearer images and more accurate details during the live streaming.
#5. Built-in Microphone: If you want to record sounds in your live stream as well, you’d better choose a security camera with audio.
Tip 2. Ensure the Internet Upload Speed Meets the Needs of IP Camera Live Streaming on YouTube
Another key factor to smooth live streaming is the fast Internet upload speed.
The recommended upload speed for HD live streaming on YouTube is 3 to 5 Mbps (megabits per second).
Or else, your YouTube live streaming may end up with poor image quality and jittery videos.
Also, note that going live on YouTube takes up much of the IP camera bandwidth. So, when the network connection is not stable, you may not be able to watch security camera live feed via the Client or App.
Add-On Tip: Make sure that you are going live on YouTube via a reliable network. Otherwise, disruption on the connection may lead to live stream failures.
Tip 3. Record IP Cameras On-Site While Live Streaming
Can you save the precious moments captured by your IP security cameras when they are on live?
Of course, Yes!
Generally speaking, you are able to stream a security camera to YouTube while storing the captured images and videos at the same time.
Make sure that you have put SD cards into your security cameras or connect them to an NVR.
Even if you have forgotten to back up the recordings, you can still find it in the Video Manager since YouTube will automatically archive your live streaming up to 12 hours when the stream is over.
Tip 4. Protect Your Own Privacy When Streaming IP Camera to YouTube Live
Aside from providing a smooth viewing experience to your viewer, it is vital to protect personal information during IP camera live stream.
Here is a YouTube live stream safety checklist for your reference:
• Never share the stream key with others
• Only share the admin access for your account to someone you trust
• Avoid showing your personal information during the live stream
• Limit access to your live streaming by setting the live stream to “private” or “unlisted”
Your Turn Now!
Does this tutorial on how to stream IP cameras to YouTube work for you? Are there any good and free software for live streaming on YouTube that you would like to recommend? Leave your comments below and we are eager to hear from you!




It really worked, I appreciate it!
It really worked, I appreciate it!
my recorder is not working
I am having trouble with the installation
It really worked, I appreciate it!
I sent an e-mail from the communication channel. Can you help?
It really worked, I appreciate it!
hello nice sharing thanks
my recorder is not working
hello nice sharing thanks
It was a great sharing
It really worked, I appreciate it!
please provide support for me i leave my email address
It was a great sharing
problem not solved thanks
my recorder is not working
hello nice sharing thanks
hi how can i do
problem not solved thanks
I sent an e-mail from the communication channel. Can you help?
It was a great sharing
problem not solved thanks
I can’t upload
I can’t upload
I can’t upload
I really love you
please provide support for me i leave my email address
I can’t upload
It really worked, I appreciate it!
I am having trouble with the installation
problem not solved thanks
can you help me please
Can you write your contact number?
I can’t upload
can you help me please
It was a great sharing
Can you write your contact number?
can you help me please
can you help me please
I can’t upload
I sent an e-mail from the communication channel. Can you help?
I am having trouble with the installation
can you help me please
my recorder is not working
It was a great sharing
I am having trouble with the installation
It was a great sharing
problem not solved thanks
my recorder is not working
I really love you
I can’t upload
It really worked, I appreciate it!
can you help me please
It was a great sharing