Purpose of The Guide
This guide will walk you through using your computer to enable Hik-Connect on your Hikvision camera system so that you are able to view your cameras on your mobile phone or tablet from any location.
Before You Begin
- Make sure that your Hikvision system is set up locally and that your cameras are viewable on your NVR or DVR. If you have not already set your device up please follow the relevant guide on this page to do so.
- Connect your NVR to your network by running an ethernet cable from the LAN port on your NVR or DVR directly to your router.
- If you are using a Windows computer, install SADP from this page. If you are using an Apple computer, install it from here.
Let’s Get Started
There are three parts to this process. FIrst we need to enable Hik-Connect on the camera or recorder, secondly we will add it to your Hik-Connect account and thirdly we will set up the Hik-Connect app on your phone or tablet so you can view the camera.
Enabling Hik-Connect
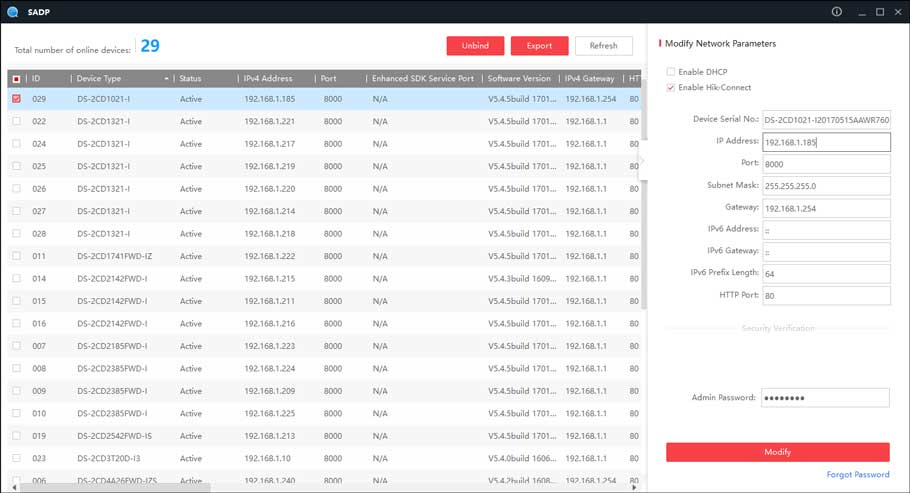
1) On your computer open SADP Tool. This program will show you any Hikvision equipment connected directly to your network. You should see a screen like the one below.
If any of your devices show a Status of Inactive please refer to the relevant guide on this page to set your device up correctly before continuing with this guide.
2) Select your NVR or DVR from the list by ticking the box to the left of it. If you have multiple devices showing and are not sure which is your NVR/DVR then searching for the Device Type on google will show you which device is which. If you are only using IP cameras with no recorder then you will need to set up each camera individually. Select one camera, follow the rest of this guide then return to this step for each of the other cameras.
3) When you select the device you will see a panel of information on the right that looks like the one in the image above. Tick the box next to Enable Hik-Connect and a window like the one below will pop up. Please enter an easy to remember Verification Code and make sure you note it down somewhere as we will need this later on.
4) Once you have set and confirmed your Verification Code you will now have a screen like the one below. Enter your devices password in the Admin Password box and press Modify.
5) The last step in this section is to make a note of the relevant portion of the serial number. If you look on the information panel you will see a Serial Number field. The part of the serial number we need to make a note of are the final 9 digits. If you look towards the right hand end of the serial number you will have a block of 8 or 9 numbers. If you see a block of 9 numbers make a note of them, if you only see 8 numbers make a note of the letter immediately beforehand and the 8 numbers.
To make this a bit clearer I will give you two examples from our cameras.
DS-2CD2142FWD-I20170407BBWR741997176 – On this device you can see we have 9 numbers at the end of the serial number, so in this case we would need to make a note of 741997176.
DS-7732NI-I4/16P1620170517CCRC65050055WCVU – On this device you will see that near the end of the serial number we only have a block of 8 numbers, so in this case what we would need to make a note of is C65050055, the block of 8 numbers and the letter before them.
Once you have a note of the relevant part of your serial number we can move on to adding the device to your Hik-Connect account.
Adding Devices to Your Hik-Connect Account
1) Go to www.hik-connect.com and register for an account. Once you are registered you need to log in to the website and you will see the following.
2) Click on the Add button in the top right corner and, in the window that pops up, enter the 9 digits from the Serial Number that you noted down earlier and press the Search button. If the device is online you should see the following screen.
If that window appears press the + icon. If that window doesn’t appear it can be one of two things. First thing to check is that you entered the correct portion of the serial number, please refer to step 5 above to check the serial number you are using. If the number you entered is correct then please refer to this guide to fix the issue before returning to this step and continuing to follow this guide.
3) After pressing the + icon you will be prompted to enter your verification code. This is the code that you set in step 3 of the first portion of this guide.
4) Once you have entered the verification code you should be presented with a screen like the one below. If all has gone well you will see your device with a status of Online.
At this point we can now move on to the final stage of the process, actually viewing the cameras.
Accessing Your Cameras on the Hik-Connect App
1) On your phone or tablet install the Hik-Connect app.
2) Log in using the details that you registered with in step 1 of the previous section of this guide. You will see a screen a bit like the one below.

3) The device you are looking for will have a name that includes the 9 digit serial number you entered in the previous section. Click on that device and it will prompt you to enter the verification code that you set earlier. The only time you will need to use this code is when you first log in to your Hik-Connect account on a new phone or tablet.
If you are using an NVR or DVR then at this point you are now finished, if you are adding individual IP cameras you now need to return to step 2 of the first section of this guide and repeat the process for each camera.


It really worked, I appreciate it!
It was a great sharing
problem not solved thanks
problem not solved thanks
I really love you
It was a great sharing
I sent an e-mail from the communication channel. Can you help?
my recorder is not working
please provide support for me i leave my email address
I sent an e-mail from the communication channel. Can you help?
It really worked, I appreciate it!
I sent an e-mail from the communication channel. Can you help?
I am having trouble with the installation
It really worked, I appreciate it!
please provide support for me i leave my email address
hello nice sharing thanks
can you help me please
problem not solved thanks
It was a great sharing
It really worked, I appreciate it!
I can’t upload
Can you write your contact number?
please provide support for me i leave my email address
please provide support for me i leave my email address
It really worked, I appreciate it!
I sent an e-mail from the communication channel. Can you help?
can you help me please
Can you write your contact number?